In today’s hyper-connected world, a reliable internet connection isn’t just a luxury; it’s a fundamental necessity for work, education, entertainment, and staying in touch. At the heart of most home and small office networks lie two crucial devices: the modem and the router. While often confused or seen as a single entity, they each play distinct, vital roles in bringing the internet to your devices. Understanding how to properly install and configure them together is the first step towards a stable, secure, and fast online experience.
This comprehensive guide will walk you through every step of installing a router with a modem, transforming a potentially daunting technical task into a straightforward process. Whether you’re setting up a new internet service, replacing old equipment, or simply looking to understand your network better, you’ll find all the necessary information here to get your digital world up and running smoothly. We’ll delve into the purpose of each device, the essential preparations, the physical connection process, and crucial configuration steps, ensuring you’re empowered to build a robust home network.
Understanding Your Network Essentials: Modems and Routers
Before diving into the installation process, it’s incredibly helpful to grasp the fundamental differences and functions of a modem and a router. While many modern devices combine both functionalities (known as a “gateway”), understanding their individual roles illuminates why a separate modem and router setup is often preferred for performance, flexibility, and security.
The Role of the Modem
The modem (short for modulator-demodulator) is your gateway to the wider internet. Its primary function is to translate the digital signals from your local network (your computer, phone, etc.) into analog signals that can travel over your Internet Service Provider’s (ISP) infrastructure (like cable lines, fiber optics, or DSL phone lines), and vice-versa. Essentially, the modem is the device that communicates directly with your ISP. Without a modem, your home network wouldn’t be able to “speak” to the internet.
Different types of modems exist depending on your ISP’s technology:
- Cable Modems: Connect to coaxial cables, common for cable internet services.
- DSL Modems: Connect to traditional phone lines.
- Fiber Optic Modems (ONT/ONU): Used for fiber internet, often converting optical signals to electrical signals.
- Cellular Modems: Connect to mobile networks for internet access.
The modem receives a single IP address from your ISP, which is the unique identifier for your connection on the internet. It acts as the bridge, ensuring that the internet’s traffic can flow into and out of your home.
The Function of the Router
Once the internet signal enters your home via the modem, the router (short for network router) takes over. Its job is to create a local area network (LAN) within your home and manage the traffic between this LAN and the internet via the modem. A router has several key functions:
- Distributing Internet Access: It takes the single internet connection provided by the modem and shares it with multiple devices in your home, whether through wired Ethernet cables or wirelessly via Wi-Fi.
- Assigning IP Addresses: The router assigns unique local IP addresses to all devices connected to your home network (e.g., your laptop, smartphone, smart TV, gaming console). This is crucial because your modem only has one public IP address; the router allows many devices to share that single internet connection.
- Routing Traffic: As its name suggests, a router directs data packets to their correct destinations within your local network or out to the internet.
- Providing Security: Routers include built-in firewalls and other security features to protect your local network from external threats. They also manage wireless security protocols to keep your Wi-Fi network private.
Why They Work Together
Think of your modem as the main highway exit that brings internet traffic to your property line. The router, then, is the internal road network within your property, distributing that traffic to all the individual buildings (your devices). You need both: the modem to get the internet signal into your home, and the router to share and manage that signal across all your devices, wirelessly and wired, securely and efficiently. A separate modem and router setup often provides greater flexibility in choosing high-performance devices, better coverage, and more advanced network management options compared to an all-in-one gateway device.
Pre-Installation Checklist: Laying the Foundation for Success
A smooth installation process begins long before you plug in the first cable. Taking a few moments to prepare ensures you have all the necessary components and information, minimizing potential headaches down the line.
Gathering Your Equipment
Ensure you have all the required items on hand before you start:
- Your Modem: This is typically provided by your ISP or purchased separately if you choose to own your equipment.
- Your Router: This is the device you’re installing. Ensure it’s compatible with your modem and internet speed requirements.
- Ethernet Cables: You’ll need at least two:
- One short Ethernet cable to connect the modem to the router (often included with the router).
- One longer Ethernet cable to connect a computer directly to the router for initial setup, if you prefer a wired connection, or for future wired devices.
- Power Adapters: For both your modem and your router.
- Coaxial Cable (for cable modems) or DSL Cable (for DSL modems): The cable that connects your modem to the wall jack.
- A Computer or Smartphone: For accessing the router’s web interface for configuration.
Choosing the Optimal Location
The physical placement of your modem and router can significantly impact your internet speed and Wi-Fi coverage. Consider these tips:
- Central Location: For optimal Wi-Fi coverage, place your router in a central location within your home, minimizing the number of walls and obstacles between the router and your devices.
- Elevated Position: Routers often perform better when placed higher up, such as on a shelf or desk, rather than on the floor.
- Avoid Obstructions: Keep the router away from large metal objects, thick concrete walls, and appliances that emit electromagnetic waves (like microwaves, cordless phones, and even baby monitors), which can interfere with Wi-Fi signals.
- Proximity to Modem and Power: The router will need to be near the modem and a power outlet.
- Ventilation: Ensure both devices have adequate airflow to prevent overheating, which can degrade performance.
Essential Information You’ll Need
Having this information readily available will expedite the setup process:
- Your ISP Account Information: This may include an account number, username, and password, especially if your ISP requires modem activation.
- Router Login Credentials: The default username and password for your router’s web interface. This information is usually printed on a sticker on the bottom or back of the router itself, or found in the router’s manual. Common defaults are “admin” for both username and password.
- Your Desired Wi-Fi Network Name (SSID): What you want your wireless network to be called (e.g., “MyHomeNetwork”).
- Your Desired Wi-Fi Password (WPA2/WPA3 Key): A strong, unique password for your Wi-Fi network.
Step-by-Step Installation: Connecting Your Home to the Internet
With your equipment gathered and a prime location selected, it’s time to connect everything and bring your network to life. Follow these steps carefully to ensure a successful setup.
Powering Down and Disconnecting
Before making any new connections, it’s good practice to power down all related equipment. If you’re replacing an old modem or router, disconnect their power cords and any cables running to them. This prevents conflicts and ensures a fresh start.
Connecting the Modem
- Connect to the Wall Jack: Take the appropriate cable (coaxial for cable modems, DSL for DSL modems) and connect one end to the corresponding port on your modem. Connect the other end to the wall jack where your internet service enters your home.
- Connect Power: Plug the modem’s power adapter into the modem and then into an electrical outlet.
- Wait for Modem to Boot: Allow the modem several minutes (usually 2-5 minutes) to power on and establish a connection with your ISP. You’ll typically see indicator lights on the modem stabilize, often solid green or blue, indicating a successful connection to the internet. Refer to your modem’s manual for specific light patterns.
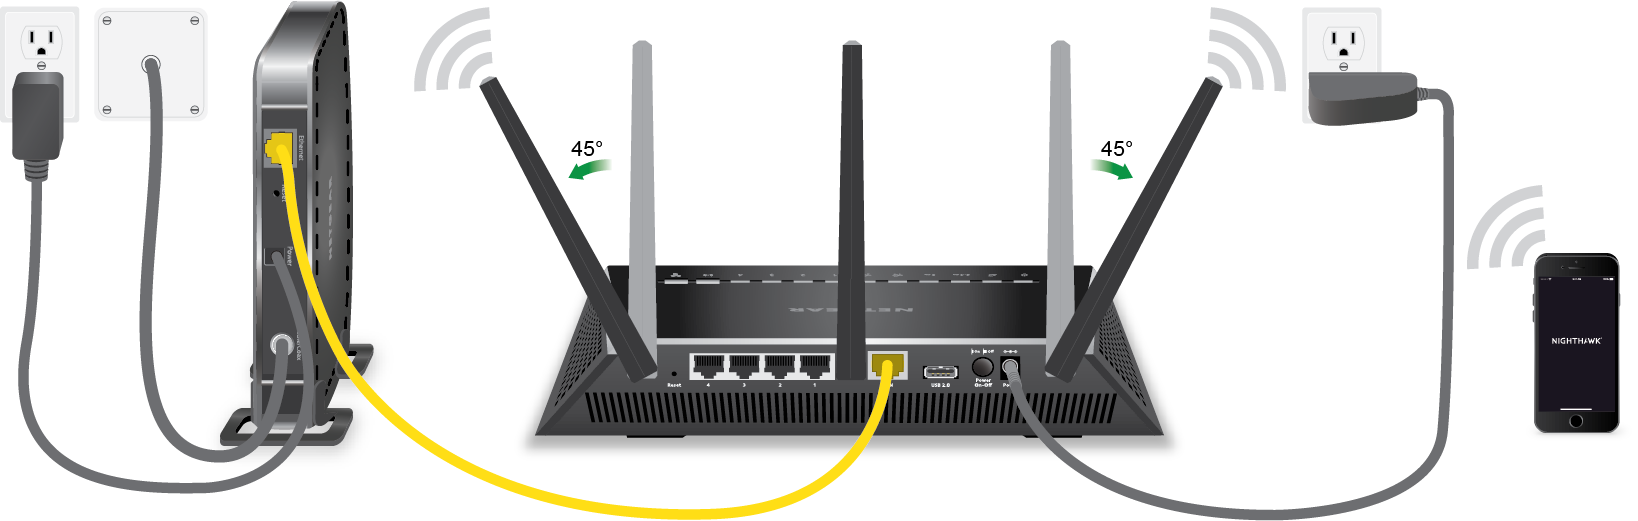
Connecting the Router to the Modem
Once your modem has fully booted and established an internet connection:
- Locate the WAN/Internet Port on the Router: This port is usually a different color (often blue or yellow) and is labeled “WAN” or “Internet.”
- Connect Ethernet Cable: Take one end of an Ethernet cable and plug it into the Ethernet port on your modem (there’s usually only one for connecting to the router).
- Connect to Router’s WAN Port: Plug the other end of that same Ethernet cable into the “WAN” or “Internet” port on your new router.
Powering Up and Initial Boot Sequence

- Connect Router Power: Plug the router’s power adapter into the router and then into an electrical outlet.
- Wait for Router to Boot: Similar to the modem, your router needs a few minutes to power on and initialize. Look for indicator lights (power, internet, Wi-Fi) to stabilize. The internet light on your router should eventually turn solid, indicating it’s receiving a signal from the modem.
Accessing the Router’s Web Interface
This is where you’ll configure your Wi-Fi network and security settings.
- Connect a Device:
- Wired: For the most stable initial setup, connect a computer directly to one of the router’s LAN (Local Area Network) Ethernet ports (usually numbered 1-4) using another Ethernet cable.
- Wireless: Alternatively, you can connect wirelessly. On your computer or smartphone, scan for available Wi-Fi networks. You should see a default network name (SSID) broadcast by your router (e.g., “TP-LinkXXXX”, “NETGEARXXXX”). Connect to this network using the default Wi-Fi password (often printed on the router).
- Open a Web Browser: Launch your preferred web browser (Chrome, Firefox, Edge, Safari).
- Enter Router’s IP Address: In the address bar, type the router’s default IP address. Common default IP addresses include
192.168.1.1,192.168.0.1, or192.168.1.254. You can find this IP address in your router’s manual or on the sticker on the router. - Login: A login screen will appear. Enter the router’s default username and password (e.g., “admin” and “admin” or “password”). If these don’t work, check the router’s sticker or manual.
Configuring Your Wireless Network (Wi-Fi)
Once logged into the router’s interface, navigate to the “Wireless,” “Wi-Fi,” or “Network Settings” section.
- Change Network Name (SSID): Change the default Wi-Fi network name to something unique and recognizable for your home (e.g., “MyFamilyNet”). Avoid using personal identifying information.
- Select Security Type: Choose the strongest available security protocol, which is typically WPA2-PSK (AES) or WPA3. WPA3 is newer and more secure, if your router supports it.
- Set a Strong Password: Create a strong, unique password (also known as a passphrase or WPA Key) for your Wi-Fi network. It should be at least 12-16 characters long, combining uppercase and lowercase letters, numbers, and symbols.
- Save Settings: Apply or save your changes. The router may restart, and you’ll need to reconnect your devices to the new Wi-Fi network name and password.
Changing Default Login Credentials for Security
This is a crucial security step. The default username and password for accessing your router’s administration page are widely known and pose a significant security risk if left unchanged.
- Navigate to Administration/System Settings: Find the section related to “Administration,” “System,” “Password,” or “User Accounts.”
- Change Router Admin Password: Change the default administrator username and password to something secure and unique. This should be different from your Wi-Fi password.
- Save Changes: Apply or save the new login credentials. Make sure to remember them, or store them in a secure password manager.
Post-Installation & Security Best Practices
With your router and modem successfully installed, it’s time to ensure everything is running optimally and securely. These steps will help maintain a high-performance and protected home network.
Verifying Your Internet Connection
After all settings are saved and the router has restarted, reconnect your devices using your new Wi-Fi network name and password. Open a web browser on a connected device and try to visit a few websites (e.g., Google.com, CNN.com). If pages load quickly and correctly, congratulations, your internet connection is working! You might also run a speed test (e.g., via Speedtest.net) to confirm you’re getting the speeds you expect from your ISP.
Updating Router Firmware
Firmware is the operating system for your router. Manufacturers regularly release firmware updates to improve performance, add new features, and, most importantly, patch security vulnerabilities.
- Check for Updates: In your router’s web interface, look for a “Firmware Update,” “System Update,” or “Maintenance” section.
- Download and Install: Follow the on-screen instructions to check for and install any available firmware updates. This process usually involves downloading a file from the manufacturer’s website and uploading it to the router, or simply clicking an “Update” button if the router has an automatic update feature. Ensure you do not power off the router during a firmware update, as this can brick the device.
Implementing Strong Wi-Fi Security (WPA2/WPA3)
We’ve already set this up, but it bears repeating: Always use WPA2-PSK (AES) or WPA3 security for your wireless network. WEP and WPA (TKIP) are outdated and easily compromised. A strong, unique Wi-Fi password (passphrase) is your first line of defense against unauthorized access to your network.
Considering a Guest Network
Most modern routers offer the option to set up a separate “Guest Network.” This is an excellent security feature:
- Isolation: Guests can access the internet but cannot access other devices on your main network (like your computers, smart storage, or smart home devices).
- Separate Credentials: You can provide a different, temporary password for guests without revealing your main Wi-Fi password.
- Bandwidth Control: Some routers allow you to limit guest network bandwidth, ensuring your main network’s performance isn’t severely impacted by guests.
Advanced Settings and Optimization
For those looking to fine-tune their network, consider exploring these advanced settings:
- Quality of Service (QoS): Prioritize certain types of traffic (e.g., streaming video or online gaming) over others to reduce lag.
- Port Forwarding: If you host game servers, torrent clients, or specific applications that require incoming connections, you might need to configure port forwarding. This directs specific internet traffic to a particular device on your network.
- Parental Controls: Many routers offer features to block specific websites, set internet access schedules, or filter content for certain devices.
- DFS Channels (for 5GHz Wi-Fi): If you’re experiencing interference on your 5GHz network, enable DFS channels. These are usually less congested but might require a brief scan time from the router.
- IPv6: Ensure IPv6 is enabled if your ISP and devices support it, as it’s the future of internet addressing.
Troubleshooting Common Installation Issues
Even with careful planning, things can sometimes go wrong. Here are solutions to common problems you might encounter:
No Internet Connection
- Check Cables: Ensure all Ethernet cables (modem to router, router to computer) are securely plugged in.
- Check Indicator Lights: Verify that the modem’s internet light is solid and the router’s internet/WAN light is also solid. If the modem’s lights are blinking or off, it’s not connecting to your ISP. Restart the modem first.
- Power Cycle: Turn off both the modem and router. Wait 30 seconds, then power on the modem. Wait 2-3 minutes for it to fully boot. Then power on the router and wait another 2-3 minutes.
- Direct Connect: Bypass the router by connecting your computer directly to the modem with an Ethernet cable. If you get internet, the issue is with the router. If not, the issue is with the modem or your ISP.
- ISP Activation: Some ISPs require you to call them to activate a new modem (even if it’s your own).
Cannot Access Router Login Page
- Check IP Address: Double-check the router’s default IP address. Make sure you typed it correctly into the browser.
- Wired Connection: If you’re trying wirelessly, switch to a wired connection directly to a LAN port on the router.
- Router Reset: As a last resort, perform a factory reset on the router (usually a small button you press and hold for 10-15 seconds with a paperclip). Be warned: This will erase all your custom settings, and you’ll have to start the configuration from scratch.
Slow Speeds
- Run Speed Test: Confirm the issue by running a speed test directly connected to the modem, then directly to the router, and finally wirelessly. This helps isolate where the speed drop occurs.
- Wi-Fi Interference: Ensure your router is away from interfering devices. Try changing your Wi-Fi channel in the router settings to a less congested one (use a Wi-Fi analyzer app on your phone).
- Firmware Update: Outdated firmware can sometimes cause performance issues.
- Router Placement: Review your router’s location for optimal signal.

Wi-Fi Signal Dropouts
- Router Placement: Again, ensure optimal placement.
- Antennas: If your router has external antennas, try adjusting their orientation.
- Channel Interference: Change your Wi-Fi channel in the router settings (especially for 2.4GHz).
- Firmware: Update firmware.
- Router Age: Older routers may simply struggle with the demands of modern devices and higher internet speeds.
By following these detailed steps, you should be able to confidently install your router and modem, establishing a robust and secure foundation for all your digital activities. A well-configured network ensures not only fast internet but also peace of mind, knowing your online environment is protected and optimized for productivity and leisure. Enjoy your seamless connectivity!
aViewFromTheCave is a participant in the Amazon Services LLC Associates Program, an affiliate advertising program designed to provide a means for sites to earn advertising fees by advertising and linking to Amazon.com. Amazon, the Amazon logo, AmazonSupply, and the AmazonSupply logo are trademarks of Amazon.com, Inc. or its affiliates. As an Amazon Associate we earn affiliate commissions from qualifying purchases.