In an increasingly connected world, smart home technology has transitioned from a luxury to a mainstream essential, offering convenience, control, and, crucially, enhanced security. Among the myriad of smart devices, the Ring Video Doorbell stands out as a foundational piece of any modern smart home ecosystem. For those seeking reliable, continuous power without the hassle of battery changes, a wired Ring Doorbell is the optimal choice. This guide will walk you through the entire installation process, transforming a potentially daunting task into an empowering DIY project, all while exploring the technological prowess, brand value, and financial wisdom behind your decision.
Why Choose a Wired Ring Doorbell? Understanding the Tech and Value
Before diving into the nuts and bolts of installation, it’s worth understanding why a wired Ring Doorbell is a superior choice for many homeowners and how it aligns with contemporary tech trends, brand expectations, and smart financial planning.
The Ring Ecosystem: Beyond the Doorbell
Ring, as a brand, has become synonymous with home security, offering a comprehensive suite of products that integrate seamlessly to create a robust surveillance and notification system. A wired Ring Doorbell is often the gateway device to this ecosystem. Unlike its battery-powered counterparts, a wired Ring Doorbell leverages your home’s existing doorbell wiring, providing a constant power supply. This means no more worrying about recharging batteries, which is a significant advantage for uninterrupted security and peace of mind.
From a technology standpoint, wired Ring doorbells often boast advanced features that benefit from continuous power. These include faster response times, more consistent live view access, and potentially more sophisticated motion detection capabilities, sometimes even leveraging AI tools for person or package detection. The Ring app, a central hub for all Ring devices, allows you to customize settings, review recorded footage, communicate with visitors, and integrate with other smart home platforms like Amazon Alexa. This level of digital security and integrated smart functionality places Ring firmly at the forefront of modern home tech. The constant power ensures your device is always online, always recording, and always ready to notify you, embodying the promise of robust digital security.
DIY vs. Professional Installation: A Financial Perspective
The decision to install your Ring doorbell yourself versus hiring a professional often boils down to a balance of confidence, time, and financial prudence. While a professional installation offers convenience, it comes at a significant cost, typically ranging from $75 to $200 or more, depending on your location and the complexity of the installation.
Opting for a DIY installation, as this guide encourages, represents a direct saving. This isn’t just about the immediate cost of labor; it’s about investing in your own skills and understanding of your home’s infrastructure. From a personal finance perspective, learning to handle basic home improvements like this can save you money repeatedly over time. Moreover, understanding how your smart home gadgets are installed can empower you to troubleshoot minor issues independently, further reducing potential future expenses. This approach aligns with a smart budgeting mindset, where you maximize the value of your purchase by leveraging readily available tutorials and your own capabilities. The tools required are common household items or easily affordable, making the initial investment minimal compared to the long-term savings and satisfaction.
The Brand Promise: Reliability and Innovation
Ring, now part of Amazon, has cultivated a strong brand identity built on reliability, user-friendliness, and continuous innovation. When you purchase a Ring product, you’re not just buying a piece of hardware; you’re investing in a system backed by extensive research and development. The design of Ring doorbells prioritizes both aesthetics and functionality, ensuring they seamlessly blend with your home’s exterior while providing cutting-edge surveillance.
The brand’s commitment to innovation is evident in its continuous software updates, adding new features and improving existing ones, often leveraging AI to refine motion detection and user experience. By choosing a wired Ring doorbell, you’re opting for a product designed for longevity and consistent performance, a testament to the brand’s promise. This reliability translates into peace of mind for you, knowing your digital security guardian is always on duty.
Pre-Installation Essentials: Gathering Your Toolkit and Ensuring Safety
Successful installation hinges on meticulous preparation. This phase involves gathering the right tools, understanding fundamental electrical safety, and assessing your existing doorbell system. Thoughtful preparation saves time, prevents frustration, and ensures a safe and effective installation.
Essential Tools and Components
Having the correct gadgets and tools at hand before you begin is crucial. Think of this as preparing your workbench for a productivity hack – everything organized and within reach. Here’s what you’ll likely need:
- Your Ring Wired Doorbell: The main unit, mounting bracket, and security screws included in the box.
- Screwdriver: A Phillips head screwdriver is almost always necessary. A flathead might be useful for prying or tightening terminals. Some Ring models also require a specific star-shaped driver (often included).
- Drill (optional): If you need to drill new pilot holes for the mounting bracket or anchors, a power drill with appropriate drill bits for masonry or wood will be required.
- Level: To ensure your doorbell is mounted straight and looks professional.
- Pencil: For marking drill holes.
- Wire Strippers: If your existing doorbell wires are damaged or too short, you might need to strip a little insulation.
- Electrical Tape: For insulating exposed wires if necessary, though usually not required for a standard Ring installation.
- Standard Household Hammer: For gently tapping wall anchors into place.
- Safety Goggles: Always a good idea when dealing with power tools or drilling.
- Step Stool or Ladder: To comfortably reach your doorbell location.
Ensure you have all these items readily available to maintain workflow and productivity during the installation process.
Prioritizing Electrical Safety
Working with electricity demands respect and caution. Your safety is paramount. Before you touch any wires, you must deactivate the power to your existing doorbell system. This is a critical step in digital security—not for your data, but for your physical well-being.
- Locate Your Breaker Box: This is usually in a utility closet, basement, garage, or outside your home.
- Identify the Correct Breaker: Look for labels like “doorbell,” “chime,” or “lighting.” If unlabeled, you might need to flip breakers one by one while someone inside observes the doorbell chime.
- Turn Off the Power: Once identified, flip the breaker to the “off” position.
- Test for Power: Go back to your doorbell and press the button. If the chime doesn’t sound, the power is off. For an extra layer of security, use a non-contact voltage tester to confirm no current is flowing through the wires. This small gadget is an inexpensive but vital safety tool.
Never assume the power is off without verifying. A brief moment of caution can prevent serious injury.
Assessing Your Existing Doorbell System
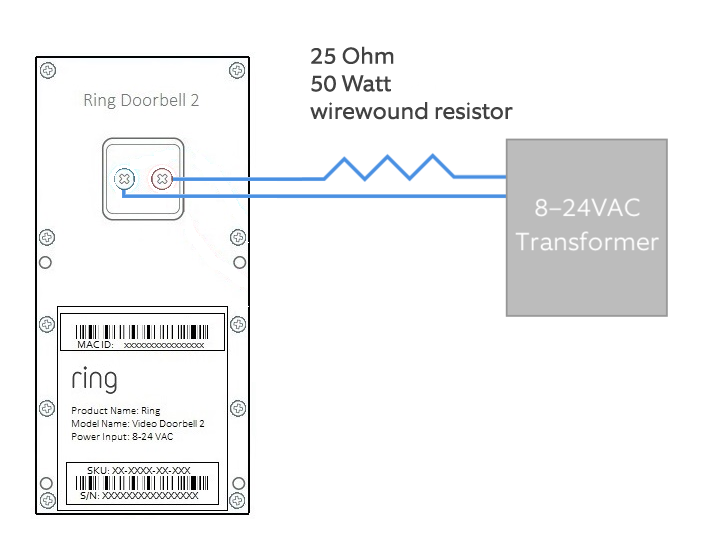
Your Ring wired doorbell is designed to work with most existing doorbell systems, typically operating on low voltage (8-24 VAC).
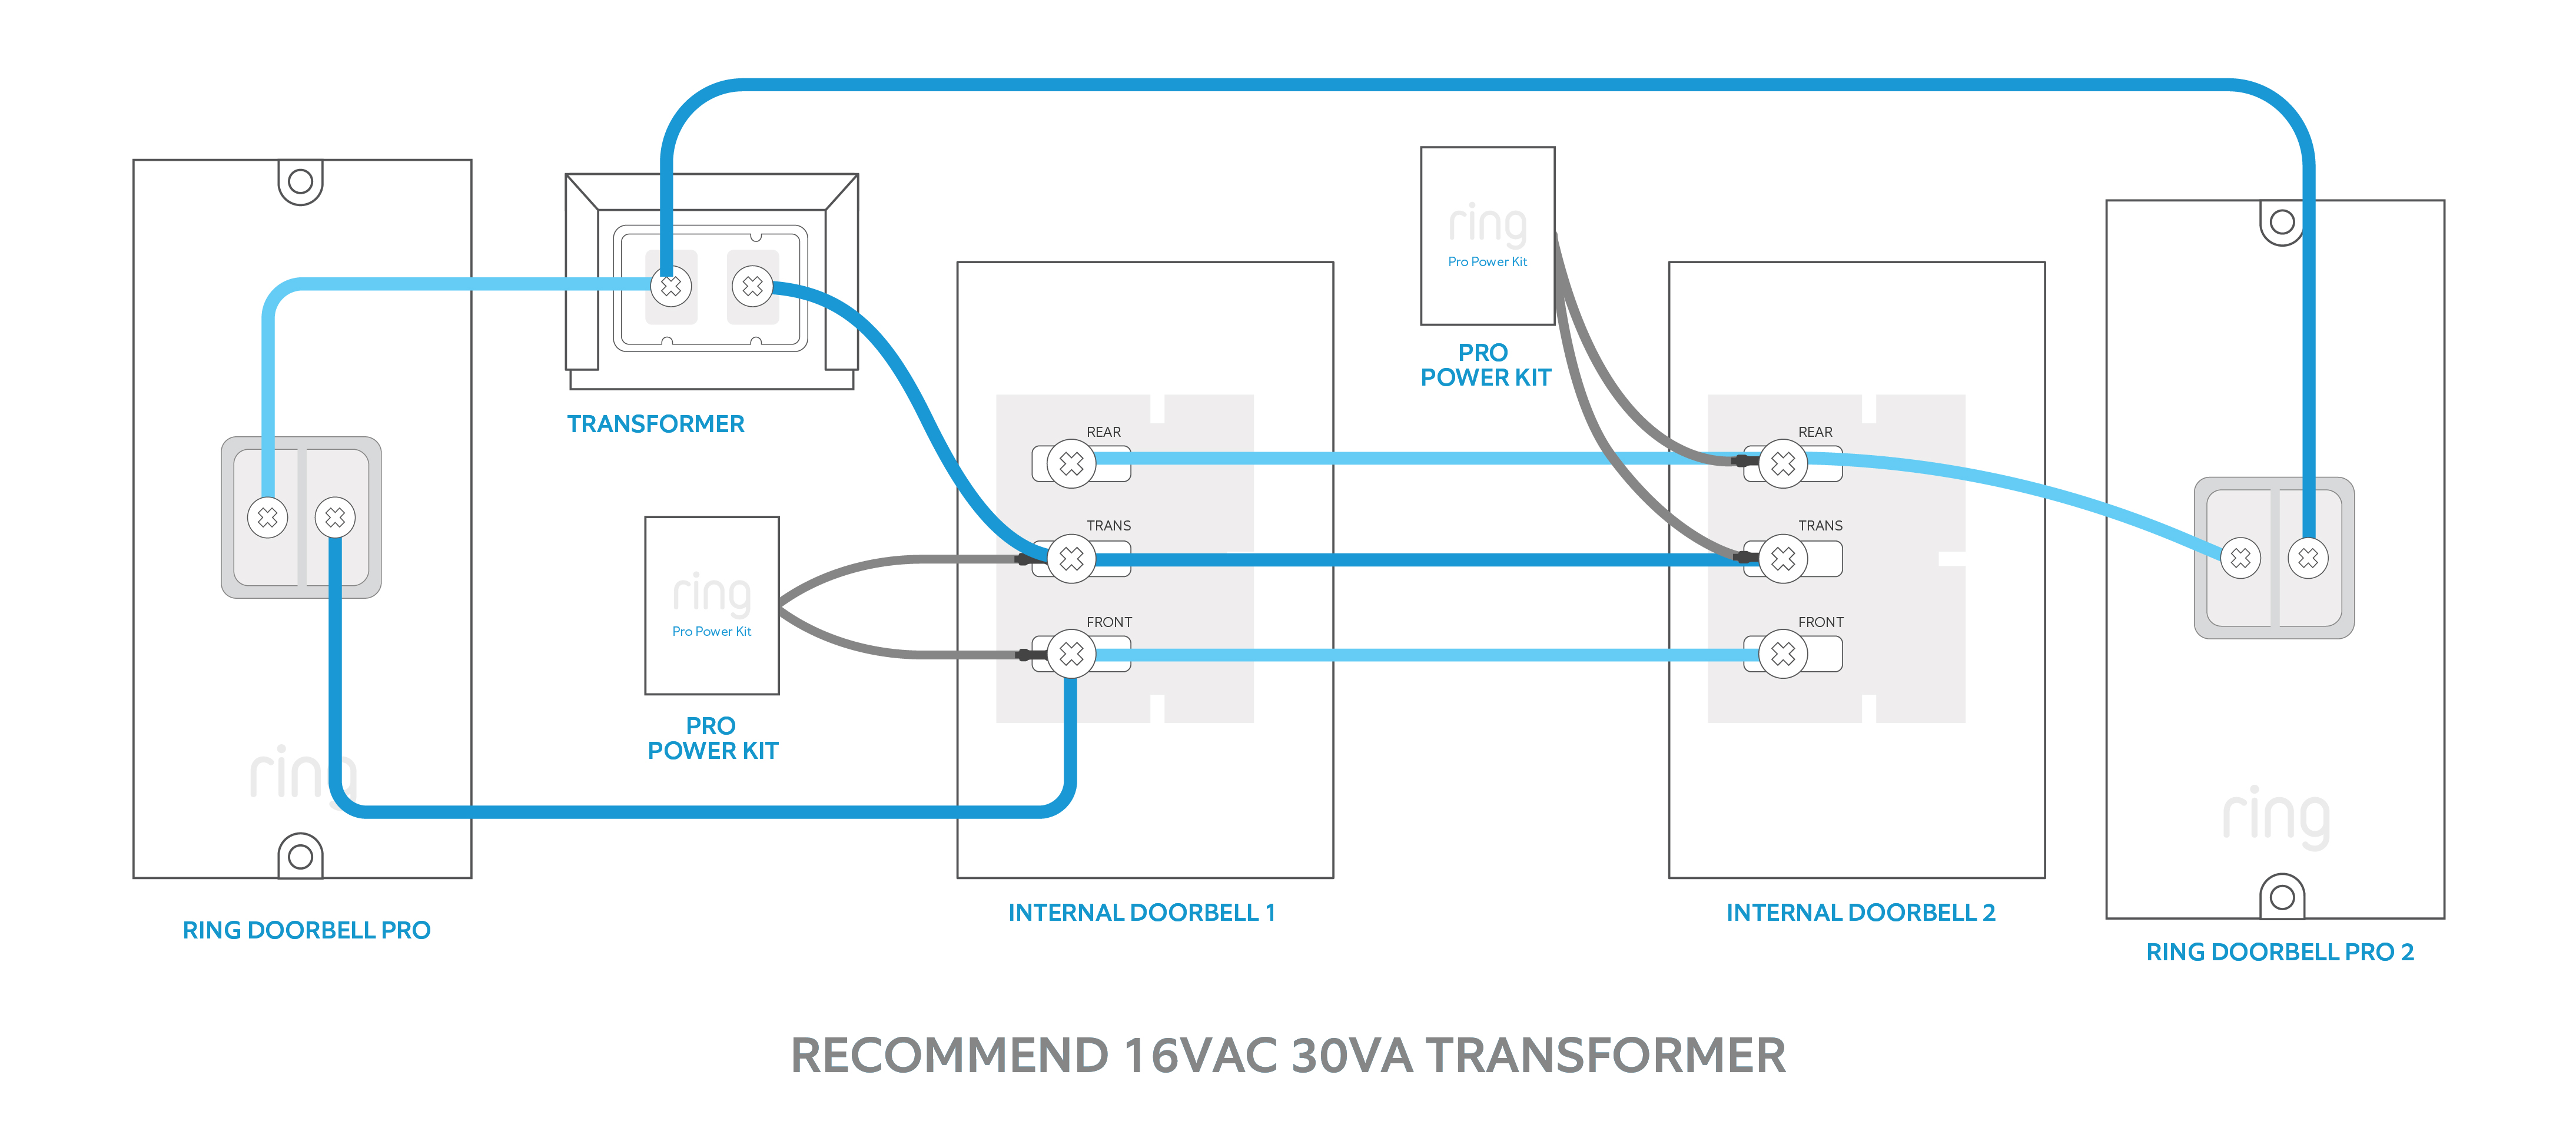
- Examine Your Existing Doorbell: Most traditional doorbells have two wires connected to their back. These wires originate from a transformer, usually located near your chime unit, in your basement, or even an attic.
- Check for Compatibility: While most Ring wired doorbells are compatible, it’s good practice to quickly check your Ring model’s specifications against your transformer’s voltage. This information is usually printed on the transformer itself. Ring offers a Chime Connector for certain models, which might be necessary if your existing chime isn’t compatible or if your voltage is at the lower end of the spectrum to ensure consistent power delivery and prevent humming.
- Wire Condition: Inspect the existing wires. Are they frayed, corroded, or too short? If so, you may need to trim them back and strip new insulation, or in rare cases, extend them. The clearer your understanding of your current setup, the smoother the transition to your new smart device will be.
The Installation Process: A Step-by-Step Walkthrough
With preparation complete, it’s time for the hands-on installation. Follow these steps methodically to ensure a seamless setup for your new smart home guardian.
Deactivating Power and Removing Your Old Doorbell
This step reiterates the critical safety measure and initiates the physical replacement.
- Confirm Power Deactivation: Double-check that the power to your doorbell circuit is off at the breaker. Use a non-contact voltage tester to be absolutely certain.
- Unscrew the Old Doorbell: Carefully unscrew your existing doorbell button from the wall. Often, it’s just two screws.
- Disconnect Wires: Gently pull the doorbell button away from the wall. You’ll typically see two small wires connected to screw terminals. Loosen these screws and disconnect the wires. Be careful not to let the wires fall back into the wall cavity. If they seem loose, use a piece of electrical tape to secure them temporarily to the wall, or gently bend them outwards so they can’t retract.
- Inspect the Area: Take a moment to clean any debris or old paint around the doorbell opening. This ensures a clean slate for your new installation.
Mounting the Ring Doorbell: Precision and Aesthetics
The physical mounting is crucial for both functionality and the visual appeal of your new gadget.
- Position the Mounting Bracket: Take the Ring mounting bracket (or the entire doorbell unit, depending on the model) and hold it against the wall where your old doorbell was. Ensure the existing wires can pass through the central opening.
- Mark Drill Holes: Use a pencil to mark the positions for the mounting screws through the holes on the bracket.
- Consider a Wedge Kit (Optional): If your doorbell is mounted on a flat wall perpendicular to your walkway, you might get a limited view. Ring offers “wedge kits” that angle the doorbell, providing a better field of view. If you need one, install it now before the main bracket.
- Drill Pilot Holes: If you’re mounting on masonry (brick, stucco) or need anchors, use your drill with the appropriate bit size (check your Ring manual for recommendations) to drill pilot holes at the marked spots. Insert the plastic anchors if required, gently tapping them flush with a hammer. If mounting on wood, you might not need pilot holes or anchors.
- Secure the Mounting Bracket: Align the bracket with the drilled holes and secure it firmly to the wall using the provided screws. Use your level to ensure it’s perfectly straight. This attention to detail reflects a commitment to good design and functionality, enhancing your home’s curb appeal while ensuring optimal camera performance.
Wiring Your Ring Doorbell: The Heart of the Connection
This is where your existing home infrastructure connects with the new smart technology.
- Retrieve Wires: Gently pull the two doorbell wires out from the wall.
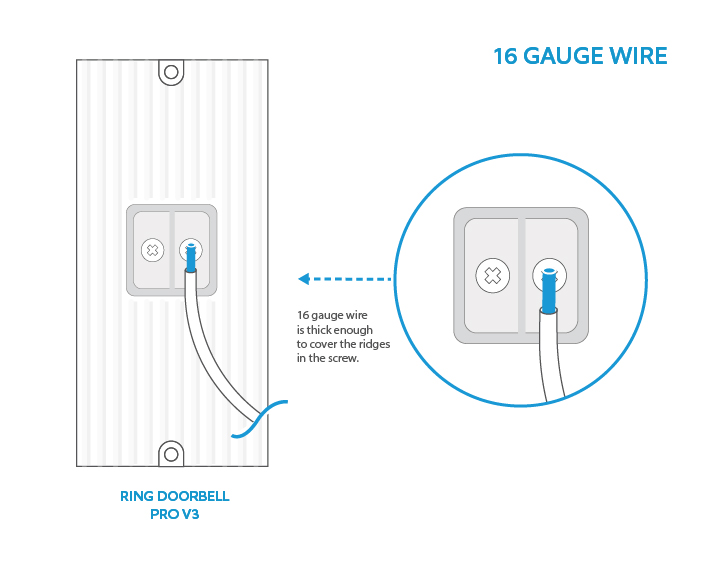
- Connect to Ring Terminals: On the back of your Ring Doorbell unit, you’ll find two screw terminals. Loosen these screws. Take one wire and loop it around one screw terminal, then tighten the screw. Repeat with the second wire and the other terminal. It doesn’t matter which wire goes to which terminal; the circuit is not polarity-sensitive.
- Ensure Secure Connection: Tug gently on each wire to ensure it’s firmly secured and won’t come loose. Loose connections are a common source of troubleshooting issues.
- Tuck Wires Neatly: Carefully push any excess wire back into the wall opening, ensuring they are not pinched or damaged when the doorbell unit is attached. This maintains the clean aesthetic and prevents potential short circuits, adding to the digital security of the device’s operation.
Securing and Sealing Your New Smart Device
The final physical steps involve securing the doorbell and ensuring it’s protected from the elements.
- Attach the Doorbell to the Bracket: Align your Ring doorbell unit with the mounting bracket on the wall. Gently push it into place until it clicks or sits flush.
- Insert Security Screw: Locate the small security screw hole at the bottom of the Ring doorbell. Use the specialized screwdriver (often included with Ring) to insert and tighten the security screw. This crucial step prevents casual theft and firmly secures your device. It’s a tangible aspect of physical digital security, protecting your investment.
- Weatherproofing: Your Ring doorbell is designed to be weather-resistant. Ensure it’s snugly fitted against the wall. If there are any significant gaps, you might consider a small bead of outdoor-grade sealant around the edges, though this is rarely necessary for standard installations.
Post-Installation Setup and Optimization: Activating Your Smart Home Guardian
With the physical installation complete, the next phase involves bringing your Ring Doorbell online and integrating it into your smart home ecosystem. This is where the true power of its software and AI tools comes into play.
Connecting to the Ring App: Software and AI Tools
This is the digital onboarding of your new gadget.
- Restore Power: Go back to your breaker box and flip the appropriate breaker back to the “on” position. Your Ring Doorbell should power up, indicated by a rotating white light on the front.
- Download the Ring App: If you haven’t already, download the Ring app from your smartphone’s app store (iOS or Android).
- Create or Log In: Open the app and either create a new account or log in with your existing Ring credentials.
- Set Up a Device: Tap “Set Up a Device” and select “Doorbells.” Follow the on-screen prompts.
- Scan the QR Code: The app will instruct you to scan the QR code located on your Ring doorbell unit (or on the packaging/manual). This initiates the connection process.
- Connect to Ring Wi-Fi: Your phone will temporarily connect to a Wi-Fi network broadcast by your Ring doorbell.
- Connect to Home Wi-Fi: The app will then guide you to connect your Ring doorbell to your home’s 2.4 GHz Wi-Fi network (ensure you have your Wi-Fi password handy). This is critical for the device’s functionality, enabling live view, notifications, and cloud storage.
- Name Your Device: Give your doorbell a descriptive name (e.g., “Front Door”).
- Test Functionality: The app will guide you through testing the doorbell button, motion detection, and two-way talk features. Ensure your indoor chime (if you have one) also rings when the Ring button is pressed.
This entire process leverages intuitive software design, guiding you step-by-step and ensuring your smart device is fully integrated.
Customizing Settings and Features
Once connected, delve into the app’s settings to personalize your experience and maximize productivity.
- Motion Settings: This is where Ring’s AI tools truly shine. Adjust motion zones to monitor specific areas and minimize false alerts (e.g., ignoring passing cars). Fine-tune motion sensitivity. You can also set “People Only” mode to reduce notifications from pets or inanimate objects, significantly improving the signal-to-noise ratio of your alerts and enhancing digital security by focusing on relevant threats.
- Privacy Zones: Mask out areas within the camera’s view that you don’t want recorded for privacy reasons (e.g., a neighbor’s window). This is a crucial feature for respecting privacy while maintaining security.
- Notification Settings: Customize how and when you receive alerts on your phone or other linked devices. You can also integrate with Alexa to announce visitors on Echo devices.
- Live View: Test the live view feature to ensure clear video and audio.
- Linked Devices: If you have other Ring cameras or security devices, you can link them within the app to trigger recordings simultaneously or perform other coordinated actions, creating a comprehensive security blanket.
Spending time on these customizations optimizes your doorbell’s performance, making it a truly personalized digital security guardian.
Troubleshooting Common Issues
Even with careful installation, minor hitches can occur. Most common issues are easily resolved.
- No Power/Not Turning On: Double-check the breaker. Ensure wires are securely connected to the Ring terminals. Verify your transformer voltage is within Ring’s compatible range.
- Indoor Chime Not Ringing: Ensure the Chime Connector (if applicable for your model) is installed correctly. In the Ring app, go to Device Settings > In-Home Chime Settings and ensure “Ring Wired Doorbell Chime” is enabled. Your chime type (mechanical or digital) might need specific selection within the app.
- Poor Wi-Fi Connection: Move your Wi-Fi router closer, consider a Wi-Fi extender, or adjust its position to reduce interference. A strong Wi-Fi signal is paramount for consistent performance and reliable digital security updates.
- Frequent Motion Alerts: Re-evaluate your motion zones and sensitivity settings. Utilize “People Only” mode if available for your model.
- Video Quality Issues: Check your internet speed. Ensure there aren’t physical obstructions blocking the lens.
Ring’s extensive online support and community forums are excellent resources for more complex troubleshooting, offering a wealth of tutorials and solutions.
Maximizing Your Ring Doorbell’s Potential: Long-Term Benefits and Smart Home Integration
Installing your wired Ring doorbell is more than just a security upgrade; it’s an investment in your home’s future and an enhancement of your digital lifestyle.
Enhancing Digital Security and Peace of Mind
The primary benefit of a Ring Doorbell is the significant boost to your home’s digital security. You gain:
- 24/7 Surveillance: Constant monitoring of your doorstep, recording events whether you’re home or away.
- Instant Alerts: Real-time notifications for motion detection or doorbell presses, allowing you to respond immediately.
- Two-Way Communication: Speak to visitors or deter unwanted guests directly from your smartphone, regardless of your location.
- Package Protection: Monitor deliveries and deter package theft, a growing concern in many communities.
- Deterrent Effect: The visible presence of a Ring doorbell itself often acts as a deterrent to potential intruders.
This robust level of security provides an invaluable sense of peace of mind, knowing your home is watched over by smart technology.
Integrating with Your Smart Home Ecosystem
A wired Ring doorbell seamlessly integrates into the broader smart home ecosystem, becoming a central piece of your connected living.
- Amazon Alexa: Link your Ring account to Alexa to receive doorbell announcements on Echo devices, view live video on Echo Show devices, and even communicate through your Ring doorbell using Alexa.
- Other Smart Devices: While Ring’s primary integrations are within its own ecosystem and with Amazon, its functionality can be extended through platforms like IFTTT (If This Then That) to trigger actions with other smart devices (e.g., turning on smart lights when motion is detected).
- Remote Access and Control: Manage your doorbell settings, view footage, and respond to alerts from anywhere in the world, directly from your smartphone. This epitomizes the convenience and control offered by modern tech trends.
Investing in Your Home’s Future
Beyond immediate security benefits, installing a wired Ring doorbell can be seen as a smart financial move and an investment in your property.
- Increased Home Value: Smart home technology, especially security features, is increasingly attractive to potential homebuyers, potentially adding to your home’s market value.
- Insurance Discounts: Some insurance providers offer discounts for homes equipped with smart security systems, leading to ongoing savings on your homeowner’s policy.
- Long-Term Reliability: The wired nature ensures consistent power and performance, offering long-term reliability and reducing the need for maintenance compared to battery-powered alternatives. This contributes to the overall “financial health” of your home maintenance strategy.
- Productivity and Convenience: By automating a part of your home security and visitor management, you free up mental bandwidth and enjoy greater convenience, which are intangible but significant benefits that contribute to overall well-being and productivity.
In conclusion, installing a wired Ring doorbell is an accessible and rewarding DIY project that empowers you to take control of your home’s security. By understanding the technological nuances, valuing the brand’s reliability, and appreciating the financial advantages of a DIY approach, you’re not just installing a gadget; you’re upgrading your lifestyle and investing in a smarter, more secure future for your home.
aViewFromTheCave is a participant in the Amazon Services LLC Associates Program, an affiliate advertising program designed to provide a means for sites to earn advertising fees by advertising and linking to Amazon.com. Amazon, the Amazon logo, AmazonSupply, and the AmazonSupply logo are trademarks of Amazon.com, Inc. or its affiliates. As an Amazon Associate we earn affiliate commissions from qualifying purchases.