In today’s interconnected digital landscape, our laptops are often the central hub for work, communication, and entertainment. Among the most critical components for seamless interaction with these devices is the touchpad – that intuitive surface that allows us to navigate, click, and gesture without needing an external mouse. However, when the touchpad acts up, it can bring productivity to a grinding halt. From erratic cursor movements to complete unresponsiveness, many touchpad issues can be traced back to a faulty, outdated, or missing driver.
A touchpad driver is essentially a piece of software that enables your operating system (like Windows) to communicate effectively with your laptop’s touchpad hardware. Without the correct driver, or with one that’s corrupted, your touchpad simply won’t function as intended, or perhaps not at all. This comprehensive guide will walk you through everything you need to know about installing and updating your touchpad drivers, ensuring your laptop’s most fundamental navigation tool remains smooth, responsive, and reliable. We’ll delve into various methods, from utilizing Windows’ built-in tools to directly engaging with your laptop manufacturer’s support, equipping you with the knowledge to troubleshoot and resolve common touchpad woes efficiently.
Understanding Touchpad Drivers and Their Importance
Before diving into the “how-to,” it’s crucial to grasp what a touchpad driver is and why it plays such a vital role in your computing experience. Imagine your laptop’s hardware components as a highly skilled team, and your operating system as the team manager. For the manager to effectively instruct a team member (like the touchpad), they need a common language and a clear set of instructions. This is precisely what a driver provides.
A touchpad driver translates commands from the operating system into instructions the touchpad hardware can understand, and vice versa. It facilitates not only basic cursor movement and clicking but also advanced gestures like multi-touch scrolling, pinch-to-zoom, and three-finger swipes that enhance productivity and user experience. Without the right driver, these functionalities are compromised, leading to frustration and inefficient workflow. An outdated driver might lack support for new operating system features, exhibit bugs, or even introduce security vulnerabilities. A corrupted driver, on the other hand, can cause erratic behavior, intermittent functionality, or a complete shutdown of the touchpad.
Maintaining updated and correctly installed drivers isn’t just about fixing problems; it’s about optimizing performance, ensuring compatibility with the latest software, and enhancing the overall security of your system. In a world where precision and speed are paramount, a perfectly functioning touchpad is non-negotiable for seamless digital interaction.
Initial Troubleshooting for Touchpad Issues
Often, a touchpad issue isn’t a direct result of a missing driver but rather a temporary glitch or a simple setting misconfiguration. Before embarking on driver installation or uninstallation, it’s wise to perform some basic troubleshooting steps. These preliminary checks can save you significant time and effort, addressing simpler problems quickly.
Basic System Checks
- Restart Your Computer: This is the golden rule of tech support for a reason. A simple reboot can resolve countless temporary software conflicts or memory glitches that might be affecting your touchpad. It clears the system’s volatile memory and reinitializes all running processes, often bringing the touchpad back to life.
- Check for Physical Damage or Obstructions: Ensure there’s no debris, liquid, or physical damage on or around the touchpad surface. Sometimes, a foreign object can interfere with its sensitivity or cause unintended inputs.
- Test with an External Mouse: If you have an external USB or Bluetooth mouse, connect it to your laptop. If the external mouse works perfectly, it strongly suggests the issue is indeed with the touchpad or its driver, rather than a broader system problem.
Checking Touchpad Enable/Disable Settings
Many laptops come with built-in mechanisms to quickly enable or disable the touchpad. This is a common culprit for a seemingly unresponsive touchpad.
- Function (Fn) Keys: Most laptops have a dedicated function key combination (often
Fn+ one of theFkeys, likeF5,F7, orF9) that toggles the touchpad on or off. Look for an icon resembling a touchpad with a cross through it, or an image of a hand touching a square. Press this combination to see if it reactivates your touchpad. - Windows Settings:
- Navigate to
Settings(Windows key + I). - Go to
Bluetooth & devices>Touchpad. - Ensure the
Touchpadtoggle is set toOn. - Check for additional touchpad settings here that might have inadvertently disabled it.
- Navigate to
- BIOS/UEFI Settings (Advanced): In rare cases, the touchpad might be disabled at a deeper hardware level within your computer’s BIOS or UEFI firmware settings. To access these, you typically need to press a specific key (like
F2,Del,F10, orEsc) repeatedly during startup. Once in BIOS/UEFI, look for options related to “Internal Pointing Device,” “Touchpad,” or “Input Devices” and ensure it’s enabled. Exercise caution when changing BIOS/UEFI settings, as incorrect modifications can affect system stability.
Running the Windows Troubleshooter
Windows includes built-in troubleshooters designed to automatically detect and fix common problems.
- Open Settings: Press
Windows key + I. - Go to Update & Security (Windows 10) or System > Troubleshoot (Windows 11).
- Select Other troubleshooters (Windows 11) or Additional troubleshooters (Windows 10).
- Look for “Hardware and Devices” or “Keyboard” or “Bluetooth & Other Devices” and run the relevant troubleshooter. While there isn’t always a specific “Touchpad” troubleshooter, related hardware troubleshooters might identify underlying issues.
By systematically going through these initial troubleshooting steps, you can often identify and resolve simple touchpad problems without needing to delve into more complex driver management. If these steps don’t yield a solution, it’s highly likely that your touchpad driver requires attention.
Comprehensive Methods for Installing or Updating Touchpad Drivers
Once you’ve ruled out basic issues, the next logical step is to address the touchpad driver itself. There are several reliable methods to install or update these drivers, ranging from using Windows’ built-in tools to directly sourcing them from your laptop manufacturer. Each method has its advantages, and understanding them will help you choose the most appropriate approach for your situation.
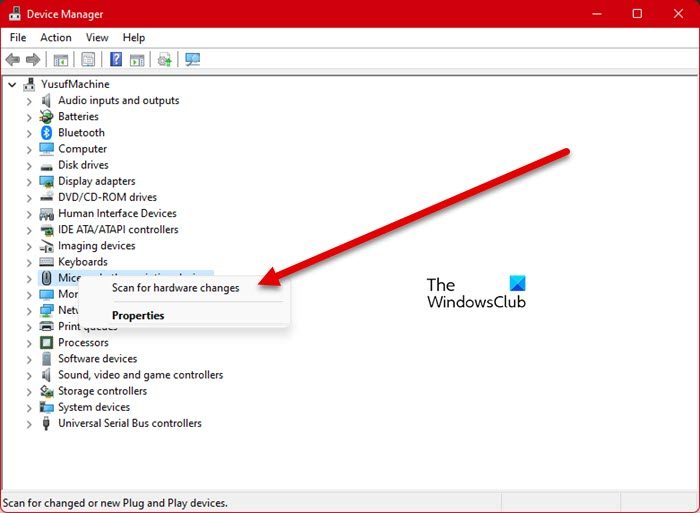
Method 1: Using Device Manager

The Device Manager is Windows’ central hub for managing all hardware components and their respective drivers. It’s often the first place to go for driver-related issues.
-
Open Device Manager:
- Right-click on the
Startbutton (or pressWindows key + X). - Select
Device Managerfrom the power user menu.
- Right-click on the
-
Locate Your Touchpad Device:
- Expand the category
Mice and other pointing devices. You might see entries like “HID-compliant mouse,” “PS/2 Compatible Mouse,” or specific names like “ELAN Touchpad” or “Synaptics Touchpad.” - Alternatively, sometimes touchpads are listed under
Human Interface Devices. Look for entries that specifically mention “Touchpad,” “HID-compliant touch pad,” or “I2C HID Device” (which a touchpad often connects through).
- Expand the category
-
Update Driver Software:
- Right-click on your touchpad device.
- Select
Update driver. - Choose
Search automatically for updated driver software. Windows will then try to find and install the best available driver from its own repository or through Windows Update. This is often the quickest and easiest method. - If that doesn’t work, right-click again and select
Update driver, but this time chooseBrowse my computer for driver software. Then, selectLet me pick from a list of available drivers on my computer. This option can be useful if Windows has multiple compatible drivers stored locally, allowing you to try an older, potentially more stable version.
-
Uninstall and Reinstall Driver (Clean Install):
- If updating doesn’t resolve the issue, a clean reinstallation might be necessary.
- Right-click on your touchpad device.
- Select
Uninstall device. - Crucially, if prompted, ensure you check the box that says “Delete the driver software for this device” (if available). This ensures a completely fresh start, removing any corrupted files.
- Click
Uninstall. - After uninstallation, restart your computer. Windows will typically detect the touchpad hardware during startup and automatically attempt to install a generic, compatible driver. You can then try updating it again via Device Manager or proceed to Method 2 for a manufacturer-specific driver.
-
Roll Back Driver:
- If your touchpad stopped working after a recent driver update, you might want to revert to a previous version.
- Right-click on your touchpad device.
- Select
Properties. - Go to the
Drivertab. - If the
Roll Back Driverbutton is active, click it and follow the prompts. This will revert to the driver version that was installed prior to the latest update.
Method 2: Downloading from Your Laptop Manufacturer’s Website
This is often the most reliable method, especially for advanced features or specific hardware optimizations, as manufacturer-provided drivers are tailor-made for your exact laptop model.
- Identify Your Laptop Model:
- The exact model number is usually found on a sticker on the underside of your laptop, inside the battery compartment (for older models), or on the original packaging.
- Alternatively, you can find it in Windows: type
dxdiaginto the Start search bar and press Enter. Look for “System Manufacturer” and “System Model.” - Even simpler: type
msinfo32into the Start search and press Enter to open System Information. Look for “System Manufacturer” and “System Model.”
- Visit the Manufacturer’s Support Website:
- Go to the official website of your laptop’s manufacturer (e.g., Dell, HP, Lenovo, Asus, Acer, Microsoft Surface).
- Navigate to the “Support,” “Drivers,” or “Downloads” section.
- Search for Your Model’s Drivers:
- Enter your laptop’s precise model number or service tag (if applicable) into the search bar.
- Locate the “Drivers & Software” section for your specific model.
- Filter by your operating system version (e.g., Windows 11 64-bit) and look for categories like “Input,” “Mouse, Keyboard & Input Devices,” or “Touchpad.”
- Download the Correct Driver:
- Identify the latest touchpad driver (often listed with a version number and release date).
- Download the executable file (.exe) or compressed archive (.zip).
- Important: Only download drivers from the official manufacturer’s website to avoid malware or incompatible software.
- Install the Driver:
- Once downloaded, locate the file (usually in your
Downloadsfolder). - Double-click the executable file and follow the on-screen instructions. This typically involves accepting a license agreement, choosing an installation location, and clicking “Next” until completion.
- You may be prompted to restart your computer after the installation is finished. Do so to ensure the changes take effect.
- Once downloaded, locate the file (usually in your
Method 3: Utilizing Windows Update
Windows Update isn’t just for operating system patches; it also often delivers critical hardware drivers, including those for touchpads. Sometimes, optional updates contain newer drivers that aren’t automatically installed through Device Manager’s “Search automatically” feature.
- Open Windows Settings: Press
Windows key + I. - Navigate to Update & Security (Windows 10) or Windows Update (Windows 11).
- Click
Check for updates. Allow Windows to scan for any available updates. - Look for Optional Updates:
- Windows 10: Click
View optional updatesorView all optional updates. - Windows 11: Click
Advanced options, thenOptional updates.
- Windows 10: Click
- Select Driver Updates: Expand the
Driver updatessection. If there’s a touchpad driver listed, check the box next to it. - Download and Install: Click
Download and install. - Restart Your Computer: After the updates are installed, restart your system to ensure the new drivers are fully integrated.
By exploring these comprehensive methods, you should be able to effectively install or update your touchpad driver, resolving most functionality issues. Remember to restart your system after any driver installation or uninstallation to ensure the changes are properly applied.
Verifying Your Touchpad Installation and Advanced Tips
Once you’ve gone through the process of installing or updating your touchpad driver, it’s crucial to verify that the installation was successful and that your touchpad is functioning as expected. Beyond basic functionality, there are also advanced tips to maintain optimal performance and troubleshoot persistent issues.
Verifying Touchpad Functionality
- Basic Cursor Movement and Clicking: Immediately test if your cursor moves smoothly across the screen in response to your finger. Try clicking, double-clicking, and dragging items.
- Gesture Functionality: Check if multi-finger gestures (like two-finger scrolling, pinch-to-zoom, and three-finger swipes for task view or desktop switching) are working correctly. These advanced features often require the specific manufacturer’s driver to function optimally.
- Windows 10/11 Touchpad Settings: Go to
Settings(Windows key + I) >Bluetooth & devices>Touchpad. Here, you can usually customize gestures, adjust sensitivity, and confirm that your touchpad is recognized and enabled. If your specific touchpad driver (e.g., Synaptics, ELAN, Precision Touchpad) is correctly installed, you might see more detailed options for that particular hardware.
- Windows 10/11 Touchpad Settings: Go to
- Device Manager Confirmation:
- Revisit
Device Manager. - Expand
Mice and other pointing devicesorHuman Interface Devices. - Right-click on your touchpad device and select
Properties. - Go to the
Drivertab. Verify theDriver VersionandDriver Date. These should reflect the new or updated driver you just installed. An exclamation mark next to the device name in Device Manager indicates a problem, even if the touchpad appears to be partially working.
- Revisit
Advanced Tips for Ongoing Touchpad Health
- Create a System Restore Point: Before making any significant driver changes, especially when uninstalling drivers, it’s a best practice to create a system restore point. This provides a safety net, allowing you to revert your system to a previous working state if the new driver causes unforeseen problems.
- Type
create a restore pointinto the Start search bar and select the option. - Click
Create...and follow the prompts.
- Type
- Regular Driver Maintenance: Don’t wait for problems to arise. Periodically check for driver updates, especially after major Windows updates or if you notice slight performance degradations. While Windows Update often handles this, a manual check on your manufacturer’s website every few months is a good habit.
- Consider Third-Party Driver Update Utilities (Use with Caution): While not officially recommended by manufacturers, some third-party tools claim to automatically identify and update drivers. If you choose to use one, proceed with extreme caution. Research the software thoroughly, read reviews, and ideally, create a system restore point before allowing it to make any changes. Many reputable tech experts advise against these tools due to potential risks of installing incorrect, outdated, or even malicious drivers. Stick to Device Manager, Windows Update, and manufacturer websites as your primary sources.
- Check for Firmware Updates: Sometimes, the touchpad issues are related to the device’s firmware rather than just the driver. Laptop manufacturers occasionally release firmware updates for their components, including touchpads, which can resolve deep-seated hardware bugs or improve compatibility. These are typically found on your laptop manufacturer’s support page, separate from driver downloads.
- Power Management Settings: Occasionally, aggressive power-saving settings can cause touchpads to become unresponsive or behave erratically after resuming from sleep or hibernation.
- In Device Manager, right-click your touchpad device, select
Properties, and go to thePower Managementtab. - Uncheck the box that says “Allow the computer to turn off this device to save power” if you’re experiencing intermittent issues. While this might slightly increase power consumption, it ensures the touchpad remains fully powered.
- In Device Manager, right-click your touchpad device, select
By meticulously verifying your installation and incorporating these advanced tips into your routine, you can ensure your touchpad remains a reliable and efficient tool for navigating your digital world. A well-maintained driver ecosystem is fundamental to a smooth and productive computing experience, allowing you to leverage your technology to its fullest potential.
Conclusion
A fully functional touchpad is more than just a convenience; it’s a cornerstone of productivity and an essential interface for interacting with your laptop. When it falters, the ripple effect on your workflow and overall user experience can be significant. Understanding how to properly install and update your touchpad drivers is a critical skill for any laptop owner, empowering you to quickly diagnose and resolve common issues, thereby minimizing downtime and maximizing your efficiency.
We’ve explored a structured approach, starting with basic troubleshooting to rule out simple glitches, then progressing to the most effective driver management techniques. From leveraging the built-in capabilities of Windows Device Manager and Windows Update to directly sourcing precision-engineered drivers from your laptop manufacturer’s website, you now possess a comprehensive toolkit to tackle any touchpad driver challenge. Remember the importance of verification steps – confirming not just basic movement but also advanced gesture functionality – and adopting proactive measures like creating system restore points and performing regular driver maintenance.
In an era defined by rapid technological advancement, keeping your system’s drivers updated ensures not only optimal performance and stability but also continued access to the latest features and security enhancements. By following the guidance in this article, you can maintain a responsive, reliable touchpad, ensuring that your laptop remains a powerful and intuitive companion in all your digital endeavors.
aViewFromTheCave is a participant in the Amazon Services LLC Associates Program, an affiliate advertising program designed to provide a means for sites to earn advertising fees by advertising and linking to Amazon.com. Amazon, the Amazon logo, AmazonSupply, and the AmazonSupply logo are trademarks of Amazon.com, Inc. or its affiliates. As an Amazon Associate we earn affiliate commissions from qualifying purchases.