
In an era defined by technological innovation, environmental consciousness, and the pursuit of financial independence, harnessing solar energy has emerged as a truly compelling endeavor. No longer the exclusive domain of large corporations or government initiatives, solar power is now remarkably accessible to the average homeowner, offering a tangible path to reducing carbon footprints and slashing energy bills. With advancements in panel efficiency, inverter technology, and battery storage, along with a wealth of online resources, the prospect of a DIY solar panel installation is more viable and rewarding than ever before.
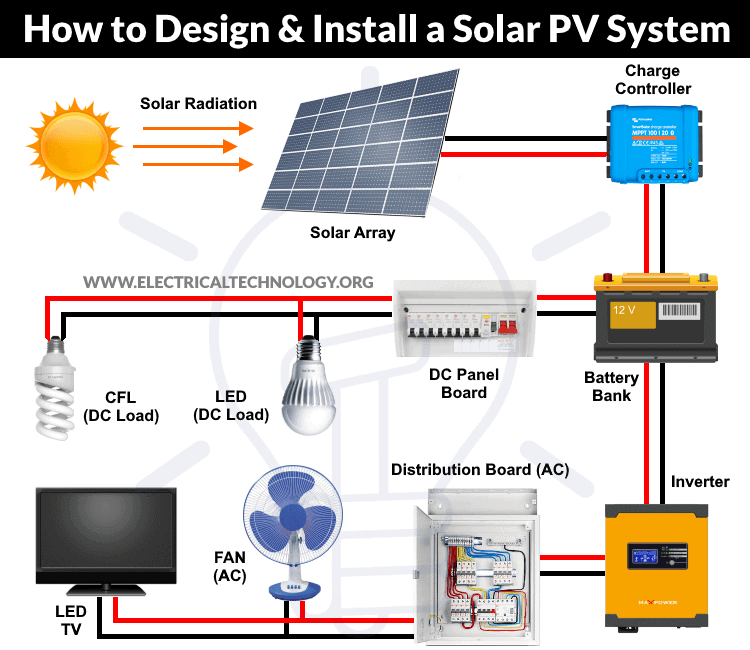
This comprehensive guide is designed for the tech-savvy, the financially astute, and anyone eager to take control of their energy future. We’ll break down the process of installing a solar panel system from conception to completion, ensuring you’re equipped with the knowledge to make informed decisions and execute a safe, efficient installation. Beyond just the “how-to,” we’ll explore the underlying technology, the financial incentives, and how going solar contributes to both personal branding as an eco-conscious individual and a broader sustainable movement. Get ready to transform your home into a clean energy powerhouse.
Why Go Solar? Understanding the Technological and Financial Imperatives
Before diving into the intricate steps of installation, it’s crucial to understand why investing in solar technology is one of the smartest decisions you can make today. It’s a confluence of environmental responsibility, shrewd financial planning, and leveraging cutting-edge technology for a more resilient future.
Environmental Impact and Sustainability: A Tech-Driven Shift
The most widely acknowledged benefit of solar power is its profound positive impact on the environment. Traditional electricity generation often relies on burning fossil fuels, releasing greenhouse gases that contribute to climate change. Solar panels, conversely, convert sunlight directly into electricity without producing any emissions during operation. By installing solar, you actively reduce your reliance on fossil fuels, significantly lowering your home’s carbon footprint. This isn’t just about feel-good optics; it’s a tangible contribution to global sustainability efforts, aligning with modern tech trends focused on green energy solutions and smart, efficient resource management. As consumers become more aware, adopting renewable tech solutions like solar also enhances your personal brand as a forward-thinking, responsible individual.
Financial Returns and Energy Independence: A Smart Money Move
Beyond environmental benefits, the financial incentives for going solar are incredibly compelling. Firstly, solar panels drastically reduce or even eliminate your monthly electricity bills. Imagine receiving a bill for mere dollars, or even getting credits from your utility company for excess energy produced! This long-term saving makes solar an excellent financial investment, often paying for itself within 7-15 years, and providing free electricity for the remainder of its 25-30+ year lifespan.
Secondly, numerous government incentives, such as federal tax credits (like the Investment Tax Credit in the US), state rebates, and local programs, can significantly offset the upfront cost of installation. These financial tools make solar more accessible and accelerate your return on investment. Furthermore, installing solar panels can increase your home’s property value, a clear benefit for future resale. In an age where personal finance and smart investing are paramount, solar power represents a stable, high-yield investment that hedges against rising energy costs and provides a degree of energy independence, protecting you from grid vulnerabilities and volatile market prices. It’s a strategic move that empowers you to control your energy future, rather than being beholden to utility companies.
Technological Advancements in Solar: Efficiency, Aesthetics, and Integration
The solar industry is a prime example of rapid technological advancement. Modern solar panels are vastly more efficient than those of even a decade ago, converting a higher percentage of sunlight into usable electricity. This means you need fewer panels to generate the same amount of power, making systems more compact and aesthetically pleasing. Innovations in inverter technology, such as microinverters, optimize the output of individual panels, mitigating the impact of shading and improving overall system performance.
Moreover, the integration of solar with battery storage solutions (like Tesla Powerwall or Enphase Encharge) allows homeowners to store excess energy for use at night or during power outages, further enhancing energy independence and resilience. Smart home technology plays a crucial role too, with apps and monitoring systems that allow you to track your solar production and consumption in real-time, providing valuable data for optimizing energy usage. These technological leaps make DIY installation more manageable, and the ongoing management of your solar array more intuitive, connecting seamlessly with the “Tech” focus of modern living.
Pre-Installation Planning: Laying the Groundwork for Success
A successful solar panel installation hinges on meticulous planning. This phase involves everything from understanding your energy needs to navigating local regulations and selecting the right components. Skipping steps here can lead to costly mistakes, so take your time and do your homework.
Site Assessment and Energy Audit: Understanding Your Needs
The first critical step is to understand your home’s energy consumption and assess your property’s suitability for solar. Gather your electricity bills from the past 12-24 months to determine your average daily and monthly kilowatt-hour (kWh) usage. This data will inform the size of the solar system you need.
Next, conduct a thorough site assessment. The primary consideration is sun exposure. Identify which sections of your roof (or property, if considering ground mounts) receive the most direct, unobstructed sunlight throughout the day and year. Tools like a solar pathfinder or even smartphone apps can help analyze sun angles and potential shading from trees, chimneys, or neighboring buildings. Consider your roof’s condition, age, and material; a roof nearing the end of its life should be replaced before solar installation. The orientation (south-facing is ideal in the Northern Hemisphere) and tilt of your roof are also important factors. If your roof isn’t ideal, ground-mounted systems offer flexibility. This detailed analysis, often aided by specific apps or professional software, directly aligns with the “Tech” aspect of smart home planning and optimization.
Permitting and Regulations: Navigating the Bureaucracy
This is arguably the most intimidating, yet crucial, part of the planning process. Installing a solar system is a significant structural and electrical modification to your home, requiring permits from your local municipality or county. This typically involves submitting detailed plans, including electrical schematics and structural diagrams, for review and approval. The specific requirements vary widely by location, so research your local building codes, electrical codes (like the National Electrical Code – NEC in the US), and zoning ordinances.
Furthermore, you’ll need to understand net metering policies from your utility company. Net metering allows you to sell excess electricity generated by your panels back to the grid, often earning credits on your bill. Applying for a net metering agreement is a separate process. Finally, if you live in a homeowner’s association (HOA), check their rules regarding solar installations, as some have restrictions on aesthetics or placement. While seemingly bureaucratic, understanding and adhering to these regulations ensures your system is legal, safe, and eligible for all available financial incentives, directly impacting the “Money” aspect of your investment.
Choosing the Right Solar Panel System: Components and Technology
The market offers a variety of solar panel technologies and system architectures, each with its own advantages.
-
Panel Types:
- Monocrystalline: High efficiency, sleek black appearance, performs well in less-than-ideal light, but generally more expensive.
- Polycrystalline: Slightly lower efficiency than mono, blueish appearance, more affordable.
- Thin-film: Less common for residential roofs, lower efficiency, but flexible and lightweight.
Your choice will depend on your budget, available roof space, and aesthetic preferences.
-
Inverters:
- String Inverters: Traditional, cost-effective, but if one panel’s performance is hampered (e.g., by shade), it can affect the entire string.
- Microinverters: Installed on each individual panel, optimizing output independently. Better performance in shaded conditions, easier monitoring, but higher upfront cost.
- Power Optimizers: A hybrid solution, often paired with a central inverter, optimizing panel output before sending power to the main inverter.
-
Mounting System: Rails and clamps designed to securely attach panels to your roof, accommodating different roof types (shingle, tile, metal) and angles.
-
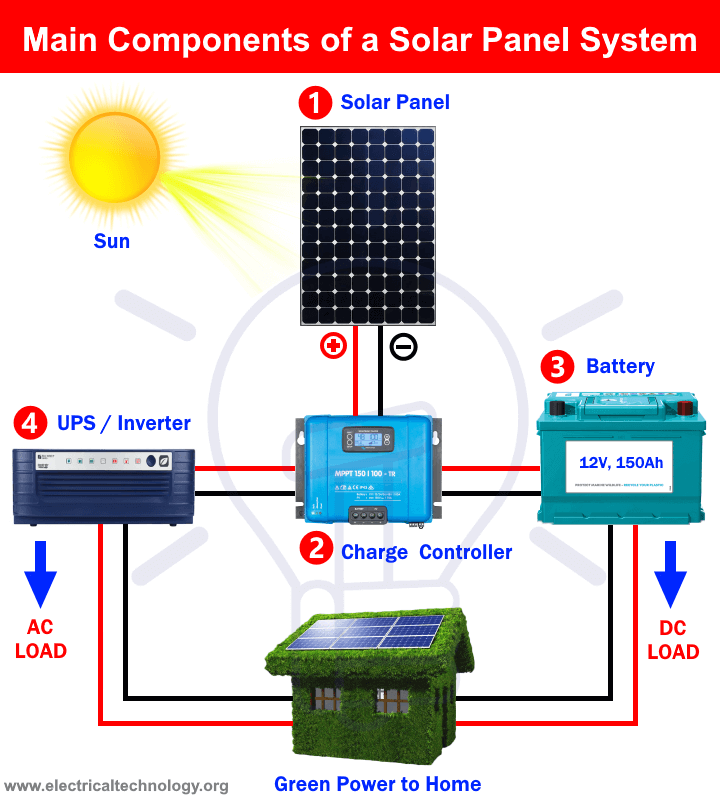
Battery Storage: While optional, integrating a battery bank allows you to store excess energy for use during peak hours, at night, or during power outages, significantly enhancing your energy independence. This is a crucial “Tech” add-on for maximizing self-consumption.
Researching these components, comparing their specifications, and understanding their compatibility is essential for designing an efficient and robust system tailored to your specific needs and budget.
Essential Tools and Safety Gear: Prioritizing Security and Efficiency
Safety is paramount when working on a roof and with electricity. You’ll need specific tools and personal protective equipment (PPE):
- Safety Gear:
- Fall Protection: Harness, lanyard, rope grab, anchor points (absolute must for roof work).
- Work Gloves: For protection against cuts and abrasions.
- Safety Glasses: To protect eyes from debris.
- Hard Hat: For overhead protection.
- Insulated Gloves/Tools: Crucial when working with electrical wiring.
- Proper Footwear: Non-slip, sturdy boots.
- Tools:
- Basic Hand Tools: Wrenches (for racking), screwdrivers, tape measure, utility knife.
- Power Tools: Cordless drill/driver, angle grinder (for cutting rails, if needed).
- Electrical Tools: Multimeter (for testing voltage/current), wire strippers, crimpers, conduit bender (if running conduit).
- Roofing Tools: Caulk gun, sealant, possibly a pry bar.
- Ladder: Sturdy, extension ladder for roof access.
- Label Maker: For clear wiring identification.
Acquire all necessary tools and safety gear before starting. A well-prepared workspace is a safe and efficient workspace, ensuring that your DIY project is not just cost-effective but also secure. This focus on proper tools and safety protocols underscores the “Tech” aspect of responsible project management and execution.
The Installation Process: A Step-by-Step Guide to Powering Your Home
With meticulous planning complete and all necessary permits in hand, you’re ready to begin the physical installation. This phase requires careful attention to detail, adherence to instructions, and a strong emphasis on safety. Remember, if at any point you feel unsure, consult with a licensed electrician or solar professional.
Mounting the Racking System: Securing the Foundation
The racking system is the skeletal structure that supports your solar panels, transferring their weight safely to your roof’s framing.
- Locate Rafters: Use a stud finder or tap test to accurately locate your roof’s rafters. This is critical as the racking must be securely anchored to the structural members of your roof, not just the sheathing.
- Install Standoffs/Flashing: Drill pilot holes into the center of the rafters. Install standoffs (or lag bolts) through roofing sealant and flashing to prevent leaks. The flashing is crucial for weatherproofing.
- Attach Rails: Secure the mounting rails to the standoffs using appropriate hardware. Ensure the rails are perfectly parallel and level across the entire array. Most systems use two rails per panel – one near the top and one near the bottom. Precise measurement and alignment are key here for proper panel installation and aesthetics.
- Grounding: Establish a continuous ground path for the racking system according to electrical codes. This typically involves grounding lugs and copper wire connecting the rails.
Attaching the Solar Panels: Physical Installation
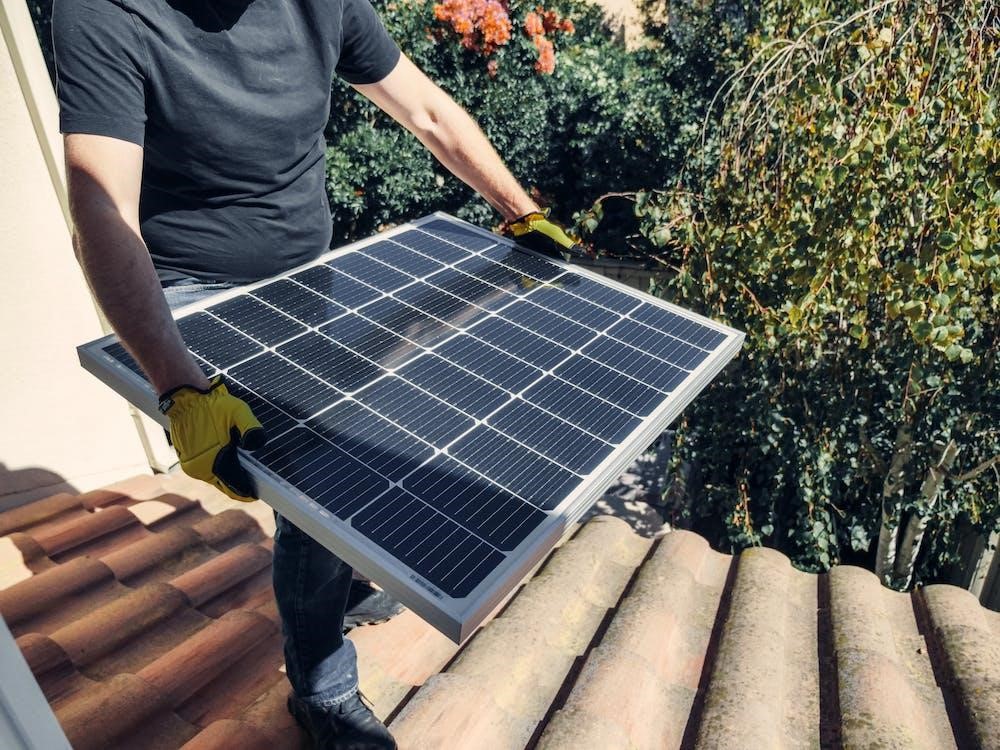
Once the racking is securely in place, you can begin installing the solar panels themselves. This is a two-person job due to the size and weight of the panels.
- Lift and Position: Carefully lift each solar panel onto the rails. Most panels have designated lifting points or edges.
- Clamp Panels: Use mid-clamps (between panels) and end-clamps (at the ends of rows) to secure the panels to the rails. Ensure the clamps are tightened to the manufacturer’s specifications. Do not overtighten, as this can damage the panel frame.
- Cable Management: As you install each panel, connect its DC output cables to the microinverter or power optimizer (if using these) that you’ve pre-mounted to the racking beneath each panel. If using a string inverter, you’ll route the DC cables towards a central combiner box. Neatly manage all wiring using UV-resistant cable ties, keeping them off the roof surface and protected within the racking system to prevent damage and ensure a clean look.
Electrical Wiring and Connections: The Heart of the System
This is the most critical and potentially dangerous part of the installation. If you are not a licensed electrician, it is highly recommended to hire one for this phase to ensure safety and code compliance.
- DC Wiring: Connect the output from the microinverters/power optimizers (AC power) or the solar panels (DC power, if using a string inverter) to the main solar electrical conduit.
- Microinverter/Optimizer Systems: The AC output from each unit is daisy-chained together and routed down to the AC disconnect switch and then to your main electrical panel.
- String Inverter Systems: DC wires from the solar panels are routed to a DC combiner box (if multiple strings), and then to the central string inverter. From the inverter, AC power is then routed to the AC disconnect and main panel.
- Inverter Installation: Install the inverter(s) in an accessible, well-ventilated location (e.g., garage, basement, or outside in a shaded area), ensuring it’s protected from the elements. Follow the manufacturer’s instructions for mounting and wiring.
- AC Wiring to Main Panel: Run the AC output from the inverter(s) through an external AC disconnect switch (required by code for safety) and then into a dedicated breaker in your home’s main electrical service panel. This typically requires adding a new circuit breaker of appropriate amperage. This connection point integrates your solar system with your home’s existing electrical infrastructure and ultimately the utility grid.
- Grounding: Ensure all electrical components, including the inverter, disconnects, and conduit, are properly grounded to prevent electrical hazards.
Grounding and Safety Checks: Final Preparations
Before activating the system, double-check every connection and ensure all safety measures are in place.
- Continuity and Polarity Checks: Use a multimeter to verify electrical continuity of all circuits and confirm correct DC polarity before making final connections to the inverter. Incorrect polarity can cause serious damage.
- Torque Checks: Re-check all bolt and clamp torques on the racking and electrical connections to ensure they meet manufacturer specifications.
- Labeling: Clearly label all disconnect switches, breakers, and conduits as “SOLAR PV” according to electrical code requirements. This is crucial for safety and for any future service work.
- Weatherproofing: Ensure all roof penetrations are sealed with appropriate sealants and flashing. All outdoor electrical boxes and conduits must be weatherproofed.
System Commissioning and Testing: Bringing Your System Online
This is the moment of truth!
- Utility Notification: Once your system passes local electrical inspections, your utility company will grant permission to operate (PTO). This typically involves replacing your existing meter with a net meter. Do NOT energize your system until you have PTO from your utility.
- Power On: Follow the inverter’s startup procedure. Typically, this involves turning on the main solar breaker in your service panel, then the AC disconnect, and finally the DC disconnect (if applicable) at the inverter.
- Monitor Performance: The inverter’s display or associated monitoring app should show that it’s generating power. Verify that the output is as expected based on current sunlight conditions. Many modern inverters and microinverters come with sophisticated apps that allow you to track real-time power production, energy consumption, and overall system health, integrating seamlessly with your “Tech” ecosystem.
Post-Installation: Maximizing Your Solar Investment and Sustained Performance
The installation itself is a significant achievement, but the journey doesn’t end there. To truly maximize your return on investment and ensure the longevity of your solar system, ongoing monitoring and minimal maintenance are key. This phase also connects deeply with the “Money” and “Tech” aspects of long-term sustainable living.
Monitoring Your System’s Performance: Smart Tech for Smart Energy
One of the greatest advantages of modern solar systems is the ability to monitor their performance in real-time. Most inverters come with dedicated smartphone apps or web portals that provide a wealth of data:
- Real-time Power Production: See how much electricity your panels are generating at any given moment.
- Daily, Monthly, Annual Production: Track your energy harvest over time.
- Energy Consumption: Some systems integrate with smart meters to show your home’s energy usage, allowing you to compare production vs. consumption.
- System Health Alerts: Be notified of any issues, such as a panel underperforming or an inverter fault.
Regularly checking this data empowers you to optimize your energy usage patterns. For instance, you might run high-energy appliances (like dishwashers or washing machines) during peak solar production hours to maximize self-consumption and reduce reliance on grid electricity. This level of granular control over your energy directly aligns with productivity tools and digital security (monitoring system health) that define the “Tech” category.
Maintenance and Troubleshooting: Keeping Your System Efficient
Solar panel systems are remarkably low-maintenance, but a few simple tasks can ensure optimal performance:
- Cleaning: Periodically clean your panels, especially if you live in a dusty area or one with significant bird activity. Rain often washes away surface dust, but a gentle rinse with a hose and a soft brush can remove stubborn grime, which can otherwise reduce efficiency. Avoid abrasive cleaners or high-pressure washers.
- Visual Inspection: Every few months, visually inspect your panels for any physical damage, loose wires, or obstructions (leaves, debris). Check the racking system for any signs of loosening.
- Vegetation Management: Keep trees and shrubs trimmed to prevent new shading from developing over time.
- Inverter Check: Periodically check the inverter display for any error codes. Most inverters are designed to be robust, but knowing basic troubleshooting steps (like resetting it) can be helpful.
For any significant issues or complex electrical problems, always consult a qualified solar technician or licensed electrician. Proactive maintenance safeguards your investment and ensures consistent energy production, directly impacting your “Money” savings over the system’s lifetime.
Financial Incentives and Rebates: Continued Savings and Earnings
Beyond the initial tax credits, explore ongoing financial benefits:
- Renewable Energy Credits (RECs): In some regions, you can sell Renewable Energy Credits generated by your system, providing an additional income stream.
- Performance-Based Incentives (PBIs): Certain states offer payments based on the actual electricity your system produces.
- Property Tax Exemptions: Some areas exempt the added value of solar panels from property tax assessments, or offer specific tax breaks.
Stay informed about local and federal programs, as these can change. Leveraging these incentives further enhances the financial viability of your solar investment. It transforms your solar array not just into an energy producer, but an active financial asset, tying back perfectly to the “Money” section of smart investing.
Integrating with Smart Home Ecosystems: Future-Proofing Your Energy
As smart home technology continues to evolve, integrating your solar system offers even greater control and efficiency. Many solar monitoring apps can now connect with broader home automation platforms, allowing you to:
- Automate appliance usage based on solar production (e.g., turn on AC when excess power is available).
- Prioritize battery charging/discharging based on utility rates or forecast weather.
- Receive alerts and control your system remotely, enhancing overall home productivity and digital security.
Embracing these integrations allows your solar system to become a seamless, intelligent part of your connected home, reflecting the cutting-edge “Tech” trends that drive modern living.
Installing a solar panel system is a rewarding journey that blends technological engagement, environmental stewardship, and astute financial planning. While it requires careful planning, diligent execution, and a commitment to safety, the long-term benefits of energy independence, reduced utility bills, and a smaller carbon footprint are immeasurable. By following this comprehensive guide, you’re not just installing solar panels; you’re investing in a smarter, more sustainable future for your home and contributing to a global shift towards clean energy. Take the leap, embrace the power of the sun, and become a part of the energy revolution.
aViewFromTheCave is a participant in the Amazon Services LLC Associates Program, an affiliate advertising program designed to provide a means for sites to earn advertising fees by advertising and linking to Amazon.com. Amazon, the Amazon logo, AmazonSupply, and the AmazonSupply logo are trademarks of Amazon.com, Inc. or its affiliates. As an Amazon Associate we earn affiliate commissions from qualifying purchases.