
The Dell Service Tag is a crucial identifier for any Dell product, acting as a unique fingerprint that unlocks a wealth of information and support specific to your device. This alphanumeric code, typically found on a sticker on the bottom or back of your Dell laptop or desktop, is your direct line to Dell’s extensive knowledge base, driver downloads, and warranty status. Given its importance, a common question arises for users looking to perform a fresh Windows installation or troubleshoot significant system issues: Can I install Windows with a Dell Service Tag?
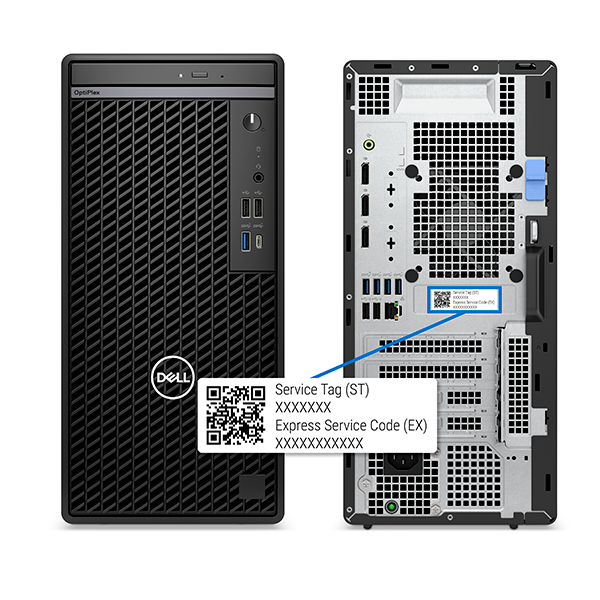
While the Service Tag itself doesn’t directly initiate a Windows installation, it plays an indispensable role in the process and legitimacy of that installation, especially when it comes to obtaining the correct drivers and ensuring you have a valid Windows license associated with your Dell hardware. This article will delve into how your Dell Service Tag can facilitate a smooth Windows installation, what you need to know about licensing, and how to leverage this identifier for a successful and supported operating system upgrade or reinstallation.
The core of the question revolves around obtaining a legitimate copy of Windows and ensuring your hardware is compatible and supported. The Service Tag is your key to achieving both. It allows Dell to verify your hardware configuration and, consequently, the specific Windows version that came pre-installed or is licensed for your device. This is particularly relevant when you’re looking to reinstall Windows from scratch, perhaps due to a system slowdown, a virus infection, or simply wanting a cleaner slate.
Understanding Your Dell Service Tag and Its Role in Windows Installation
At its heart, the Dell Service Tag is a unique identifier that Dell uses to track your specific hardware. When you enter your Service Tag on Dell’s support website, you’re presented with a tailored experience. This includes:
- Product Identification: Confirming the exact model and configuration of your Dell computer.
- Driver Downloads: Accessing the specific drivers for your hardware components (graphics card, Wi-Fi adapter, audio, etc.) that are tested and optimized for your system. This is arguably the most critical function of the Service Tag when it comes to reinstalling Windows.
- Warranty Information: Checking the remaining duration and coverage of your Dell warranty.
- Documentation and Manuals: Finding user guides, troubleshooting manuals, and specifications related to your device.
- Support Options: Connecting you with Dell’s customer support for assistance.
Why Drivers are Paramount for a Fresh Windows Install
When you perform a fresh installation of Windows, the operating system installs a set of generic drivers that enable basic functionality. However, these generic drivers often lack the full performance optimization and specific features that manufacturer-provided drivers offer. Without the correct drivers, you might experience:
- Poor Performance: Your graphics might be sluggish, Wi-Fi connectivity could be unreliable, and audio may not function at all.
- Hardware Malfunctions: Certain components might not be recognized or work intermittently.
- Limited Functionality: Special features or power management options unique to your Dell hardware might not be available.
- System Instability: Incompatible or missing drivers can lead to crashes and blue screen errors.
This is where your Dell Service Tag becomes invaluable. By inputting it into the Dell Support website, you can navigate directly to the section dedicated to your specific device and download the latest, most compatible drivers for all its components. This ensures that after your Windows installation, you can quickly and efficiently get your Dell machine running at its optimal performance with all hardware functioning as intended.
Navigating Windows Licensing with Your Dell Service Tag
A significant aspect of installing Windows, especially a fresh copy, is ensuring you have a legitimate license. For most Dell computers purchased with Windows pre-installed, the Windows license is tied to your hardware through a digital entitlement. This means you don’t necessarily need a product key to reinstall the same edition of Windows.
Digital Entitlement and OEM Licenses
Dell, as an Original Equipment Manufacturer (OEM), licenses Windows from Microsoft and pre-installs it on their devices. This pre-installation includes a digital license embedded in your system’s firmware (UEFI/BIOS) or associated with your Microsoft account (for Windows 10 and 11). This digital entitlement is linked to the unique hardware ID of your Dell computer.
When you install a version of Windows that matches your digital entitlement (e.g., Windows 10 Home if it originally came with Windows 10 Home), Windows will automatically activate upon connecting to the internet. The activation servers at Microsoft will recognize your hardware ID and verify that it’s associated with a valid OEM license.
Using Your Service Tag to Confirm Windows Edition
While your Service Tag doesn’t directly provide a product key for installation, it can be used to confirm which edition of Windows was originally licensed for your Dell machine. By entering your Service Tag on the Dell Support site, you can often find information about the original system configuration, including the pre-installed operating system. This is crucial because you can only reinstall the edition of Windows for which you have a digital entitlement. Trying to install Windows Pro if your device only has a Home license will likely result in activation issues.

What if You Want to Upgrade or Install a Different Edition?
If you wish to install a different edition of Windows (e.g., upgrading from Windows 10 Home to Windows 10 Pro) or install a version of Windows not originally licensed for your device, you will need to purchase a new license. In such cases, your Dell Service Tag still plays a role in ensuring you download the correct installation media from Microsoft’s official website, and it helps you confirm your hardware’s compatibility with the newer Windows version.
Step-by-Step Guide: Installing Windows Using Your Dell Service Tag as a Resource
While the Service Tag doesn’t directly initiate the installation, it’s your essential companion for a successful reinstallation. Here’s a general workflow:
Pre-Installation: Gathering Resources
- Locate Your Dell Service Tag: As mentioned, it’s usually on a sticker. You can also find it by typing
wmic bios get serialnumberin the Command Prompt. - Access Dell Support: Go to the official Dell Support website (e.g., support.dell.com).
- Enter Your Service Tag: Navigate to the support page for your specific device by entering your Service Tag.
- Identify Your Original Windows Edition: Look for information regarding the original operating system. Note down the exact edition (e.g., Windows 11 Home, Windows 10 Pro).
- Download Essential Drivers: Before you wipe your drive, navigate to the “Drivers & Downloads” section for your Service Tag. Prioritize downloading the following:
- Network Drivers: Specifically, your Wi-Fi and Ethernet drivers. These are critical for getting online immediately after installation to download other updates and drivers.
- Chipset Drivers: These are fundamental for your motherboard and core system components.
- Graphics Drivers: For optimal display performance.
- Audio Drivers: To ensure sound works.
- Any other critical drivers: Such as those for storage controllers or essential system utilities.
- Save these drivers: Store them on a USB drive or an external hard drive. Avoid saving them on the drive you intend to format.
Creating Windows Installation Media
- Download the Media Creation Tool: Go to the official Microsoft website and download the Media Creation Tool for the Windows version you intend to install (e.g., Windows 10 or Windows 11).
- Create a Bootable USB Drive: Run the Media Creation Tool and follow the prompts to create a bootable USB drive with the Windows installation files. You’ll need a USB drive with at least 8GB of space.
Performing the Windows Installation
- Boot from USB: Insert the bootable USB drive into your Dell computer and restart it. You’ll likely need to enter your BIOS/UEFI settings (usually by pressing F2, F12, or DEL during startup) to change the boot order and set the USB drive as the primary boot device.
- Follow On-Screen Prompts: The Windows installer will launch. Follow the instructions, selecting your language, time, and keyboard input.
- Choose “Custom: Install Windows only (advanced)”: When prompted to select the installation type, choose the custom option.
- Partition and Format: You will see a list of drives and partitions. You can delete existing partitions (this will erase all data on them) and create new ones or select an existing partition to install Windows on. It’s generally recommended to delete all partitions on the target drive for a truly clean installation and then select “Unallocated Space” to let Windows create the necessary partitions.
- Complete Installation: Windows will now begin installing. Your computer will restart several times during this process. Remove the USB drive when prompted or after the first restart to prevent booting from it again.
Post-Installation: Driver Installation and Activation
- Install Network Drivers: Once Windows is installed and you’re on the desktop, the first priority is to install the network drivers you saved earlier. This will allow you to connect to the internet.
- Install Remaining Drivers: Now, install all the other drivers you downloaded from the Dell Support website. It’s generally a good practice to install them in the order they appear on the Dell website, often starting with Chipset drivers.
- Windows Update: Run Windows Update. It will often detect and install some additional drivers or updates for your system.
- Activation: Connect your computer to the internet. Windows should automatically activate if you’ve installed the same edition that was originally licensed for your device. If activation fails, you can try troubleshooting via Windows Settings or by contacting Microsoft Support. If you purchased a new license, you would enter the product key during or after installation.
Maximizing Your Dell Experience Beyond a Fresh Install
Your Dell Service Tag is more than just a tool for installing Windows. It’s the gateway to a continuously optimized and supported computing experience. Regularly checking the Dell Support website using your Service Tag can help you stay on top of critical firmware updates, BIOS updates, and driver enhancements that can improve performance, security, and stability.
Proactive Maintenance and Upgrades
By referencing your Service Tag, you can explore available hardware upgrades recommended by Dell for your specific model, such as RAM or storage. You can also stay informed about any recalls or known issues related to your hardware.

Leveraging Dell’s Support Ecosystem
The Dell Support website, powered by your Service Tag, also provides access to diagnostic tools. These tools can help you identify hardware problems before they become critical. If you encounter any issues during or after your Windows installation, your Service Tag is the first piece of information Dell support will ask for to quickly diagnose and assist you.
In conclusion, while your Dell Service Tag doesn’t directly install Windows, it is an indispensable tool that enables and supports the process. It ensures you have the correct drivers for optimal performance, helps confirm your Windows licensing, and serves as your primary key to Dell’s vast support ecosystem. By understanding and utilizing your Service Tag effectively, you can perform a clean Windows installation with confidence and keep your Dell machine running smoothly for years to come.
aViewFromTheCave is a participant in the Amazon Services LLC Associates Program, an affiliate advertising program designed to provide a means for sites to earn advertising fees by advertising and linking to Amazon.com. Amazon, the Amazon logo, AmazonSupply, and the AmazonSupply logo are trademarks of Amazon.com, Inc. or its affiliates. As an Amazon Associate we earn affiliate commissions from qualifying purchases.