In the intricate ecosystem of modern computing, the graphics processing unit (GPU) stands as a cornerstone for everything from gaming and professional content creation to general desktop fluidity. NVIDIA, a titan in the GPU industry, powers millions of systems worldwide. However, the raw power of your NVIDIA graphics card is only as effective as the software that orchestrates it – the driver. An outdated, corrupted, or incorrectly installed driver can lead to a litany of issues: stuttering games, software crashes, display anomalies, or even an inability to utilize your GPU’s full capabilities.
For tech enthusiasts, gamers, and professionals alike, understanding how to properly install and manage NVIDIA drivers is not just a convenience; it’s a necessity. This guide will demystify the process, walking you through each step to ensure your NVIDIA GPU is running at its peak, providing you with stability, performance, and access to the latest features. Whether you’re setting up a new PC, troubleshooting an old one, or simply looking to update your system, this article offers a definitive roadmap to a smooth and successful NVIDIA driver installation.
The Crucial Role of Graphics Drivers: Why Installation Matters
Before diving into the “how-to,” it’s essential to grasp the “why.” What exactly is a graphics driver, and why is its correct installation so pivotal to your PC’s performance and stability?
Bridging Hardware and Software
At its core, a graphics driver is a piece of software that enables your operating system (Windows, Linux, macOS) and applications to communicate effectively with your NVIDIA graphics card. Think of it as a translator: without it, your PC wouldn’t know how to tell the GPU to render a game scene, display a video, or even draw your desktop environment. The driver provides the specific instructions and protocols needed for this interaction.
Enhancing Performance and Stability
Newer NVIDIA drivers often come packed with optimizations for the latest games and applications. These optimizations can translate into higher frame rates, smoother gameplay, and reduced latency. For professionals, updated drivers can unlock new features in software like Adobe Premiere Pro, Blender, or AutoCAD, enhancing workflow efficiency and enabling access to advanced rendering capabilities.
Beyond performance, drivers play a critical role in system stability. Bug fixes are a common component of driver updates, addressing issues that could lead to crashes, freezes, or graphical glitches. An outdated or faulty driver is a frequent culprit behind system instability, making regular and correct installation vital for a seamless computing experience.
Unlocking New Features and Security Updates
NVIDIA constantly evolves its GPU architecture and software stack. New drivers often introduce support for cutting-edge technologies like DLSS (Deep Learning Super Sampling), Ray Tracing enhancements, or new features within the NVIDIA Control Panel. Furthermore, drivers can include critical security patches, safeguarding your system against potential vulnerabilities related to graphics processing. Staying current ensures you’re not missing out on these advancements or exposing your system to risks.
Preparing for NVIDIA Driver Installation: Essential Pre-requisites
A successful driver installation often hinges on proper preparation. Skipping these initial steps can lead to unnecessary complications. This section outlines the crucial checks and downloads you need to perform before commencing the installation process.
Identifying Your NVIDIA GPU and Operating System
The first and most critical step is to accurately identify your specific NVIDIA graphics card model and your computer’s operating system (OS). NVIDIA drivers are highly specific: a driver for a GeForce RTX 3080 on Windows 10 will not work for a GeForce GTX 1060 on Windows 7, or even the same RTX 3080 on a Linux distribution.
How to Identify Your GPU:
- Windows Device Manager:
- Right-click the Start button and select “Device Manager.”
- Expand the “Display adapters” section. Your NVIDIA GPU model should be listed there (e.g., NVIDIA GeForce RTX 3070).
- NVIDIA Control Panel:
- Right-click on your desktop and select “NVIDIA Control Panel.”
- In the bottom-left corner, click “System Information.” Your GPU model will be displayed under the “Display” tab.
- System Information Tool (DirectX Diagnostic Tool):
- Press
Win + R, typedxdiag, and press Enter. - Go to the “Display” tab. Your NVIDIA GPU details will be listed.
- Press
How to Identify Your Operating System:
- Windows:
- Right-click the Start button and select “System” (or go to Settings > System > About).
- Here you’ll find your Windows edition (e.g., Windows 10 Home/Pro), version, and whether it’s a 64-bit or 32-bit operating system. NVIDIA primarily supports 64-bit systems for modern GPUs.
Knowing these details is paramount for downloading the correct driver package.
Downloading the Correct NVIDIA Driver
Once you know your GPU and OS, you can proceed to download the driver. NVIDIA offers two primary methods for this:
1. Using NVIDIA GeForce Experience (Recommended for Gamers and Most Users)
NVIDIA GeForce Experience (GFE) is a robust companion application designed to optimize your gaming experience and simplify driver updates. If you primarily use your PC for gaming or general tasks and already have GFE installed, this is the easiest method.
- Download GFE: If you don’t have it, download GeForce Experience from the official NVIDIA website.
- Check for Updates: Open GeForce Experience. Navigate to the “Drivers” tab. GFE will automatically check for available updates.
- Download and Install: If an update is found, click “Download.” Once downloaded, you’ll typically have two options: “Express Installation” or “Custom Installation.” We’ll delve into these in the next section.
2. Manual Driver Download from NVIDIA’s Official Website (For All Users, Especially Professionals or Troubleshooting)
This method provides more control and is ideal if you prefer not to use GeForce Experience, are performing a clean installation, or are troubleshooting issues.
- Visit the Official NVIDIA Driver Download Page: Go to
www.nvidia.com/drivers. - Use the Manual Driver Search:
- Product Type: Select “GeForce” (for consumer GPUs) or “NVIDIA RTX / Quadro” (for professional GPUs).
- Product Series: Choose the series corresponding to your GPU (e.g., “GeForce RTX 30 Series”).
- Product: Select your exact GPU model (e.g., “GeForce RTX 3070”).
- Operating System: Select your Windows version and architecture (e.g., “Windows 10 64-bit”).
- Download Type: Usually “Game Ready Driver” is sufficient. “Studio Driver” is available for content creators who prioritize stability over the absolute latest game optimizations.
- Search and Download: Click “Search.” The website will present the latest compatible driver. Click “Download” and then “Download” again on the next page.
- Save the Installer: Save the executable file (.exe) to a memorable location on your computer, such as your “Downloads” folder or desktop.
Considerations Before Installation
- Close All Programs: Before starting the installation, close all open applications, especially games or graphics-intensive software, to prevent conflicts.
- Disable Antivirus (Optional but Recommended for Troubleshooting): Temporarily disabling your antivirus software can sometimes prevent conflicts during the installation process. Remember to re-enable it afterward.
- Create a Restore Point (Highly Recommended): In case something goes wrong, a system restore point allows you to revert your system to its previous state. Search for “Create a restore point” in Windows Search.
Step-by-Step Guide: Installing Your NVIDIA Driver
With your driver downloaded and preparations complete, you’re ready to proceed with the installation. This section details the process, including crucial options like clean installation.
Method 1: Installing via GeForce Experience (If Applicable)
If you chose to use GeForce Experience for your update, the process is straightforward:
- Open GeForce Experience: Launch the application.
- Navigate to Drivers: Click on the “Drivers” tab at the top.
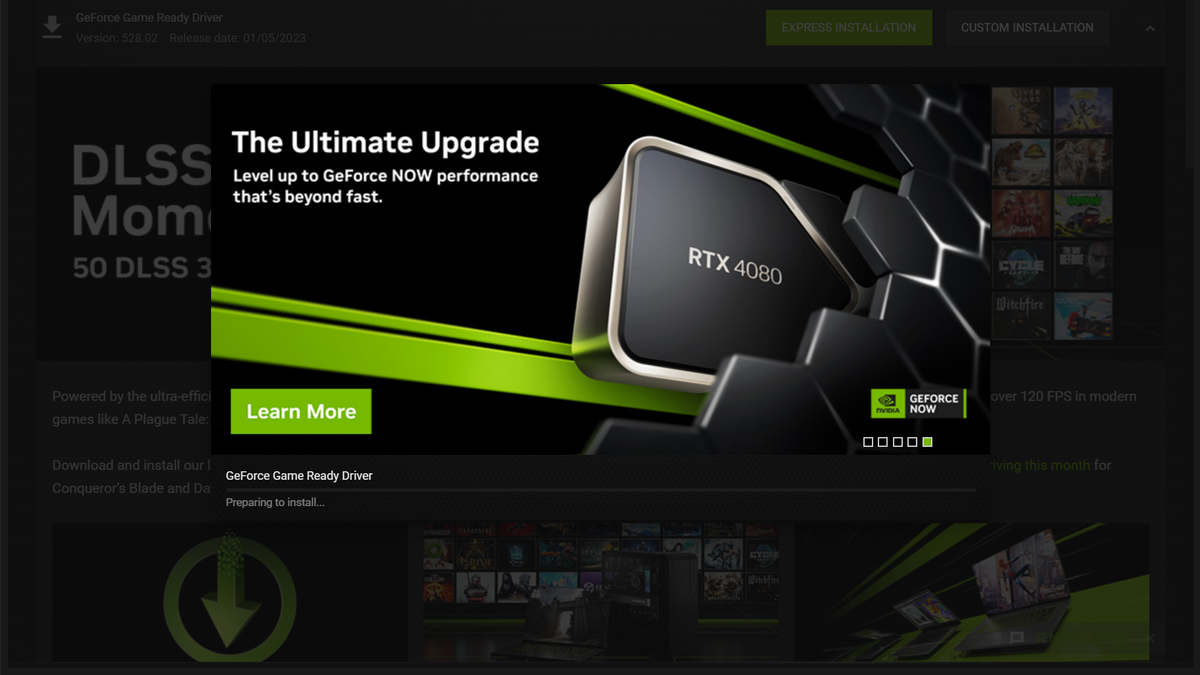
- Initiate Installation: After the download is complete, click “Express Installation” or “Custom Installation.”
- Express Installation: This is the easiest option. GeForce Experience handles everything automatically, installing the driver and all default components. It’s usually sufficient for most users updating an existing driver.
- Custom Installation: This allows you to select specific components (e.g., PhysX, HD Audio Driver, GeForce Experience itself) and offers the vital “Perform a clean installation” option.
Method 2: Manual Driver Installation (Recommended for Clean Installs & Troubleshooting)
This method involves running the downloaded installer directly. It’s generally preferred for fresh installations, significant driver version jumps, or when troubleshooting driver-related issues, as it allows for a “clean installation.”
- Locate the Installer: Navigate to where you saved the NVIDIA driver executable file (e.g.,
C:UsersYourNameDownloadsnvidia_driver_version.exe). - Run as Administrator: Right-click the installer file and select “Run as administrator.” This ensures the installer has the necessary permissions.
- Extraction Process: The installer will first ask for a location to extract its files. The default location is usually fine. Click “OK” or “Extract.”
- System Compatibility Check: The installer will perform a quick check to ensure your system meets the minimum requirements and is compatible with the driver.
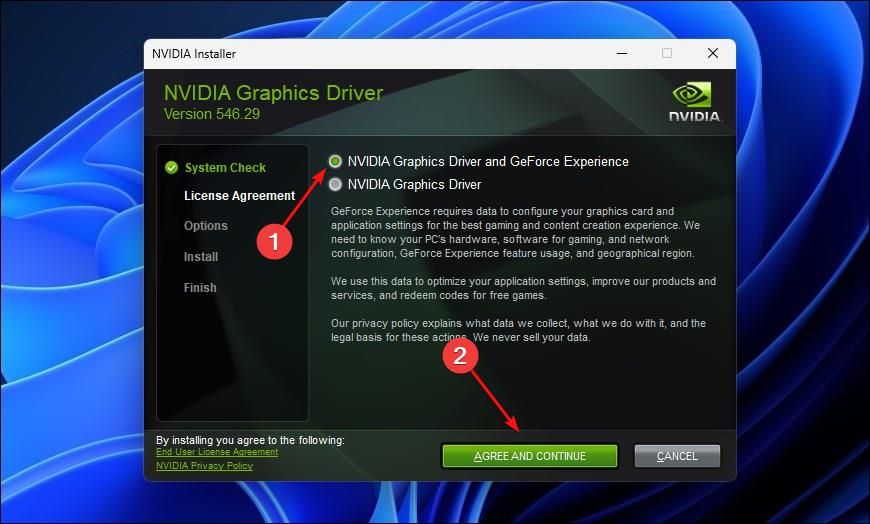
- License Agreement: Read the NVIDIA Software License Agreement and click “AGREE AND CONTINUE.”
- Installation Options: This is a critical step:
- Express (Recommended): This option automatically installs all NVIDIA components (Graphics Driver, GeForce Experience, PhysX, HD Audio, etc.) with default settings. It’s suitable for most users performing a routine update.
- Custom (Advanced): This option is highly recommended for a “clean installation” or if you want to selectively install components.
- If choosing Custom: Click “CUSTOM (Advanced)” and then “NEXT.”
- Select Components: On the next screen, you can uncheck components you don’t need (e.g., if you don’t use 3D Vision, you can deselect it).
- Crucially, check the box that says “Perform a clean installation.” This option uninstalls any previous NVIDIA drivers and associated files before installing the new ones. This is vital for preventing conflicts, corruption, and ensuring optimal performance, akin to starting fresh. Click “NEXT.”
- Installation Progress: The installation process will begin. Your screen may flicker, go black momentarily, or change resolution several times. This is normal as the display driver is being updated.
- Completion and Restart: Once the installation is complete, click “RESTART NOW” or “CLOSE.” It is highly recommended to restart your computer immediately after the installation to finalize changes and ensure all components are loaded correctly.
Verifying the Installation
After your system has restarted, it’s a good practice to verify that the NVIDIA driver was installed correctly.
- NVIDIA Control Panel: Right-click on your desktop and select “NVIDIA Control Panel.” If it opens without error, and you can see your GPU information under “Help” > “System Information,” the driver is likely installed correctly.
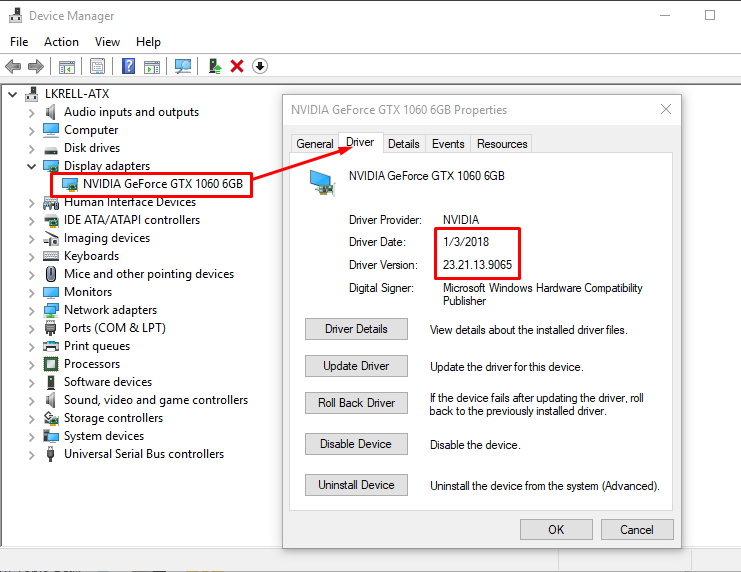
- Device Manager: Open Device Manager (as described in the preparation section) and expand “Display adapters.” Your NVIDIA GPU should be listed without any warning signs (like a yellow exclamation mark).
- GeForce Experience (if installed): Open GFE and check the “Drivers” tab. It should indicate that you have the latest driver installed.
Troubleshooting Common NVIDIA Driver Issues
Even with careful preparation, issues can sometimes arise during or after driver installation. This section covers some common problems and their solutions.
1. “NVIDIA Installer Failed” or Installation Hangs
- Run as Administrator: Ensure you’re running the installer with administrative privileges.
- Disable Antivirus: Temporarily disable your antivirus software.
- Clean Installation with DDU: This is often the most effective solution.
- What is DDU? Display Driver Uninstaller (DDU) is a free utility that thoroughly removes all remnants of graphics drivers (NVIDIA, AMD, Intel) from your system. This is much more comprehensive than NVIDIA’s built-in uninstaller.
- How to Use DDU:
- Download DDU from a reputable source (e.g., Guru3D).
- Restart your PC in Safe Mode. To do this in Windows 10/11: Go to Settings > System > Recovery > Advanced startup > Restart now. Then, Troubleshoot > Advanced options > Startup Settings > Restart. Press 4 or F4 for Safe Mode.
- Run DDU. Select “GPU” and then “NVIDIA.”
- Choose “Clean and restart.” DDU will remove all traces of your old driver and restart your PC in normal mode.
- Once in normal mode, attempt the manual NVIDIA driver installation again, making sure to select “Custom” and “Perform a clean installation.”
- Corrupted Download: Re-download the driver file; it might have been corrupted during the initial download.
- Windows Updates: Ensure your Windows operating system is fully updated before installing the driver.
2. Black Screen or No Display After Installation
- Wait: Sometimes the display driver takes a moment to initialize. Wait a minute or two.
- Reboot in Safe Mode: If the screen remains black, force shut down your PC (hold power button) and then restart it. If you get a display, quickly try to boot into Safe Mode (as described above).
- Use DDU in Safe Mode: Once in Safe Mode, use DDU to completely uninstall the problematic NVIDIA driver. Then, reboot and try installing an older, known-stable driver version (if the latest one is causing issues) or the latest driver again.
- Check Cables: Ensure your display cables (HDMI, DisplayPort) are securely connected to both your monitor and your GPU.
3. Performance Issues After Driver Update
- Roll Back Driver: If performance worsens immediately after an update, you can roll back to the previous driver.
- Open Device Manager.
- Expand “Display adapters,” right-click your NVIDIA GPU, and select “Properties.”
- Go to the “Driver” tab and click “Roll Back Driver.” If this option is grayed out, Windows hasn’t stored a previous version.
- Clean Installation: Use DDU to completely remove the current driver and perform a clean installation of the desired version (either the latest or an older stable one).
- Check Game Settings: Sometimes driver updates reset game graphics settings. Verify your in-game settings are still optimal.
Maintaining Your NVIDIA Drivers: Best Practices
Installing a driver is not a one-time event. To continually enjoy optimal performance and stability, ongoing maintenance is key.
Regular Updates
NVIDIA frequently releases new drivers. For gamers, “Game Ready Drivers” are often released in conjunction with major game launches, offering performance optimizations and bug fixes for those titles. For professionals, “Studio Drivers” prioritize stability and compatibility with creative applications.
- GeForce Experience: The easiest way to stay updated. GFE will notify you when new drivers are available.
- Manual Checks: Regularly visit the NVIDIA driver download page to check for new releases, especially if you encounter performance issues or new games/software are released.
Why Not Always Update Immediately?
While regular updates are good, there can be exceptions. Sometimes, a very new driver might introduce unforeseen bugs or conflicts with specific system configurations.
- Read Release Notes: Always check the driver’s release notes on NVIDIA’s website to see what changes, fixes, and known issues are included.
- Wait and See: If your system is stable and performing well, there’s no immediate rush to update the day a new driver drops. It’s often wise to wait a few days or a week to see if other users report widespread issues.
- Backups: Before any major update, creating a system restore point is a simple yet powerful safeguard.
The Power of a Clean Installation
As highlighted throughout this guide, performing a “clean installation” using either the Custom option in the NVIDIA installer or by using DDU is arguably the most important best practice. Over time, remnants of old drivers can accumulate, leading to conflicts and performance degradation. A clean installation ensures a fresh slate, maximizing compatibility and stability.
Conclusion
Mastering the art of NVIDIA driver installation is a fundamental skill for any PC user looking to extract the most performance and stability from their graphics card. From carefully identifying your GPU to understanding the nuances of clean installations and effective troubleshooting, each step contributes to a robust and reliable computing experience.
By consistently following the guidelines outlined in this comprehensive guide, you’ll ensure your NVIDIA GPU is always operating at its peak potential, delivering the high-fidelity visuals, smooth frame rates, and reliable performance you expect. Remember, the journey to a perfectly optimized PC begins with its drivers, and with this knowledge, you are well-equipped to keep your system at the forefront of technological performance. Happy computing!
aViewFromTheCave is a participant in the Amazon Services LLC Associates Program, an affiliate advertising program designed to provide a means for sites to earn advertising fees by advertising and linking to Amazon.com. Amazon, the Amazon logo, AmazonSupply, and the AmazonSupply logo are trademarks of Amazon.com, Inc. or its affiliates. As an Amazon Associate we earn affiliate commissions from qualifying purchases.