
In the intricate world of personal computing, where cutting-edge processors hum and powerful graphics cards render breathtaking visuals, there’s an unsung hero working tirelessly behind the scenes: the Power Supply Unit, or PSU. Often overlooked, frequently misunderstood, and rarely flaunted, the PSU is the literal heart of your system, delivering the lifeblood of electricity to every single component. Without a robust, reliable, and appropriately specced PSU, even the most formidable PC hardware is nothing more than an expensive paperweight.
Whether you’re an aspiring PC builder, an avid gamer planning an upgrade, a dedicated content creator pushing your rig to its limits, or simply troubleshooting an unexpected system shutdown, knowing the specifics of your PSU is paramount. It’s not just about curiosity; it’s about making informed decisions, ensuring system stability, and safeguarding your valuable components. From understanding its wattage to discerning its efficiency rating and even identifying its brand, every piece of information about your PSU equips you with crucial knowledge for future upgrades, efficient operation, and effective troubleshooting.
This comprehensive guide will walk you through various methods, both direct and indirect, to uncover the vital statistics of your Power Supply Unit. We’ll delve into why this knowledge is so important, linking it to performance, longevity, and even your wallet. So, let’s peel back the layers of your PC case and illuminate the often-hidden world of your power supply.
The Unsung Hero: Why Your PSU Matters More Than You Think
The PSU is far more than just a box that plugs into the wall. It’s a sophisticated piece of engineering responsible for converting alternating current (AC) from your wall outlet into direct current (DC) that your computer components can use, supplying the correct voltages and stable power delivery to everything from your motherboard and CPU to your graphics card and storage drives. Its importance cannot be overstated, touching upon critical aspects of your PC’s performance, longevity, and overall financial efficiency.
Powering Performance and Stability
Imagine trying to run a marathon on an inconsistent diet. Your performance would suffer, and you’d likely break down. Similarly, your PC components demand a consistent and clean power supply to operate at their peak. An underpowered or unreliable PSU can lead to a litany of problems: random crashes, system instability, inexplicable freezes, and even hardware damage. When your graphics card suddenly demands a surge of power during an intense gaming session, a quality PSU responds instantly, delivering precisely what’s needed without faltering. Conversely, a weak or aging PSU might sag under load, leading to performance drops, visual artifacts, or outright system restarts.
For those engaging in demanding tasks like video editing, 3D rendering, or competitive gaming, a stable power supply translates directly into uninterrupted workflow and consistent frame rates. It allows your high-end CPU and GPU to draw the power they need without bottlenecking or risking premature failure. In the realm of “Tech,” where innovation relentlessly pushes the boundaries of hardware capability, the PSU acts as the foundational pillar, ensuring that these advanced components can truly shine. Over time, consistent power delivery from a robust PSU also contributes significantly to the longevity of your other expensive components, preventing stress and wear that can lead to early failures.
The Efficiency Advantage: Saving Money and the Planet
Beyond raw power delivery, modern PSUs boast another crucial characteristic: efficiency. This is typically measured by the 80 Plus certification program, which grades PSUs based on how much AC power they draw from the wall is converted into usable DC power for your components, with the remainder lost as heat. Ratings range from 80 Plus Standard, Bronze, Silver, Gold, Platinum, to Titanium, with each step representing a higher percentage of efficiency. For instance, an 80 Plus Gold PSU is certified to be at least 87% efficient at 20% load, 90% at 50% load, and 87% at 100% load.
Why does this matter? It’s a direct link to the “Money” aspect of your computing experience. A more efficient PSU wastes less energy as heat, meaning it draws less power from your wall outlet to deliver the same amount of usable power to your components. Over the lifespan of your PC, especially for systems that run for many hours a day, the savings on your electricity bill can be substantial. While a higher-rated PSU often comes with a higher initial price tag, the long-term energy cost savings can easily offset this investment, turning it into a smart financial decision. Furthermore, by reducing energy waste, you’re also contributing to a smaller carbon footprint, aligning with broader environmental awareness in technology. This focus on efficiency is a prime example of how smart hardware choices can impact both your personal finance and the planet.
Brand Matters: Trusting Your Power Source
Just as you wouldn’t trust a no-name brand with your financial investments or your personal safety, the “Brand” of your PSU should be a significant consideration. The market is flooded with power supplies, but not all are created equal. Reputable manufacturers like Corsair, EVGA, Seasonic, Cooler Master, be quiet!, and XFX have built their corporate identity and reputation on consistent quality, rigorous testing, and robust warranty policies. These brands invest heavily in high-quality internal components, superior circuit design, and effective cooling solutions, all of which contribute to the longevity, stability, and safety of their PSUs.
Opting for a well-regarded brand isn’t just about paying for a label; it’s about investing in peace of mind. A cheap, unbranded, or poorly reviewed PSU can be a ticking time bomb, risking not only its own failure but also taking out other expensive components in your system due to unstable voltage, overcurrents, or short circuits. Case studies of such failures are abundant in tech forums, highlighting the devastating consequences of skimping on this critical component. A strong brand also implies better customer support and warranty service, which can be invaluable if you ever encounter an issue. In essence, a PSU from a trusted brand reflects a strategic choice to protect your “investment” in your PC, emphasizing the importance of corporate identity and reputation in the highly competitive tech market.
Direct Methods: Getting Up Close and Personal with Your PSU
The most reliable way to ascertain the specifications of your PSU is to physically inspect it. While this might sound intimidating to some, it’s a straightforward process that requires minimal tools and a healthy respect for electrical safety. This direct approach offers unequivocal data, leaving no room for guesswork or software-based inaccuracies.
Method 1: The Case Window Glimpse (If Applicable)
Modern PC cases often feature tempered glass or acrylic side panels, offering a tantalizing view into the system’s internals. If your case has such a window and your PSU is mounted in a visible orientation (often with its label facing the side panel or downwards through a cutout), you might be able to read some of the crucial information without even opening the case fully.
Carefully peer through the window. Look for a sticker or label on the side of the PSU. This label is where manufacturers list all the vital statistics. You’re primarily looking for:
- Wattage (W): This is usually the largest number, e.g., 650W, 750W.
- 80 Plus Rating: Indicated by a badge (Bronze, Gold, Platinum, etc.).
- Brand and Model Name: Often clearly displayed.
If you can clearly read these details, take a photo for your records. This is the quickest and least invasive direct method. However, due to PSU mounting orientations or limited visibility, this isn’t always possible, necessitating a more thorough physical inspection.
Method 2: The Full Physical Inspection (The Most Reliable Way)
This is the definitive method, guaranteeing you access to all the information printed on your PSU’s label. It involves opening your PC case, which, while simple, requires adherence to basic safety protocols to protect both yourself and your hardware.
Safety First: Preparation and Precautions
Before you touch anything inside your PC, remember the “Digital Security” principle – protecting your hardware from electrical hazards is paramount.
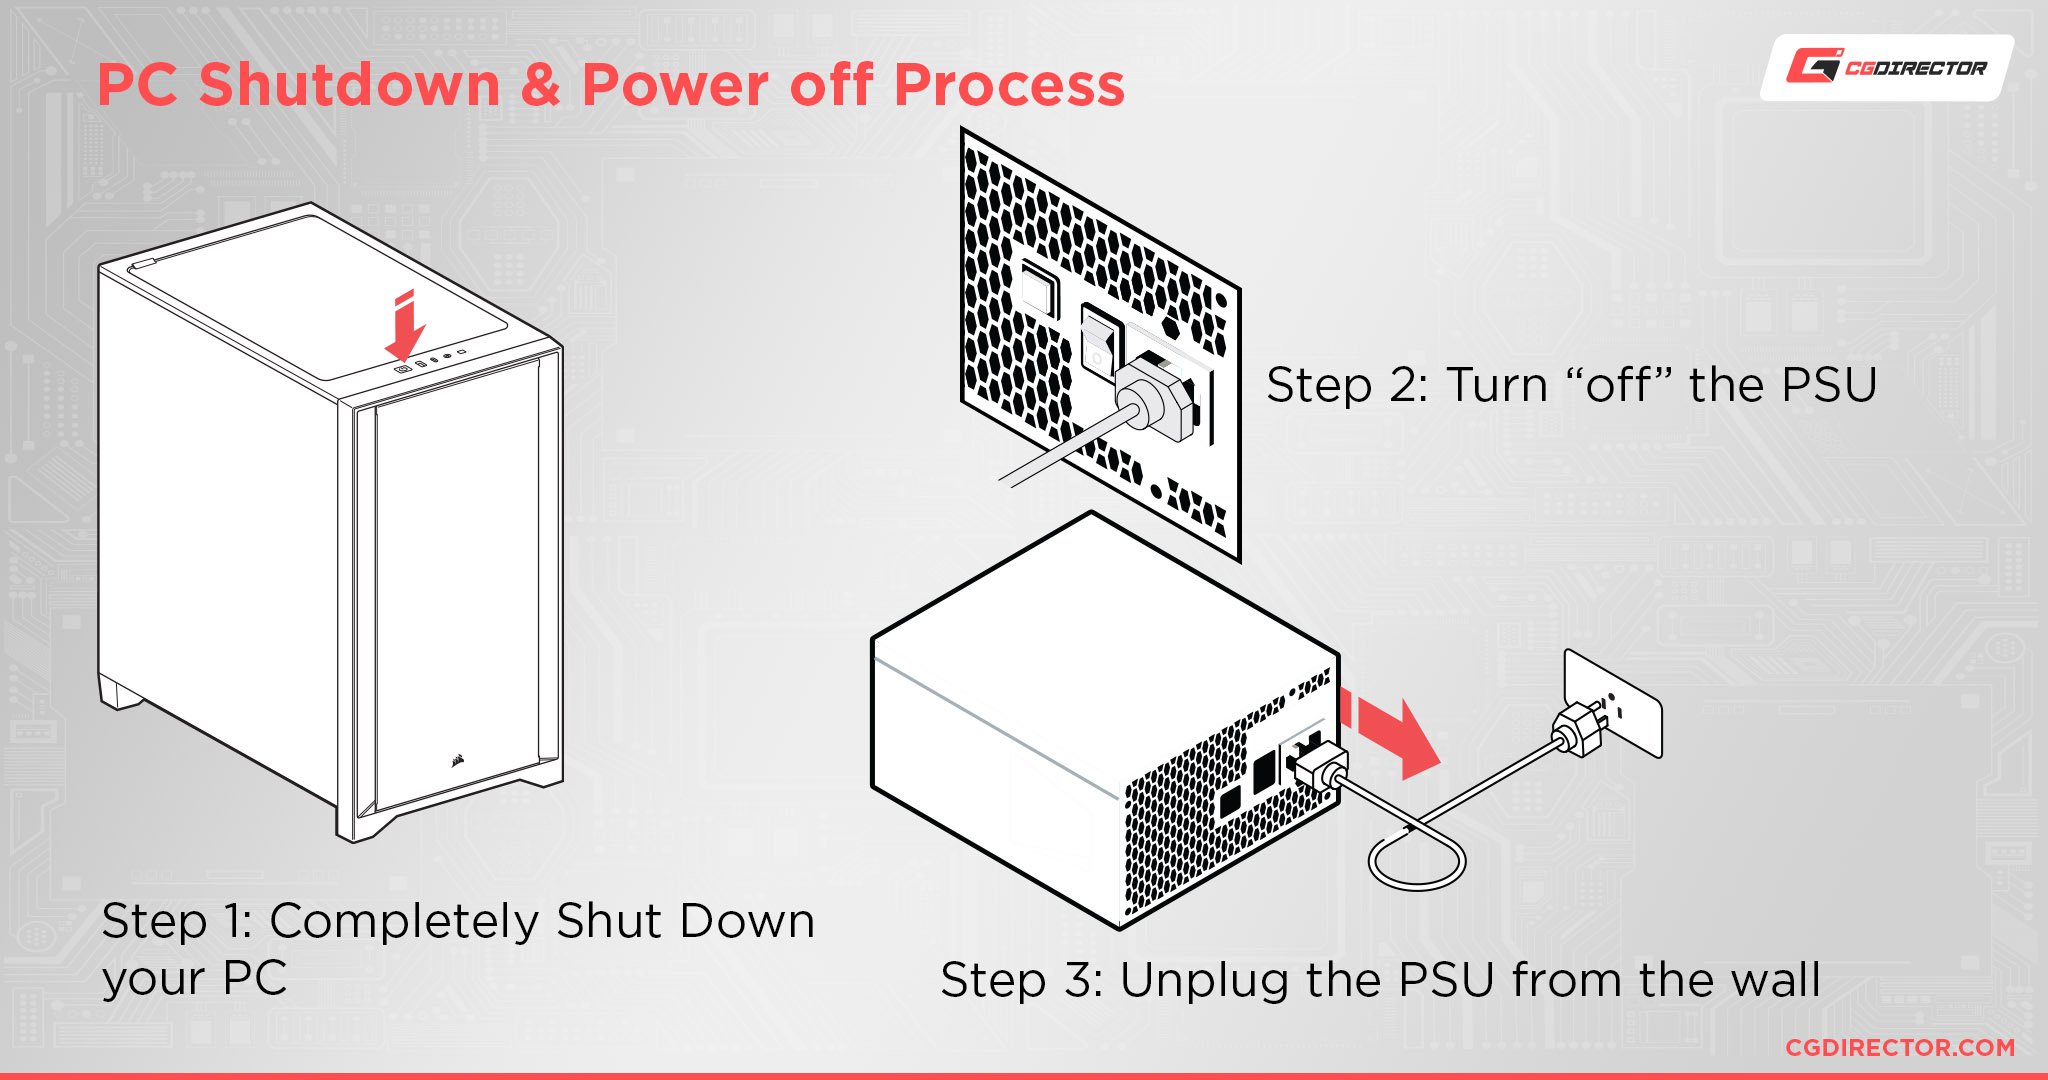
- Power Down and Unplug: Completely shut down your computer. Unplug the main power cable from the back of the PSU and from the wall outlet.
- Discharge Residual Power: Press and hold the power button on your PC for 10-15 seconds. This helps discharge any residual power stored in the capacitors of the PSU and motherboard.
- Ground Yourself: Static electricity can severely damage PC components. Wear an anti-static wrist strap connected to a grounded metal object (like your PC case’s metal frame, once opened and unplugged) or frequently touch a bare metal part of your case. Avoid working on carpeted floors.
- Gather Tools: You’ll typically only need a Phillips head screwdriver.
Opening the PC Case and Locating the PSU
With safety measures in place:
- Remove the Side Panel: Most cases have thumbscrews or standard screws at the back holding the side panel in place. Remove these and carefully slide or swing open the panel. The side panel that grants access to the main components (motherboard, GPU) is usually the one you need to open.
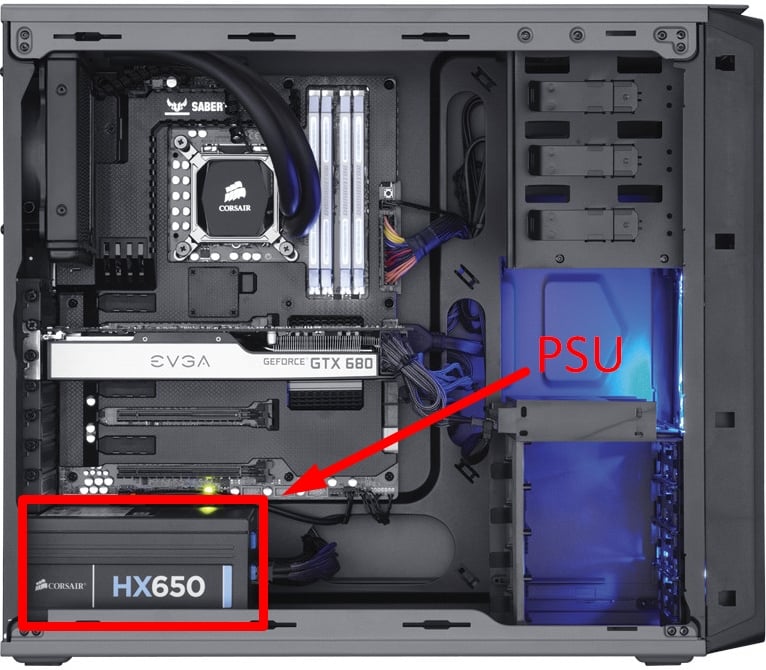
- Locate the PSU: The PSU is typically a rectangular metal box, often located at the bottom rear of the case, or sometimes at the top rear in older or more budget-oriented cases. It will have a large bundle of cables emerging from it, connecting to various components.
Identifying Key Information from the PSU Label
Once you’ve located the PSU, you’ll need to find the label. This label is usually on one of its larger flat sides. You might need to gently manipulate some cables or even partially unscrew the PSU from its mounting bracket to rotate it slightly for better visibility (though often this isn’t necessary).
The label will contain a wealth of information:
- Brand Name: (e.g., Corsair, EVGA, Seasonic)
- Model Name/Number: (e.g., RM750x, SuperNOVA 750 G3)
- Maximum Wattage (Total Power): This is the most crucial number, typically prominently displayed (e.g., 750W).
- 80 Plus Certification: Look for the 80 Plus badge (Bronze, Gold, Platinum, Titanium).
- Amperage on +12V Rail(s): This specifies how much power your PSU can deliver to power-hungry components like your CPU and GPU. Modern PSUs usually have a single, strong +12V rail. The total wattage on this rail should ideally be very close to the PSU’s total rated wattage.
- Input Voltage/Frequency: (e.g., 100-240V, 50-60Hz) – important for international travel but less so for typical usage.
- Safety Certifications: Various stamps indicating compliance with electrical safety standards.
Checking Connectors
While you’re inside, take note of the types and number of connectors available. This is vital for future upgrades:
- 24-pin ATX: Powers the motherboard (standard).
- 4+4-pin EPS (CPU Power): Powers the CPU (one or two usually).
- 6+2-pin PCIe: Powers graphics cards (check how many you have and their configuration).
- SATA Power: Powers SSDs, HDDs, and optical drives.
- Molex: Older peripheral power connector, still used for some fans or legacy devices.
Method 3: Documenting Your Findings
Once you have identified all the relevant information, meticulously document it. Take clear photographs of the PSU label from multiple angles. Write down the Brand, Model, Wattage, and 80 Plus rating in a text file or notebook. This information is your digital asset for future reference, saving you the hassle of opening your PC again. This practice aligns with “Productivity” principles, creating an accessible record for future maintenance or upgrade planning.
Indirect Methods: When Physical Access is Limited
Sometimes, a full physical inspection isn’t feasible or desirable. Perhaps your PC is a pre-built system with a warranty seal you don’t want to break, or it’s simply too much hassle. While less definitive than direct inspection, there are several indirect methods that can offer clues or estimations about your PSU.
Method 1: Checking Your PC’s Purchase History or Documentation
This is often the best indirect method, especially for pre-built systems or custom PCs where you kept meticulous records.
- Original Purchase Invoice/Receipt: Many retailers list detailed component specifications on their invoices. If you bought a pre-built PC, the PSU’s brand and wattage are frequently included.
- System Builder Documentation: If you had a custom PC built, the builder often provides a spec sheet or component list.
- Online Order History: Check your order history on retailer websites (Amazon, Newegg, Best Buy, Dell, HP, etc.). Many online orders retain detailed product descriptions.
- OEM Support Websites: For brands like Dell, HP, Acer, or Lenovo, entering your service tag or serial number on their support website can often pull up the original specifications for your model, including the PSU.
This method links directly to “Money” and “Business Finance” – retaining purchase records is a sound financial practice that extends beyond tax purposes to practical utility like identifying your PSU.
Method 2: System Information Tools (With Caveats)
While there isn’t a magical software tool that can directly “read” your PSU’s wattage or efficiency rating (as PSUs don’t typically report this data digitally), some system information utilities can provide indirect clues, especially in pre-built systems. These tools are part of the broader “Tech” category focusing on software and apps for system monitoring.
- System Information in Windows: Typing “msinfo32” in the Run dialog opens the System Information utility. While it lists many hardware components, PSU details are almost never included here.
- Third-Party System Information Software: Programs like Speccy, HWiNFO, or CPU-Z are excellent for identifying components like your CPU, GPU, RAM, and motherboard. In rare cases, for some pre-built PCs, they might display a generic PSU wattage if the OEM has integrated a specific power management chip that reports this to the system. However, this is the exception, not the rule. Generally, these tools will not tell you your PSU’s specific model or wattage.
- Windows Event Viewer: For troubleshooting, if your PC is experiencing power-related issues, the Event Viewer (accessible by searching “Event Viewer” in Windows) might log critical errors related to power management (Event ID 41 “Kernel-Power” is common for unexpected shutdowns). While it won’t tell you your PSU’s wattage, it can confirm if power delivery is a suspect, guiding you towards physical inspection.
It’s crucial to manage expectations here: software primarily reports what the operating system can detect or what specific sensors communicate. PSUs are generally passive components in this regard, with their crucial information physically printed on their label.
Method 3: Online Calculators and Estimators
If you know your major components (CPU, GPU, RAM, storage drives), online PSU wattage calculators can help you estimate the recommended wattage for your system. While this doesn’t tell you what PSU you currently have, it can be immensely useful for:
- Validating a known PSU: If you have partial information (e.g., you know it’s a 750W PSU but not the brand), these calculators can help you determine if 750W is sufficient for your current or planned components.
- Planning upgrades: If you’re considering a new, more powerful graphics card, these tools can tell you if your existing PSU will be able to handle the increased power draw, thus avoiding a costly mistake.
Popular PSU calculators include those from OuterVision (Extreme Power Supply Calculator), PCPartPicker, and various PSU manufacturers (e.g., Cooler Master, Seasonic). You simply input your CPU model, GPU model, number of RAM sticks, storage drives, and any other peripherals, and the calculator provides an estimated total power consumption and a recommended PSU wattage. This “Tech” tool becomes a “Financial Tool” when it helps you prevent unnecessary purchases or component damage, thereby optimizing your “Money” spent on upgrades.
What to Do with Your PSU Information
Now that you’ve successfully identified the brand, model, wattage, and efficiency rating of your Power Supply Unit, what’s next? This knowledge is a powerful asset that enables you to make smarter decisions about your PC, impacting everything from performance and troubleshooting to future investments.
Planning Future Upgrades
This is arguably the most common reason for checking your PSU. The graphics card is often the most power-hungry component in a gaming or workstation PC, and a new, more powerful GPU almost invariably demands more wattage. Similarly, upgrading to a higher-end CPU can also increase power draw.
Knowing your PSU’s exact wattage allows you to:
- Assess Compatibility: Before buying a new GPU or CPU, check its manufacturer’s recommended PSU wattage. If your current PSU is below that recommendation, you know you’ll need to factor in the cost of a new PSU, saving you from a frustrating situation of buying a component that won’t run.
- Avoid Bottlenecks: An underpowered PSU can effectively “bottleneck” your new, powerful components, preventing them from reaching their full potential.
- Optimize Investment: Investing in a sufficiently powerful and efficient PSU from a reputable brand (as discussed under “Brand”) ensures that your other expensive components receive stable power, maximizing their lifespan and performance, thus protecting your “Investment” in your PC. This proactive approach saves “Money” in the long run by preventing component failure and ensuring optimal performance from your upgrades.
Troubleshooting Power Issues
If your PC is experiencing random shutdowns, reboots, or crashes under load, your PSU is a prime suspect. With its specifications at hand, you can effectively diagnose potential issues:
- Is it Underpowered? Compare your PSU’s wattage to the combined power requirements of your current components. If you’ve added new hardware without upgrading the PSU, it might simply be unable to keep up.
- Is it Failing? Older PSUs can degrade over time, losing efficiency and stability. Knowing its age and original specifications can help you determine if it’s time for a replacement.
- Checking Connections: While troubleshooting, ensure all cables are securely connected. Knowing the correct connector types (e.g., 6+2 pin PCIe for GPUs) ensures everything is hooked up correctly.
This diagnostic capability transforms a potentially frustrating “Tech” problem into a manageable task, enhancing your “Productivity” by minimizing downtime.
Maximizing Efficiency and Longevity
Beyond upgrades and troubleshooting, simply being aware of your PSU’s efficiency rating can guide decisions about energy consumption.
- Energy Consumption Awareness: A lower 80 Plus rating means more wasted energy and higher electricity bills. If you find your PSU is an old, inefficient model, considering an upgrade to an 80 Plus Gold or Platinum unit could be a smart “Personal Finance” move, leading to significant savings over its lifespan.
- Component Protection: As highlighted earlier, a stable and reliable power supply is crucial for the longevity of all your PC components. Knowing you have a quality, appropriately specced PSU offers reassurance that your motherboard, CPU, GPU, and storage drives are receiving the clean, consistent power they need to operate for years to come. This aligns with the “Investment” aspect of owning a PC – protecting your assets.
Conclusion
The Power Supply Unit, while often out of sight and out of mind, is undeniably one of the most vital components in any PC. Understanding “How to Check What PSU You Have” is not merely a technical exercise; it’s an empowering piece of knowledge that informs intelligent decision-making across the spectrum of your computing experience. From optimizing “Tech” performance and planning seamless upgrades to safeguarding your valuable hardware and managing your “Money” through energy efficiency, the humble PSU plays a central role.
By utilizing the direct physical inspection methods, bolstered by indirect checks through documentation and online tools, you can confidently uncover the crucial specifications of your power supply. This newfound understanding will allow you to plan your next GPU upgrade with precision, troubleshoot system instabilities with confidence, and make financially savvy choices that save you money on electricity bills and extend the life of your entire system. So, take the time to know your PSU – your PC, and your wallet, will thank you for it.
aViewFromTheCave is a participant in the Amazon Services LLC Associates Program, an affiliate advertising program designed to provide a means for sites to earn advertising fees by advertising and linking to Amazon.com. Amazon, the Amazon logo, AmazonSupply, and the AmazonSupply logo are trademarks of Amazon.com, Inc. or its affiliates. As an Amazon Associate we earn affiliate commissions from qualifying purchases.