In the vast landscape of digital expression, fonts are more than just mere characters on a screen or page; they are the silent communicators of tone, style, and identity. Whether you’re a professional designer crafting a brand’s visual language, a student preparing a presentation, a blogger curating your site’s aesthetic, or simply someone looking to personalize their digital experience, mastering the art of installing new fonts is an indispensable skill. This comprehensive guide will walk you through the process, demystifying the technicalities and empowering you to infuse new life into your projects across various operating systems.
At its core, installing a font is a fundamental “Tech” skill that unlocks a world of creative possibilities. It directly impacts “Brand” identity, allowing individuals and businesses to forge a unique visual signature that stands out in a crowded digital marketplace. From enhancing readability to evoking specific emotions, the right typeface can make all the difference, transforming mundane text into engaging content. Let’s delve into how you can expand your typographic toolkit and elevate your digital presence.
Why Custom Fonts Matter: More Than Just Aesthetics
The choice of font might seem like a minor detail, but its impact on communication and perception is profound. Default system fonts, while reliable, often lack the distinctiveness needed for projects that aim to capture attention or convey a specific brand message. Custom fonts offer a pathway to originality, allowing you to tailor your visual output to perfectly match your intent.
Elevating Your Personal and Corporate Brand Identity
In the realm of “Brand” strategy, consistency and distinctiveness are paramount. A unique font can become an integral part of your personal or corporate identity, instantly recognizable and deeply impactful. Think about iconic brands – their logos and marketing materials often feature custom or carefully selected typefaces that are synonymous with their image. For entrepreneurs, small businesses, or freelancers, investing time in selecting and installing a unique font set is akin to curating a distinct wardrobe; it signals professionalism, attention to detail, and a unique personality.
For “Personal Branding,” a consistent font across your resume, portfolio, social media graphics, and website creates a cohesive and professional image that sets you apart. It tells your audience that you are intentional about your presentation. In the corporate world, a well-chosen font reinforces brand values, improves recognition, and contributes to a unified corporate identity that resonates across all communication channels, from marketing campaigns to internal documents. It’s an investment in your visual equity, subtly influencing how your brand is perceived and remembered. This thoughtful approach to design assets can even indirectly impact “Money” aspects, as a stronger brand often translates to better market positioning and client attraction.
Boosting Productivity and Visual Communication
Beyond aesthetics, custom fonts can significantly enhance “Productivity” and the effectiveness of “Visual Communication.” Specialized fonts can improve readability for specific contexts, such as coding fonts designed for clarity in programming environments, or display fonts crafted to make headlines pop. For content creators, educators, or anyone producing documents, presentations, or digital art, having a diverse font library means less time struggling with generic options and more time focusing on conveying your message with precision and impact.
Imagine creating a marketing flyer that needs to convey both trustworthiness and innovation. A carefully chosen font can do this almost instantly, allowing you to communicate complex ideas and emotions without relying solely on imagery. This efficiency in communication is a direct boost to productivity, as your message is understood faster and with greater clarity. Furthermore, for design-focused roles or “Side Hustles” involving graphic design, a rich font collection is a professional asset that expands your creative toolkit and service offerings.
Preparing for Installation: Understanding Font Types and Sources
Before you dive into the installation process, it’s crucial to understand the different types of font files you’ll encounter and where to safely acquire them. This foundational knowledge ensures compatibility, security, and the best possible typographic results.
Decoding Font File Formats: TTF, OTF, WOFF, and More
The world of digital typography is home to several file formats, each with its own characteristics and uses. Understanding them will save you headaches and ensure your fonts work correctly across various platforms and applications. This is a core “Tech” insight for anyone working with digital assets.
- TrueType Font (TTF): Developed by Apple and Microsoft, TTF is one of the oldest and most common font formats. It contains both screen and print font data in a single file, making it highly versatile and widely supported across all major operating systems (Windows, macOS, Linux). Most free fonts you’ll download will likely be in TTF format.
- OpenType Font (OTF): A more advanced format developed jointly by Microsoft and Adobe, OTF builds upon TTF. It offers greater typographic sophistication, including support for more characters, ligatures, small caps, old-style figures, and other advanced features (like contextual alternates) that designers often crave. OTF fonts are generally preferred for professional design work due to their flexibility and broader character sets. Like TTF, they are cross-platform compatible.
- Web Open Font Format (WOFF & WOFF2): These formats are specifically designed for web use. WOFF (and its successor, WOFF2) are essentially OpenType or TrueType fonts with compression and additional metadata, optimized for faster loading times on websites. While crucial for web developers building beautiful and branded websites, you typically won’t install these directly onto your operating system for desktop application use. However, if you are dabbling in “Online Income” through web design, knowing these is essential.
- SVG Fonts: Scalable Vector Graphics fonts were also used for web embedding, especially by older browsers, but they are largely deprecated in favor of WOFF/WOFF2 due to file size and rendering limitations.
- EOT Fonts: Embedded OpenType fonts are a proprietary Microsoft format for web pages, primarily for Internet Explorer compatibility. Less relevant now.
For desktop installation, you’ll primarily be working with .ttf and .otf files. When downloading fonts, ensure you’re getting one of these formats for seamless integration with your operating system and applications.
Where to Discover Your Next Favorite Font: Free vs. Premium Options
The quest for the perfect font often begins with knowing where to look. Both free and premium options abound, each catering to different needs and budgets. This ties into “Money” considerations, as choosing between free and paid fonts can impact your project costs.
Free Font Sources:
Many designers and enthusiasts generously share their creations for free, making them ideal for personal projects or budget-conscious endeavors. However, always check the license terms (e.g., personal use only, commercial use allowed with attribution) to ensure you’re using them legally, especially if the project is related to your “Brand” or “Online Income.”
- Google Fonts: An absolute powerhouse for free, high-quality, and open-source fonts. All fonts on Google Fonts are licensed for both personal and commercial use, making it a safe and popular choice. They are also optimized for web performance, which is a bonus if you’re working on a website.
- DaFont: A massive archive of shareware, freeware, and public domain fonts. It’s excellent for finding unique and quirky fonts but be diligent in checking the licensing information for each font.
- Font Squirrel: Specializes in high-quality, hand-picked commercial-use fonts that are 100% free. They also offer a handy “Webfont Generator” tool.
- 1001 Free Fonts: Similar to DaFont, offering a wide array of free fonts, but again, always verify the license.
Premium Font Sources:
For professional projects, unique brand identities, or specific typographic features, premium (paid) fonts are often the way to go. These fonts typically come with more robust character sets, multiple weights and styles (font families), and dedicated support from their creators.
- Adobe Fonts (included with Creative Cloud subscriptions): If you’re an Adobe Creative Cloud subscriber, you have access to thousands of high-quality fonts for desktop and web use, all included in your subscription. This is a fantastic value for designers.
- MyFonts: One of the largest online retailers of professional fonts, featuring creations from countless foundries. Excellent for finding high-quality typefaces with comprehensive licensing options.
- Fontspring: Known for its clear and straightforward licensing, often offering “unlimited web use” and simple desktop licenses.
- Creative Market / Etsy: These marketplaces offer unique fonts from independent designers. You can find very distinctive options here, often at competitive prices, especially if you’re looking for something that aligns with a specific “Brand” aesthetic.
When choosing between free and premium, consider the project’s scope, budget, and the desired level of professionalism and uniqueness. For critical “Brand” assets, investing in a premium font can often be a wise “Money” decision.
Step-by-Step Installation Guides Across Major Operating Systems
Once you’ve acquired your desired font files, the installation process is relatively straightforward. While the core principle is the same – placing the font files in a location where your operating system can access them – the exact steps vary slightly depending on your OS. This is where the practical “Tech” tutorial aspects come into play.
Installing Fonts on Windows
Windows offers a few simple methods for installing TrueType (.ttf) and OpenType (.otf) fonts. These methods are compatible with Windows 11, 10, 8, and 7.
-
Direct Installation (Recommended for Single/Few Fonts):
- Locate your font file(s): Navigate to the folder where you’ve downloaded or extracted your font file(s). You’ll typically see files ending in
.ttfor.otf. - Preview the font (Optional): Double-click the font file. A window will open, displaying a preview of the font and its characteristics.
- Install: In the preview window, click the “Install” button. Alternatively, you can simply right-click the font file(s) directly in File Explorer and select “Install.” If you’re installing multiple fonts, you can select them all and right-click to install.
- Administrator Privileges: You might be prompted for administrator permission. Click “Yes” to proceed.
- Font Installed: The font will be installed and ready for use in your applications.
- Locate your font file(s): Navigate to the folder where you’ve downloaded or extracted your font file(s). You’ll typically see files ending in
-
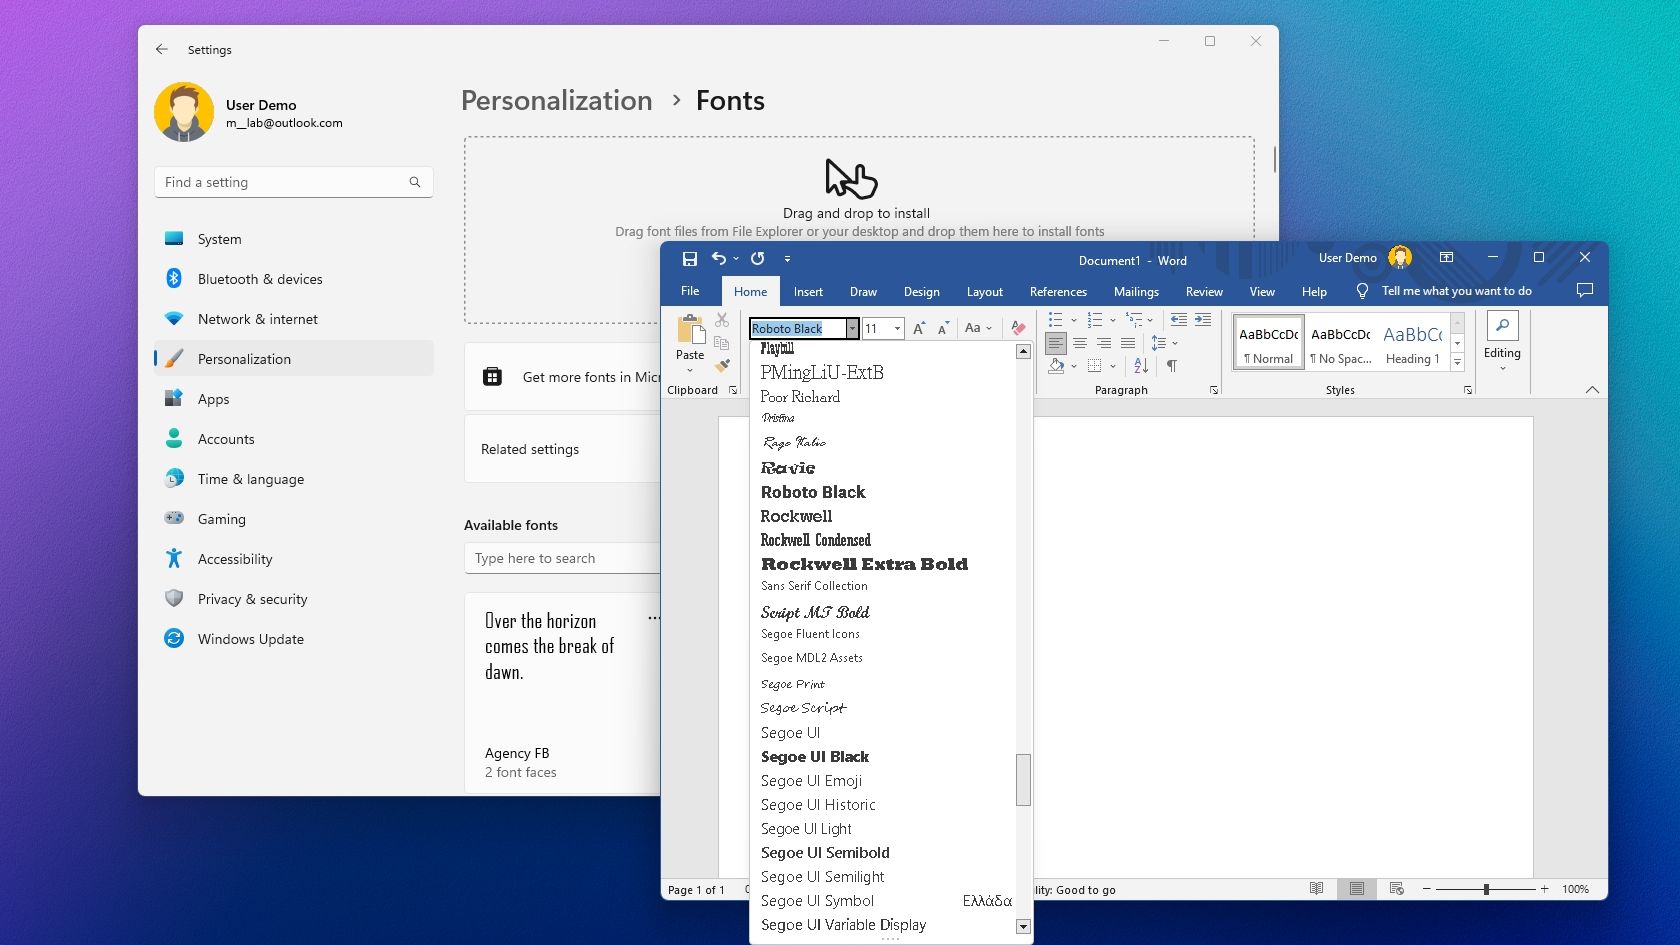
Using Windows Settings / Control Panel (For Managing Many Fonts):
- Open Settings (Windows 10/11): Go to
Start > Settings > Personalization > Fonts. - Drag and Drop: In the “Fonts” settings, you’ll see a section that says “Drag and drop to install.” Simply drag your
.ttfor.otffont file(s) from File Explorer into this area. - Using Control Panel (Older Windows or alternative): For older Windows versions or an alternative route, go to
Control Panel > Appearance and Personalization > Fonts. You can then drag and drop font files into this folder, or go toFile > Install New Font(if available) and navigate to your font’s location.
- Open Settings (Windows 10/11): Go to
After installation, close and reopen any applications (like Word, Photoshop, etc.) where you wish to use the new font. This allows the application to refresh its font list and recognize the newly added typeface.
Installing Fonts on macOS
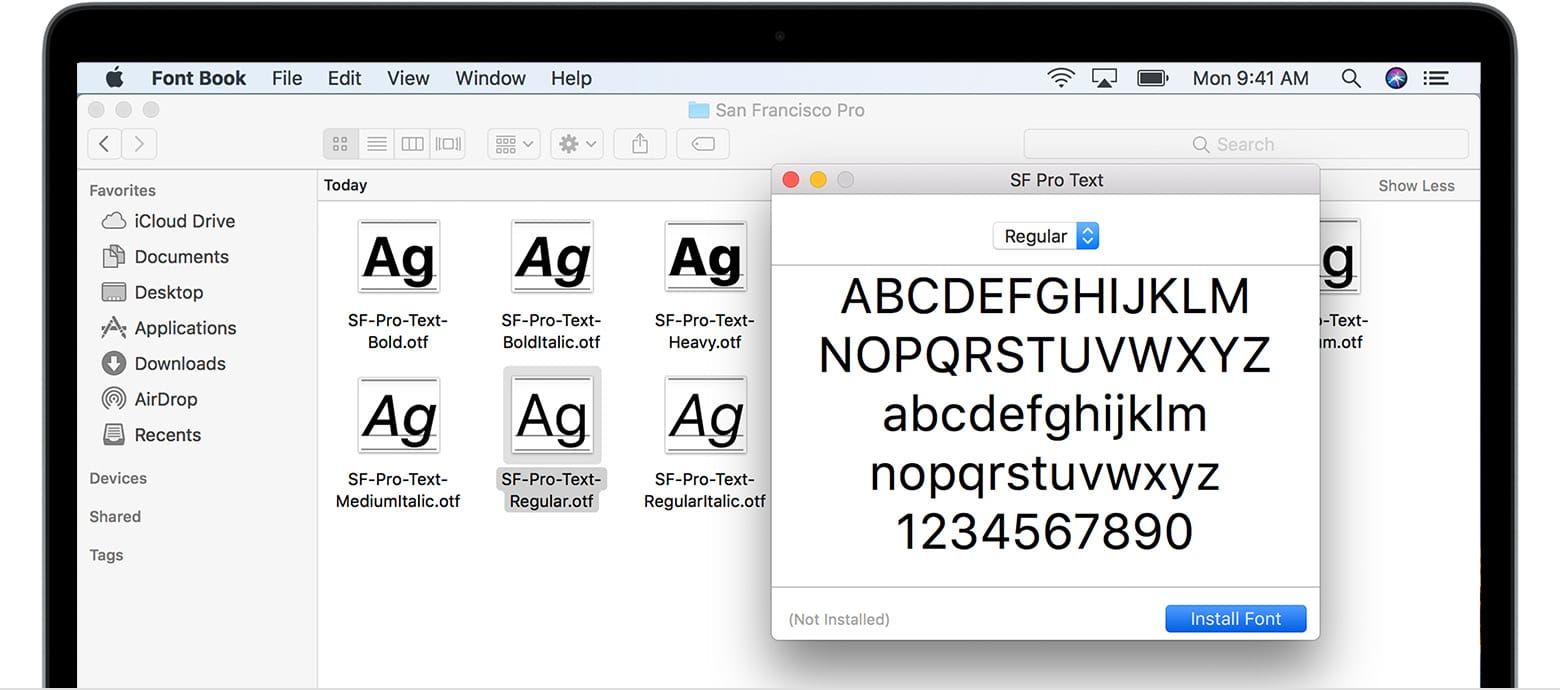
macOS simplifies font management through its built-in application, Font Book.
- Locate your font file(s): Find your downloaded or extracted
.ttfor.otffont file(s) in Finder. - Open with Font Book: Double-click the font file. It will automatically open in the Font Book application, displaying a preview.
- Install: In the Font Book preview window, click the “Install Font” button.
- Validate and Install: Font Book will quickly validate the font for any errors. If issues are found, it will notify you, but generally, it proceeds to install.
- Font Installed: The font is now available across all your macOS applications.
Alternatively (Drag and Drop):
You can also drag and drop font files directly into the Font Book application icon in your Dock or Applications folder. Font Book will then prompt you to install them. For system-wide availability, ensure the font is installed for “All Users” (if the option is presented) in Font Book’s preferences.
Similar to Windows, always restart applications to ensure they recognize the newly installed fonts.
Installing Fonts on Linux
Linux offers more flexibility, but the methods can vary slightly depending on your distribution and desktop environment (e.g., GNOME, KDE, XFCE). The two primary methods involve a graphical interface or manual installation.
-
Graphical Installation (Easier for most users):
- Locate your font file(s): Navigate to your downloaded
.ttfor.otffont file(s) in your file manager (e.g., Nautilus for GNOME, Dolphin for KDE). - Open Font Viewer: Double-click the font file. Most Linux distributions will open it in a Font Viewer application.
- Install: In the Font Viewer, you should see an “Install” or “Install Font” button. Click it.
- Authentication: You might be prompted for your user password for authentication.
- Font Installed: The font will be installed into your personal font directory (
~/.local/share/fonts/or~/.fonts/), making it available for applications.
- Locate your font file(s): Navigate to your downloaded
-
Manual Installation (For advanced users or system-wide fonts):
- Create a Fonts Directory (if it doesn’t exist): Open a terminal and type:
mkdir -p ~/.local/share/fonts/(This creates a hidden.local/share/fontsdirectory in your home folder for personal fonts). For system-wide installation (available to all users), you’d move fonts to/usr/local/share/fonts/, which requiressudoprivileges. - Copy the Font Files: Copy your
.ttfor.otffiles into the newly created or existing font directory.- For personal fonts:
cp /path/to/your/font.ttf ~/.local/share/fonts/ - For system-wide fonts:
sudo cp /path/to/your/font.ttf /usr/local/share/fonts/
- For personal fonts:
- Update Font Cache: After copying, it’s good practice to update the font cache so the system recognizes the new fonts immediately. In the terminal, run:
fc-cache -fv - Font Installed: The font is now available.
- Create a Fonts Directory (if it doesn’t exist): Open a terminal and type:
Remember to restart any open applications to see the new fonts in their menus.
Leveraging Your New Fonts and Troubleshooting Common Issues
With your new fonts successfully installed, the next step is to put them to good use. However, sometimes things don’t go as smoothly as planned. Knowing how to troubleshoot common issues and adopting best practices for font management will ensure a seamless experience.
Integrating Fonts into Your Favorite Applications
Once installed, your new fonts should automatically appear in the font menus of most applications that support custom typefaces. This includes:
- Microsoft Office Suite: Word, PowerPoint, Excel, Outlook.
- Adobe Creative Cloud: Photoshop, Illustrator, InDesign, Premiere Pro.
- Other Design Software: GIMP, Inkscape, CorelDRAW, Affinity Designer/Photo/Publisher.
- Web Browsers: While not directly used in the browser’s interface, web fonts (WOFF/WOFF2) are crucial for “Branded” websites you design or develop.
- Productivity Apps: Google Docs (via Google Fonts or extensions), many text editors.
To use them, simply select the text you wish to format and choose your new font from the font dropdown menu. Experiment with different fonts to see how they impact the overall feel and readability of your content. This creative exploration is key to developing your unique “Brand” aesthetic.
When Things Go Wrong: Common Troubleshooting Tips
Even with careful installation, you might encounter issues. Here’s how to tackle the most common problems:
-
Font Not Appearing in Application:
- Restart Applications: This is the most common fix. Applications often load their font lists when they start.
- Restart Your Computer: A full system restart can resolve deeper caching issues.
- Check Installation Location: Ensure the font file was installed in the correct system or user-specific font directory.
- Verify File Type: Make sure it’s a
.ttfor.otffile for desktop use. - Corrupt File: Try re-downloading the font. Sometimes files can be corrupted during download.
-
Font Appears, But Text is Garbled or Missing Characters:
- Incomplete Font: Some free fonts might have limited character sets, especially for non-Latin alphabets or special symbols.
- Corrupt Font File: Again, try re-downloading.
- Software Compatibility: Very rarely, an application might have trouble rendering a specific font. Try it in another application to confirm.
-
Duplicate Fonts:
- Manage with Font Book (macOS) / Settings (Windows): Both operating systems have tools to identify and resolve duplicate fonts. Font Book, for example, will flag duplicates and allow you to disable or remove older versions. Managing duplicates helps avoid conflicts and performance issues.
-
Permissions Issues (Linux):
- If you manually installed fonts, ensure the file permissions are correct.
chmod 644 /path/to/font.ttfandchmod 755 /path/to/font_directorycan help.
- If you manually installed fonts, ensure the file permissions are correct.
Addressing these “Tech” issues promptly ensures your creative flow isn’t interrupted.
Best Practices for Font Management and Ethical Use
Effective font management is crucial for maintaining system performance and ensuring you comply with licensing agreements.
- Don’t Over-Install: While tempting to install every cool font you find, a massive font library can slow down your system and applications. Install only the fonts you regularly use. Utilize font managers (like Font Base, Typeface, RightFont) to organize and activate fonts only when needed. This is a “Productivity” tip that saves resources.
- Organize Your Font Files: Keep your downloaded font files organized in a dedicated folder on your hard drive. This makes it easy to back them up or reinstall them if needed.
- Understand Licensing: This is paramount, especially if you’re using fonts for “Brand” projects or any “Online Income” generation.
- Personal Use vs. Commercial Use: Many free fonts are only free for personal projects. If you’re using a font for a client, a business logo, a website for profit, or any commercial endeavor, you must ensure the license permits commercial use.
- Web Use vs. Desktop Use: Some licenses differentiate between these. A desktop license might not cover embedding the font on a website.
- Number of Users: For premium fonts, licenses often specify the number of users who can install the font.
- Check Readme Files: Always read the
readme.txtorlicense.txtfile that comes with downloaded fonts. When in doubt, contact the font creator or foundry. Misusing a font license can lead to legal issues.
By adhering to these best practices, you not only maintain a clean and efficient digital environment but also uphold ethical standards in your creative and business endeavors, protecting both your “Brand” and “Money.”

Conclusion
The ability to install new fonts is a foundational skill that opens up a universe of creative possibilities, fundamentally impacting your digital “Tech” experience and strengthening your “Brand” identity. From selecting the perfect typeface to understanding file formats and navigating operating system specifics, this guide has equipped you with the knowledge to personalize your digital canvas.
Whether you’re aiming to refine your personal brand, elevate a corporate identity, or simply inject fresh creativity into your everyday documents, the right font is a powerful tool. By conscientiously managing your font library and respecting licensing agreements, you ensure a productive, ethical, and aesthetically pleasing digital workflow. So go forth, explore the endless world of typography, and let your text speak volumes with style and purpose!
aViewFromTheCave is a participant in the Amazon Services LLC Associates Program, an affiliate advertising program designed to provide a means for sites to earn advertising fees by advertising and linking to Amazon.com. Amazon, the Amazon logo, AmazonSupply, and the AmazonSupply logo are trademarks of Amazon.com, Inc. or its affiliates. As an Amazon Associate we earn affiliate commissions from qualifying purchases.