
Minecraft, at its core, is a game of boundless creativity and exploration. Yet, for many players, the vanilla experience, while charming, merely scratches the surface of what the game can truly offer. This is where mods (modifications) come into play, transforming the blocky landscapes into realms of unimaginable possibilities. From intricate technological advancements and mystical new biomes to quality-of-life improvements and entirely new game mechanics, mods inject fresh life and endless replayability into Minecraft.
On a website dedicated to technology trends, software tutorials, and digital security, understanding how to safely and effectively modify one of the world’s most popular games aligns perfectly with our mission to empower users with technical knowledge. This comprehensive guide will walk you through the process of installing mods in Minecraft, ensuring you can unlock its full potential while maintaining optimal digital security and system performance. We’ll delve into the necessary preparations, explore the leading mod loaders, and provide essential troubleshooting tips, transforming your Minecraft experience from standard to spectacular.

Understanding Minecraft Mods and Why You Need Them
Minecraft mods are essentially fan-made add-ons that alter or enhance various aspects of the game. They range from minor tweaks that improve usability to massive overhauls that introduce new dimensions, creatures, items, and gameplay loops. The community-driven nature of mod development means there’s an almost infinite array of content available, catering to every conceivable playstyle and preference.
The Allure of Customization
The primary appeal of mods lies in their ability to customize your game experience far beyond what official updates provide. This level of personalization is a cornerstone of digital freedom, allowing users to tailor software to their exact needs and desires. Whether you want to streamline resource gathering with an inventory sorter, automate complex farming operations with advanced machinery, or simply give your world a visual facelift with shaders and high-resolution textures, mods offer the tools to sculpt your ideal Minecraft universe. This deep customization not only extends the game’s longevity but also fosters a deeper connection between the player and their unique digital world.
Enhancing Gameplay: From Aesthetics to Automation
Mods can fundamentally change how you interact with Minecraft. Visually, mods can introduce dynamic lighting, realistic water physics, and breathtaking skyboxes, turning the voxel art style into something akin to a digital masterpiece. From a gameplay perspective, the enhancements are even more profound. Imagine building sprawling factories with intricate automation systems, exploring new magic systems with spells and rituals, or embarking on epic quests with custom-designed bosses and dungeons.
Beyond the grand transformations, many mods focus on quality of life, improving aspects that might feel clunky in vanilla Minecraft. This could include better mapping systems, enhanced crafting interfaces, or information overlays that display block properties. For users accustomed to efficient software interfaces, these small but significant improvements can dramatically boost your “productivity” within the game, making your time spent more enjoyable and less frustrating. The ability to shape the software environment to be more user-friendly and feature-rich is a key technological advantage that mods provide.
Essential Preparations Before You Begin
Before you dive into the exciting world of modding, a few crucial preparatory steps are necessary. These steps are not just about ensuring a smooth installation process but also about safeguarding your existing game data and maintaining system stability. Think of these as standard best practices for any software modification or installation, crucial for digital security and a positive user experience.
Backing Up Your Worlds: A Crucial First Step
This is arguably the most critical step before attempting any mod installation. Modding, by its nature, modifies game files, and while most mod loaders are designed to be stable, conflicts or incorrect installations can occasionally corrupt game data. Losing hours, days, or even years of progress on your meticulously crafted Minecraft worlds would be devastating.
How to Backup Your Worlds:
- Locate your
.minecraftfolder:- Windows: Press
Win + R, type%appdata%and press Enter. Open the.minecraftfolder. - macOS: In Finder, click
Go>Go to Folder..., type~/Library/Application Support/minecraftand press Enter. - Linux: Typically found at
~/.minecraft.
- Windows: Press
- Copy the
savesfolder: Inside the.minecraftfolder, you’ll find asavesfolder. This folder contains all your Minecraft worlds. Copy this entire folder to a safe location, such as your desktop, an external hard drive, or a cloud storage service. - Consider backing up the entire
.minecraftfolder: For comprehensive safety, especially if you have custom resource packs, settings, or screenshots you wish to preserve, consider backing up the entire.minecraftfolder. This ensures you can revert to a completely unmodded state if necessary.
This backup acts as your digital safety net, allowing you to restore your worlds and game configuration should anything go awry. It’s a fundamental principle of data management: always back up before making significant changes.
Ensuring Java Compatibility
Minecraft Java Edition, as its name suggests, relies on Java to run. Mods are also typically written in Java. Therefore, having the correct version of Java installed on your system is paramount. Different Minecraft versions and mod loaders might require specific Java versions.
- Minecraft 1.17 and newer: Requires Java 16 or newer.
- Minecraft 1.16.5 and older: Typically uses Java 8.
The official Minecraft launcher usually bundles its own Java runtime, but mod loaders often require a system-wide Java installation.
How to Check and Install Java:
- Check existing Java version: Open your command prompt (Windows) or terminal (macOS/Linux) and type
java -version. This will display your currently installed Java version. - Download Java Development Kit (JDK): For modding, it’s generally recommended to install a full JDK from reputable sources like Oracle (for specific versions) or Adoptium (for OpenJDK builds). Search for “Adoptium OpenJDK” and download the appropriate version for your operating system and the Java version required by your Minecraft/mod loader.
- Install Java: Follow the installation wizard. Ensure that Java is added to your system’s PATH during installation (this is usually a default option).
Having the correct and properly configured Java environment is a technical prerequisite that underpins the stability and functionality of your modded game.
Identifying Your Minecraft Version
Mods are highly version-specific. A mod designed for Minecraft 1.16.5 will almost certainly not work with Minecraft 1.19 or vice-versa. Attempting to mix incompatible versions is a common cause of crashes and errors.
How to Find Your Minecraft Version:
- Check the Minecraft Launcher: When you open the Minecraft Launcher, the version number of your selected profile is usually displayed prominently.
- In-Game: Once you launch Minecraft, the version number is typically shown in the bottom-left corner of the main menu screen.
Always ensure that the mod loader and every single mod you download are compatible with your specific Minecraft version. This meticulous attention to version compatibility is a core aspect of successful software integration.
Choosing and Installing Your Mod Loader
With your preparations complete, the next step is to choose and install a mod loader. A mod loader is a fundamental piece of software that modifies the base Minecraft game to allow other mods to run. It provides the framework and API (Application Programming Interface) that mods use to interact with the game. The two most popular and widely supported mod loaders are Forge and Fabric.
The Forge Mod Loader: A Classic Choice
Minecraft Forge has been the dominant mod loader for many years, supporting a vast library of mods across numerous Minecraft versions. It’s known for its robust API and extensive documentation, making it a favorite among mod developers and players alike.
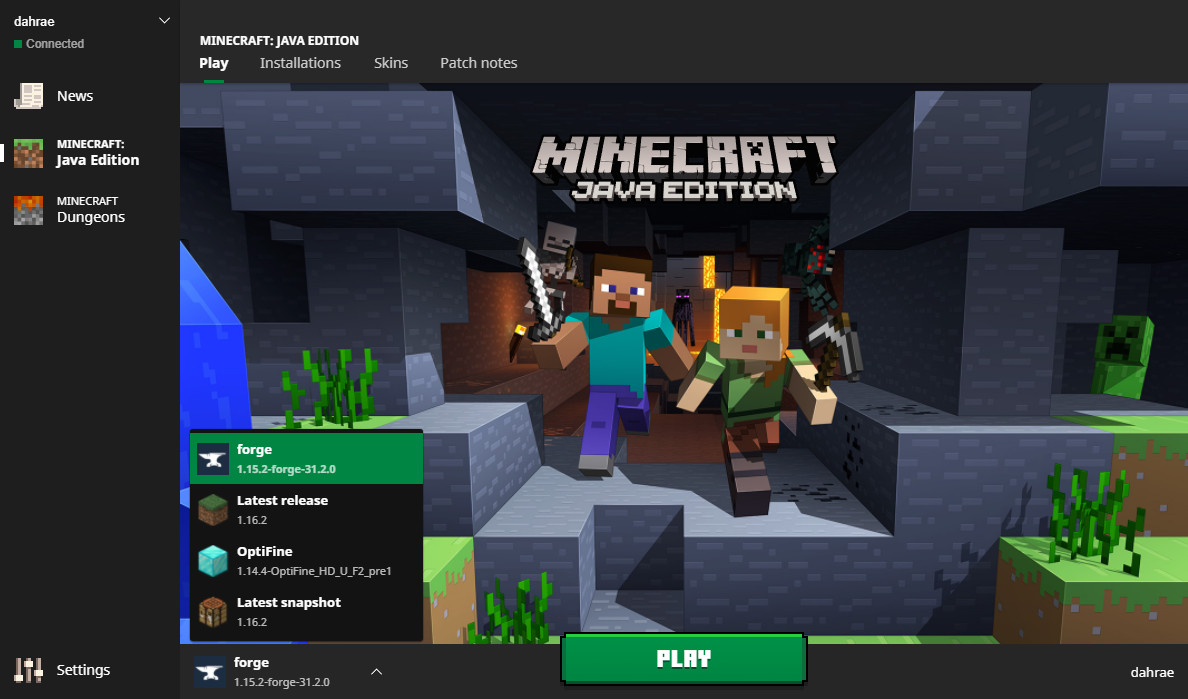
Step-by-Step Forge Installation
- Download Forge: Go to the official Forge website (
files.minecraftforge.net). - Select Your Minecraft Version: On the left sidebar, choose the Minecraft version you intend to mod (e.g., 1.19.2, 1.16.5).
- Download the Installer: For the recommended version, click the “Installer” button. This will download a
.jarfile.- Security Note: Always download mod loaders and mods from their official websites or reputable community hubs like CurseForge or Modrinth to avoid malware.
- Run the Installer: Double-click the downloaded Forge installer
.jarfile.- Troubleshooting: If it doesn’t open, ensure you have Java installed correctly. You might need to right-click and select “Open with” > “Java(TM) Platform SE binary.”
- Install Client: In the Forge installer window, ensure “Install client” is selected. Confirm that the installation path points to your
.minecraftfolder. Click “OK.” - Verify Installation: Open your Minecraft Launcher. You should now see a new profile named “forge” (or similar, depending on the version) in the bottom-left corner. Select this profile.
Adding Mods to Forge
- Download Forge-compatible Mods: Find mods that explicitly state they are for Minecraft Forge and your specific Minecraft version. Reputable sources include CurseForge (
curseforge.com) and Modrinth (modrinth.com). - Locate the
modsFolder: Open your.minecraftfolder (as described in the backup section). If you’ve successfully run Forge at least once, there should now be a new folder namedmodswithin.minecraft. If not, create it manually. - Place Mod Files: Drag and drop the downloaded mod
.jarfiles directly into themodsfolder. Do not extract the.zipor.rarfiles unless the mod specifically instructs you to; most mods are distributed as.jarfiles. - Launch Minecraft: Open the Minecraft Launcher, select your Forge profile, and click “Play.” If everything is correct, the mods will load, and you’ll see them active in your game (often visible on the main menu or within a dedicated mod list in-game).
The Fabric Mod Loader: Lightweight and Modern
Fabric is a newer mod loader that has gained significant popularity due to its lightweight nature and speed. It’s designed to be more modular and has a faster update cycle, often supporting new Minecraft versions sooner than Forge. Fabric requires its own set of mods, as Forge and Fabric mods are not cross-compatible.
Step-by-Step Fabric Installation
- Download Fabric Installer: Go to the official Fabric website (
fabricmc.net). - Download Universal JAR: Click on “Download universal .jar” for the installer.
- Run the Installer: Double-click the downloaded Fabric installer
.jarfile. - Select Version and Install: In the installer window, choose your desired Minecraft version and the corresponding loader version. Ensure “Create profile” is checked. Confirm the installation path. Click “Install.”
- Install Fabric API: Unlike Forge, most Fabric mods require the “Fabric API” mod to be installed separately. Go to the Fabric API page on CurseForge or Modrinth, download the
.jarfile compatible with your Minecraft version, and place it in themodsfolder (which you’ll create or find in your.minecraftdirectory). - Verify Installation: Open your Minecraft Launcher. You should see a new profile named “fabric-loader-
” (or similar). Select this profile.
Adding Mods to Fabric
- Download Fabric-compatible Mods: Search for mods specifically designed for Fabric and your Minecraft version. Again, CurseForge and Modrinth are excellent resources. Remember to also download Fabric API if you haven’t already.
- Locate the
modsFolder: Navigate to your.minecraftfolder. Create amodsfolder inside it if one doesn’t exist after running Fabric once. - Place Mod Files: Drag and drop the downloaded Fabric mod
.jarfiles (including Fabric API) into thismodsfolder. - Launch Minecraft: Select your Fabric profile in the Minecraft Launcher and click “Play.” Your Fabric mods should now be active.
Finding Reliable Mod Sources
The internet is a vast place, and while the world of Minecraft modding is vibrant, it’s not without its risks. Downloading mods from unverified sources can expose your system to malware, viruses, or simply non-functional files. Always adhere to these best practices:
- CurseForge: The largest and most reputable modding platform for Minecraft. Most major mods are hosted here.
- Modrinth: A newer, open-source-focused platform that is quickly gaining traction, known for its user-friendly interface and focus on quality.
- Official Mod Websites/GitHub: Some independent mod developers host their mods on their own websites or GitHub repositories. Always verify the authenticity of these links, often found through the CurseForge or Modrinth pages.
- Avoid: Shady download sites, YouTube videos linking directly to random file-sharing services, or any site that seems suspicious or demands excessive permissions.
Prioritizing digital security by only downloading from trusted sources is paramount. These platforms often employ community moderation and scanning tools to minimize risks.
Post-Installation: Testing and Troubleshooting
Once you’ve installed your mod loader and added some mods, the journey isn’t quite over. Testing your setup and knowing how to troubleshoot common issues are crucial skills for any modded Minecraft enthusiast. This reflects a broader principle in tech: successful deployment involves verification and the ability to diagnose problems.
Verifying Mod Installation
After launching Minecraft with your modded profile, there are several ways to confirm your mods are running:
- Main Menu Indicator: Many mod loaders (especially Forge) will display an indicator on the main menu screen, often showing the number of mods loaded or a specific “Mods” button.
- In-Game Mod List: Clicking the “Mods” button (if available) will usually open a list of all installed and active mods, allowing you to see their names and versions.
- Create a New World/Load Existing: The ultimate test is to load into a game world. Check for new items in your inventory (creative mode), new blocks, or new UI elements that your mods are supposed to introduce.
Common Issues and Solutions
Even with careful preparation, issues can arise. Knowing how to approach them can save you a lot of frustration.
- Game Crashes on Startup:
- Incompatible Versions: The most common culprit. Double-check that all your mods, the mod loader, and your Minecraft version are perfectly aligned.
- Conflicting Mods: Some mods simply don’t play well together. Try removing half your mods and launching the game. If it works, gradually add the other half back until you find the culprit.
- Missing Dependency: Many mods require other “library” mods (like Fabric API for Fabric or specific core mods for Forge). Check the mod’s description for required dependencies.
- Outdated Java: Ensure you have the correct Java version installed and that your system is using it.
- Mods Not Appearing/Working:
- Incorrect Folder: Ensure the mod
.jarfiles are directly in themodsfolder within your.minecraftdirectory, not in a subfolder. - Incorrect Loader: Are you trying to load a Forge mod with Fabric, or vice-versa? They are not interchangeable.
- Corrupted Download: Re-download the mod from a trusted source.
- Incorrect Folder: Ensure the mod
- Low Performance/Lag:
- Too Many Mods: Large modpacks can be very demanding. Consider removing some resource-intensive mods.
- Hardware Limitations: Your computer might not have enough RAM or processing power. Allocate more RAM to Minecraft in the launcher settings (e.g., 4GB or 6GB for heavily modded instances).
- Optimization Mods: Consider installing performance-enhancing mods like OptiFine (compatible with Forge) or Sodium/Lithium/Phosphor (for Fabric).
When troubleshooting, always consult the mod’s official page or documentation for specific requirements or known issues. The “logs” folder in your .minecraft directory can also contain crash reports (.log or .txt files) that offer clues about what went wrong.
Digital Security and Best Practices for Mods
Modding, while rewarding, introduces potential vectors for digital security risks. Adhering to best practices is vital:
- Source Verification: As mentioned, always download from reputable sources. Avoid direct downloads from unknown links.
- Antivirus/Anti-Malware: Keep your system’s security software up-to-date and run regular scans.
- Read Reviews: Before downloading a mod, check community reviews and comments. If a mod has a history of causing issues or is flagged as suspicious, steer clear.
- Stay Updated: Keep your mod loader and essential library mods updated, as developers often patch bugs and security vulnerabilities.
- Backups, Backups, Backups: Reinforcing the first rule of modding, regularly back up your worlds and even your entire
.minecraftfolder, especially before adding new mods or updating existing ones.
These practices not only protect your game but also your entire system, embodying a proactive approach to digital security that extends beyond typical browsing habits.

Conclusion: Unlocking Infinite Possibilities
Installing mods to Minecraft is a rewarding process that transforms a beloved game into an entirely new experience, tailored to your every whim. By carefully following the steps outlined in this guide – from meticulous preparation and choosing the right mod loader to diligent troubleshooting and unwavering commitment to digital security – you empower yourself to unlock a realm of infinite possibilities.
This journey into modding isn’t just about adding new content; it’s a practical exercise in understanding software installation, managing dependencies, troubleshooting technical issues, and practicing essential digital hygiene. It demonstrates how user-driven innovation can significantly enhance and extend the lifespan of commercial software, offering lessons applicable to various technological endeavors. So, go forth, explore the vast universe of Minecraft mods, and build a world that is truly, uniquely yours. The blocks await your imagination.
aViewFromTheCave is a participant in the Amazon Services LLC Associates Program, an affiliate advertising program designed to provide a means for sites to earn advertising fees by advertising and linking to Amazon.com. Amazon, the Amazon logo, AmazonSupply, and the AmazonSupply logo are trademarks of Amazon.com, Inc. or its affiliates. As an Amazon Associate we earn affiliate commissions from qualifying purchases.