
In an era where vehicle theft remains a persistent concern, integrating an automotive kill switch into your car’s security system is a powerful, yet often overlooked, deterrent. Far more than a simple novelty, a kill switch offers a robust layer of protection, preventing unauthorized individuals from starting your vehicle even if they manage to bypass your alarm system or hotwire the ignition. This comprehensive guide will walk you through the process of understanding, choosing, and installing a kill switch, empowering you to take proactive steps in securing your automotive investment. Perfect for the tech-savvy individual looking to enhance their digital security in the physical world, this tutorial provides the knowledge to fortify your car against opportunistic thieves.

Understanding the Automotive Kill Switch: Your First Line of Defense
Before diving into the nuts and bolts of installation, it’s crucial to grasp what a kill switch is, why it’s so effective, and the various forms it can take. This foundational knowledge will help you make informed decisions about the best type of kill switch for your specific vehicle and security needs.
What is a Kill Switch?
At its core, an automotive kill switch is a hidden, manual electrical switch designed to interrupt one of your car’s essential starting circuits. When activated, it prevents the flow of electricity to a critical component, rendering the vehicle immobile. Unlike an alarm system that alerts you to a potential theft, a kill switch actively stops the car from starting, effectively immobilizing it at the point of theft attempt. Think of it as a secret “off” button that only you know how to toggle, adding a significant hurdle for any would-be thief. Its simplicity is its strength; with no complex electronics to hack, it relies on physical interruption of a circuit.
Why Install One?
The primary motivation for installing a kill switch is enhanced vehicle security. Modern cars come with sophisticated alarm systems and immobilizers, but determined thieves can often find ways around them. A well-placed and concealed kill switch provides an additional, often unexpected, barrier.
- Theft Prevention: This is the most obvious benefit. By cutting power to the fuel pump, ignition, or starter, you ensure the car simply won’t start. This frustrates thieves, forcing them to abandon the attempt before they can drive away.
- Peace of Mind: Knowing you have an extra layer of protection can significantly reduce anxiety about your car’s security, especially when parking in high-risk areas or overnight.
- Cost-Effective Security: Compared to high-end aftermarket security systems, a DIY kill switch is an incredibly affordable solution that offers substantial protective value.
- Customization: You decide where it goes, what it interrupts, and how it’s hidden, making it uniquely yours and harder for professional thieves to anticipate.
- Retrofit for Older Vehicles: Older cars, often lacking advanced factory security features, benefit immensely from a simple, reliable kill switch.
Types of Kill Switches: Choosing Your Weapon
Kill switches typically work by interrupting one of three main systems necessary for a car to start and run: the starter motor, the fuel pump, or the ignition system. Each has its advantages and disadvantages regarding installation difficulty, effectiveness, and the specific symptoms a thief might encounter.
-
Starter Motor Kill Switch: This is often the easiest to install. It interrupts the power signal to the starter solenoid, meaning when the key is turned, the engine won’t crank at all. The car will be completely silent, making it immediately clear something is amiss.
- Pros: Relatively simple wiring, clearly identifiable symptom (no crank).
- Cons: A very determined thief might still be able to hotwire the starter directly, bypassing the switch, though this is less common for casual theft.
-
Fuel Pump Kill Switch: This type interrupts the power supply to the fuel pump. The engine will crank, and might even start for a brief moment as it consumes any residual fuel in the lines, but it will quickly die and then refuse to restart due to a lack of fuel delivery. This can be more confusing for a thief.
- Pros: Engine cranks normally, potentially deceiving a thief into thinking there’s a different mechanical issue. Effective on most modern vehicles with electric fuel pumps.
- Cons: Requires identifying the correct fuel pump wire, which can be more complex depending on the vehicle’s wiring harness.
-
Ignition System Kill Switch: This category can involve interrupting the main power to the ignition coils, the distributor (in older cars), or the ECU (Engine Control Unit) itself. If the ignition system is cut, the engine will crank but won’t spark, thus failing to ignite the fuel.
- Pros: Very effective; the engine cranks but won’t fire up.
- Cons: Can be more complex to identify the correct wires, especially in modern vehicles with integrated ignition systems and sensitive ECUs. Improper wiring could potentially damage the ECU if not done carefully, making it generally recommended for those with more electrical experience or a clear wiring diagram.
When choosing, consider your comfort level with electrical work, the specific make and model of your car, and where you intend to hide the switch. For beginners, a starter motor or fuel pump kill switch is generally recommended.
Preparation is Key: Gathering Your Tools and Materials
Successful installation hinges on thorough preparation. Having the right tools and components on hand, coupled with a strong emphasis on safety, will make the process smoother, safer, and more effective.
Essential Tools You’ll Need
Equipping yourself with the correct tools is the first step towards a professional-looking and reliable installation.
- Wire Strippers/Crimpers: For cleanly removing insulation and securely attaching connectors.
- Multimeter (Digital Recommended): Absolutely critical for identifying the correct wires and testing circuits. Don’t skip this!
- Soldering Iron and Solder (Optional but Recommended): For the most secure and durable electrical connections.
- Heat Shrink Tubing and Heat Gun/Lighter: To insulate soldered joints and protect wiring.
- Electrical Tape (High-Quality): For insulating connections and bundling wires.
- Drill and Drill Bits: To mount the switch, if necessary.
- Wrenches and Screwdrivers: For removing trim panels and accessing components.
- Safety Glasses: Always protect your eyes when working with tools and wiring.
- Wire Cutters: For cutting wires to length.
- Test Light (Optional): Can be useful for quickly checking for power.
Components for Your Kill Switch Project
Beyond the tools, you’ll need the actual components that make up the kill switch circuit.
- Toggle Switch or Push-Button Switch: Choose a sturdy switch rated for the current it will carry. A simple ON/OFF toggle switch is common. Ensure it has a low profile for easy concealment.
- Appropriate Gauge Wire: Use automotive-grade wire of a sufficient gauge (e.g., 14-18 gauge) to handle the current of the circuit you’re interrupting. Consult your car’s wiring diagram if unsure.
- Inline Fuse Holder and Fuses: Crucial for protecting the new circuit and preventing damage to your car’s electrical system in case of a short circuit. Use a fuse rated slightly above the normal operating current of the circuit you’re modifying.
- Electrical Connectors (e.g., Spade, Butt, Ring Terminals): To make secure connections without soldering, though soldering is often preferred for permanence.
- Automotive Relay (Optional, but Recommended for High-Current Circuits): If you’re interrupting a high-current circuit (like the starter motor’s main power), using a relay allows the kill switch itself to only handle a small amount of current to activate the relay, which then handles the larger current. This protects the switch and makes it last longer.
- Zip Ties/Cable Clamps: For neatly securing new wiring.
Safety First: Precautions Before You Begin

Electrical work on a vehicle carries inherent risks. Prioritizing safety is non-negotiable.
- Disconnect the Battery: ALWAYS disconnect the negative (-) terminal of your car battery before starting any electrical work. This prevents accidental shorts, sparks, and potential damage to electrical components or even personal injury.
- Work in a Well-Ventilated Area: Especially if soldering or using adhesives.
- Identify Correct Wires: Use your multimeter and a reliable wiring diagram (often found in service manuals or online resources specific to your vehicle model) to absolutely confirm you are cutting into the correct wire. Guessing can lead to serious electrical problems or even damage to your ECU.
- Avoid Live Circuits: Never work on live circuits. Even with the battery disconnected, avoid touching components that might hold residual charge, such as capacitors.
- Test Thoroughly: Before reassembling anything, test your kill switch multiple times to ensure it works as intended and doesn’t interfere with other systems.
Step-by-Step Installation Guides for Common Kill Switches
Now, let’s get to the practical application. We’ll outline the general steps for installing the most common types of kill switches. Remember, specific wire colors and locations will vary by vehicle, so always refer to your car’s wiring diagram.
Method 1: The Fuel Pump Kill Switch (Intermediate Difficulty)
This method involves interrupting the power supply to the electric fuel pump.
- Locating the Fuel Pump Circuit:
- Consult your car’s wiring diagram to identify the positive (+) power wire running to your fuel pump. This wire typically runs from the fuel pump relay or fuse box directly to the fuel pump, often located in or near the fuel tank.
- Alternatively, you can often find the fuel pump access under the rear seat or in the trunk area. Use your multimeter to confirm the wire by testing for voltage when the ignition is on (and the car is attempting to start) and no voltage when the ignition is off.
- Accessing the Wire:
- Depending on your vehicle, you might need to remove interior trim panels, lift the rear seat, or access the wiring harness in the trunk or under the vehicle (if the fuel pump is external).
- Once located, expose a section of the identified fuel pump power wire.
- Interrupting the Power Wire:
- With the battery disconnected, carefully cut the chosen fuel pump power wire at a convenient point where you can route your new wires to the kill switch location.
- Strip about 1/2 inch of insulation from both ends of the newly cut wire.
- Wiring the Switch:
- Take your new wire (of the appropriate gauge) and cut two lengths sufficient to run from the cut fuel pump wire to your chosen kill switch location.
- Connect one end of the first new wire to one end of the cut fuel pump wire using a secure method (solder and heat shrink, or quality crimp connector).
- Connect one end of the second new wire to the other end of the cut fuel pump wire.
- Route these two new wires cleanly and discreetly to your desired kill switch mounting location.
- Connect the other ends of these two new wires to the two terminals of your toggle switch. If using an inline fuse, ensure it’s placed on one of these wires, preferably closer to the power source.
- Recommendation: If using a relay, the switch would interrupt the control signal to the relay, and the relay would then handle the high-current fuel pump circuit. This adds complexity but improves reliability for higher current applications.
- Hiding the Switch:
- Mount the toggle switch in a location that is easily accessible to you but completely out of sight for anyone else. Common spots include under the dashboard, inside a non-obvious console compartment, or even integrated into an existing blank switch panel.
- Secure and Insulate:
- Ensure all connections are tightly secured, soldered (if applicable), and properly insulated with heat shrink tubing and/or high-quality electrical tape.
- Bundle and secure your new wiring with zip ties to prevent it from rattling or getting snagged.
- Reconnect and Test:
- Reconnect the negative battery terminal.
- With the kill switch in the “off” position, try to start the car. It should crank but not start, or start briefly and then die.
- With the kill switch in the “on” position, the car should start and run normally. If not, immediately disconnect the battery and troubleshoot your connections.
Method 2: The Starter Motor Kill Switch (Easier, but Still Effective)
This method prevents the starter motor from engaging, resulting in no engine cranking.
- Identifying the Starter Solenoid Wire:
- Locate the starter motor, usually found on the lower part of the engine block.
- Identify the small-gauge wire (not the thick battery cable) that connects to the starter solenoid. This is the signal wire that tells the starter to engage when you turn the key.
- Confirm with your multimeter: this wire should receive 12V only when the key is in the “start” position.
- Accessing and Interrupting the Wire:
- With the battery disconnected, cut this small-gauge starter solenoid wire at an accessible point.
- Strip insulation from both cut ends.
- Wiring the Switch (and Optional Relay):
- Route two new wires from the cut ends of the solenoid wire to your chosen kill switch location.
- Connect these two new wires to your toggle switch terminals.
- Important: While this circuit is generally lower current than the main battery cable to the starter, it’s still good practice to consider a relay, especially if the switch is small. If using a relay, the toggle switch would power the relay’s coil, and the relay’s contacts would then interrupt the starter solenoid wire. This is safer and ensures longevity for the switch.
- Concealment, Securing, and Testing:
- Follow the same steps for hiding the switch, securing wiring, insulating connections, and thorough testing as outlined in Method 1.
- When testing: with the switch “off,” the car should be completely silent when you try to start it (no cranking). With the switch “on,” it should crank and start normally.
Method 3: The Ignition Coil/Distributor Kill Switch (More Advanced, Vehicle-Specific)
This method cuts power to the component that generates the spark needed to ignite fuel.
- Finding the Ignition System’s Primary Power:
- Consult your vehicle’s wiring diagram to identify the main 12V power wire feeding the ignition coils (for coil-on-plug systems) or the distributor (for older vehicles). This is typically a single wire that branches out to the various ignition components.
- Confirm with a multimeter: this wire should show 12V when the ignition is “on.”
- Integrating the Switch (Often with a Relay):
- With the battery disconnected, cut this main ignition power wire.
- Run two new wires from the cut ends to your chosen kill switch location.
- Given the importance of the ignition system and the potential for higher currents, a relay is highly recommended here. The toggle switch would activate the relay, and the relay’s contacts would then bridge or break the ignition power wire. This protects the sensitive ignition components and the switch itself.
- Concealment, Securing, and Testing:
- Follow the same steps for hiding the switch, securing wiring, insulating connections, and thorough testing as outlined previously.
- When testing: with the switch “off,” the car should crank normally but fail to fire or start (as there’s no spark). With the switch “on,” it should crank and start normally.
Post-Installation: Testing, Hiding, and Maintenance
A kill switch is only as good as its installation and concealment. The final steps ensure reliability and maximum effectiveness.
Verifying Your Installation: The Acid Test
Once your wiring is complete and neatly secured, it’s time for the ultimate test.
- Reconnect the Battery: Carefully reattach the negative battery terminal.
- Initial Test (Switch OFF): Ensure your kill switch is in the “off” (disabled) position. Attempt to start your car.
- If a starter kill switch: The engine should not crank at all.
- If a fuel pump or ignition kill switch: The engine should crank, but it should not fire up or run (it might briefly start and then die for a fuel pump kill switch).
- Full Functionality Test (Switch ON): Flip your kill switch to the “on” (enabled) position. Attempt to start your car. It should start and run exactly as it normally would.
- Troubleshooting: If the car doesn’t behave as expected in either test, immediately disconnect the battery and re-check all your connections against your wiring diagram. Look for loose wires, incorrect wire identification, blown fuses (check the new inline fuse!), or faulty switch/relay connections. A multimeter is invaluable for tracing power flow.
Strategic Concealment: Where to Hide Your Switch
The effectiveness of a kill switch relies heavily on its invisibility to a thief.
- Beyond the Obvious: Avoid obvious locations like directly on the dashboard, easily visible under the steering column, or in the glove box.
- Hidden but Accessible: You need to be able to activate/deactivate it quickly and easily.
- Creative Spots:
- Under the dashboard: Tucked far back, requiring an awkward reach.
- Inside a non-functional or rarely used console compartment: Requires removal of a panel.
- Within a blank switch panel: Drill a hole and integrate the switch, making it look factory.
- Under the carpet or floormat: A durable switch can be hidden here, activated by foot.
- Engine bay (less common): Can be effective, but requires opening the hood, which isn’t ideal for quick activation.
- Fake broken component: Integrate it into a non-working piece of trim.
- Tactile Feedback: Ensure you can operate the switch by feel, without needing to look at it.
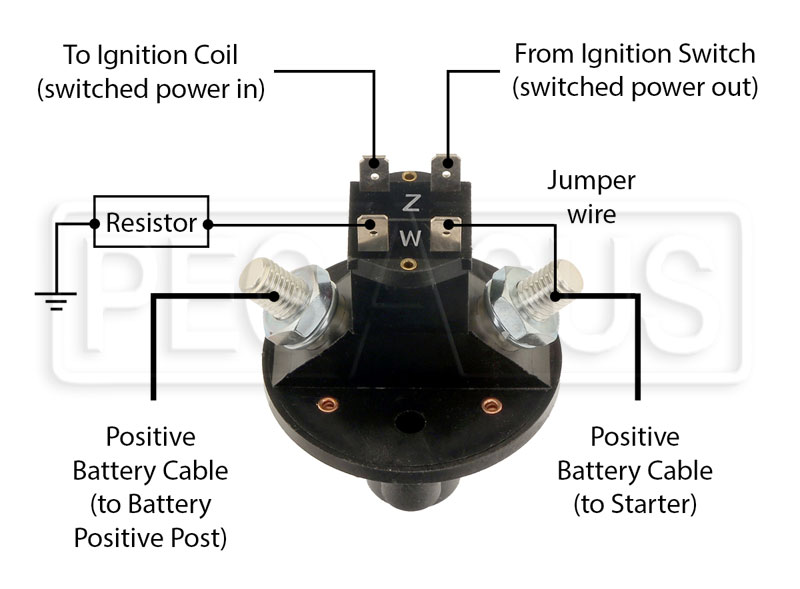
Maintenance and Best Practices
A kill switch is a “set it and forget it” security measure, but a few considerations ensure its long-term effectiveness.
- Regular Checks: Periodically (e.g., every few months) test your kill switch to ensure it’s still functioning correctly.
- Inform Others (Carefully): If anyone else needs to drive your car, make sure they know how to operate the kill switch. However, be discreet about who you share this knowledge with.
- Consider a Multi-Stage System: For ultimate security, some enthusiasts install multiple kill switches on different circuits, providing layered protection.
- Legal Considerations: In most regions, installing a kill switch is perfectly legal. However, ensure it doesn’t interfere with safety systems (like airbags or ABS) or create a fire hazard. Always consult local regulations if unsure. This DIY project falls squarely under personal property protection and doesn’t typically raise legal issues, but it’s always wise to be informed.
By following this comprehensive guide, you can confidently install a reliable automotive kill switch, transforming your car into a significantly harder target for thieves. This simple yet effective modification provides an invaluable layer of digital security in the analog world, offering you enhanced peace of mind on the road and when your vehicle is parked.
aViewFromTheCave is a participant in the Amazon Services LLC Associates Program, an affiliate advertising program designed to provide a means for sites to earn advertising fees by advertising and linking to Amazon.com. Amazon, the Amazon logo, AmazonSupply, and the AmazonSupply logo are trademarks of Amazon.com, Inc. or its affiliates. As an Amazon Associate we earn affiliate commissions from qualifying purchases.