
In an era where car theft remains a persistent and evolving challenge, traditional alarms often fall short against sophisticated thieves. While advancements in automotive technology offer convenience, they sometimes inadvertently create new vulnerabilities. For a growing number of car owners, taking proactive steps to safeguard their vehicle isn’t just a recommendation—it’s a necessity. This is where the humble, yet incredibly effective, kill switch comes into play. A kill switch acts as an impassable barrier, cutting off a critical system required for your car to run, thereby rendering it immobile. It’s a low-tech solution to a high-tech problem, providing a layer of security that often outsmarts even the most determined criminals.

This comprehensive guide will walk you through everything you need to know about installing a kill switch in your car. We’ll explore the technical aspects, financial benefits, and even the strategic thinking involved in protecting your valuable asset. Whether you’re looking to enhance your vehicle’s digital security, protect your financial investment, or simply achieve greater peace of mind, a DIY kill switch installation is a highly rewarding endeavor that aligns perfectly with the principles of tech-savvy self-reliance and smart money management.
Understanding Vehicle Security and the Kill Switch Advantage
Modern vehicles are marvels of engineering, equipped with complex anti-theft systems, immobilizers, and GPS trackers. However, the increasing sophistication of car theft rings means that these factory-installed defenses are frequently circumvented. From signal jamming to key fob cloning, thieves are leveraging technology to exploit weaknesses, making it imperative for owners to consider additional, robust security measures.
The Evolving Threat Landscape
The statistics on vehicle theft are sobering, with millions of cars stolen globally each year. These aren’t just joyrides; they often involve organized crime syndicates aiming to dismantle cars for parts or export them overseas. While factory alarms might deter opportunistic thieves, they are often easily bypassed by professionals who understand their vulnerabilities. The primary limitation of many OEM (Original Equipment Manufacturer) systems is their predictability. Thieves know how they work and, more importantly, how to disable them. This predictability is precisely what a kill switch counters.
From a Tech perspective, a kill switch is a brilliantly simple mechanism. It doesn’t rely on complex algorithms or network connections; instead, it manually breaks an electrical circuit essential for the car’s operation. This direct approach makes it incredibly difficult for thieves to bypass, especially if the switch is hidden effectively. When a thief attempts to start a vehicle equipped with a kill switch, nothing happens, or the engine sputters and dies. This unexpected failure often leads them to abandon the attempt, as spending more time struggling with a stubborn vehicle increases their risk of being caught.
Beyond the technical resilience, there are significant Money implications. The financial repercussions of car theft extend far beyond the market value of your vehicle. There’s the hassle of dealing with insurance claims, potential deductibles, loss of no-claims bonuses, and the emotional toll of losing a significant asset. Even if your insurance covers the loss, the disruption to your daily life, transportation costs, and the time spent on administrative tasks can be substantial. A kill switch, therefore, acts as an affordable, proactive insurance policy against such losses.
Protecting Your Investment and Peace of Mind
Your car is often one of the largest financial investments you make, second only to your home. Protecting this asset is paramount for maintaining your financial stability and future plans. Installing a kill switch directly addresses this need by substantially increasing your vehicle’s resistance to theft. This isn’t just about preventing a monetary loss; it’s about preserving the Brand of your vehicle, in terms of its integrity and long-term value. A vehicle that is well-protected is one that maintains its condition and, consequently, its resale value.
Furthermore, the concept of a “kill switch” extends beyond just physical security; it contributes to your personal Brand as a conscientious and responsible owner. It signifies a proactive approach to protecting your property and demonstrating a level of care that can resonate in various aspects of your life. The peace of mind that comes with knowing you’ve implemented an extra layer of defense for your vehicle is invaluable. You can park your car with greater confidence, reducing anxiety and allowing you to focus on other aspects of your life or work. This peace of mind, though intangible, directly contributes to overall well-being and productivity, making a kill switch installation a sound decision from both a financial and personal standpoint.
Choosing the Right Kill Switch and Location
Not all kill switches are created equal, and the effectiveness of your setup heavily depends on the type of system you choose to interrupt and its strategic placement. Understanding the technical principles behind each option is crucial for making an informed decision.
Types of Kill Switches: A Technical Overview
The core principle of any kill switch is to break an essential electrical circuit. The most common and effective circuits to target include:
-
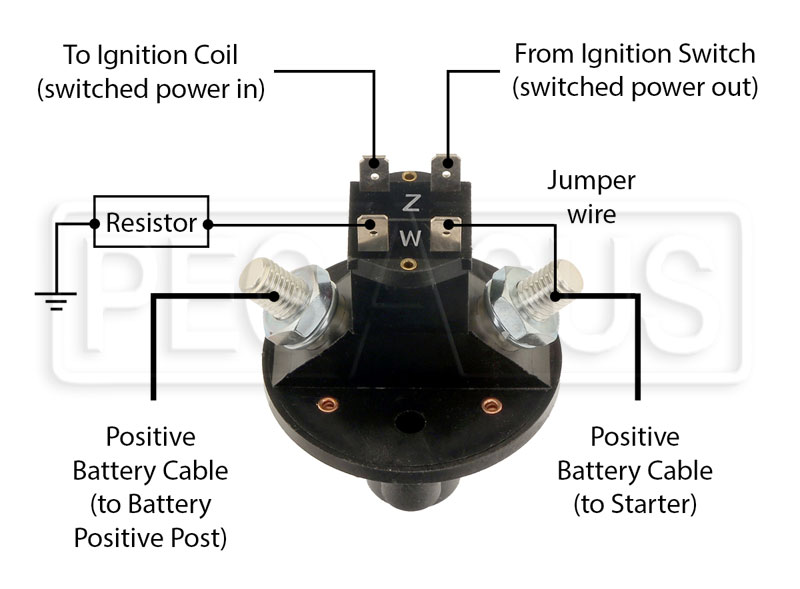
Battery Disconnect Switch: This is the most straightforward type. It involves installing a heavy-duty switch directly on the battery’s negative terminal. When activated, it completely cuts off all power to the car.
- Pros: Simple to install, cuts all power, highly effective.
- Cons: Can reset vehicle electronics (radio presets, clock, ECU learning), may not be ideal for modern cars with complex computer systems that prefer constant power. Primarily useful for long-term storage or highly targeted simple theft.
-
Fuel Pump Interrupt Switch: This switch interrupts the power supply to the fuel pump. Without fuel, the engine will either not start or will run for only a few seconds on residual fuel pressure before dying.
- Pros: Engine will crank but won’t start, which can confuse thieves, relatively easy to locate and interrupt the fuel pump wire.
- Cons: Requires locating the fuel pump’s power wire, which can sometimes be tricky depending on the car model. It won’t prevent the car from being towed.
-
Starter Interrupt Switch: This type of kill switch prevents power from reaching the starter motor. When activated, the car will appear completely dead when the key is turned, or the engine will not crank.
- Pros: Prevents the engine from even attempting to crank, making it seem like a dead battery or a major electrical fault.
- Cons: Requires interrupting a high-current circuit, often necessitating the use of a relay for safety and longevity of the switch.
-
Ignition System Interrupt Switch: This switch cuts power to critical components of the ignition system, such as the ignition coil or the ignition module. Similar to the fuel pump interrupt, the engine will crank but won’t spark, thus failing to start.
- Pros: Effective at preventing engine start, often targets lower-current wires than the starter circuit.
- Cons: Requires knowledge of the specific ignition system components for your vehicle.
For most DIY installations aiming for a blend of effectiveness and simplicity, the fuel pump interrupt or starter interrupt are often preferred, especially when combined with a well-hidden switch. The choice of which circuit to interrupt will depend on your comfort level with automotive electrical systems and your vehicle’s specific wiring. Always consult your car’s wiring diagrams (often available online or in service manuals) to identify the correct wires.
Strategic Placement for Maximum Effectiveness
The most technically sound kill switch is useless if its location is obvious. The key to an effective kill switch lies in its stealth. A thief spending precious seconds trying to start a car won’t typically spend minutes searching for a hidden switch. They want a quick in-and-out operation.
Consider these factors for placement:
- Hidden, Not Obscured: The switch should be out of sight from plain view, even if a thief were to quickly glance under the dashboard or seats. Good locations include tucked away under the dashboard, inside a non-essential console compartment, behind a trim panel, or even disguised as an existing, non-functional button.
- Accessible to You: While hidden from thieves, the switch must be easily accessible to you, the owner. You shouldn’t have to contort yourself or struggle to activate/deactivate it every time you use your car. Convenience for the owner is key to regular use.
- Unconventional Spots: Think outside the box. Avoid common “hiding” spots that thieves might already know about. The more unique and difficult to stumble upon, the better. For example, some people integrate the switch into existing electrical components, requiring a specific sequence of button presses or operations to activate a hidden relay. This aligns with Tech security principles of multi-factor authentication, even in a mechanical context.
The ultimate goal is to make the kill switch location a unique secret between you and your car, adding a personalized layer of Brand security that differentiates your vehicle from a typical target.

Essential Tools and Materials for Installation
Before you begin the installation process, gathering all the necessary tools and materials will ensure a smooth and safe experience. Trying to improvise or making multiple trips to the hardware store can lead to frustration and potential mistakes.
Tools:
- Wire Cutters/Strippers: Essential for cleanly cutting and stripping insulation from wires.
- Multimeter (Voltmeter/Ohmmeter): Crucial for identifying the correct wires, checking continuity, and ensuring no live circuits during installation. This is your primary Tech diagnostic tool.
- Crimping Tool: For securely attaching electrical connectors.
- Soldering Iron and Solder: For making more robust and permanent connections (optional, but highly recommended for reliability).
- Heat Gun: For shrinking heat-shrink tubing to insulate connections.
- Drill and Drill Bits: If you need to mount the switch or run wires through panels.
- Screwdrivers/Socket Set: For removing trim panels and accessing wiring.
- Test Light (optional): Another tool for checking for power in circuits.
Materials:
- Toggle Switch (or Push-Button Switch): Ensure it’s rated for automotive use and can handle the amperage of the circuit you’re interrupting. For starter circuits, a heavy-duty switch or a relay is mandatory.
- Automotive Relay (e.g., SPDT 30/40 amp relay): Essential if you’re interrupting a high-current circuit like the starter motor to protect your switch from excessive current. This is a critical Tech component for safety and functionality.
- Automotive Wire: Matching gauge (thickness) to the existing wire you’re interrupting, or slightly thicker. Use different colors if adding multiple wires for clarity.
- Wire Connectors: Butt connectors, spade connectors, ring terminals, etc., as needed for your chosen switch and connections.
- Heat-Shrink Tubing or Electrical Tape: For insulating all exposed wires and connections to prevent short circuits and moisture ingress.
- In-line Fuse Holder and Fuses: For adding a fuse to protect your new circuit and the vehicle’s electronics, especially if you’re powering a relay coil.
- Zip Ties/Cable Management: For securing wires and keeping the installation tidy and hidden.
- Safety Glasses and Gloves: Always prioritize safety.
Investing in quality tools and materials is a smart Money decision in the long run, ensuring a reliable installation that won’t fail prematurely and potentially cause more expensive electrical problems.
Step-by-Step Installation Guide
Installing a kill switch is a relatively straightforward DIY project for those comfortable with basic automotive electrical work. However, precision and adherence to safety protocols are paramount.
Safety First: Preparing for the Installation
Before touching any wires, always prioritize safety:
- Disconnect the Battery: This is the most critical step. Disconnect the negative terminal of your car battery to prevent accidental shorts, electrical shocks, or damage to your vehicle’s sensitive electronic control units (ECUs).
- Consult Your Vehicle’s Manual/Diagrams: Familiarize yourself with your car’s specific wiring diagrams. This is your most valuable Tech resource for identifying the correct wires for the fuel pump, starter, or ignition system. Online forums or specialized service manuals can also be excellent sources.
- Wear Safety Gear: Always wear safety glasses to protect your eyes from stray wires or sparks, and gloves to protect your hands.
- Work in a Well-Ventilated Area: If you’re using a soldering iron, ensure proper ventilation.
Identifying the Target Circuit
This is arguably the most crucial step for the kill switch’s effectiveness.
- Locate the Target System:
- Fuel Pump: The fuel pump wire typically runs from the fuse box or relay box, often to the rear of the car where the fuel tank is. You might find it under the rear seat or in the trunk area, or tracing wires from the fuel pump relay.
- Starter Motor: The starter motor wire runs from the ignition switch or starter relay to the starter motor itself. This is usually a thicker gauge wire.
- Ignition Coil/Module: Wires for the ignition system are typically found under the hood, leading to the ignition coils or distributor.
- Confirm the Wire with a Multimeter: Once you’ve identified a potential wire (e.g., based on color coding from a diagram), reconnect the battery temporarily (if safe to do so) and use your multimeter. With the ignition in the “on” or “start” position, measure voltage across the wire to confirm it’s the correct power supply. Then, disconnect the battery again before cutting. For the fuel pump, you might hear it prime for a few seconds when the ignition is turned on. The multimeter helps you verify the precise power wire responsible for activating the component. This precision is a cornerstone of Tech proficiency.
Wiring the Kill Switch
You will be installing the switch “in series” with the chosen wire, meaning you’ll cut the wire and connect the two ends to your switch, so the current must flow through the switch to complete the circuit.
- Choose Your Location: Select your stealthy spot for the switch. If necessary, carefully drill a hole for the switch, ensuring no existing wires or components are damaged behind the panel.
- Cut the Target Wire: Carefully cut the identified target wire in a convenient location that allows you enough slack to work.
- Strip and Connect: Strip about 1/2 inch of insulation from each cut end of the wire.
- For Low-Current Circuits (e.g., fuel pump, ignition system, if not using a relay): Connect one end of the cut wire to one terminal of your toggle switch and the other end to the second terminal. Use crimp connectors or, ideally, solder the connections for maximum reliability.
- For High-Current Circuits (e.g., starter motor) – Using a Relay: This is critical for Tech safety.
- Locate the starter signal wire (the smaller gauge wire that activates the starter solenoid, not the thick battery cable).
- Cut this signal wire. Connect one end to terminal 86 of your relay and the other end to terminal 87a (normally closed) or 87 (normally open) depending on your desired operation (normally closed for switch to break circuit, normally open for switch to complete circuit for starter).
- Wire terminal 30 of the relay to a fused 12V constant power source.
- Wire terminal 85 of the relay to ground.
- Connect your hidden toggle switch between the fused 12V source and terminal 86 of the relay (if using normally open) or to ground (if using normally closed). This allows the low-current switch to control the high-current relay. This protects your small toggle switch from carrying the heavy starter current.
- Insulate All Connections: This is non-negotiable for Tech safety and reliability. Use heat-shrink tubing over all soldered or crimped connections. If heat-shrink is not available, wrap generously with high-quality electrical tape. Exposed wires can lead to short circuits, fires, or damage to your vehicle’s electronics.
- Route and Secure Wires: Carefully route the new wires to your switch location, tucking them away behind trim panels, under carpets, or through existing wire looms. Use zip ties to secure the wires and prevent them from rattling, getting snagged, or being easily discovered by a thief. The cleaner and more integrated the wiring, the more stealthy and professional the installation appears.
Testing and Securing Your New Defense System
Once all connections are made and insulated:
- Reconnect the Battery: Reconnect the negative terminal of your car battery.
- Test the Kill Switch:
- With the kill switch in the “off” position, try to start your car. The engine should not start, or it should crank but not turn over, depending on the circuit you interrupted.
- Flip the kill switch to the “on” position and try starting the car again. It should now start normally.
- Final Security Checks: Double-check all connections for tightness and insulation. Ensure the switch is firmly mounted and the wiring is completely hidden and secure. Pay attention to any sounds or vibrations from loose wires. This final check ensures the integrity of your Tech solution and protects your Money investment.
Advanced Considerations and Legal Aspects
While a basic kill switch significantly enhances security, there are ways to further fortify your vehicle and practical considerations to keep in mind.
Enhancing Security: Beyond a Single Switch
- Multiple Kill Switches: For ultimate protection, consider installing two or more kill switches that interrupt different circuits (e.g., one for the fuel pump, another for the starter). This creates a layered defense, forcing a thief to bypass multiple, independently hidden obstacles. This multi-factor approach aligns with robust Tech security strategies.
- Disguised Switches: Instead of a simple toggle switch, some owners integrate momentary push-buttons into existing, non-functional dashboard buttons or even use proximity sensors or RFID tags to trigger a hidden relay. This increases the stealth factor exponentially.
- Integrating with Existing Security: A kill switch complements, rather than replaces, your car’s factory alarm and immobilizer. Together, they create a formidable defense system.
- Professional Installation vs. DIY: While DIY offers cost savings and the satisfaction of personal security, a professional automotive electrician can ensure a flawlessly executed and highly stealthy installation, especially for complex systems involving relays or multiple circuits. This is a Money decision based on your skill level and desired outcome.
Legalities and Insurance Implications
- Legality: In most jurisdictions, installing a kill switch in your personal vehicle is perfectly legal, as it’s considered an anti-theft device. However, it’s always wise to check local vehicle modification laws if you have any doubts.
- Insurance: Informing your insurance company about a significant anti-theft modification might lead to a slight reduction in your premiums, especially if they recognize it as an approved security enhancement. However, this varies widely between providers and policies. It’s always worth a call to your insurer to discuss the potential Money benefits and to ensure they are aware of any modifications that could affect coverage.
Conclusion
In an increasingly complex world where vehicle theft poses a tangible threat, installing a kill switch for your car is a simple yet profoundly effective measure. It embodies the best principles of Tech ingenuity—a straightforward, reliable solution that circumvents sophisticated criminal tactics. By taking this proactive step, you’re not only safeguarding a significant Money investment but also reinforcing your personal sense of security and responsibility, enhancing the ‘brand’ of your ownership.
The DIY installation process, while requiring careful attention to detail and basic electrical knowledge, empowers you with a hands-on approach to vehicle protection. It’s a testament to the idea that sometimes, the most robust security solutions are the ones that are custom-tailored and expertly hidden by the owner. By understanding the types of switches, choosing a strategic location, and meticulously following the installation steps, you can equip your vehicle with an invisible guardian that significantly deters theft and provides invaluable peace of mind. Drive with confidence, knowing you’ve fortified your ride against the unexpected.
aViewFromTheCave is a participant in the Amazon Services LLC Associates Program, an affiliate advertising program designed to provide a means for sites to earn advertising fees by advertising and linking to Amazon.com. Amazon, the Amazon logo, AmazonSupply, and the AmazonSupply logo are trademarks of Amazon.com, Inc. or its affiliates. As an Amazon Associate we earn affiliate commissions from qualifying purchases.