The landscape of home living is constantly evolving, driven by an insatiable demand for convenience, efficiency, and interconnectedness. In this era of smart homes, few devices offer as much tangible benefit as the smart thermostat. Gone are the days of manually adjusting temperatures or returning to a freezing (or sweltering) house. Modern smart thermostats, particularly those from a reputable brand like Honeywell, empower homeowners to take precise control over their indoor climate, often leading to significant energy savings and unparalleled comfort. This guide will walk you through the process of installing a Honeywell smart thermostat, transforming your home’s climate control system into an intelligent, responsive hub.
The decision to upgrade to a smart thermostat is often rooted in a desire for greater efficiency and automation – core tenets of modern technology. Honeywell, a brand with a century-long legacy in home comfort and industrial controls, has successfully transitioned its expertise into the smart home arena. Their smart thermostats are renowned for their reliability, user-friendly interfaces, and seamless integration with broader smart home ecosystems. By leveraging cutting-edge software and connectivity, these devices don’t just maintain a set temperature; they learn your preferences, adapt to your schedule, and can even respond to external factors like weather forecasts. This blend of sophisticated technology and a trusted brand promise offers not only enhanced comfort but also a smarter way to manage your household budget by curbing energy waste. Investing in a Honeywell smart thermostat is therefore not just about installing a gadget; it’s about embracing a smarter, more sustainable, and ultimately more enjoyable way of living.
I. Embracing the Smart Home: Why Upgrade to a Honeywell Smart Thermostat?
The shift towards smart home technology is more than a fleeting trend; it’s a fundamental change in how we interact with our living spaces. At the heart of this revolution are devices designed to simplify daily routines, enhance security, and improve energy efficiency. Among these, the smart thermostat stands out as a particularly impactful upgrade, offering a direct pathway to tangible savings and improved lifestyle quality.
A. The Evolution of Home Climate Control
For decades, thermostats were simple mechanical or digital devices, allowing basic temperature setting and perhaps rudimentary scheduling. While functional, they lacked the intelligence to adapt to real-world conditions or user habits. The advent of smart technology has utterly transformed this. Modern smart thermostats are sophisticated computing devices, equipped with sensors, Wi-Fi connectivity, and advanced algorithms. They move beyond mere temperature regulation to become proactive energy managers and comfort providers, representing a significant leap forward in home climate control. This evolution taps into the broader “Tech” trend of intelligent automation, making our homes more responsive and efficient.
B. The Honeywell Advantage: Brand Trust Meets Innovation
When considering a smart home upgrade, the brand behind the technology is often as important as the features themselves. Honeywell, with its rich history dating back to 1906, has been a stalwart in temperature control systems for over a century. This deep-rooted experience in HVAC (Heating, Ventilation, and Air Conditioning) technology instills a level of trust and confidence that newer entrants sometimes struggle to match. Their smart thermostats are built upon this foundation of reliability and precision engineering, yet they seamlessly integrate the latest innovations in software, connectivity, and user experience. Choosing Honeywell means investing in a product from a “Brand” synonymous with quality and durability, ensuring that your smart home investment is sound and long-lasting. Their devices often feature intuitive apps, robust security protocols for digital safety, and broad compatibility, making them a cornerstone of a well-integrated smart home.
C. Unlocking Efficiency and Convenience: Benefits You Can’t Ignore
The advantages of installing a Honeywell smart thermostat extend far beyond simply having a fancier temperature control unit. These devices deliver concrete benefits that impact both your daily comfort and your financial bottom line.
Firstly, significant energy savings are a primary driver. Smart thermostats learn your schedule, turning down heating or cooling when you’re away and adjusting to your preferred temperature just before you return. Features like geofencing (which uses your phone’s location to know when you’re coming or going), detailed energy reports, and optimized scheduling help reduce wasted energy, directly translating into lower utility bills. This directly addresses the “Money” aspect, providing a tangible return on investment.
Secondly, unparalleled convenience and comfort become a daily reality. Imagine adjusting your home’s temperature from your smartphone while commuting home, or simply asking your voice assistant (like Amazon Alexa or Google Assistant) to make an adjustment. Smart thermostats offer remote control, personalized scheduling, and even adaptive recovery, ensuring your home is always at the perfect temperature without any manual intervention. They integrate seamlessly with other smart home gadgets, creating a unified and automated living experience.
Finally, the insights and data provided by these devices are invaluable. Through the accompanying app, you can monitor your energy usage, identify patterns, and make informed decisions to optimize your home’s efficiency further. This level of control and transparency empowers you to be an active manager of your home’s energy consumption, embodying the “Tech” trend of data-driven decision-making.
II. Preparing for Installation: Your Pre-Flight Checklist
Before you grab your tools and dive into the wiring, a thorough preparation phase is crucial. This step ensures safety, identifies potential compatibility issues, and gathers all necessary resources for a smooth and successful installation. Skipping these preliminary steps can lead to frustration, damage, or even hazardous situations.
A. Safety First: Power Down Your System
This is the most critical step. Working with electrical wiring without cutting the power can result in serious injury or damage to your HVAC system.
How to do it: Locate your home’s electrical panel (usually in a basement, garage, or utility closet). Find the breaker labeled for your furnace, air handler, or HVAC system and flip it to the “OFF” position. It’s also wise to turn off the main breaker for the entire house if you’re unsure, or if your HVAC system’s breaker isn’t clearly marked. To double-check, try to turn on your old thermostat and ensure the system doesn’t respond. This simple act safeguards you and your equipment.
B. Gather Your Toolkit: Essential Items for a Smooth Install
Having the right tools on hand prevents delays and makes the job much easier.
You’ll typically need:
- Phillips and Flathead Screwdrivers: For removing the old thermostat and securing the new one.
- Needle-Nose Pliers/Wire Strippers: Useful for manipulating wires and, if necessary, stripping insulation (though often not needed with modern thermostats).
- Small Level: To ensure your new thermostat is mounted perfectly straight.
- Drill with Appropriate Bits: If you need to drill new pilot holes for the mounting plate (often not required if reusing existing holes).
- Pen or Pencil and Notepad: For labeling wires and taking notes.
- Smartphone with Camera: To take photos of your existing wiring – an absolute lifesaver for reference.
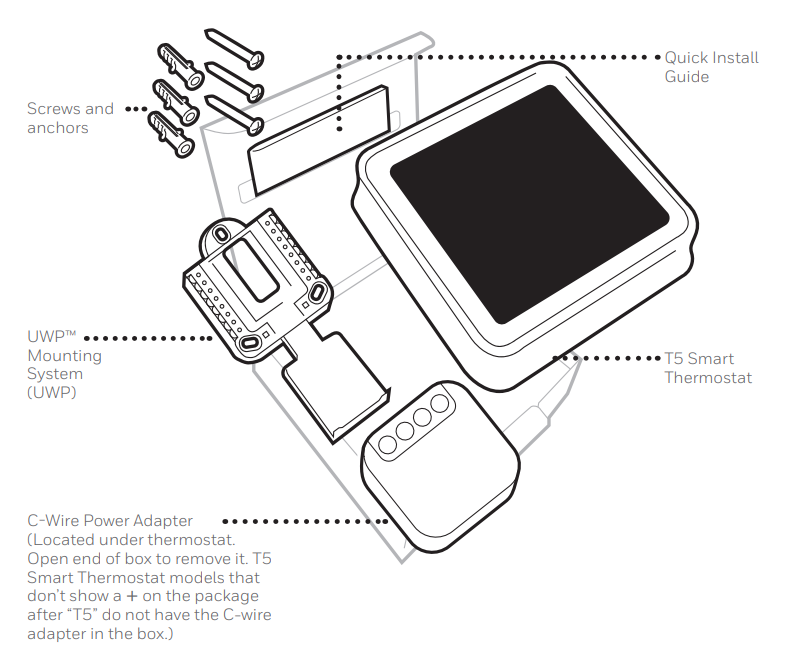
- New Honeywell Smart Thermostat: Of course! Make sure all components (thermostat, wall plate, mounting hardware, manual) are present.
C. Compatibility Check: Understanding Your HVAC System and Wiring
Not all thermostats work with all HVAC systems. Understanding your existing setup is vital for a seamless transition. Most Honeywell smart thermostats are compatible with standard 24-volt systems (gas, oil, electric furnaces, central AC). However, high-voltage systems (often found in older homes or electric baseboard heaters) or proprietary communication systems are generally incompatible. Always refer to your specific Honeywell model’s compatibility requirements.
1. The Crucial C-Wire: What it is and Why it Matters
Many smart thermostats require a “C-wire” (common wire) for continuous power. Unlike traditional thermostats that use batteries or “power stealing” (drawing minute amounts of power from other wires, which can cause issues), a C-wire provides a dedicated 24VAC power supply.
- Why it matters: Without a C-wire, your smart thermostat’s battery may drain quickly, or it might experience intermittent power issues, leading to Wi-Fi connectivity problems or system malfunctions.
- How to check: Remove the cover of your old thermostat. Look for a wire connected to a terminal labeled “C.” If you see one, great! If not, don’t despair. Sometimes, an unused wire might be tucked into the wall, or a C-wire adapter (often included with the thermostat or sold separately) can be used. Some Honeywell models offer battery-powered alternatives, but the C-wire is always the preferred, most reliable power source for optimal performance, especially for always-on Wi-Fi connectivity and advanced features.
2. Identifying Your Existing Wiring: A Visual Guide
Before disconnecting anything, meticulously document your current wiring.
- Take Photos: Use your smartphone to snap clear, close-up pictures of the wiring connected to your old thermostat. Get multiple angles. These photos are your best friend if you get confused during the installation.
- Label Wires: Most old thermostats have terminals labeled with letters (e.g., R, G, Y, W, C). Use the labels provided in your new Honeywell kit (or masking tape and a pen) to label each wire as you disconnect it from the old thermostat’s terminal. Do not rely solely on color, as wire colors can vary. For example, a red wire connected to “R” should be labeled “R.”
D. Choosing the Right Spot: Ideal Thermostat Placement
While you’re likely replacing an existing thermostat, it’s worth considering if its current location is optimal.
- Avoid Heat/Cold Sources: Don’t place the thermostat near direct sunlight, heat registers, windows, outside walls, or behind doors, as these can skew temperature readings.
- Central Location: The ideal spot is on an interior wall in a frequently used central area of your home, allowing it to accurately sense the average temperature.
- Away from Drafts: Drafts from windows or doors can also lead to inaccurate readings.
- Accessibility: Ensure it’s at an accessible height for easy viewing and interaction.
III. The Installation Process: From Old to New
With preparations complete, you’re ready for the hands-on phase of replacing your old thermostat with your new, intelligent Honeywell unit. Proceed methodically, referring back to your photos and labels often.
A. Removing Your Old Thermostat: A Gentle Farewell
This step is critical for a smooth transition. Remember, power should already be off!
1. Documenting Your Connections: The Golden Rule
Before touching any wires, re-verify your wire labels and photos. This cannot be stressed enough. Each wire typically corresponds to a specific function:
- R (Red/Power): Provides 24V power. There might be an R, Rc (cooling power), and Rh (heating power). If you have separate Rc and Rh, your new thermostat might have jumpers, or you might only use one R and cap the other.
- G (Green/Fan): Controls the blower fan.
- Y (Yellow/Cooling): Activates the cooling system (compressor).
- W (White/Heating): Activates the heating system (furnace).
- C (Blue/Common): Provides continuous 24V power (the C-wire).
- O/B (Orange/Blue/Heat Pump): Reversing valve for heat pumps.
2. Detaching the Old Unit
Carefully unscrew the old thermostat from the wall plate. Then, gently disconnect each wire from its terminal, ensuring the corresponding label is securely attached to the wire. Once all wires are free, remove the old wall plate from the wall. Be careful not to let the wires fall back into the wall cavity; you might want to wrap them loosely around a pencil if they’re particularly short.
B. Mounting the New Honeywell Backplate: The Foundation
Your Honeywell smart thermostat comes with a new backplate (or wall plate) that needs to be securely mounted to the wall.
- Positioning: Thread the labeled wires through the opening in the center of the new backplate.
- Leveling: Hold the backplate against the wall and use your small level to ensure it’s perfectly straight.
- Securing: Use the screws provided with your Honeywell thermostat to attach the backplate to the wall. If the existing screw holes don’t line up, you may need to mark and drill new pilot holes. Ensure the backplate is firmly affixed and doesn’t wiggle.
C. Connecting the Wires: Precision is Key
This is where your diligent labeling pays off. The new Honeywell backplate will have clearly marked terminals.
1. Matching Labeled Wires to the New Terminals
Take each labeled wire and connect it to the corresponding terminal on the new Honeywell backplate. For example, the wire you labeled “R” goes into the “R” terminal, “Y” into “Y,” and so on.
- Stripping Wires (If Necessary): The new terminals usually require about 1/4 to 3/8 inch of exposed copper wire. If your wires are too short, or the insulation is damaged, use your wire strippers to expose a fresh section of copper.
- Inserting Wires: Many Honeywell thermostats use push-in terminals or screw terminals. For push-in, simply push the wire firmly into the corresponding hole until it clicks into place. For screw terminals, insert the wire underneath the screw and tighten it securely, but don’t overtighten.
2. Securing Connections
Double-check every connection. Give each wire a gentle tug to ensure it’s firmly seated and won’t come loose. Loose connections are a common cause of troubleshooting headaches. If you have any unused wires (e.g., if you had an O/B wire but your new system is conventional), cap them off with wire nuts to prevent accidental shorts.
D. Attaching Your New Honeywell Smart Thermostat
Once the wires are securely connected to the backplate, it’s time to attach the main thermostat unit.
- Alignment: Carefully align the thermostat with the backplate. There are usually pins or connectors that need to mate properly.
- Snap into Place: Gently push the thermostat onto the backplate until it snaps securely into position. You might hear a click. Ensure it’s flush against the wall and stable.
E. Restoring Power and Initial Boot-Up
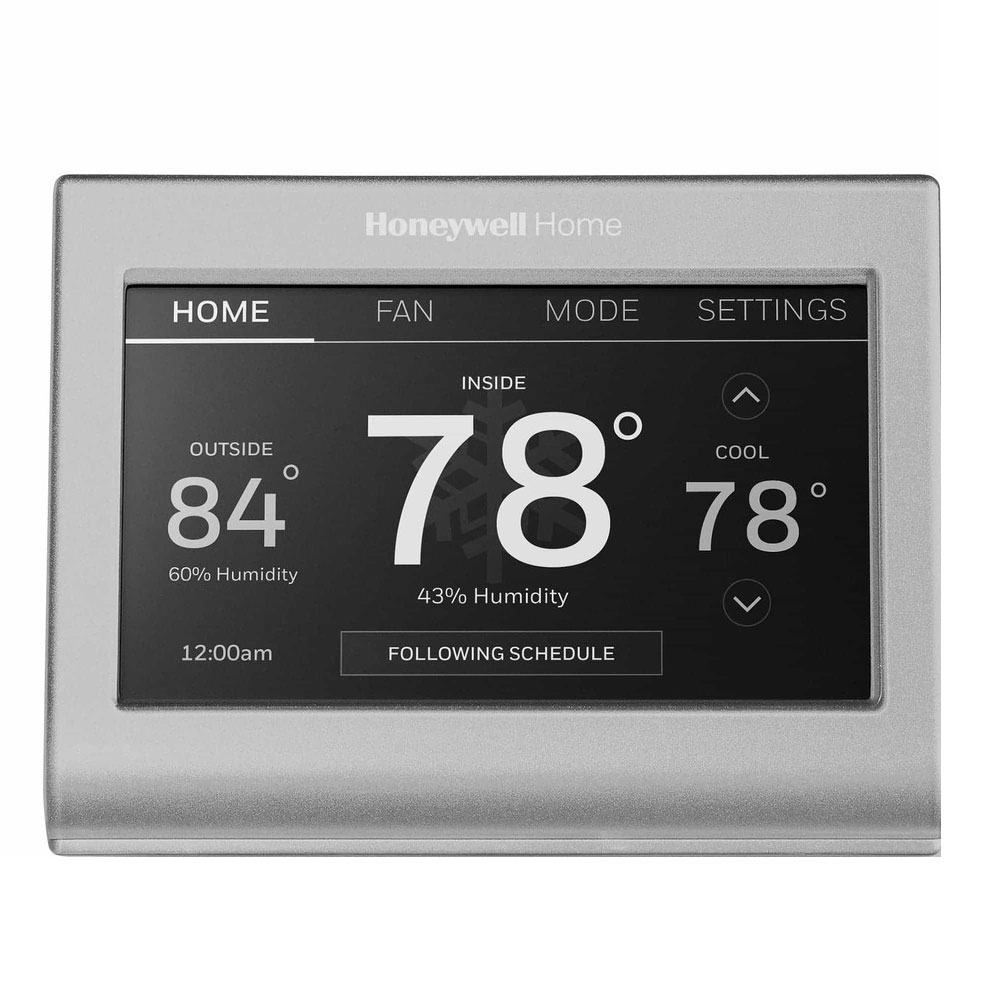
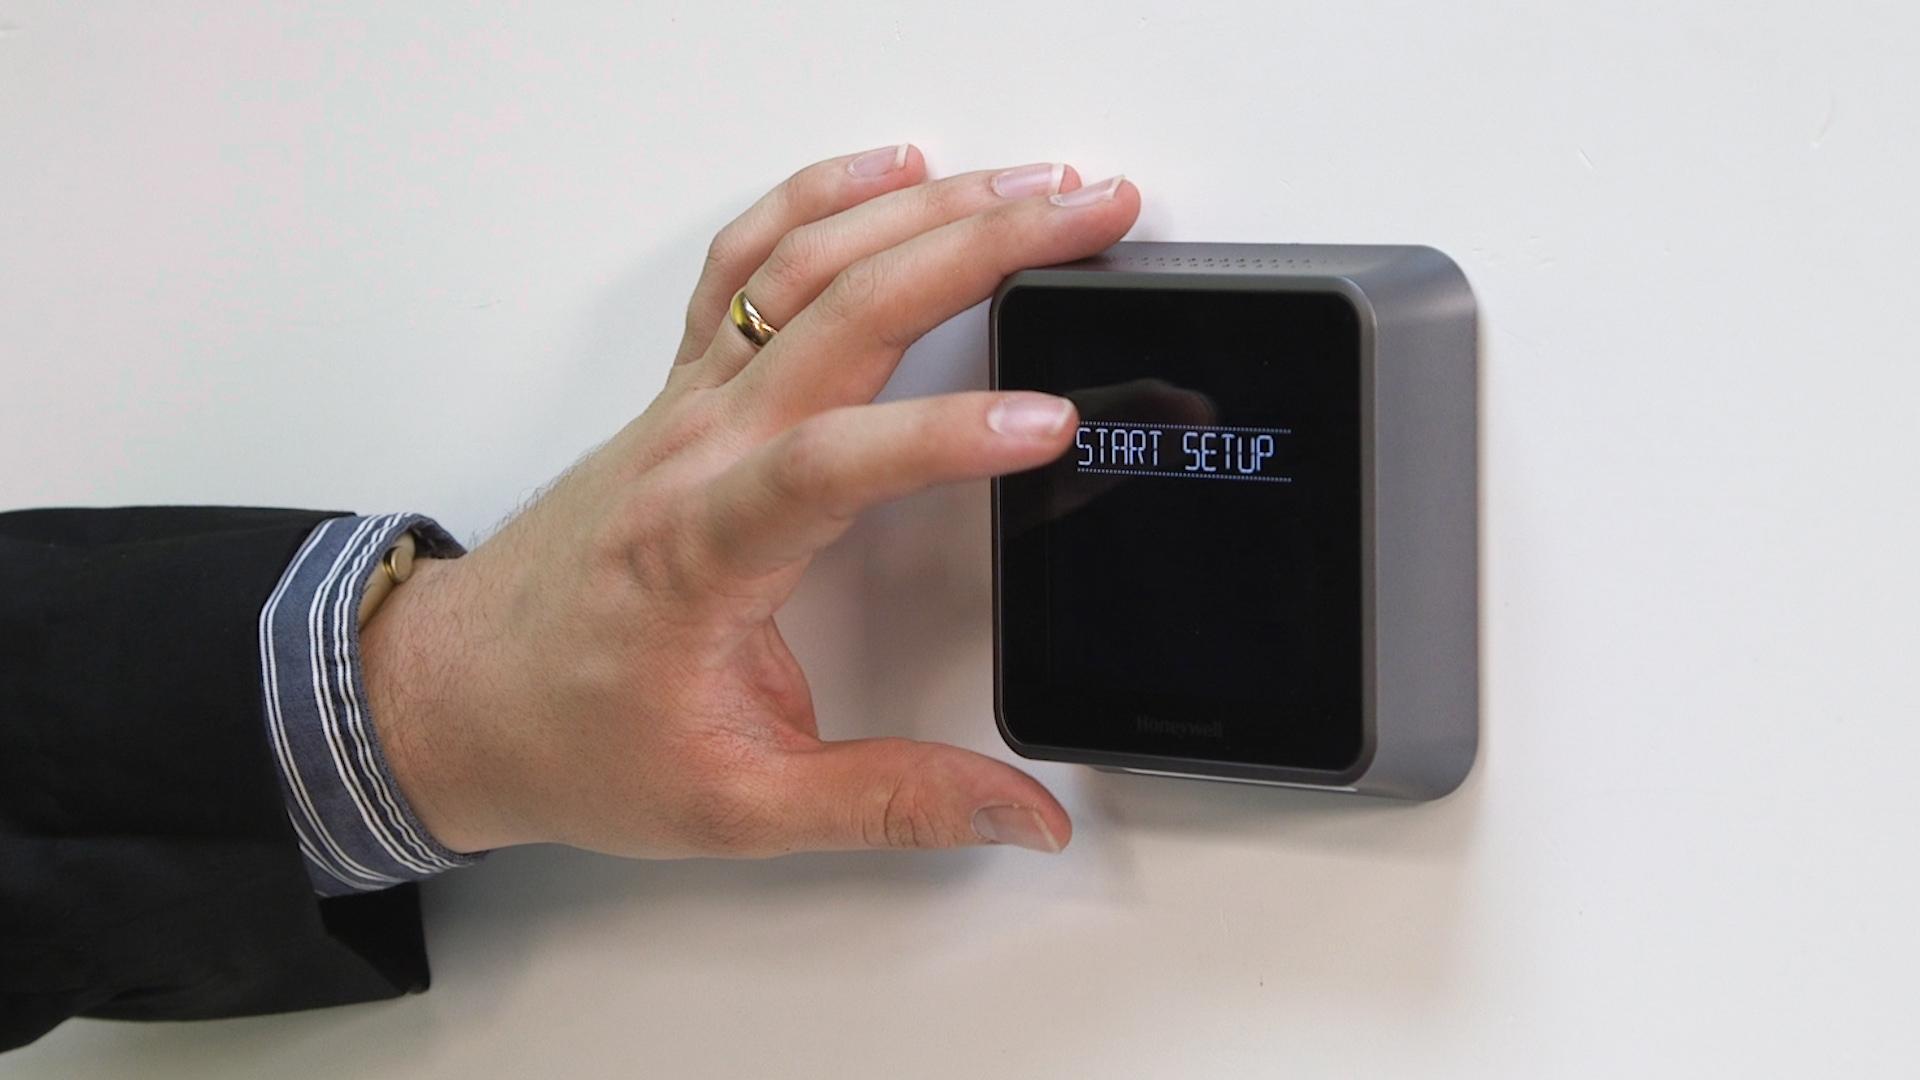
Return to your electrical panel and flip the breaker for your HVAC system back to the “ON” position. Your new Honeywell smart thermostat should power up. It will likely display a greeting message, the current temperature, or begin an initial setup wizard. This moment marks a significant step into your smarter home environment.
IV. Configuring Your Smart Thermostat: Bringing Intelligence to Life
With the physical installation complete, the real “smart” features come to life through configuration and app integration. This phase connects your thermostat to your home network and personalizes its operation to your lifestyle.
A. The First Power-On: On-Screen Setup
Upon powering up, your Honeywell thermostat will likely guide you through an initial setup process directly on its screen. This typically involves:
- Language Selection: Choosing your preferred language.
- HVAC System Type: Identifying whether you have a conventional system (furnace and AC) or a heat pump, and how many stages of heating/cooling. This is crucial for the thermostat to operate your system correctly and efficiently. If unsure, refer to your HVAC system’s manual or consult an HVAC professional.
- Fan Control: Setting fan preferences (e.g., whether the fan runs continuously or only with heating/cooling).
- Date and Time: Setting the correct date and time.
B. Connecting to Your Home Wi-Fi Network
A key feature of a smart thermostat is its internet connectivity, which enables remote control, updates, and advanced features.
- Wi-Fi Setup: Follow the on-screen prompts to connect your thermostat to your home Wi-Fi network. You’ll typically be asked to select your network name (SSID) from a list and enter your Wi-Fi password.
- Strong Signal: Ensure your thermostat is within good range of your Wi-Fi router for a stable connection. A weak signal can lead to connectivity drops and prevent the thermostat from communicating with the app or receiving updates. If you have a large home, consider a Wi-Fi extender.
C. Downloading and Setting Up the Honeywell Home App
The Honeywell Home app (available for iOS and Android) is your primary interface for controlling and managing your smart thermostat from anywhere.
1. Creating Your Account
Download the Honeywell Home app to your smartphone or tablet. You’ll need to create an account if you don’t already have one. This account securely links your thermostat to your device. Follow the app’s instructions to add your new thermostat to your account, often involving scanning a QR code on the thermostat or manually entering a device ID.
2. Integrating with Your Smart Home Ecosystem
One of the great advantages of smart devices is their ability to work together. Honeywell smart thermostats often integrate with popular smart home platforms like Amazon Alexa, Google Assistant, Apple HomeKit, and Samsung SmartThings.
- Voice Control: Once integrated, you can use voice commands to adjust the temperature (e.g., “Alexa, set the thermostat to 72 degrees”).
- Automation: You can create routines where your thermostat works in conjunction with other smart devices, such as lights turning off when you leave and your thermostat goes into “away” mode. This expands the “Tech” utility far beyond simple temperature control, creating a truly automated home.
D. Personalizing Your Settings: Schedules, Geofencing, and More
Once connected, delve into the app to unlock the full potential of your new smart thermostat.
1. Programming Energy-Saving Schedules
One of the most effective ways to save money is by setting intelligent schedules. Program different temperatures for various times of the day (e.g., warmer when you’re at work, cooler at night). The app makes this intuitive, allowing you to create custom schedules for weekdays and weekends, or even individual days. Over time, many Honeywell models will also learn your preferences and suggest optimal schedules.
2. Leveraging Geofencing for Automated Comfort
Geofencing uses your smartphone’s location to automatically switch your thermostat into “away” mode when you leave home and “home” mode when you’re approaching. This ensures you’re not heating or cooling an empty house, but also that your home is comfortable by the time you walk through the door. It’s a prime example of smart technology adapting to your real-time needs, contributing significantly to both comfort and “Money” savings.
3. Voice Control Integration (e.g., Alexa, Google Assistant)
Beyond basic setup, explore integrations. Connecting your Honeywell smart thermostat to popular voice assistants like Amazon Alexa or Google Assistant provides a hands-free way to manage your climate control. Simple commands can adjust temperatures, check the status, or even change modes, adding another layer of convenience to your smart home experience.
V. Maximizing Your Smart Thermostat’s Potential & Troubleshooting
The installation is complete, and your thermostat is configured. Now, it’s about making the most of its features and knowing how to address common issues.
A. Advanced Features for Enhanced Living
Honeywell smart thermostats often come packed with advanced functionalities that go beyond basic temperature control:
- Energy Reports: The app provides detailed insights into your energy consumption, allowing you to track usage, understand patterns, and identify opportunities for further savings. This data-driven approach aligns perfectly with modern “Tech” and “Money” management principles.
- Filter Change Reminders: Many models can remind you when it’s time to change your HVAC filter, ensuring optimal system performance and air quality.
- Temporary Holds and Vacation Mode: Override your schedule temporarily for unexpected changes or set a long-term “vacation mode” to save energy while you’re away.
- Weather Integration: Some models can pull local weather forecasts to optimize heating or cooling cycles proactively.
- Fan Control Options: Beyond auto, you can often set the fan to run for a certain duration each hour to circulate air, improving overall comfort.
B. Common Troubleshooting Tips
Even with careful installation, issues can arise. Here are solutions to common problems:
1. Wi-Fi Connectivity Issues
- Check Router: Ensure your Wi-Fi router is powered on and working correctly.
- Signal Strength: Verify the thermostat is within range of your Wi-Fi network. Consider a repeater if the signal is weak.
- Reboot: Try rebooting your thermostat (usually by turning the HVAC breaker off for 30 seconds and back on) and your Wi-Fi router.
- Incorrect Password: Double-check your Wi-Fi password in the app and on the thermostat.
2. Power Problems (No C-Wire solution)
If your thermostat isn’t powering on or frequently drops Wi-Fi and you don’t have a C-wire:
- C-Wire Adapter: If your model didn’t include one, you may need to purchase and install a C-wire adapter (also known as an external power adapter or power extender kit). This connects to your furnace and provides the necessary continuous power.
- Professional Help: For complex wiring scenarios or if you’re uncomfortable, consult an HVAC professional to install a C-wire or adapter.
3. System Not Responding
- Breaker Check: Ensure your HVAC system’s breaker is still “ON.”
- Wiring Check: Power off the system and re-verify all wire connections at the thermostat and, if possible, at the furnace control board. A loose wire is a frequent culprit.
- Thermostat Settings: Double-check your thermostat’s system settings (e.g., “Heat,” “Cool,” “Off,” “Auto”). Ensure the desired temperature is set higher than the current room temperature for heating, or lower for cooling.
- Safety Features: Many HVAC systems have safety cut-offs. If the furnace filter is clogged or the AC coil is frozen, the system might not run.
C. Regular Maintenance for Optimal Performance
While your Honeywell smart thermostat is largely maintenance-free, a few simple practices can ensure its longevity and continued efficiency:
- Keep it Clean: Dust the exterior of the thermostat periodically to keep sensors clear.
- HVAC Maintenance: Remember that the thermostat is only part of the system. Regular maintenance of your furnace and AC unit by a qualified technician will ensure your entire HVAC system operates at peak efficiency, maximizing the “Money” savings your smart thermostat helps achieve.
- App Updates: Keep the Honeywell Home app updated on your smartphone to ensure you have the latest features and security patches.
VI. Conclusion: A Smarter Home Awaits
Installing a Honeywell smart thermostat is a straightforward yet profoundly impactful upgrade that truly embodies the promise of the modern smart home. By following these detailed steps, you’ve not only replaced an outdated piece of hardware but have integrated a sophisticated piece of “Tech” into the core of your living environment. This investment pays dividends in daily comfort, effortless control, and significant “Money” savings through optimized energy consumption.
From the meticulous preparation and secure wiring to the intuitive app setup and smart home integration, each step leads you closer to a home that anticipates your needs and responds intelligently. The Honeywell brand ensures you’re investing in reliability and innovation, offering peace of mind alongside cutting-edge features. Embrace the full potential of your new smart thermostat by utilizing its scheduling, geofencing, and energy reporting capabilities. With your Honeywell smart thermostat in place, you’re not just managing your home’s temperature; you’re orchestrating a symphony of efficiency and comfort, unlocking a smarter, more sustainable, and ultimately more enjoyable way to live. Your journey into the truly intelligent home has just begun.
aViewFromTheCave is a participant in the Amazon Services LLC Associates Program, an affiliate advertising program designed to provide a means for sites to earn advertising fees by advertising and linking to Amazon.com. Amazon, the Amazon logo, AmazonSupply, and the AmazonSupply logo are trademarks of Amazon.com, Inc. or its affiliates. As an Amazon Associate we earn affiliate commissions from qualifying purchases.