In the rapidly evolving landscape of technology, where data consumption is constantly escalating, upgrading or adding a hard drive to your PC remains one of the most fundamental yet impactful enhancements you can make. Whether you’re a gamer seeking more space for the latest titles, a content creator needing room for high-resolution media, a professional managing vast datasets, or simply someone looking to breathe new life into an aging system, understanding how to properly install a hard drive is an invaluable skill. This tutorial will walk you through the entire process, from preliminary preparations to final software configuration, ensuring a smooth and successful installation. We’ll cover various drive types and provide practical tips to optimize your PC’s storage and performance, aligning perfectly with our mission to empower users with essential tech knowledge for improved productivity and digital security.
Why Upgrade or Add a Hard Drive? Enhancing Your Digital Ecosystem
Before diving into the intricate steps of installation, it’s crucial to understand the compelling reasons why one might undertake such a project. This foundational understanding not only justifies the effort but also helps in making informed decisions about the type of drive best suited for your needs.
Expanding Storage Capacity
The most obvious reason to install a new hard drive is to increase your PC’s storage capacity. Modern software, operating systems, and especially multimedia files (4K videos, high-resolution photos, AAA games) consume an enormous amount of space. Running out of storage can lead to sluggish performance, frustrating errors, and the constant need to delete files. Adding a secondary drive or replacing a smaller primary drive provides the breathing room necessary for your digital life to flourish without compromise. For instance, a dedicated large-capacity Hard Disk Drive (HDD) can serve as an excellent archive for your media library, while a Solid State Drive (SSD) handles your OS and frequently used applications for maximum speed.
Boosting System Performance
While adding an HDD primarily addresses capacity, upgrading to a Solid State Drive (SSD) can dramatically improve your PC’s overall performance. Traditional HDDs, with their spinning platters and read/write heads, are mechanical bottlenecks. SSDs, on the other hand, use flash memory, offering significantly faster boot times, application loading, and file transfer speeds. Replacing an old HDD with an SSD as your primary drive (where your operating system resides) is arguably the single most impactful upgrade you can make for general system responsiveness. Furthermore, installing a cutting-edge NVMe M.2 SSD takes this performance boost to an even higher level, utilizing PCIe lanes for unparalleled data transfer rates, making it indispensable for professionals working with massive files or gamers demanding the fastest load times.
Replacing a Failing Drive or Building a New PC
Hard drives, like all electronic components, have a finite lifespan. If you’ve noticed increasingly slow performance, frequent crashes, or unusual noises emanating from your PC, your existing drive might be failing. Replacing a failing drive is not just an upgrade; it’s a critical preventative measure against data loss. Similarly, for enthusiasts embarking on a new PC build, installing the hard drive is a fundamental step in bringing their custom rig to life. In these scenarios, knowing the installation process ensures data integrity and a stable foundation for your computing experience. This also ties into digital security, as regular backups become critical when dealing with potential drive failures.
Essential Preparations Before You Begin: Safety, Tools, and Drive Selection
A successful hard drive installation begins long before you open your PC case. Proper preparation ensures safety, streamlines the process, and prevents common pitfalls. This section will guide you through gathering necessary tools, understanding safety precautions, and making an informed decision about your new drive.
Gathering Your Tools and Workspace Setup
Having the right tools at hand will make the installation process much smoother.
- Screwdriver Set: A basic Philips head screwdriver (magnetic tip is a bonus) is usually sufficient for most PC cases and drive mounting. Some modern cases feature tool-less designs, but a screwdriver is always a good idea.
- Anti-Static Wrist Strap: This is crucial for preventing electrostatic discharge (ESD), which can permanently damage sensitive internal components. If you don’t have one, regularly touching a grounded metal object (like an unpainted part of your PC case frame) can help discharge static.
- Flashlight or Headlamp: PC interiors can be dark, and a light source will help you locate ports and ensure proper connections.
- Cable Ties (Optional but Recommended): For neat cable management, which improves airflow and aesthetics.
- Your New Hard Drive(s): Ensure you have the drive itself, and any necessary mounting brackets or screws that came with it.
- SATA Data Cables (for SATA drives): Your motherboard typically comes with a few spare SATA cables, but if not, you might need to purchase one or two. M.2 NVMe drives don’t require separate data cables.
Prioritizing Safety: Power Down and Anti-Static Measures
Safety is paramount when working inside a computer.
- Power Down and Unplug: Completely shut down your PC, then unplug it from the wall outlet.
- Disconnect Peripherals: Unplug all external devices like monitors, keyboards, mice, and USB drives.
- Ground Yourself: Wear your anti-static wrist strap, attaching it to an unpainted metal part of the PC chassis. Alternatively, frequently touch the metal chassis before and during handling components. This prevents static electricity from damaging the delicate internal circuitry.
- Work on a Clean, Flat Surface: Avoid carpeted areas, which are prone to static buildup. A wooden or non-conductive table is ideal.
Choosing the Right Drive: HDD, SATA SSD, or NVMe M.2?
The type of drive you choose significantly impacts performance and installation steps.
- Hard Disk Drives (HDDs): Best for bulk storage where speed isn’t the primary concern. They offer the lowest cost per gigabyte, making them ideal for archiving photos, videos, and large game libraries. HDDs typically come in 3.5-inch form factors for desktops, requiring dedicated drive bays and SATA power/data cables.
- SATA Solid State Drives (SATA SSDs): A significant upgrade from HDDs in terms of speed, offering faster boot times and application loading. They come in a 2.5-inch form factor, making them compatible with most desktop cases (often requiring a 2.5-inch to 3.5-inch adapter or dedicated 2.5-inch bays). Like HDDs, they require a SATA power and a SATA data cable.
- NVMe M.2 SSDs: The pinnacle of consumer storage performance. These compact drives plug directly into a dedicated M.2 slot on your motherboard and utilize the PCIe interface for incredibly fast data transfer rates, far surpassing SATA limits. They are ideal for operating systems, frequently used applications, and demanding games. Make sure your motherboard has an M.2 slot and supports NVMe (some older M.2 slots only support SATA M.2 SSDs, which are slower). Most modern motherboards have multiple M.2 slots, often with heat sinks to manage thermal performance, which is crucial for these high-speed drives.
Understanding these distinctions will guide your purchase and subsequent installation. For instance, if you’re installing an NVMe drive, you won’t need SATA cables, simplifying the wiring process.
The Physical Installation Process: A Step-by-Step Guide
With preparations complete, it’s time to physically integrate your new hard drive into your PC. This phase involves opening the case, mounting the drive, and connecting the necessary cables.
1. Opening Your PC Case
Carefully remove the side panel(s) of your PC case. Most cases use thumbscrews or standard screws at the rear of the case. Once the screws are removed, slide the panel backward and then lift it away. Some cases might have a hinged panel. Familiarize yourself with your specific case design. Set the panel aside in a safe place.
2. Locating Drive Bays or M.2 Slots
- For 3.5-inch HDDs: Look for dedicated drive cages or bays, typically near the front or bottom of the case. These often have slide-out trays or screw-in mounts.
- For 2.5-inch SATA SSDs: Many cases have dedicated 2.5-inch mounts, often on the back of the motherboard tray or within the 3.5-inch drive cages (using adapters).
- For NVMe M.2 SSDs: Locate the M.2 slot(s) directly on your motherboard. They are typically horizontal slots, often covered by a heatsink, and secured by a small screw at the end. Consult your motherboard manual for exact locations if unsure.
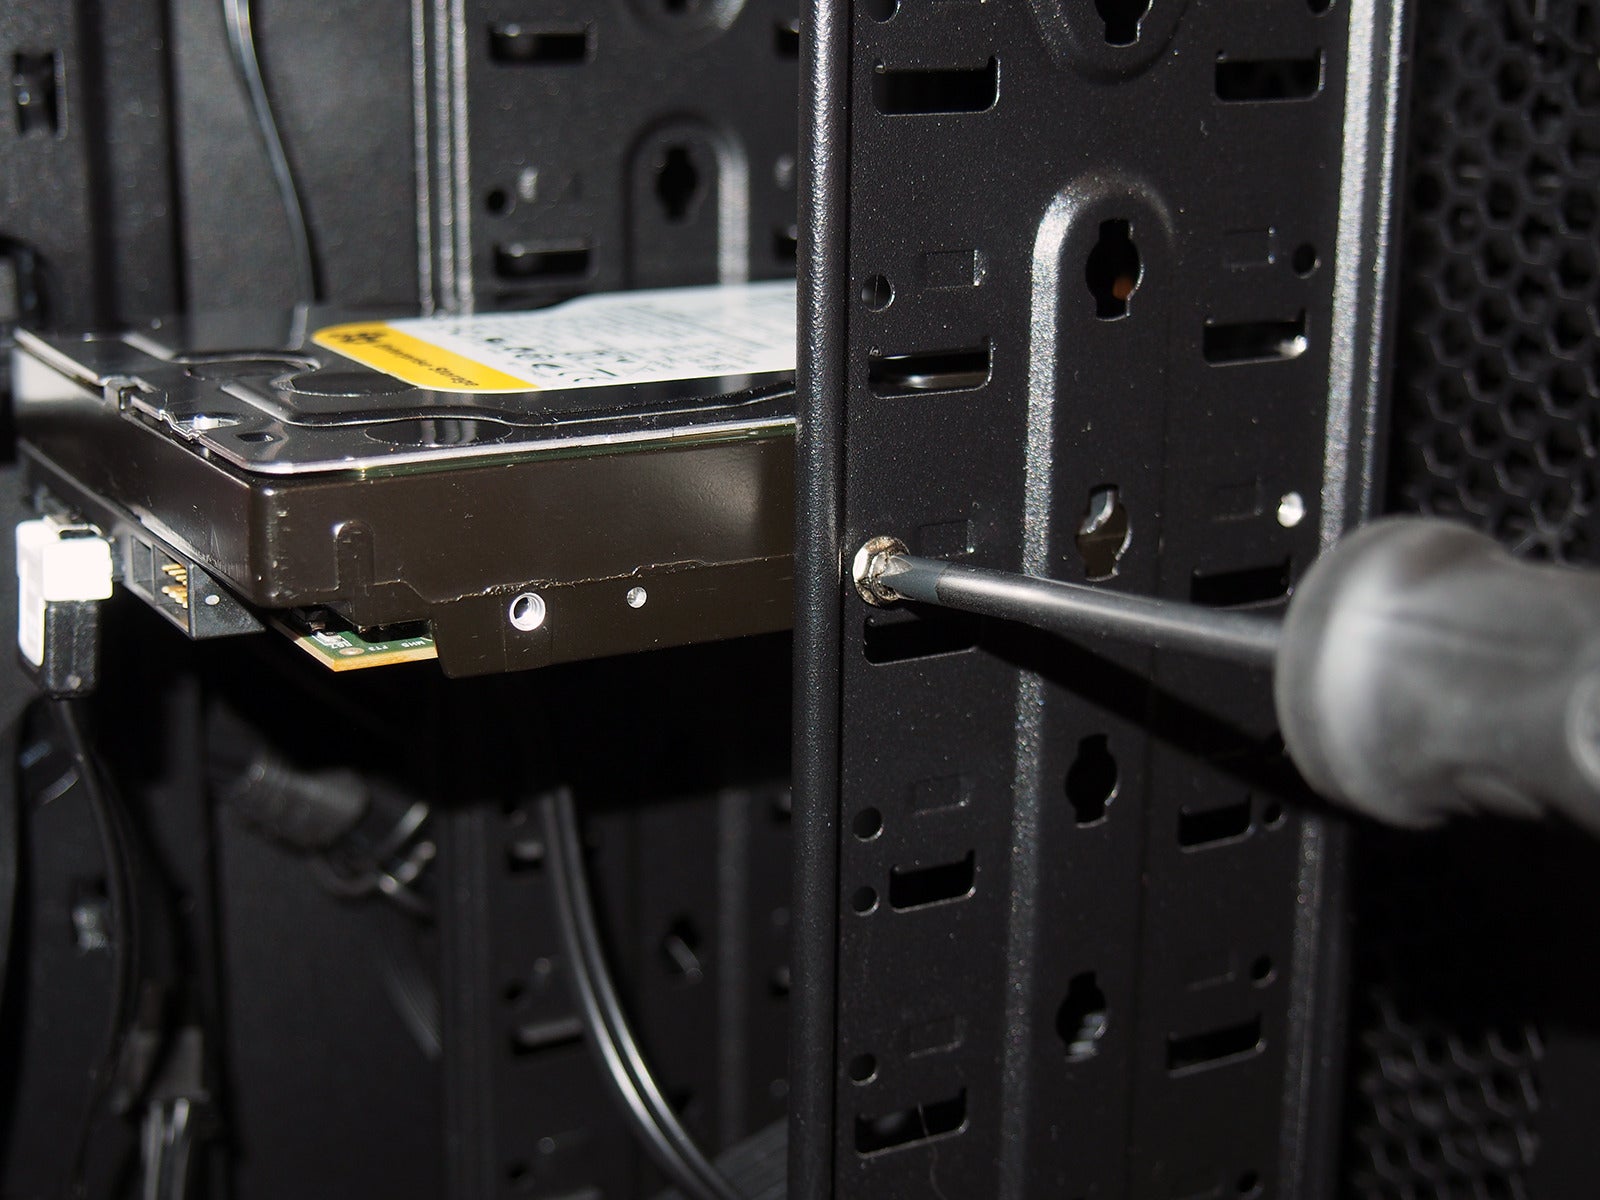
3. Mounting the Drive
- For 3.5-inch HDDs: Slide the drive into an available bay until it clicks into place (tool-less design) or align the screw holes and secure it with screws provided with your case or drive. Ensure the drive’s connectors face the interior of the case for easy cable access.
- For 2.5-inch SATA SSDs: If using a 3.5-inch adapter, attach the SSD to the adapter first, then mount the adapter as you would a 3.5-inch HDD. If your case has dedicated 2.5-inch mounts, simply secure the SSD with screws.
- For NVMe M.2 SSDs: Unscrew the small screw (and potentially remove the heatsink) at the end of the M.2 slot. Carefully insert the M.2 drive into the slot at a slight angle (usually 30 degrees) until it’s fully seated. Gently push the drive down until it’s flat, and then re-secure it with the small screw. If your motherboard has an M.2 heatsink, reattach it over the drive, ensuring it makes good contact (thermal pads are often used).
4. Connecting Power and Data Cables (for SATA Drives)
This step applies only to 3.5-inch HDDs and 2.5-inch SATA SSDs. NVMe M.2 drives do not require separate cables.
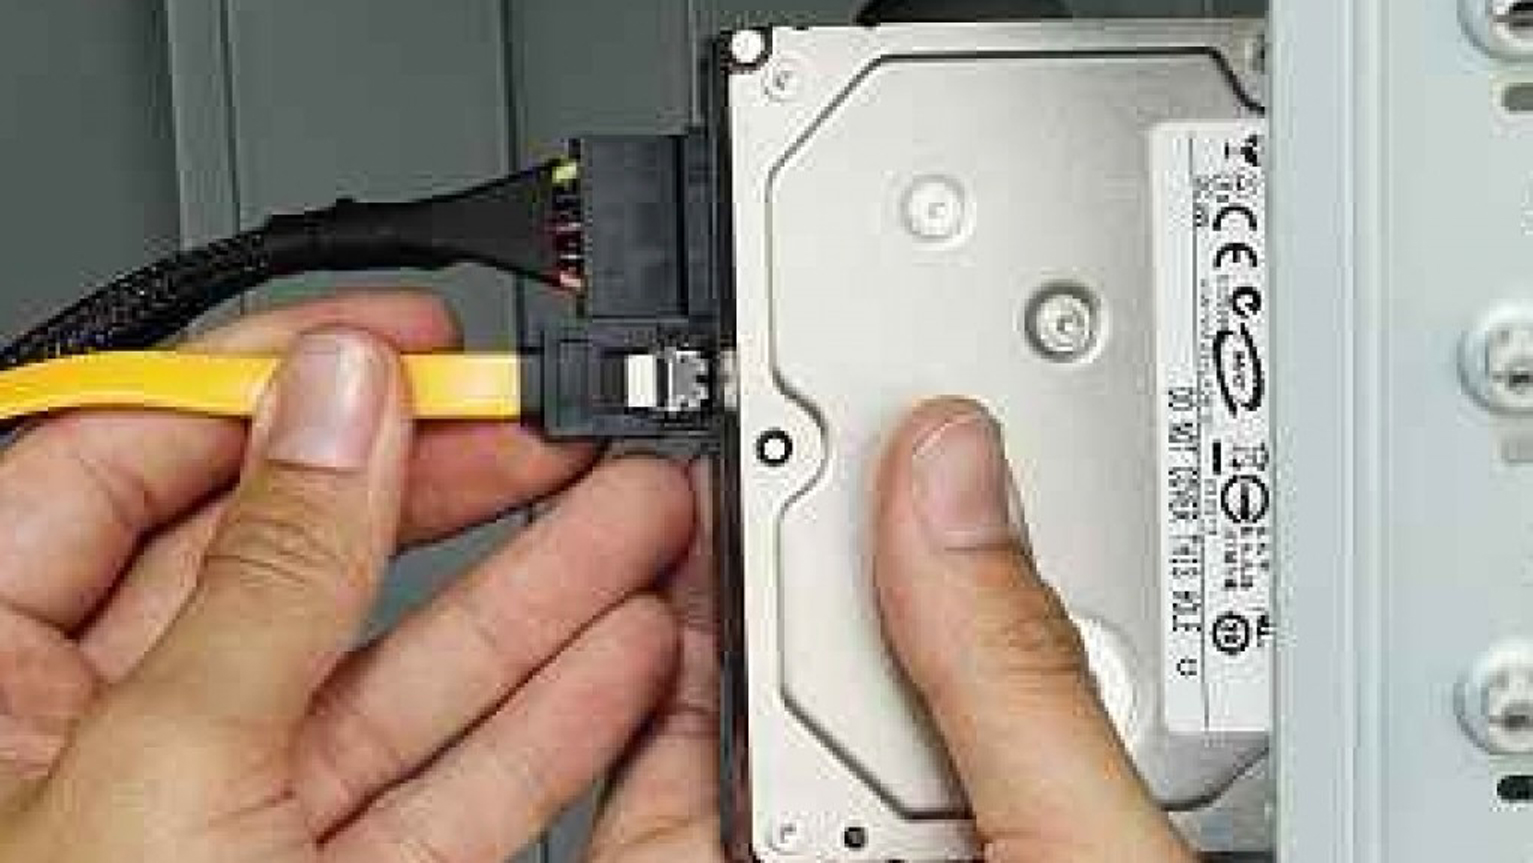
- SATA Power Cable: Locate a SATA power connector from your power supply unit (PSU). These are typically flat, wide connectors with five or more wires. Plug one end firmly into the back of your new SATA drive. Ensure it’s fully seated and clicks into place.
- SATA Data Cable: Connect one end of the SATA data cable (a thinner, L-shaped connector) to the back of your new SATA drive. Connect the other end to an available SATA port on your motherboard. Motherboard SATA ports are also L-shaped and often numbered (SATA0, SATA1, etc.). It’s generally good practice to use the lowest numbered available port for your primary drive, though for a secondary drive, any available port will work.
5. Cable Management (Optional but Recommended)
Neatly route your power and data cables, tucking them away behind the motherboard tray or using cable ties. Good cable management improves airflow, reduces clutter, and makes future maintenance easier.
6. Closing the PC Case
Once all connections are secure and cables are managed, carefully replace the side panel(s) of your PC case and secure them with their screws. Reconnect all external peripherals and the power cable.
Configuring Your New Drive: Software Setup
The physical installation is only half the battle. Your operating system needs to recognize, initialize, and format the new drive before it can be used. This process is primarily handled through your PC’s BIOS/UEFI settings and operating system’s disk management tools.
1. Accessing BIOS/UEFI to Verify Detection
Power on your PC. As it starts up, repeatedly press the designated key to enter your BIOS/UEFI settings. Common keys include Del, F2, F10, or F12 (consult your motherboard manual if unsure).
- Once in BIOS/UEFI, navigate to the storage or boot configuration section. Look for a list of connected drives. Your new drive should be listed there. If it’s not, power down your PC, double-check all cable connections (for SATA drives) or reseat the M.2 drive. For NVMe drives, ensure your M.2 slot supports NVMe and not just SATA.
- Quick Tip: If this is a new primary drive for an OS installation, ensure it’s set as the first boot device if you intend to install Windows/Linux on it immediately after. Otherwise, just confirm detection.
- Save changes and exit BIOS/UEFI. Your PC will now boot into your operating system.
2. Initializing and Formatting the Drive in Windows
For Windows users, the Disk Management tool is where you’ll configure your new drive.
- Open Disk Management: Press
Windows Key + Xand select “Disk Management” from the menu. - Initialize Disk: If it’s a brand new drive, a “Initialize Disk” window will automatically pop up. If not, find your new drive (it will likely appear as “Disk X” with “Unallocated” space) and right-click on it, then select “Initialize Disk.”
- Choose a Partition Style:
- MBR (Master Boot Record): Older standard, suitable for drives up to 2TB. If your drive is larger than 2TB, MBR will not utilize the full capacity.
- GPT (GUID Partition Table): Modern standard, supports drives larger than 2TB and is required for UEFI-based systems. For most modern systems and drives, GPT is the recommended choice.
- Click “OK.”
- Choose a Partition Style:
- Create a New Simple Volume: Right-click on the “Unallocated” space of your new drive and select “New Simple Volume…” This will launch the New Simple Volume Wizard.
- Specify Volume Size: You can use the entire unallocated space or partition it into multiple smaller drives. For most users, using the maximum available space is sufficient.
- Assign Drive Letter: Choose an available drive letter (e.g., D:, E:).
- Format Partition:
- File System: For Windows, NTFS is the standard.
- Allocation unit size: Leave as “Default.”
- Volume label: Give your drive a descriptive name (e.g., “Data Drive,” “Games,” “Media Storage”).
- Perform a quick format: Check this box for a faster formatting process.
- Click “Next” and then “Finish” to complete the process.
Your new drive should now appear in “This PC” (or “My Computer”) and be ready for use!
3. Configuring Drives in Linux or macOS
- Linux: Users can typically use graphical tools like “Disks” (GNOME) or “KDE Partition Manager,” or command-line utilities such as
fdisk,gdisk, andmkfsto initialize, partition, and format their drives. Common file systems include Ext4, XFS, or Btrfs. - macOS: Use “Disk Utility” (found in Applications/Utilities). Select your new drive, erase it, choose a format (APFS for modern macOS, Mac OS Extended (Journaled) for older systems), and give it a name.
Troubleshooting Common Issues and Final Thoughts
Even with careful preparation, issues can sometimes arise. Here are some common troubleshooting tips and final considerations.
Common Troubleshooting Scenarios
- Drive Not Detected in BIOS/UEFI or OS:
- SATA Drives: Double-check both the power and data cables. Ensure they are firmly seated at both ends (drive, PSU, motherboard). Try a different SATA data cable or port on the motherboard.
- M.2 Drives: Ensure the drive is fully seated in the M.2 slot. Check your motherboard manual to confirm the slot supports NVMe (if applicable) and if using certain M.2 slots disables other SATA ports (this is common on some motherboards).
- Power Supply: Ensure your PSU has enough wattage to power all your components, especially if adding multiple drives.
- Drive Detected but Showing “Unallocated” or “Raw” in Disk Management: This is normal for a new drive. Follow the “Initialize Disk” and “New Simple Volume” steps detailed above.
- Slow Performance:
- SATA Drives: Ensure the drive is connected to a SATA 6Gb/s (SATA III) port for optimal speed. Older motherboards might have slower SATA II ports.
- NVMe M.2 Drives: Confirm it’s running at PCIe x4 (or higher) speeds. Check your motherboard manual as some M.2 slots might share bandwidth with other components, potentially reducing speed. Ensure you have the latest chipset drivers installed.
- Noises from the Drive (HDD only): If your new HDD is making clicking, grinding, or excessive rattling noises, it might be faulty. Back up any data immediately and consider an RMA.
Final Thoughts on Productivity and Digital Security
Integrating a new hard drive is more than just adding space; it’s an opportunity to optimize your workflow and enhance your digital security.
- Productivity: By strategically placing your operating system and frequently used applications on a fast SSD (especially NVMe) and using a high-capacity HDD for archival or less frequently accessed data, you create a tiered storage solution that maximizes both speed and cost-effectiveness. This translates directly into faster boot times, quicker application launches, and reduced waiting, boosting overall productivity.
- Digital Security: A new drive can also be crucial for a robust backup strategy. Consider using the new drive as a dedicated backup location for your critical files, either through Windows’ built-in backup tools, third-party software, or simply by manually copying important documents. While internal backups are good, remember the golden rule of 3-2-1 backup strategy: at least 3 copies of your data, on 2 different types of storage, with 1 copy off-site. Your new internal drive can be one of those two storage types.
Installing a hard drive into your PC might seem daunting at first, but by following these detailed steps and paying attention to safety and component compatibility, you can confidently expand your storage and significantly enhance your computing experience. Embrace the power of DIY upgrades and unlock your PC’s full potential!
aViewFromTheCave is a participant in the Amazon Services LLC Associates Program, an affiliate advertising program designed to provide a means for sites to earn advertising fees by advertising and linking to Amazon.com. Amazon, the Amazon logo, AmazonSupply, and the AmazonSupply logo are trademarks of Amazon.com, Inc. or its affiliates. As an Amazon Associate we earn affiliate commissions from qualifying purchases.