In today’s visually driven world, the fonts you choose can speak volumes before a single word is read. Whether you’re a graphic designer crafting a brand identity, a student polishing a presentation, a content creator aiming for engaging visuals, or simply someone looking to personalize their computing experience, understanding how to install and manage fonts on Windows is a fundamental skill. This guide will walk you through the straightforward process of adding new fonts to your Windows operating system, transforming your documents, designs, and digital interactions.

The ability to incorporate custom fonts goes beyond mere aesthetics. In the realm of Tech and Design, fonts are powerful tools. For brands, a unique typeface can become an integral part of their Corporate Identity, fostering recognition and conveying specific emotions or values. In personal branding, carefully selected fonts can imbue your communications with personality and professionalism. On a practical level, well-chosen fonts can enhance readability, improve the user experience of applications, and even boost Productivity by making content more accessible and engaging.
The process of installing fonts on Windows has become increasingly user-friendly over the years, with Microsoft offering intuitive methods to integrate new typefaces into your system. This means you can quickly expand your typographical palette from the vast array of free and commercial fonts available online, or even those you’ve created yourself.
Understanding Font Files and Where to Find Them
Before you can install a font, it’s essential to understand what you’re dealing with. Fonts come in various file formats, with the most common on Windows being:
- TrueType Fonts (.ttf): This is one of the oldest and most widely supported font formats. TTF files are known for their scalability and compatibility across different applications and operating systems.
- OpenType Fonts (.otf): An advancement on TrueType, OpenType fonts offer more sophisticated features, including support for a wider range of characters, ligatures, stylistic alternates, and advanced typography. They are also highly scalable and cross-platform compatible.
- Font Collections (.ttc): These are files that contain multiple TrueType fonts within a single file, often used for Asian language fonts.
Where to Discover and Download Fonts
The digital landscape is brimming with resources for font enthusiasts. Here are some popular avenues for finding fonts, ranging from free options to premium selections:
- Google Fonts: A treasure trove of high-quality, open-source fonts that are completely free to use for personal and commercial projects. They offer a vast library with extensive language support and are easily integrated into web projects.
- Font Squirrel: Another excellent source for free, commercially licensed fonts. Font Squirrel curates a selection of high-quality free fonts and often provides webfont kits for easy website integration.
- Adobe Fonts: Included with Adobe Creative Cloud subscriptions, Adobe Fonts offers a massive library of premium fonts from renowned foundries. These fonts are designed for professional use and integrate seamlessly with Adobe applications.
- MyFonts, Fontspring, Creative Market: These are leading marketplaces for purchasing commercial fonts. Here, you’ll find an unparalleled selection of unique and expertly crafted typefaces for every design need, from elaborate display fonts to refined body text fonts.
- DaFont, 1001 Fonts: These sites offer a mix of free fonts, many of which are suitable for personal projects. It’s crucial to pay attention to the licensing agreements for each font downloaded from these platforms, as not all are free for commercial use.
When downloading fonts, always ensure you are obtaining them from reputable sources. This helps protect your system from malware and ensures you have the necessary licenses for your intended use. Be mindful of the license agreements, especially when using fonts for commercial projects.
Installing Fonts on Windows: Simple and Direct Methods
Windows provides several straightforward methods for installing fonts, catering to both individual font files and entire font collections.
Method 1: The Drag-and-Drop Approach (Most Common and Easiest)
This is by far the quickest and most intuitive way to install a font.
- Locate Your Font File(s): Navigate to the folder where you have downloaded and extracted your font files (e.g.,
.ttf,.otf). If the font came in a.zipfile, you’ll need to extract its contents first by right-clicking the.zipfile and selecting “Extract All.” - Open the Fonts Folder: Open File Explorer (you can press
Windows Key + E). In the address bar, typeC:WindowsFontsand press Enter. This will open the dedicated Windows Fonts folder. - Drag and Drop: Simply drag the font file(s) from your download location directly into the
C:WindowsFontsfolder. - Automatic Installation: Windows will automatically detect the font file and begin the installation process. You might see a brief progress bar. Once complete, the font will be installed and available for use in your applications.
Method 2: Right-Click and Install
This method offers a slightly more contained installation process, especially if you only have a few fonts to install.
- Locate Your Font File(s): As with the drag-and-drop method, find the folder containing your font files.
- Right-Click the Font: Right-click on the individual font file (e.g.,
MyAwesomeFont.ttf). - Select “Install”: From the context menu that appears, select “Install.” If you are prompted for administrator permission, click “Yes.”
- Font Installation: Windows will then install the font. You’ll see a confirmation, and the font will be added to your system.
- Installing Multiple Fonts: If you have multiple fonts to install using this method, you can select them all (hold
Ctrlwhile clicking each file, or click and drag a selection box around them), then right-click on any of the selected files and choose “Install.”
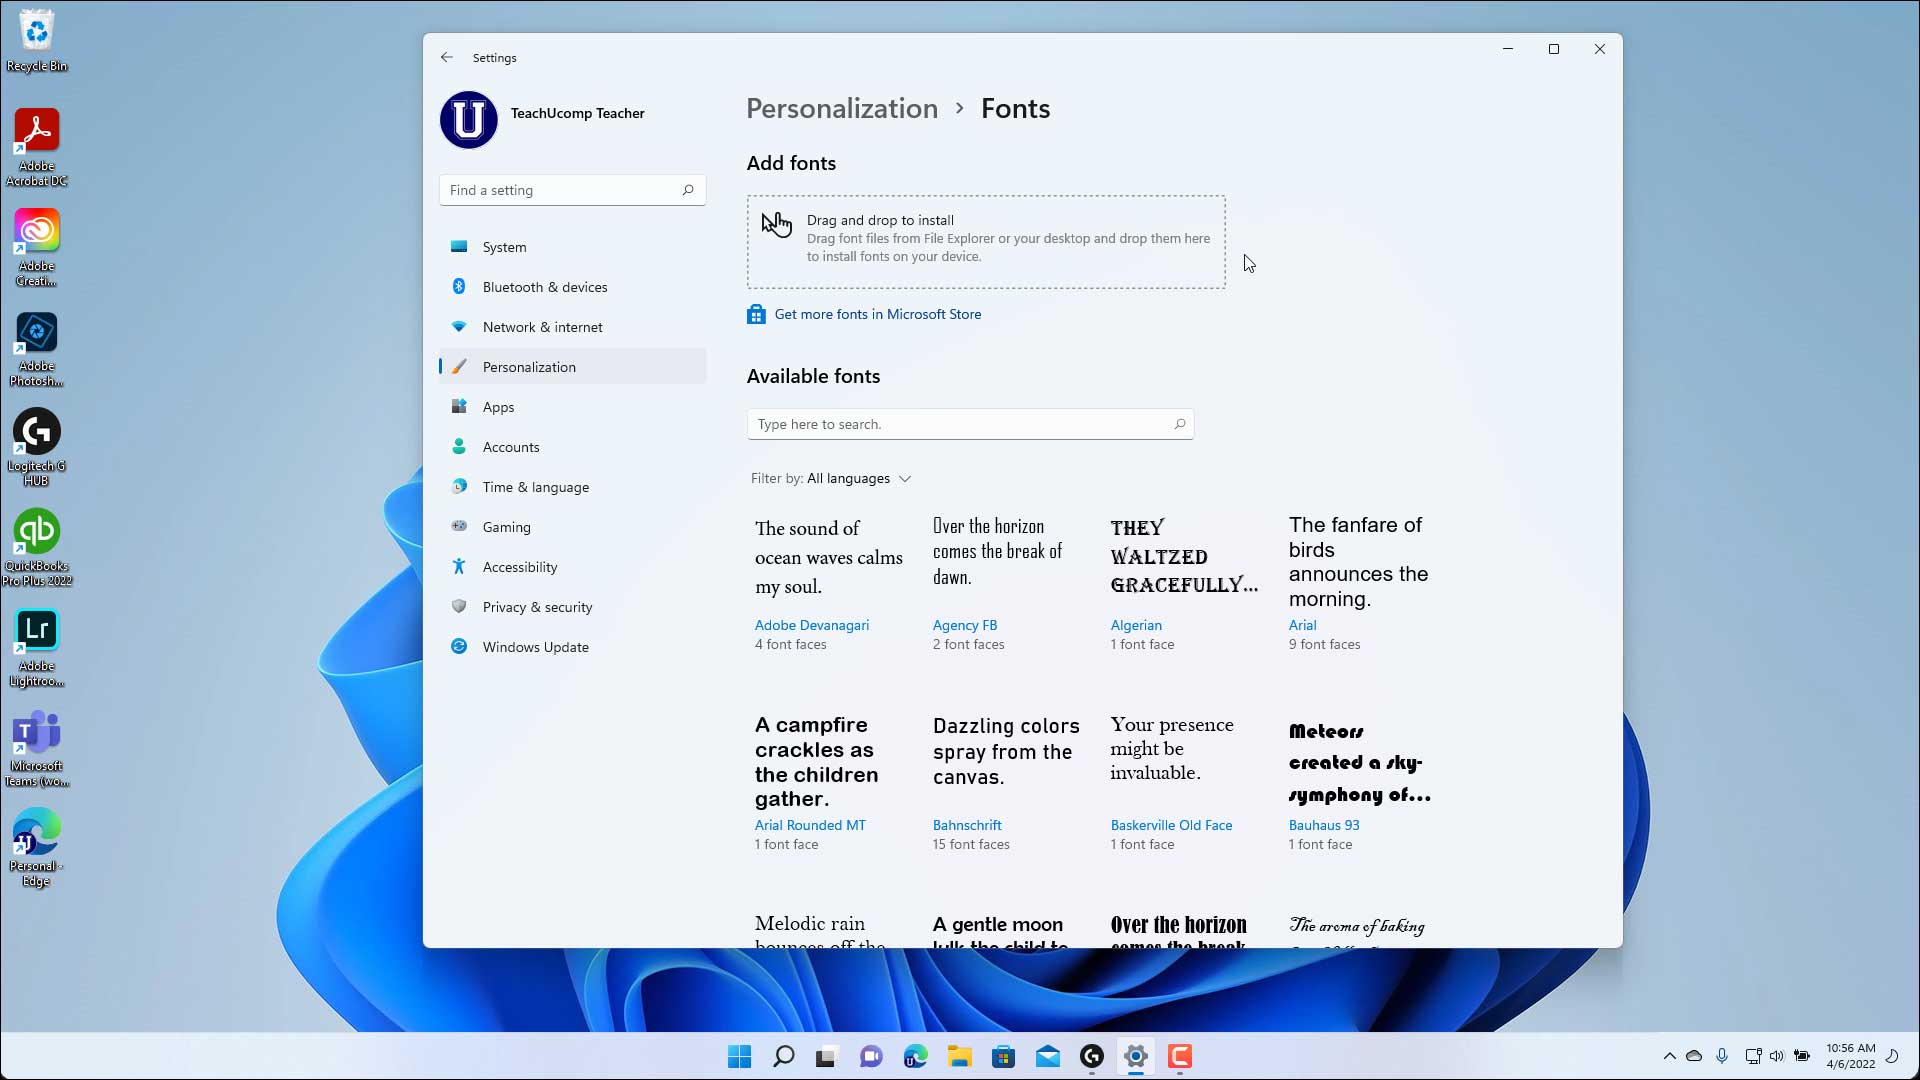
Method 3: Using the Font Settings Menu (Windows 10 and 11)
Windows 10 and 11 offer a more modern interface for managing fonts through the Settings app.
- Open Settings: Click the Start button and select “Settings” (the gear icon).
- Navigate to Personalization: In the Settings window, click on “Personalization.”
- Select “Fonts”: On the left-hand menu of the Personalization screen, click “Fonts.”
- Drag and Drop into the Font Settings Window: You’ll see a section with a box that says “Drag and drop to install.” Open your File Explorer to your downloaded font files and drag the font file(s) directly into this designated area within the Fonts settings window.
- Installation: The fonts will install automatically. You’ll see them appear in the list of installed fonts below.
This method is particularly useful as it provides a centralized place to view all your installed fonts, their previews, and basic information.
Accessing and Using Your Newly Installed Fonts
Once a font is installed, it’s typically available for immediate use in most Windows applications that allow font selection.
Where Fonts Appear
- Microsoft Office Suite (Word, PowerPoint, Excel, etc.): Open any Office application. When you go to the font selection dropdown menu in the Home tab, your newly installed font should appear in alphabetical order.
- Adobe Creative Suite (Photoshop, Illustrator, InDesign, etc.): Similar to Office applications, your new fonts will be available in the character or text panels within Adobe software.
- Other Applications: Most other Windows applications that support custom fonts will also recognize them after installation. This includes graphics editors, word processors, and even some web browsers for local content.
Troubleshooting Common Issues
Occasionally, you might encounter minor hiccups. Here are a few common issues and their solutions:
- Font Not Appearing:
- Restart the Application: Sometimes, applications need to be restarted to recognize newly installed fonts. Close and reopen the program you’re trying to use the font in.
- Restart Your Computer: In rarer cases, a full system restart might be necessary for Windows to fully register the font across all processes.
- Check the Font File: Ensure the font file is not corrupted. Try re-downloading it from the source.
- Verify Font Format: Confirm that the font file is in a supported format (
.ttf,.otf).
- Font Looks Garbled or Incorrect: This can sometimes happen with poorly designed or corrupted font files. Try a different font or re-download the problematic one.
- Administrator Privileges: If you’re on a managed Windows account (like in a work or school environment), you might need administrator privileges to install fonts. If prompted, enter the administrator password.
Beyond Installation: Font Management and Best Practices
Installing fonts is just the first step. Effective font management can significantly impact your workflow and the professionalism of your projects.
Uninstalling Fonts
If you find you no longer need a font or wish to declutter your font menu, uninstalling is just as easy:
- Open the Fonts Folder: Navigate to
C:WindowsFontsor use the Fonts section in Settings. - Locate the Font: Find the font you wish to remove in the list.
- Right-Click and Uninstall: Right-click on the font and select “Delete” or “Uninstall.” Confirm the action if prompted.
- Note: You cannot uninstall fonts that are currently in use by an open application. Close all relevant applications before attempting to uninstall.

Font Organization and Best Practices
- Create a Font Library: For designers and heavy users, it’s beneficial to create a dedicated folder on your computer to store your downloaded font files. This makes it easy to reinstall fonts if needed or to keep backups.
- Understand Font Licensing: As mentioned, always be aware of the licensing terms for the fonts you use. Free fonts often have restrictions for commercial use, while paid fonts usually come with specific usage rights.
- Font Pairing: Learning about font pairing can elevate your designs. Combine fonts with different characteristics (e.g., a serif with a sans-serif) to create visual hierarchy and interest. Resources like font pairing tools can be invaluable here.
- Maintain Readability: While decorative fonts can be exciting, remember that readability is paramount for most content. Choose fonts that are clear and easy to read for the intended purpose and audience. This is crucial for Productivity and effective communication.
- Consider Font Size and Weight: Beyond the typeface itself, the size and weight (bold, italic, light) of a font play a significant role in its legibility and impact. Experiment to find what works best for your content.
By mastering the simple process of installing fonts on Windows and adopting good font management practices, you can unlock a new level of creativity and professionalism in all your digital endeavors. From making your personal documents shine to building a compelling brand identity, the right typography is a powerful asset.
aViewFromTheCave is a participant in the Amazon Services LLC Associates Program, an affiliate advertising program designed to provide a means for sites to earn advertising fees by advertising and linking to Amazon.com. Amazon, the Amazon logo, AmazonSupply, and the AmazonSupply logo are trademarks of Amazon.com, Inc. or its affiliates. As an Amazon Associate we earn affiliate commissions from qualifying purchases.