
In an era defined by personal expression and digital customization, our smartphones have become extensions of ourselves. From wallpaper choices to app icon arrangements, every element on our device can reflect our unique style. Yet, one of the most fundamental aspects of a phone’s aesthetic – its typography – often goes overlooked, largely because changing it isn’t always as straightforward as swapping a background image. For many Android users, the default system font, while perfectly functional, can feel restrictive or simply uninspiring.
This comprehensive guide delves into the intricate world of Android font customization, offering practical, step-by-step instructions for installing new fonts on your device. Whether you’re aiming for enhanced readability, a bolder statement, or a touch of elegant sophistication, understanding how to manipulate your device’s typography unlocks a new level of personalization. We’ll explore various methods, catering to both non-rooted and rooted devices, ensuring there’s a solution for nearly every Android user seeking to refresh their digital canvas.
The Allure of Android Font Customization
The text we read on our screens daily significantly impacts our user experience. Beyond mere aesthetics, the choice of font can influence readability, mood, and even how we perceive the information presented. Android’s open-source nature, compared to its more restrictive counterparts, offers a fertile ground for deeper customization, and fonts are no exception.
Why Change Your Device’s Typography?
The desire to change a device’s font stems from a variety of motivations, ranging from purely aesthetic preferences to practical accessibility needs:
- Personal Expression and Brand Alignment: For many, a smartphone is a personal statement. Custom fonts allow users to imbue their device with a personality that aligns with their personal brand or aesthetic preferences. A sleek, modern font might appeal to a minimalist, while a playful, whimsical one could suit a creative individual. Businesses or personal brands often have specific typefaces that define their identity; customizing a device’s font can extend this branding to one’s primary digital tool.
- Enhanced Readability and Comfort: Not all default fonts are universally comfortable for every user. Individuals with specific visual impairments, dyslexia, or simply those who find certain font styles challenging to read for extended periods, can significantly benefit from switching to a typeface optimized for their needs. Fonts with larger x-heights, distinct letterforms, or better kerning can dramatically improve legibility and reduce eye strain.
- Aesthetic Refresh and Modernization: Over time, even the most beloved interface can start to feel stale. Changing the system font is a subtle yet impactful way to give your device an instant aesthetic refresh, making it feel new and exciting again without needing a major overhaul of your operating system or device hardware. It’s a simple act that breathes new life into the daily interaction with your smartphone.
- Professionalism and Thematic Cohesion: Certain fonts convey specific tones. A professional might opt for a clean, sans-serif font for a sleek, corporate look, while someone designing an event might choose a thematic font to match the event’s style. This extends beyond personal use to presenting documents, emails, or even just interacting with productivity apps on your phone.
Understanding Android’s Font Landscape
Before diving into the “how-to,” it’s crucial to understand the landscape of Android font management. Android’s approach to fonts has evolved, and capabilities vary significantly based on the device manufacturer (OEM), the version of Android, and whether the device is “rooted.”
At its core, Android uses font files, typically in TrueType Font (.ttf) or OpenType Font (.otf) format, stored within its system directories. Modifying these system-level files usually requires elevated permissions, which is where rooting comes into play. However, many manufacturers and third-party developers have created user-friendly workarounds for non-rooted devices, albeit with varying degrees of system-wide impact. The key distinction lies in whether a font change applies to the entire operating system, every app, and every piece of text, or if it’s confined to specific applications or user interfaces.
Installing Fonts on Non-Rooted Android Devices
For the vast majority of Android users, rooting their device is either not an option or an unnecessary risk. Fortunately, several methods allow for font customization without requiring root access, primarily leveraging manufacturer-specific features, third-party launchers, or dedicated applications.
Leveraging Manufacturer-Specific Settings (OEM Customization)
Many Android device manufacturers include their own customization layers, or “skins,” over stock Android. These often come with built-in theme stores or dedicated font settings that make changing your device’s typography remarkably easy. This is usually the safest and most integrated method for non-rooted users.
Detailed Steps for Samsung Galaxy Devices
Samsung’s One UI (formerly TouchWiz) is one of the most feature-rich Android skins, offering robust font customization:
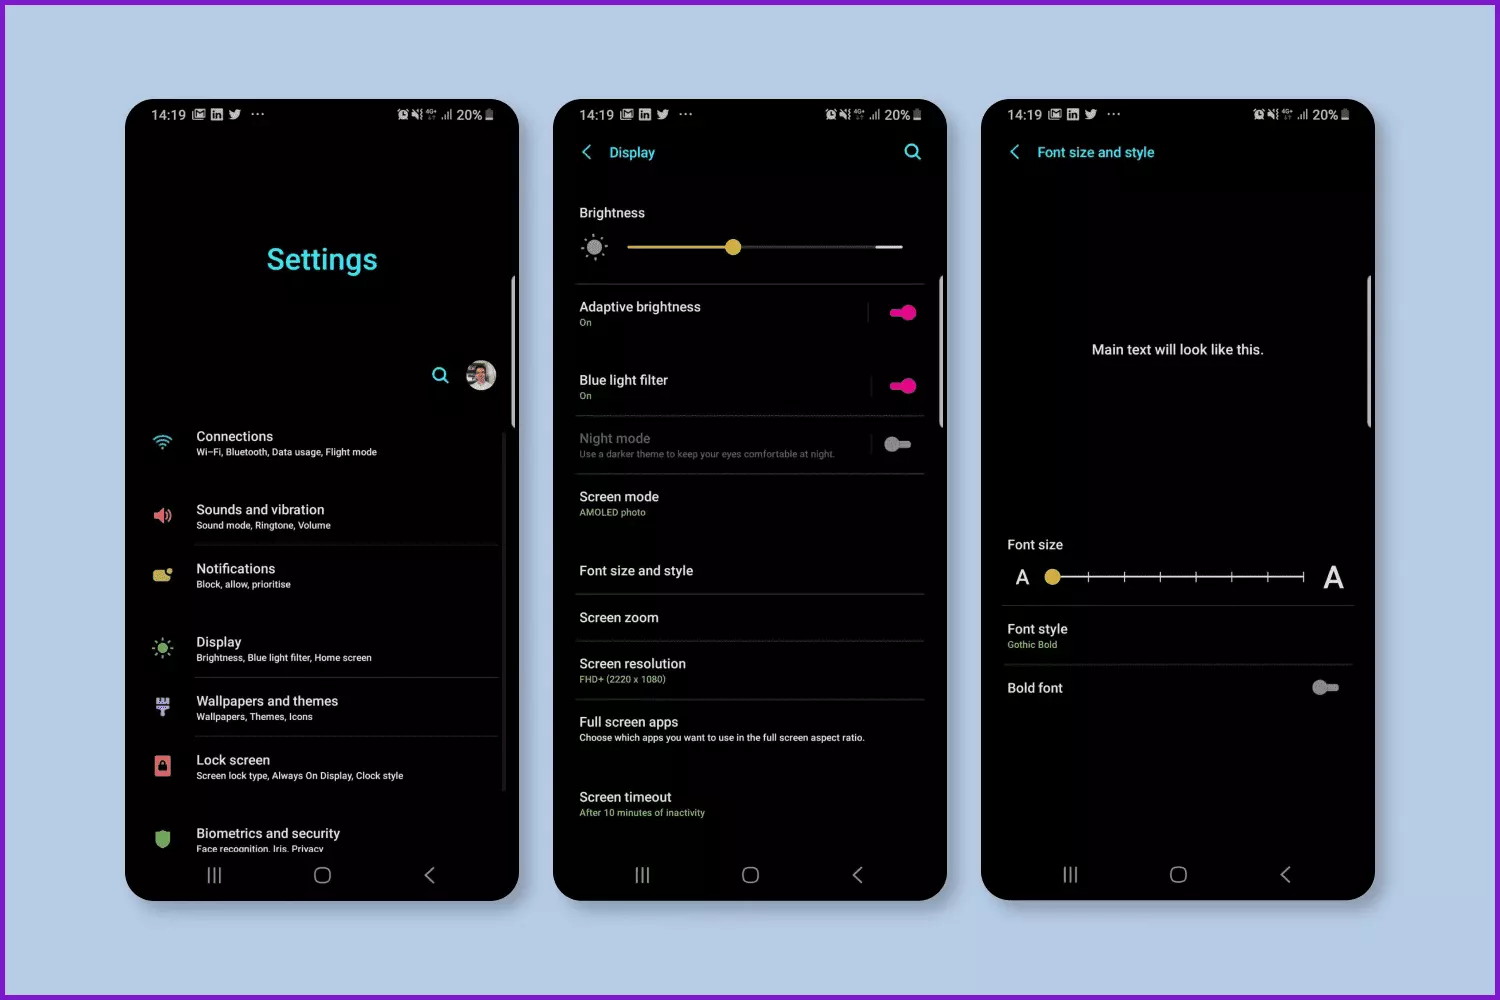
- Navigate to Display Settings: Open the “Settings” app on your Samsung device. Scroll down and tap on “Display.”
- Access Font Size and Style: Within the Display settings, look for “Font size and style” and tap on it.
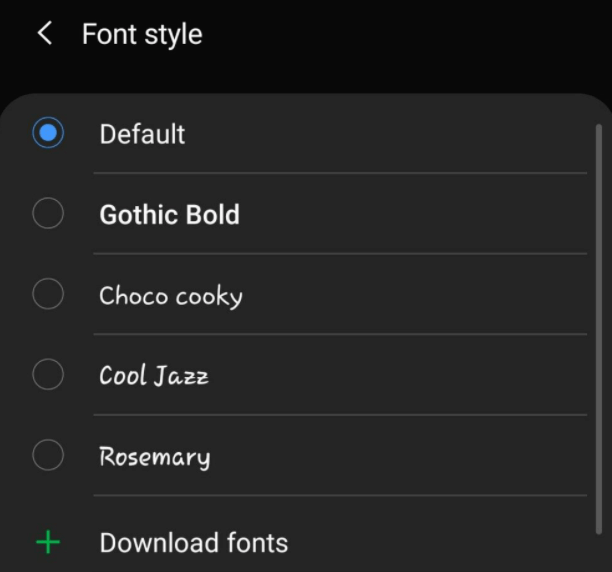
- Choose or Download Fonts: Here, you’ll see “Font style.” Tap on it. You’ll have a few pre-installed options (e.g., Default, SamsungOne, Gothic Bold). To explore more, tap on “Download fonts.”
- Browse and Install from Galaxy Store: This will take you to the “Galaxy Store” section dedicated to fonts. You’ll find a wide array of free and paid fonts. Browse, preview, and select the one you like. Tap “Download” and then “Install.”
- Apply the New Font: Once installed, return to the “Font style” menu in your device settings. Your newly downloaded font will appear in the list. Select it to apply it system-wide.
Steps for Xiaomi/MIUI Devices
Xiaomi’s MIUI also offers an extensive theme engine that includes font customization:
- Open the Themes App: Locate and open the “Themes” app on your Xiaomi device.
- Navigate to Fonts Section: At the bottom navigation bar, tap on the “T” icon (often labeled “Fonts” or represented by a typography symbol).
- Browse and Download: You’ll be presented with a large collection of fonts. Browse through them, previewing as you go. Select a font you like and tap “Download” or “Free” (for free fonts).
- Apply the Font: After downloading, tap “Apply.” Your device may prompt you to reboot to fully apply the new font. Confirm the reboot.
Other OEMs (e.g., OnePlus, Huawei)
Many other manufacturers like Huawei (with EMUI/HarmonyOS) and sometimes even OnePlus (via their theme store or specific customization options) offer similar font changing capabilities within their display or theme settings. The general path usually involves: Settings > Display > Font Style or Settings > Themes > Fonts. Always check your device’s specific settings for these built-in options first.
Utilizing Third-Party Launcher Applications
While OEM-specific settings offer system-wide changes, third-party launchers provide a more contained approach. These applications replace your device’s home screen interface and often come with their own customization options, including font changes for elements within the launcher itself (e.g., app labels, widget text). Note that these changes typically do not affect fonts within other applications or the system settings.
- Examples: Go Launcher, Apex Launcher, Nova Launcher (with some limitations or specific widgets), Action Launcher.
- How it Works (General Steps for most Launchers):
- Install a Launcher: Download and install a third-party launcher from the Google Play Store (e.g., Go Launcher EX).
- Set as Default: Set the new launcher as your default home app.
- Access Launcher Settings: Long-press on an empty area of your home screen or find the launcher’s icon in your app drawer, then go into its “Settings.”
- Find Font Options: Look for sections like “Display,” “Appearance,” “Personalization,” or “Fonts.”
- Apply Font: You might find a list of included fonts, or the option to import your own
.ttffiles (more common in comprehensive launchers). Select your desired font to apply it to your home screen and app drawer text.
Exploring Keyboard and Specific Application Font Options
Some applications offer their own internal font customization, which is entirely independent of the system font. This is particularly common in:
- Keyboard Apps: While Gboard and SwiftKey offer limited font adjustments (usually just for their emoji/number rows or specific themes), some niche keyboard apps might offer more extensive font choices for the keys themselves.
- Note-Taking & Word Processing Apps: Apps like Google Docs, Microsoft Word, Evernote, or specialized drawing/design apps often allow you to select specific fonts for the content you create within them, irrespective of your system font. This is crucial for creative work and maintaining specific document aesthetics.
- Social Media & Messaging Apps: A few apps might allow you to change the font for outgoing messages or posts, but this is usually a specific app feature rather than a direct font installation.
Using Dedicated Font Apps (Without Root – Limited Scope)
The Google Play Store hosts numerous “font installer” apps that claim to change fonts without root. Many of these either:
- Rely on OEM-specific workarounds: Essentially acting as a gateway to the manufacturer’s built-in font options (like Samsung’s).
- Utilize a “theme engine” approach: Where they apply a theme that includes a font, which might only work on certain Android versions or OEM builds.
- Provide fonts for specific contexts: Such as custom keyboards or social media text generators.
- Are outdated or ineffective: Due to changes in Android’s security model.
Examples might include apps that offer custom keyboards with a wide range of text styles (which are essentially character-based visual tricks rather than true font changes) or apps that list fonts compatible with specific OEM theme engines. While convenient, these are often less reliable for system-wide font changes than the manufacturer’s own settings. Users should read reviews carefully and manage expectations for system-wide impact.
Advanced Font Installation for Rooted Android Devices
Rooting an Android device grants superuser permissions, allowing access to and modification of core system files. This opens up a world of possibilities for customization, including truly system-wide font changes that affect every part of the operating system and all applications. However, rooting comes with risks, including potentially bricking your device or voiding your warranty. This method is recommended only for experienced users comfortable with the implications of modifying system software.
The Power of Root Access for Global Font Changes
With root access, you can directly replace the font files located in the /system/fonts directory. This ensures that the chosen font is applied universally, from your status bar and app drawer to text within every application, even those without their own font settings. This level of customization is unparalleled but requires caution and a thorough understanding of the process.
Installing Fonts with Root-Enabled Apps (e.g., Font Installer, Magisk Modules)
The safest and most recommended way to change fonts on a rooted device is by using specialized root-enabled applications or Magisk modules.
Using Root Font Installer Apps
Apps like “Font Installer” (by JRummy Apps Inc. or similar reputable developers) were popular for a long time. They simplify the process of replacing system fonts:
- Grant Root Permissions: Install the app from the Play Store and grant it root access when prompted.
- Browse and Select: The app will typically display a list of available fonts, or allow you to browse for
.ttfor.otffiles on your device’s storage. - Preview and Install: Select your desired font. The app usually provides a preview. Tap “Install” or “Apply.”
- Reboot: Most font changes require a device reboot to take effect. Confirm the reboot when prompted.
Leveraging Magisk Modules (Recommended Modern Approach)
Magisk has become the go-to solution for rooting Android devices due to its “systemless” approach, meaning it modifies the boot image without altering the system partition directly. This makes it safer and easier to revert changes. Many font packs are available as Magisk modules.
- Ensure Magisk is Installed: Your device must be rooted with Magisk.
- Download Font Module: Search for Magisk font modules online (e.g., “Google Sans Magisk Module,” “Emoji Font Changer Magisk”). Download the
.zipfile to your device. - Install via Magisk Manager: Open the Magisk Manager app.
- Go to Modules: Tap on the “Modules” icon (puzzle piece icon) in the bottom navigation.
- Install from Storage: Tap “Install from storage” and navigate to where you downloaded the font
.zipfile. Select it. - Flash and Reboot: Magisk will flash the module. Once complete, tap “Reboot” at the bottom right. The new font will be applied system-wide after reboot.
The advantage of Magisk modules is that they can be easily disabled or uninstalled from the Magisk Manager app if you encounter issues or want to revert, making them a very safe option for rooted users.
Manual System Font Replacement (Caution Advised)
This method involves manually replacing the default system font files with your chosen ones using a root file manager. It’s the most granular approach but also the riskiest. A single mistake could lead to a boot loop.
- Backup: Crucially, create a Nandroid backup in custom recovery (TWRP) before attempting this. This is your safety net.
- Obtain Font Files: Get the
.ttfor.otffiles for your desired font. You’ll usually need to rename them to match the original system font filenames (e.g.,Roboto-Regular.ttf,NotoSans-Regular.ttf). - Use Root File Manager: Install a root-enabled file manager (e.g., Solid Explorer, Mixplorer, FX File Explorer) and grant it root access.
- Navigate to System Fonts: Go to
/system/fonts. - Backup Original Fonts: Copy the original font files (e.g.,
Roboto-Regular.ttf,Roboto-Bold.ttf, etc.) from/system/fontsto a safe location on your internal storage or SD card. - Replace Fonts: Copy your new, renamed font files into the
/system/fontsdirectory, overwriting the originals. Ensure the file permissions are set correctly (usuallyrw-r--r--or0644). - Clear Cache and Reboot: Clear your device’s dalvik/ART cache and cache partitions from your custom recovery, then reboot your device.
This method is less common now due to the elegance and safety of Magisk modules.
Sourcing and Managing Your Font Files
Regardless of the installation method, you’ll need suitable font files. Most commonly, these are TrueType Font (.ttf) or OpenType Font (.otf) files.
Where to Download Quality Font Files (.ttf, .otf)
There’s a vast universe of fonts available online, both free and paid. Here are some reputable sources:
- Google Fonts: An excellent source for high-quality, open-source fonts. All fonts are licensed under the SIL Open Font License, making them free to use for personal and commercial projects.
- DaFont: Offers a massive collection of freeware, shareware, and demo fonts. Always check the license information for each font, as many are free for personal use only.
- Font Squirrel: Specializes in hand-picked, high-quality, 100% free commercial fonts. This is a great resource if you need fonts for projects that might have commercial implications.
- Adobe Fonts: If you have an Adobe Creative Cloud subscription, you have access to a vast library of professional-grade fonts that can be synced to your desktop and sometimes integrated with mobile Adobe apps.
- MyFonts, Fontspring, Creative Market: These are marketplaces for professional fonts, often requiring purchase for both personal and commercial use. They offer a huge selection of unique and expertly crafted typefaces.
Essential Font Management Practices
- Understand Font Licensing: This is critical. Many beautiful fonts are free for “personal use only.” Using such a font in a commercial context (even just for branding on your phone if you represent a business) could lead to legal issues. Always check the license attached to each font.
- Organize Your Downloads: Create a dedicated folder on your computer or cloud storage for downloaded fonts. This makes it easy to find and transfer them to your Android device when needed.
- Backup Original Fonts (if rooting): As mentioned, if you’re manually replacing system fonts, always back up the originals before proceeding.
- Preview Before Installation: Before committing to a system-wide change, try to preview the font on your desktop or within an app that supports it. This helps ensure it’s readable and aesthetically pleasing.
Troubleshooting Common Font Installation Issues
Even with the best instructions, you might encounter issues. Here are some common problems and their solutions:
Addressing Compatibility and Display Problems
- Garbled Text/Missing Characters: This often happens when a font doesn’t support all characters or languages, or if the font file is corrupted. Try a different font or redownload the file.
- Partial Font Change: If only some text elements change, it’s likely due to the method used (e.g., a launcher only changes its own text, not system-wide). If you expected system-wide, verify your steps for OEM or rooted installation.
- Device Not Booting (Rooted Devices): This is the biggest risk with manual root methods. If your device gets stuck in a boot loop, you’ll need to boot into custom recovery (like TWRP) and restore your Nandroid backup. This is why backups are paramount.
Reverting to Default Fonts
- OEM Methods: Go back to
Settings > Display > Font size and style > Font styleand select the “Default” option. - Launcher Apps: Go into the launcher’s settings and choose the default font or uninstall the launcher.
- Rooted Apps: Most root font installers have an option to restore default fonts.
- Magisk Modules: Open Magisk Manager, go to Modules, find the font module, and disable or uninstall it, then reboot.
- Manual Root: You’ll need to use your root file manager to copy the original font files (which you hopefully backed up!) back into
/system/fontsand reboot. If you didn’t back them up, you might need to flash your device’s stock firmware.
Security and Performance Implications
- Security: Downloading fonts from untrusted sources can introduce malware. Always use reputable font websites. Rooting itself also lowers your device’s security posture.
- Performance: While unlikely, extremely complex or poorly optimized font files could theoretically cause minor performance dips, though this is rare with modern Android devices.
- Battery Life: Font changes themselves have negligible impact on battery life.

Conclusion: Personalizing Your Digital Canvas
Customizing the font on your Android device is a profound way to personalize your digital experience, enhance readability, and inject fresh life into your daily interactions. Whether you opt for the simplicity of manufacturer-provided settings, the focused approach of third-party launchers, or delve into the advanced capabilities of a rooted device, there’s a path for everyone to transform their device’s typography.
By carefully following the steps outlined in this guide and understanding the nuances of each method, you can confidently navigate the world of Android font installation. Remember to always prioritize reputable sources for your font files, understand licensing terms, and exercise caution, especially when dealing with root-level modifications. With a little effort, your Android device can truly become a unique reflection of your style, making every glance at your screen a more engaging and personalized experience. Embrace the power of typography and make your Android truly your own.
aViewFromTheCave is a participant in the Amazon Services LLC Associates Program, an affiliate advertising program designed to provide a means for sites to earn advertising fees by advertising and linking to Amazon.com. Amazon, the Amazon logo, AmazonSupply, and the AmazonSupply logo are trademarks of Amazon.com, Inc. or its affiliates. As an Amazon Associate we earn affiliate commissions from qualifying purchases.