In an increasingly wireless world, the reliability, speed, and security of a hardwired internet connection often get overlooked. While Wi-Fi offers unparalleled convenience, there are scenarios where nothing beats the steadfast performance of an Ethernet cable. For gamers, remote workers, streaming enthusiasts, and anyone managing a home server or smart home devices, a stable, high-speed wired connection can significantly enhance productivity, entertainment, and digital security. Installing an Ethernet wall jack might seem like a daunting task reserved for professional electricians or network technicians, but with the right tools, a bit of patience, and a clear guide, it’s a perfectly achievable DIY project. This comprehensive tutorial will walk you through every step, from understanding the components to successfully testing your new, robust network connection, ensuring your digital life runs smoother and faster.

Why Hardwired Connectivity Still Matters
In an era dominated by wireless technology, it’s easy to assume that Wi-Fi is sufficient for all your networking needs. However, for critical connections and specific applications, a physical Ethernet cable continues to offer distinct advantages that wireless simply cannot match. Understanding these benefits is the first step in appreciating why installing an Ethernet wall jack is a worthwhile investment for your home or office.
The Limitations of Wi-Fi
While Wi-Fi has revolutionized how we connect to the internet, it comes with inherent limitations. Signal interference is perhaps the most common issue; microwaves, cordless phones, Bluetooth devices, and even neighboring Wi-Fi networks can all degrade your signal quality and speed. The further you are from your router, and the more walls and obstacles between you and the access point, the weaker and slower your connection becomes. This leads to frustrating buffering during streaming, lag spikes in online gaming, and dropped video calls, directly impacting productivity and entertainment.
Furthermore, bandwidth contention is a significant factor. Every device connected to your Wi-Fi network shares the same wireless bandwidth. As you add more smartphones, tablets, smart TVs, and IoT gadgets, the available bandwidth for each device decreases, slowing down the entire network. This is particularly noticeable during peak usage times, when multiple users are trying to stream high-definition content or participate in bandwidth-intensive activities simultaneously.
Unlocking Enhanced Performance and Security
Opting for a hardwired Ethernet connection directly addresses these Wi-Fi shortcomings, offering a suite of compelling benefits. The most obvious advantage is superior speed and stability. Ethernet cables can consistently deliver significantly higher data transfer rates than even the latest Wi-Fi standards, with virtually no latency or packet loss. This translates to incredibly fast downloads, seamless 4K/8K streaming, and a competitive edge in online gaming where every millisecond counts. For professionals working from home, a stable wired connection ensures uninterrupted video conferences and rapid file transfers, boosting overall productivity.
Beyond speed, enhanced reliability is a key differentiator. Ethernet connections are immune to the wireless interference that plagues Wi-Fi. Once connected, your device has a dedicated, consistent data pathway, ensuring a stable connection that won’t drop unexpectedly due to external factors. This consistency is invaluable for critical applications like network-attached storage (NAS) devices, home automation hubs, or security cameras, which require continuous, reliable access.
Finally, improved security is a significant, though often underestimated, benefit. While modern Wi-Fi encryption is robust, wired connections inherently offer a higher degree of security simply because they are physical. An unauthorized user would need physical access to your network cabling or devices to tap into your data, a much harder feat than attempting to breach a wireless signal from outside your property. For sensitive data transfers or securing your smart home ecosystem, the peace of mind offered by a hardwired connection is invaluable, directly contributing to your digital security posture.
Gathering Your Arsenal: Tools and Materials You’ll Need
Before you embark on the journey of installing an Ethernet wall jack, proper preparation is key. Having all the necessary tools and materials on hand will not only streamline the process but also prevent frustrating delays. This section outlines everything you’ll need, from specialized networking tools to common household items.
Essential Tools for the Job
Performing a professional-grade installation requires more than just a screwdriver. Here’s a comprehensive list of the tools you should have ready:
- Punch Down Tool: This is arguably the most specialized tool you’ll need. It’s used to securely terminate the individual wires of your Ethernet cable into the keystone jack, simultaneously trimming off any excess wire. Ensure it’s compatible with the type of keystone jack you’re using (usually 110-type).
- Wire Strippers/Cable Stripper: While regular wire strippers can work in a pinch, a dedicated cable stripper designed for Ethernet cables (typically UTP/STP) will make quick work of removing the outer jacket without damaging the internal insulated wires.
- Utility Knife or Drywall Saw: For cutting the hole in your drywall. A drywall saw is often preferred for its ease of use in cutting precise rectangular openings.
- Drill with Paddle Bit/Hole Saw (Optional, for running cable through studs): If you need to run your Ethernet cable through wooden studs or floor joists, a drill with an appropriate-sized paddle bit or hole saw will be necessary.
- Screwdriver Set (Phillips and Flathead): Essential for mounting the wall plate and tightening screws on the low voltage bracket.
- Cable Tester (Ethernet Tester): Absolutely crucial for verifying your work. This device confirms that your newly terminated cable has continuity and that all wires are correctly punched down, preventing frustrating troubleshooting later. Basic models are affordable and well worth the investment.
- Pencil: For marking the exact location of your wall jack.
- Tape Measure: For accurate placement and determining cable length.
- Level: To ensure your wall plate is installed straight.
- Flashlight or Headlamp: Especially useful when working in dimly lit wall cavities or behind furniture.
- Gloves and Safety Glasses: Always prioritize safety. Gloves can protect your hands from sharp edges, and safety glasses are a must when drilling or cutting.
Key Components for Your Ethernet Jack
Beyond the tools, you’ll need the specific hardware that constitutes your Ethernet wall jack and connects it to your network.
- Ethernet Cable (Bulk Roll): You’ll need a roll of Category 5e (Cat5e) or Category 6 (Cat6) Ethernet cable. Cat6 offers better performance for future-proofing, especially for gigabit and multi-gigabit speeds over longer distances. Ensure you purchase solid core cable for in-wall installations, as it’s more durable and suitable for permanent runs than stranded cable. The length will depend on your specific cable run from your network switch/router to the wall jack location.
- Keystone Jack (RJ45): This is the actual connector that the Ethernet cable plugs into. Ensure it matches your cable category (e.g., Cat6 keystone jack for Cat6 cable). Keystone jacks are available in various colors and types, but the key is that it will accept your Ethernet cable’s individual wires and be terminated with a punch down tool.
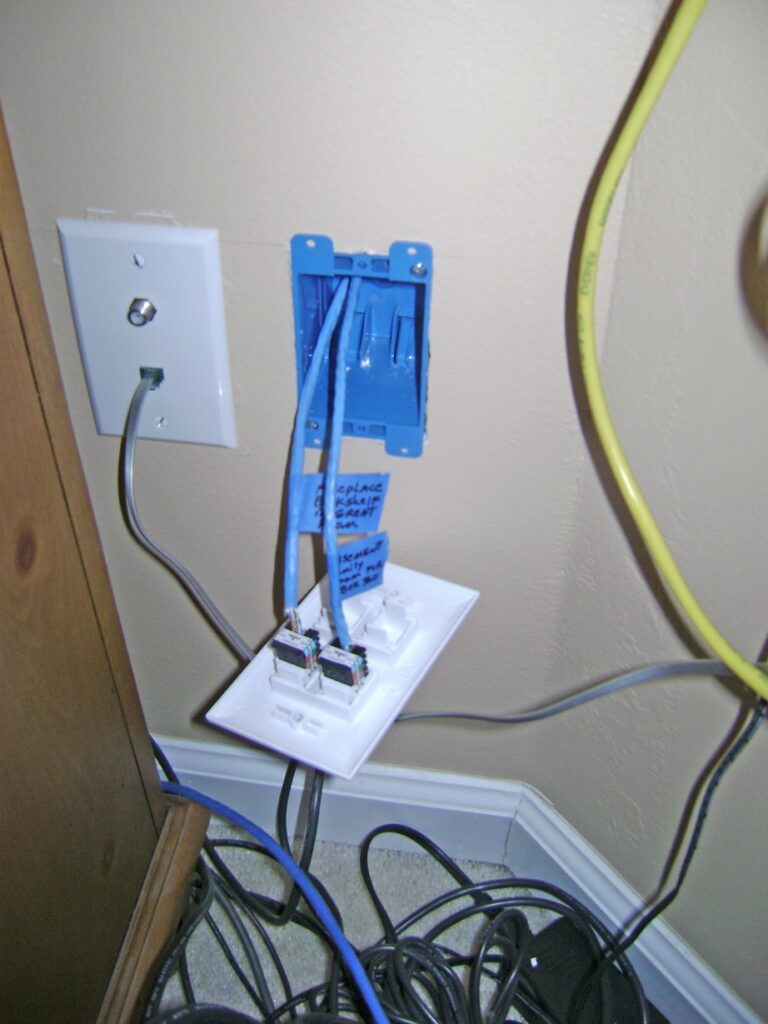
- Low Voltage Mounting Bracket (Old Work Box): This plastic bracket mounts directly into the drywall and provides a secure frame for attaching the faceplate. Unlike electrical boxes, low voltage brackets don’t enclose the cable, as low voltage wiring doesn’t require the same level of protection.
- Wall Plate (Faceplate): This is the visible cover that mounts over the low voltage bracket and houses the keystone jack. They come in single-port or multi-port configurations, allowing you to add more jacks (e.g., for telephone or coaxial) if needed.
- Cable Ties or Staples (Optional, for securing cable runs): If you’re running cables along joists or inside wall cavities, cable ties or specialized low-voltage staples can help secure the cable and prevent sagging or damage.
- Stud Finder: Crucial for locating wooden studs behind your drywall, allowing you to avoid them when cutting your hole, or guiding you on where to drill if you need to pass a cable through one.
Having this comprehensive list checked off before you begin will ensure a smooth and efficient installation process, setting you up for success.
The Step-by-Step Guide to Installation
With your tools and materials ready, it’s time to dive into the core of the project: the installation itself. This process can be broken down into three logical phases: preparing the wall, running and terminating the cable, and finally, securing the jack and testing the connection.
Phase 1: Planning and Wall Preparation
Careful planning and preparation are crucial for a clean and functional installation.
- Select the Location: Choose a convenient spot on the wall, preferably near where your device (computer, TV, game console) will be located. Consider the height – often at a similar height to electrical outlets, or perhaps lower if it’s for a floor-standing device. Use your stud finder to locate any wooden studs behind the drywall. You’ll want to avoid cutting into a stud directly, though you might need to drill through one if routing the cable horizontally. Also, be mindful of any electrical wiring, plumbing, or HVAC ducts inside the wall.
- Mark and Cut the Hole: Once you’ve chosen your spot, use the low voltage mounting bracket as a template. Hold it against the wall, ensuring it’s level, and trace its inner opening with a pencil. Double-check your markings before proceeding. Using your drywall saw or utility knife, carefully cut along the traced line. Take your time to make a clean, precise cut. Remove the cutout piece of drywall.
- Install the Low Voltage Mounting Bracket: Insert the low voltage bracket into the freshly cut hole. Most brackets have small tabs or wings that you tighten with a screwdriver. As you tighten, these tabs pivot outwards and clamp firmly against the inside of the drywall, securing the bracket in place. Ensure it’s flush with the wall surface and level.
Phase 2: Running and Terminating the Ethernet Cable
This is where the actual cabling work happens, requiring precision for a reliable connection.
- Route the Ethernet Cable: This is often the trickiest part, especially in existing homes.
- From Above/Below: If routing from an attic or crawl space, you may need to drill a hole in the top or bottom wall plate (the wooden frame supporting the wall) to drop or pull the cable down/up the wall cavity. Use a fish tape or glow rod to guide the cable.
- Horizontally: If running across a wall cavity, you might need to open up additional sections of drywall (which you’ll later patch) to drill through studs. Alternatively, you can use specialized tools like a flexible drill bit.
- Existing Conduits: If your home has existing electrical conduits (though rarely for low-voltage), you might be able to use them, but always ensure proper separation from high-voltage wiring to prevent interference.
- Leave Slack: Once the cable is routed to your wall opening, leave ample slack (at least 12-18 inches) extending from the hole. This slack is essential for easy termination and future maintenance.
- Prepare the Cable End: Gently strip about 1-1.5 inches of the outer jacket from the Ethernet cable using your cable stripper or wire strippers. Be careful not to nick the insulated wires inside. You’ll expose four twisted pairs of wires. Untwist each pair and straighten out the individual wires.
- Arrange the Wires (T568B or T568A): This is a critical step. Ethernet cables must be terminated according to a specific wiring standard, either T568A or T568B. The most common standard in North America for residential and commercial installations is T568B. It’s crucial that both ends of your cable run (the wall jack and the patch panel/switch connection) use the same standard.
- T568B Color Code (from left to right, when looking at the keystone jack’s punch-down side with the retaining clip facing away from you): Orange/White, Orange, Green/White, Blue, Blue/White, Green, Brown/White, Brown.
- T568A Color Code: Green/White, Green, Orange/White, Blue, Blue/White, Orange, Brown/White, Brown.
- Most keystone jacks have a color-coded diagram printed on them for both T568A and T568B, making it easier to follow.
- Punch Down the Wires: Carefully place each individual wire into its corresponding slot on the keystone jack, matching the color code you’ve chosen (T568B is highly recommended for consistency). Ensure the wire is seated firmly in the slot. Take your punch down tool, align it over the wire, and apply firm, even pressure until it clicks. The tool will simultaneously seat the wire and trim off the excess. Repeat this for all eight wires. Inspect each connection to ensure the wire is fully seated and the insulation is pierced.
Phase 3: Securing the Jack and Finalizing
The final steps involve assembling the components and making the connection presentable.
- Mount the Keystone Jack into the Faceplate: Most keystone jacks simply snap into the rectangular opening(s) of the wall plate. Push it in firmly until it clicks into place.
- Attach the Faceplate to the Bracket: Carefully push the terminated cable and keystone jack back into the wall cavity, guiding the faceplate over the low voltage mounting bracket. Use the screws provided with the faceplate to secure it to the bracket. Don’t overtighten.
- Connect the Other End of the Cable: At the other end of your cable run (e.g., near your router or network switch), you will either terminate it into another keystone jack in a patch panel or another wall plate, or crimp an RJ45 connector directly onto the cable if connecting directly to a device or a small home switch. Ensure this end also follows the exact same T568B (or T568A) standard.
Testing Your New Connection and Troubleshooting Common Issues
After all the hard work, the moment of truth arrives: testing your new Ethernet connection. This step is non-negotiable and ensures that your installation is successful and reliable. Should you encounter any issues, a methodical troubleshooting approach will help you pinpoint and resolve them.
Verifying Your Installation
- The Ethernet Cable Tester: This is your best friend for validating the installation. Connect one end of your completed Ethernet cable run to the “main” unit of the cable tester (typically the transmitter), and the other end to the “remote” unit (the receiver).
- Run the Test: Activate the tester. It will typically cycle through the eight individual wires, illuminating corresponding LEDs on both units. For a perfectly terminated cable, the LEDs on both the main and remote units should light up sequentially from 1 to 8 (or indicate “pass” if it’s a more advanced tester).
- Interpreting Results:
- All lights 1-8 light up correctly on both units: Congratulations! Your cable is properly terminated, and you have a good connection.
- A light doesn’t light up on either unit: Indicates an open circuit. The wire might not be fully punched down, or it could be cut somewhere along the run.
- Lights are out of sequence: This is a “cross-over” or “split pair” fault. It means two wires are swapped. You’ll need to re-terminate the affected end(s) according to the correct T568A/B standard.
- A light on one unit lights up, but not the corresponding one on the other (or vice-versa): This suggests a short circuit or a wire touching another.
Once the cable tester confirms a perfect connection, you can confidently plug in your device and enjoy the benefits of your new hardwired Ethernet jack.
Addressing Potential Hiccups
Even with careful execution, issues can arise. Here’s how to troubleshoot common problems:
- No Connection (Cable Tester Failure or Device Doesn’t Connect):
- Re-check Punch Downs: The most common issue. Ensure every wire is firmly seated in its slot on the keystone jack, and the punch down tool has properly cut the excess wire. Sometimes, a wire isn’t fully pierced by the terminal blade.
- Verify Wiring Standard: Double-check that both ends of the cable are terminated with the same T568A or T568B standard. Inconsistent standards will result in no connection.
- Inspect for Damage: Look for any nicks or cuts on the cable jacket or individual wires that might have occurred during routing. A severely kinked cable can also cause issues.
- Test the Equipment: If the cable tester passes, the issue might be with your device’s Ethernet port or the port on your router/switch. Test with a known good patch cable directly to the router to rule out device issues.
- Slow Speed or Intermittent Connection:
- Re-Test with Cable Tester: Even if it initially passed, a marginal connection might cause issues. Check for intermittent continuity on the tester.
- Check for Interference: While less common with wired, extreme electromagnetic interference (EMI) if the cable runs parallel to high-voltage electrical lines for a significant distance without proper shielding can sometimes cause degradation. Ensure cables are not tightly bundled with power lines.
- Cable Quality/Length: Ensure you’re using appropriate category cable (Cat5e for Gigabit, Cat6 for future-proofing) and that your cable run doesn’t exceed the maximum recommended length (100 meters or ~328 feet) for its category. Beyond this, signal degradation can occur.
- Network Device Issues: The problem might not be your new jack. Ensure your router, switch, and connected device’s network adapters are all capable of the desired speed (e.g., Gigabit Ethernet).
- Physical Damage to Jack or Faceplate:
- If the keystone jack or faceplate gets damaged during installation, simply replace the faulty component. Keystone jacks are modular and easily swappable.
Patience is key during troubleshooting. Address one potential issue at a time, testing after each adjustment, to systematically narrow down the cause of the problem.
Beyond the Basics: Tips for a Robust Network
Installing a single Ethernet wall jack is a great start, but thinking ahead can save you time and effort in the long run. Consider these tips to future-proof your network and when it might be best to call in the professionals.
Future-Proofing Your Setup
Technology evolves rapidly, and what’s fast today might be commonplace tomorrow. When installing Ethernet, consider these points to ensure your setup remains relevant for years to come:
- Go with Cat6 (or Higher): While Cat5e is sufficient for Gigabit Ethernet, Cat6 provides better performance and reduced crosstalk, especially important for longer runs or in environments with potential electromagnetic interference. For those looking even further ahead, Cat6a supports 10 Gigabit Ethernet over longer distances, which could become standard in homes within the next decade. The cost difference is often minimal compared to the labor involved, making it a wise upgrade.
- Install Multiple Drops: Even if you only need one jack now, consider installing two or even four-port wall plates and running extra cables. It’s significantly easier to run multiple cables through a wall cavity during a single installation than to revisit the wall for additional jacks later. This provides flexibility for future devices, network expansion, or as redundant connections.
- Centralize Your Network: If you have multiple Ethernet runs, consider terminating them all into a central patch panel located near your router/switch. A patch panel organizes your cable runs, making network management, troubleshooting, and reconfiguring connections much simpler and cleaner.
- Conduit for Flexibility: If possible, especially during new construction or major renovations, install electrical conduit in critical wall runs. This allows for easy pulling of new cables in the future without tearing open walls, making upgrades or replacements a breeze.
- Label Everything: Before you close up walls or finalize connections, clearly label both ends of every Ethernet cable. Use a label maker or durable cable ties with tags. This will save you countless hours of frustration when troubleshooting or reconfiguring your network later.

When to Call a Professional
While installing an Ethernet wall jack is a manageable DIY project for most, there are instances where professional assistance is highly recommended:
- Complex Cable Runs: If your home has challenging architecture, inaccessible wall cavities, or requires running cables through multiple floors, a professional network installer has the specialized tools, experience, and techniques (like wall fishing or attic/crawl space navigation) to do it efficiently and without damaging your property.
- Large-Scale Installations: For an entire home network setup with numerous jacks, a central server rack, or integration with smart home systems, a professional can design and implement a robust, scalable solution.
- Existing Electrical Concerns: If you are unsure about the location of electrical wiring, or if your installation requires modifications near high-voltage circuits, it’s always safer to consult or hire a licensed electrician. Mixing low-voltage and high-voltage wiring without proper separation can be dangerous and cause signal interference.
- Time Constraints or Lack of Confidence: If you’re short on time, lack confidence in your DIY skills, or simply prefer to have the job done quickly and professionally, hiring an expert is a wise choice. Their efficiency can often outweigh the cost, especially for complex jobs.
- Warranty and Compliance: For businesses or commercial properties, professional installation often comes with warranties and ensures compliance with building codes and industry standards, which can be critical.
Ultimately, installing an Ethernet wall jack is an empowering project that can significantly upgrade your home network’s performance, reliability, and security. By carefully following these steps and considering future needs, you’ll establish a robust wired backbone that will serve your digital life well for years to come.
aViewFromTheCave is a participant in the Amazon Services LLC Associates Program, an affiliate advertising program designed to provide a means for sites to earn advertising fees by advertising and linking to Amazon.com. Amazon, the Amazon logo, AmazonSupply, and the AmazonSupply logo are trademarks of Amazon.com, Inc. or its affiliates. As an Amazon Associate we earn affiliate commissions from qualifying purchases.