
In an age dominated by digital convenience and compact hardware, the traditional method of installing operating systems via optical discs has largely become a relic of the past. Today, the ubiquitous USB flash drive stands as the preferred tool for a swift and efficient Windows installation. Whether you’re setting up a new PC, reinstalling Windows on an existing machine, or troubleshooting system issues, a bootable USB drive offers unparalleled speed, portability, and versatility. This guide will walk you through every essential step, from preparing your USB drive to the final post-installation tweaks, ensuring a smooth and successful Windows setup.
Using a USB drive for installation isn’t just about modernity; it’s a practical choice that streamlines the entire process. It’s often faster than DVD installations, requires no optical drive (a feature increasingly absent in modern laptops and compact desktops), and the USB drive itself is reusable for future installations or other data storage needs. This tutorial is designed for anyone, from first-time PC builders to experienced technicians looking for a quick refresher, to master the art of installing Windows via USB.
Essential Prerequisites: What You’ll Need Before You Begin
Before embarking on your Windows installation journey, gathering the necessary tools and information is crucial. Proper preparation ensures a smooth process and minimizes potential roadblocks. Think of this as your pre-flight checklist for a successful system deployment.
1. A Reliable USB Flash Drive
The cornerstone of this entire process is a suitable USB flash drive. Not just any old drive will do; you need one that meets specific criteria to reliably store and boot the Windows installation files.
- Capacity: For Windows 10 or 11, a minimum of 8GB is generally recommended, though 16GB provides a safer margin, especially if you plan to use the Windows Media Creation Tool which might include recovery partitions or additional language packs. Avoid drives smaller than 8GB, as they may not have enough space for the full installation image.
- Speed: While not strictly mandatory, a USB 3.0 or 3.1 drive will significantly reduce the time it takes to create the bootable drive and, more importantly, speed up the actual Windows installation process. If your computer has USB 3.0/3.1 ports, using a compatible drive is highly recommended.
- Empty Drive (or Backed Up): The process of creating a bootable USB drive will format it, erasing all existing data. Ensure you’ve backed up any important files from the USB drive before proceeding. It’s often best to use a fresh, empty drive to avoid accidental data loss.
- Durability and Reliability: Choose a reputable brand. A faulty USB drive can lead to corrupted installation files and frustrating errors during setup.
2. The Windows ISO File
The ISO file is essentially a complete digital copy of the Windows installation disc. It contains all the necessary files, folders, and boot information required to install the operating system.
- Where to Get It: The most reliable and legal source for a Windows ISO file is directly from Microsoft’s official website.
- Windows 10: You can download the ISO directly or use the Media Creation Tool (which downloads the ISO and can create the bootable USB in one go).
- Windows 11: Microsoft also provides an official download page for the Windows 11 ISO or offers the Media Creation Tool for it.
- Version and Edition: Ensure you download the correct version (e.g., Windows 10, Windows 11) and edition (e.g., Home, Pro) that you intend to install and for which you have a license. The ISO usually contains multiple editions, allowing you to choose during installation.
- Language: Select the appropriate language for your Windows installation during the download process.
3. Bootable USB Creation Software
To transform your ordinary USB drive into a bootable Windows installer, you’ll need specialized software. Two primary tools dominate this space:
- Microsoft’s Media Creation Tool: This is Microsoft’s official utility, and it’s often the simplest and most recommended method, especially for those new to the process. It not only downloads the correct Windows ISO file but also automatically formats your USB drive and copies the installation files to make it bootable, all in one streamlined process. It’s foolproof and ensures compatibility.
- Rufus: A popular third-party utility, Rufus is highly regarded for its speed, versatility, and advanced options. It’s an excellent choice if you already have an ISO file, need to create a bootable drive for an older PC with specific BIOS settings (e.g., MBR vs. GPT, UEFI vs. Legacy BIOS), or prefer more control over the creation process. Rufus is a portable application, meaning it doesn’t require installation.
4. Your Windows Product Key (Optional, but Recommended)
While you don’t always need to enter your product key during the initial installation phase, having it handy is a good practice.
- When it’s Needed: If you’re performing a clean installation, you will eventually need a valid product key to activate Windows.
- Digital Licenses: If you’re reinstalling Windows on a machine that previously had an activated digital license tied to your Microsoft account, Windows will usually reactivate automatically once connected to the internet. However, keeping the key accessible provides peace of mind.
- Where to Find It: It might be on a sticker on your PC, in an email from an online purchase, or linked to your Microsoft account.
5. Target PC System Requirements
Before installing, quickly verify that your target computer meets the minimum system requirements for the version of Windows you intend to install. This is especially critical for Windows 11, which has stricter hardware requirements (e.g., TPM 2.0, Secure Boot). Installing on incompatible hardware can lead to performance issues or even prevent installation altogether.
Creating Your Bootable Windows USB Drive
With all your prerequisites in order, the next step is to transform your blank USB drive into a powerful Windows installer. We’ll cover the two most popular methods: Microsoft’s official Media Creation Tool and the robust third-party utility, Rufus.
1. Method 1: Using the Windows Media Creation Tool (Recommended for Most Users)
This is Microsoft’s go-to solution for creating installation media. It’s user-friendly and ensures the most compatible setup.
- Download the Tool: Go to the official Microsoft website (for Windows 10 or Windows 11) and locate the “Download tool now” or “Create Windows 11 Installation Media” section. Download and run the executable file.
- Accept Terms: Read and accept the license terms.
- Choose Your Action: Select “Create installation media (USB flash drive, DVD, or ISO file) for another PC” and click “Next.”
- Select Language, Edition, and Architecture: The tool will usually recommend options based on your current PC. If you’re creating media for a different machine, uncheck “Use the recommended options for this PC” and choose your desired language, Windows edition (e.g., Windows 10 Pro), and architecture (64-bit is standard for most modern systems). Click “Next.”
- Choose Media Type: Select “USB flash drive” and click “Next.”
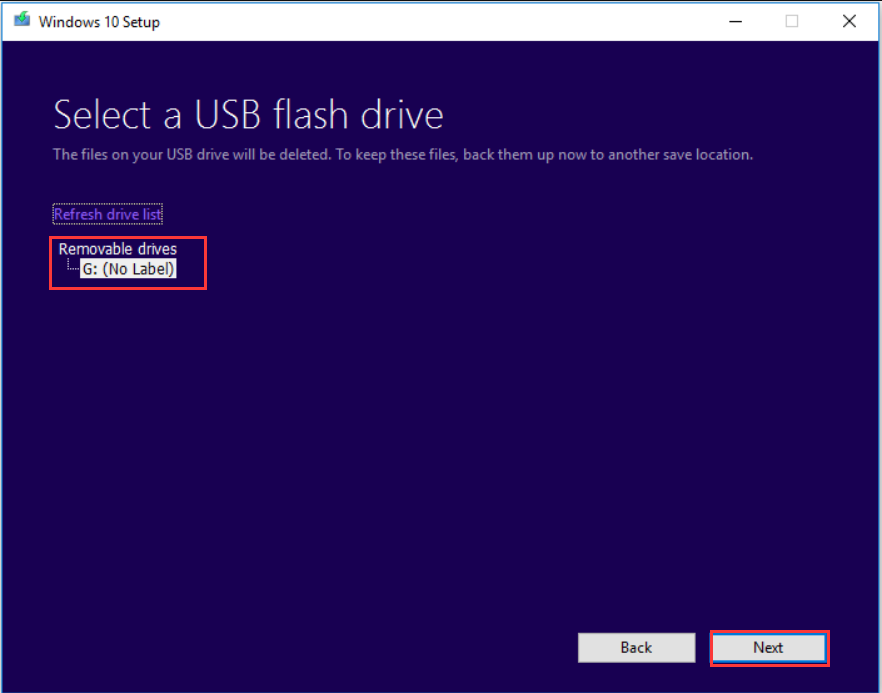
- Select USB Drive: From the list of available drives, choose your USB flash drive. Be absolutely sure to select the correct drive, as all data on it will be erased. Click “Next.”
- Download and Creation Process: The tool will now download the Windows ISO file and then proceed to format your USB drive and copy the necessary files. This process can take a significant amount of time, depending on your internet speed and USB drive speed.
- Finish: Once completed, you’ll see a “Your USB flash drive is ready” message. Click “Finish.” Your bootable USB drive is now ready for use.
2. Method 2: Using Rufus (For Advanced Users or Specific Scenarios)
Rufus offers more control, making it ideal if you already have an ISO or need specific partitioning schemes (MBR/GPT) for older or unique systems.
- Download Rufus: Go to the official Rufus website (
https://rufus.ie/) and download the latest portable version. - Insert USB Drive: Plug your USB flash drive into your computer.
- Launch Rufus: Run the downloaded Rufus executable file. It doesn’t require installation.
- Device Selection: Under “Device,” select your USB flash drive from the dropdown menu. Again, double-check that you’ve selected the correct drive.
- Select Boot Selection: Click the “SELECT” button next to “Boot selection” and browse to your downloaded Windows ISO file. Open it.
- Image Option: Rufus will usually auto-populate the correct “Image option” (Standard Windows installation).
- Partition Scheme and Target System (Crucial): This is where Rufus offers more control.
- Partition scheme: Most modern systems use GPT for UEFI. Older systems (typically pre-2012) might require MBR for BIOS (or CSM/Legacy BIOS). If you’re unsure, check your target PC’s motherboard manual or assume GPT for modern systems.
- Target system: This will automatically adjust based on your partition scheme selection (UEFI or BIOS/CSM).
- Tip: If you’re installing Windows 11 on a non-TPM 2.0/Secure Boot compliant PC, Rufus often provides an option to bypass these requirements during this step.
- Volume Label: You can give your USB drive a descriptive name (e.g., “Win11 Installer”).
- File System and Cluster Size: Leave these at their default settings (usually NTFS for modern Windows installations).
- Start Creation: Click the “START” button. You’ll receive a warning that all data on the USB drive will be destroyed. Confirm by clicking “OK.”
- Wait for Completion: Rufus will now format the drive and copy the ISO contents. This process includes multiple stages and may take several minutes.
- Close Rufus: Once the status bar shows “READY,” you can close Rufus. Your bootable USB drive is now prepared.
Installing Windows from Your Bootable USB Drive
With your bootable USB drive ready, the next phase involves booting your target computer from this drive and navigating the Windows installation wizard.
1. Back Up Your Data (CRITICAL!)
Before proceeding with any operating system installation, always back up all important data from the hard drive or SSD of the computer where you plan to install Windows. A clean installation will erase everything on the chosen drive or partition. External hard drives, cloud storage (OneDrive, Google Drive, Dropbox), or network attached storage (NAS) are excellent options for backups. Do not skip this step!
2. Configure Your PC to Boot from USB
Your computer needs to be told to start from the USB drive rather than its internal hard drive. This is done through the BIOS (Basic Input/Output System) or UEFI (Unified Extensible Firmware Interface) settings.
- Insert USB: Plug your bootable USB drive into an available USB port on the target computer. Use a USB 2.0 port if you encounter issues with 3.0/3.1 ports during booting, although 3.0/3.1 is generally fine for the installation itself.
- Restart/Power On PC: Turn on or restart your computer.
- Access Boot Menu or BIOS/UEFI Settings: As soon as the computer starts, you’ll need to repeatedly press a specific key to enter either the “Boot Menu” or the “BIOS/UEFI Setup.” Common keys include:
- Boot Menu: F12, F10, F8, Esc
- BIOS/UEFI Setup: Del, F2, F1, F10
- The key varies by motherboard manufacturer (ASUS, MSI, Gigabyte, Dell, HP, Lenovo, Acer, etc.). Look for a brief on-screen message during startup (e.g., “Press DEL to Enter Setup,” “Press F12 for Boot Menu”).
- Select USB Drive from Boot Menu (Easiest): If you successfully accessed the Boot Menu, you’ll see a list of bootable devices. Select your USB drive (it might be listed by its brand name, model, or simply “USB HDD” or “UEFI USB Device”) and press Enter. The computer should then boot from the USB.
- Change Boot Order in BIOS/UEFI (Alternative): If you can’t access a dedicated Boot Menu, or if the USB doesn’t appear, you’ll need to enter the BIOS/UEFI setup.
- Navigate to the “Boot” or “Boot Options” tab.
- Locate the “Boot Order” or “Boot Priority” section.
- Move your USB drive to the top of the boot order list.
- For UEFI systems: Ensure “Secure Boot” is disabled (if you encounter issues, especially with Rufus-created drives), and “CSM” or “Legacy Boot” is enabled only if you’re attempting an MBR installation on a UEFI system (generally not recommended). For standard UEFI/GPT installations, leave Secure Boot enabled and CSM disabled if possible.
- Save your changes (usually F10) and exit BIOS/UEFI. The computer will restart and should boot from the USB.
3. Navigating the Windows Setup Process
Once your computer successfully boots from the USB drive, the Windows Setup wizard will appear.
- Language, Time, and Keyboard: On the first screen, select your preferred language, time and currency format, and keyboard or input method. Click “Next.”
- Install Now: Click the “Install now” button.
- Product Key: If prompted, enter your Windows product key. If you don’t have it or plan to activate later, click “I don’t have a product key.” Windows will install but require activation later.
- Choose Operating System: If your ISO contains multiple Windows editions (e.g., Home, Pro), select the one you intend to install and click “Next.” Ensure this matches your product key.
- License Terms: Read and accept the Microsoft Software License Terms. Click “Next.”
- Type of Installation: This is a crucial step:
- Upgrade: Install Windows and keep files, settings, and applications: Choose this ONLY if you’re upgrading an existing Windows installation and want to preserve your data and programs. This is less common for USB installations, which are often clean installs.
- Custom: Install Windows only (advanced): Choose this option for a clean installation. This is what you’ll typically select when installing Windows from a USB drive on a new PC or wiping an old one.
- Where Do You Want to Install Windows?: This is the disk partitioning screen.
- You’ll see a list of drives and partitions. Carefully identify the drive where you want to install Windows.
- For a clean install on an existing drive: Select each existing partition related to your old Windows installation (e.g., System Reserved, Primary, Recovery) and click “Delete.” This will erase all data on those partitions. Once all related partitions are deleted, you’ll have “Unallocated Space.” Select this space and click “Next.” Windows will automatically create the necessary partitions (system, recovery, primary) and begin installation.
- For a new drive or entirely clean slate: You might see a single “Drive X Unallocated Space.” Select it and click “Next.” Windows will handle the partitioning.
- Advanced Partitioning (Optional): If you want to create custom partitions (e.g., a separate partition for data), select “Unallocated Space,” click “New,” specify the size, and then format it. Repeat for other partitions. Then select the primary partition you created for Windows and click “Next.”
- Installation Process: Windows will now begin copying files, installing features, and performing various stages of installation. Your computer will restart multiple times during this process. Do not remove the USB drive until after the first restart, or if prompted to do so. Generally, it’s safe to remove it once the system reboots and starts loading the setup process again, or when you see the “Getting devices ready” or initial setup screens.
- Initial Setup Screens: After the restarts, you’ll be greeted by initial setup screens.
- Region and Keyboard Layout: Select your country/region and keyboard layout.
- Connect to a Network: Connect to a Wi-Fi or Ethernet network.
- Account Setup:
- Microsoft Account: Windows 10/11 often pushes you to sign in with a Microsoft account. This links your PC to your account for syncing settings, OneDrive, etc.
- Offline Account (Local Account): It’s often possible to create a local account by selecting “Offline account” or declining to sign in with a Microsoft account during the initial setup. This option might be less prominent in Windows 11 Home.
- PIN Creation: Create a PIN for faster login.
- Privacy Settings: Review and adjust your privacy settings (location, diagnostic data, tailored experiences, etc.).
- Other Settings: You might be prompted to set up features like OneDrive, Xbox Game Pass, or phone linking. Make your choices.
4. Post-Installation Steps: Getting Your System Ready
Once the setup is complete and you’ve reached the Windows desktop, there are a few crucial steps to ensure your system is fully functional and secure.
- Run Windows Update: This is paramount. Go to
Settings > Update & Security(Windows 10) orSettings > Windows Update(Windows 11) and click “Check for updates.” Install all available updates, including cumulative updates, security patches, and optional driver updates. You might need to restart your PC multiple times. - Install Device Drivers: While Windows Update often installs generic drivers, it’s best to install the latest, manufacturer-specific drivers for optimal performance, especially for:
- Graphics Card: Download from NVIDIA, AMD, or Intel’s website.
- Motherboard Chipset: Download from your motherboard manufacturer’s website (ASUS, MSI, Gigabyte, etc.) or your PC OEM (Dell, HP, Lenovo).
- Network (Wi-Fi/Ethernet): Crucial if Windows didn’t automatically detect your network adapter.
- Audio: For sound functionality.
- Other Peripherals: Printers, webcams, etc.
- Tip: Visit your PC or motherboard manufacturer’s support website, enter your model number, and download the latest drivers for your version of Windows.
- Activate Windows: If you skipped entering a product key during installation, now is the time to activate Windows. Go to
Settings > Update & Security > Activation(Windows 10) orSettings > System > Activation(Windows 11) and enter your product key. If you have a digital license, Windows should activate automatically once connected to the internet and signed into your Microsoft account. - Install Essential Software: Begin installing your favorite applications, such as web browsers (Chrome, Firefox, Edge), office suites (Microsoft Office, LibreOffice), security software, media players, and productivity tools.
- Configure System Settings: Personalize your desktop, background, theme, sound settings, power options, and user account settings to your liking.
Troubleshooting Common Windows Installation Issues
Even with careful preparation, issues can sometimes arise during Windows installation. Here are some common problems and their solutions.
1. USB Drive Not Booting
- Incorrect Boot Order: Re-enter BIOS/UEFI and ensure the USB drive is at the top of the boot order.
- Legacy/UEFI Mismatch: If your PC uses UEFI and your USB was created for Legacy BIOS (MBR), or vice versa, it won’t boot. Recreate the USB with the correct partition scheme (GPT for UEFI, MBR for Legacy BIOS). Rufus is excellent for this.
- Secure Boot/CSM: Try disabling Secure Boot and enabling CSM (Compatibility Support Module) in UEFI settings if you’re stuck on a black screen or your drive isn’t recognized. Remember to re-enable them for better security after installation if your system supports it.
- Faulty USB Drive/Port: Try a different USB drive or a different USB port on your computer (preferably a USB 2.0 port first, then a 3.0/3.1).
- Corrupted ISO/USB Creation: Download the ISO again or recreate the bootable USB using a different tool (e.g., if Media Creation Tool failed, try Rufus, and vice versa).
2. Drive Partitioning Errors (“Windows cannot be installed to this disk”)
- GPT/MBR Mismatch: This is often the culprit. If your error message states, “Windows cannot be installed to this disk. The selected disk has an MBR partition table,” and your PC is UEFI, you need to convert the disk to GPT. Or, if it states, “…disk is of the GPT partition style,” and your PC is Legacy BIOS, you need to convert to MBR.
- Solution (during setup): At the “Where do you want to install Windows?” screen, press
Shift + F10to open Command Prompt.- Type
diskpartand press Enter. - Type
list diskto see your drives. Identify your target disk number (e.g.,disk 0). - Type
select disk X(replace X with your disk number). - WARNING: This will erase all data on the selected disk.
- To convert to GPT: Type
clean(Enter), thenconvert gpt(Enter). - To convert to MBR: Type
clean(Enter), thenconvert mbr(Enter). - Type
exit(Enter) twice to close Command Prompt and then refresh the partition screen in the Windows installer.
- Type
- Solution (during setup): At the “Where do you want to install Windows?” screen, press
- Insufficient Space: Ensure you have enough unallocated space for Windows. Delete unnecessary partitions to create more.
3. Product Key Issues
- Invalid Key: Double-check the product key for typos.
- Edition Mismatch: Ensure the product key matches the Windows edition you selected to install (Home, Pro, etc.).
- Activation Servers Busy: Sometimes it’s a temporary issue. Try again later, or proceed without a key and activate after installation.
- Digital License: If you have a digital license linked to your Microsoft account, skip the key entry during installation. Windows should activate automatically once you sign in with that account online.
4. Driver Compatibility and Post-Installation Issues
- Missing Drivers: If hardware isn’t working (e.g., no Wi-Fi, no sound), visit your PC or motherboard manufacturer’s website on another device, download the relevant drivers to a USB drive, and install them manually.
- Blue Screen of Death (BSOD): If you experience BSODs after installation, it often points to a faulty driver, hardware issue, or corrupted Windows files. Update all drivers, run Windows Update, and consider running memory diagnostics (Windows Memory Diagnostic Tool) or checking disk health.

Conclusion
Installing Windows from a USB drive is a fundamental skill for any PC user, offering a fast, flexible, and efficient way to manage your operating system. By carefully following the steps outlined in this comprehensive guide, from preparing your bootable media to navigating the installation wizard and performing crucial post-installation tasks, you can confidently set up or reinstall Windows on any compatible machine.
Remember the key takeaways: always back up your data, choose the right tools (Media Creation Tool for simplicity, Rufus for control), understand your PC’s boot settings (BIOS/UEFI, MBR/GPT), and be diligent with post-installation updates and driver installations. With these practices, you’ll not only master the Windows installation process but also gain a deeper understanding of your PC’s foundations, paving the way for a stable, secure, and optimized computing experience. Embrace the power of the USB, and unlock the full potential of your Windows system.
aViewFromTheCave is a participant in the Amazon Services LLC Associates Program, an affiliate advertising program designed to provide a means for sites to earn advertising fees by advertising and linking to Amazon.com. Amazon, the Amazon logo, AmazonSupply, and the AmazonSupply logo are trademarks of Amazon.com, Inc. or its affiliates. As an Amazon Associate we earn affiliate commissions from qualifying purchases.