
In the intricate world of automotive technology, few modifications offer such a direct and insightful window into your engine’s performance as a boost gauge. For enthusiasts and performance drivers alike, understanding the internal workings of a turbocharged or supercharged engine isn’t just about horsepower figures; it’s about real-time data, predictive diagnostics, and the peace of mind that comes from being truly connected to your vehicle. This comprehensive guide will walk you through the process of installing a boost gauge, transforming a seemingly complex task into an empowering journey of automotive enlightenment.
As part of a website focusing on Tech, Brand, and Money, installing a boost gauge perfectly aligns with our mission. From a Tech perspective, it involves understanding sophisticated engine mechanics, electrical systems, and precise instrumentation. From a Brand standpoint, the choice of a quality gauge and its seamless integration into your vehicle reflects attention to detail and a commitment to performance and aesthetics. And from a Money perspective, this simple modification can be a powerful diagnostic tool, potentially saving you significant costs in preventable repairs by offering early warnings of engine issues. Let’s dive into the fascinating world of forced induction and discover how to unlock your engine’s secrets.
Understanding Your Boost Gauge: Why It Matters
Before reaching for any tools, it’s crucial to understand what a boost gauge is, why it’s invaluable, and the different types available. This foundational knowledge empowers you to make informed decisions throughout the installation process and fully appreciate the benefits this device brings.
The Core Function: Monitoring Engine Performance
At its heart, a boost gauge measures the pressure within your engine’s intake manifold, specifically the positive pressure (boost) generated by a turbocharger or supercharger, and the negative pressure (vacuum) present during engine deceleration or idle. For engines equipped with forced induction, this measurement is paramount. Without a boost gauge, you’re essentially driving blind to one of the most critical aspects of your engine’s operation.
- Performance Optimization: Knowing your boost levels allows you to confirm that your turbocharger or supercharger is operating within its optimal range. During performance tuning, it’s an indispensable tool for verifying power delivery and ensuring consistency.
- Early Problem Detection: Fluctuations, unusually low boost, or excessive boost can be indicators of underlying issues. A sudden drop in boost might signal a vacuum leak, a failing turbo, or a wastegate problem. Conversely, over-boosting could point to a stuck wastegate or an ECU calibration issue, potentially leading to engine damage if left unaddressed. Catching these problems early can save you from far more expensive repairs down the line—a clear “Money” benefit.
- Driver Engagement: Beyond diagnostics, a boost gauge adds another layer of engagement to the driving experience. Monitoring boost levels during spirited driving provides instant feedback, deepening your connection to the vehicle and its capabilities. It’s a real-time display of your engine’s effort, making you a more informed and skilled driver.
Choosing Your Weapon: Mechanical vs. Electrical Gauges
Boost gauges primarily come in two types: mechanical and electrical. Each has its advantages and considerations for installation and performance. Your choice will depend on factors like budget, desired accuracy, ease of installation, and personal preference.
- Mechanical Boost Gauges: These gauges operate purely on pneumatic pressure. A direct vacuum line runs from the intake manifold to the gauge itself, transferring pressure changes directly to a needle on the gauge face.
- Pros: Generally less expensive, highly accurate as there’s no electronic interpretation, and often have a quicker response time. Installation can be simpler in terms of wiring (though running a vacuum line can be tricky).
- Cons: Requires running a physical vacuum line into the cabin, which can pose challenges for finding a clean route and ensuring a leak-free seal. The line can be susceptible to kinks or damage, and there’s a slight risk of a boost leak inside the cabin if the line fails. Some drivers also dislike the slight “hissing” sound that can sometimes emanate from the gauge.
- Electrical (Electronic) Boost Gauges: These gauges use a separate electronic sensor (MAP sensor, or Manifold Absolute Pressure sensor) mounted in the engine bay. This sensor converts pressure readings into an electrical signal, which is then sent to the gauge display in the cabin.
- Pros: No need to run a vacuum line directly into the cabin, reducing potential leak points and simplifying cabin routing. Often come with additional features like peak hold, warning lights, or digital readouts. Can be integrated more cleanly into modern vehicle interiors.
- Cons: Generally more expensive due to the additional sensor and electronics. There’s a slight inherent delay in the signal processing, though modern gauges have minimized this to be almost imperceptible. Requires more electrical wiring (power, ground, sensor input).
- Hybrid Gauges: Some gauges offer a combination, using an electrical sensor for the boost reading but still requiring a power source for illumination and display.
Regardless of the type you choose, investing in a reputable Brand for your gauge ensures accuracy, durability, and a consistent aesthetic that complements your vehicle’s interior. A cheap, unbranded gauge might provide readings, but its reliability and longevity can be questionable.
Preparation is Key: Gathering Your Arsenal
A successful boost gauge installation hinges on thorough preparation. Having the right tools and materials, coupled with a strict adherence to safety protocols, will streamline the process and prevent costly mistakes. This section outlines everything you’ll need to transform your vision into a functional reality.
Essential Tools and Supplies
Before you begin, gather all the necessary items. Nothing slows down a project more than realizing you’re missing a crucial tool halfway through.
- The Boost Gauge Kit: This should include the gauge itself, mounting pod/cup, wiring harness (for electrical gauges), vacuum line (for mechanical gauges), T-fitting, and any necessary adapters or instruction manual.
- Basic Hand Tools:
- Screwdrivers: Flathead and Phillips head, various sizes, for removing interior panels and tightening hose clamps.
- Wrenches/Socket Set: Metric and/or SAE, depending on your vehicle, for loosening and tightening nuts and bolts.
- Wire Strippers/Crimpers: Essential for making clean electrical connections (if installing an electrical gauge).
- Utility Knife/Razor Blade: For cutting vacuum line neatly.
- Drill and Drill Bits: Potentially needed for mounting the gauge pod or creating a firewall pass-through (use with extreme caution!).
- Electrical Supplies (for Electrical Gauges or Illumination):
- Multimeter/Test Light: Crucial for identifying proper power, ground, and illumination wires. This is a non-negotiable tool for electrical work.
- Fuse Tap (Add-a-Circuit): The safest and cleanest way to draw switched 12V power from your fuse box.
- Electrical Tape/Heat Shrink Tubing: For insulating connections and preventing shorts.
- Zip Ties/Cable Ties: For neatly securing wiring and vacuum lines.
- Wire Connectors: Butt connectors, spade connectors, or quick splices, as needed.
- Vacuum/Pressure System Supplies:
- Vacuum Hose: Ensure it’s high-quality, high-temperature resistant, and the correct diameter for your T-fitting and gauge.
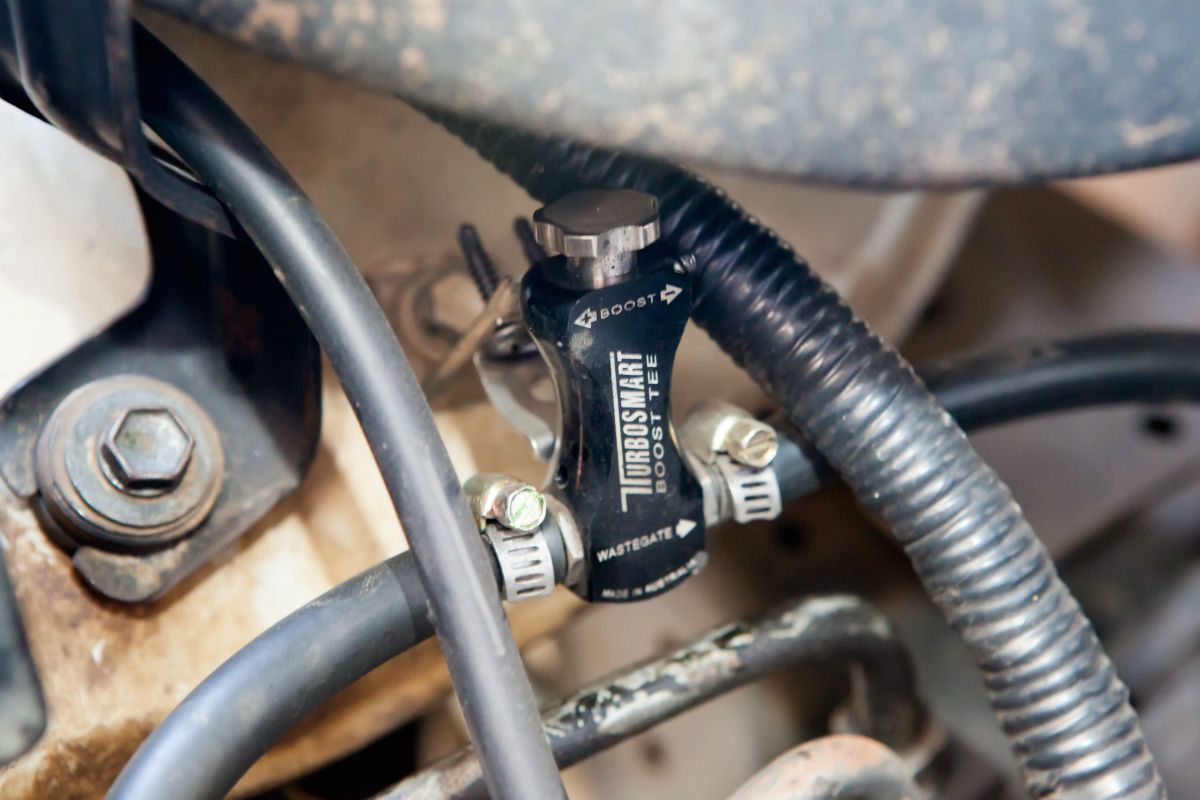
- T-Fitting: To tap into an existing vacuum line. Choose a durable material (brass or robust plastic).
- Hose Clamps: Small clamps for securing vacuum lines to the T-fitting and gauge, preventing leaks.
- Miscellaneous:
- Shop Towels/Rags: For cleaning up any spills or grime.
- Flashlight/Headlamp: For illuminating dark engine bay and under-dash areas.
- Protective Eyewear: Always protect your eyes!
- Gloves: Optional, but recommended for keeping hands clean and preventing cuts.
Prioritizing Safety: A Crucial First Step
Working on your vehicle always carries inherent risks. Adhering to safety guidelines is paramount to prevent injury to yourself and damage to your car.
- Disconnect the Battery: This is the golden rule for any electrical work. Disconnecting the negative terminal of your car battery prevents accidental shorts, electrical shocks, and potential damage to your vehicle’s sensitive electronics.
- Work on a Cool Engine: The engine bay can become extremely hot after operation. Allow the engine to cool down completely before working on any components within it, especially vacuum lines and manifolds.
- Secure the Vehicle: If you need to lift the vehicle for any reason (unlikely for a boost gauge, but good general practice), ensure it’s properly supported by jack stands on a level surface.
- Use Proper Personal Protective Equipment (PPE): Safety glasses are a must when drilling, cutting, or working with any tools. Gloves can protect your hands.
- Understand Your Vehicle’s Layout: Before you start pulling panels or drilling, familiarize yourself with your car’s wiring diagrams, fuse box locations, and engine bay layout. Consult your vehicle’s owner’s manual or repair manual.
- Avoid Critical Components: Be extremely careful when routing wires and lines. Avoid hot exhaust components, moving parts (belts, pulleys), and sharp edges that could chafe or melt your lines/wires.
By meticulously preparing and prioritizing safety, you set the stage for a smooth and successful boost gauge installation, ensuring both your well-being and the integrity of your vehicle.
Step-by-Step Installation Guide
With your tools ready and safety precautions in mind, it’s time to embark on the core of the project: the installation itself. This section breaks down the process into manageable, logical steps, guiding you from locating your gauge to firing up your engine and seeing those boost pressures climb.
Selecting the Ideal Mounting Location
The first practical step is deciding where to mount your boost gauge. This choice balances aesthetics, visibility, and practicality, ensuring the gauge is easy to read without obstructing your view of the road.
- A-Pillar Mount: A very popular choice, often utilizing a custom pod that clips onto or replaces part of the A-pillar trim. This offers excellent line-of-sight visibility, keeping your eyes closer to the road. Ensure it doesn’t block critical airbag deployment zones if your vehicle has A-pillar airbags.
- Dashboard Mount: Less common but viable. Small, unobtrusive pods can be mounted on top of the dashboard, typically near the driver’s side. Be mindful of reflections on the windshield and securing the pod firmly.
- Steering Column Mount: Some smaller gauges can be mounted to the steering column, often with a dedicated pod, placing them just above or next to the steering wheel. This offers direct visibility without impeding other dash functions.
- Vent Pod Mount: For a very clean, integrated look, some kits allow you to replace an air vent with a gauge pod. This can be aesthetically pleasing but might slightly reduce airflow from that particular vent.
- Custom Mounts: For the truly dedicated, a custom fabrication can integrate the gauge into existing dash panels, storage bins, or even the center console. This requires more skill and tools but offers the most “factory” look.
Once you’ve chosen your location, temporarily place the gauge there to ensure it provides a clear view and doesn’t interfere with driving controls or visibility. Consider how wiring or vacuum lines will be routed to this location from the engine bay and power sources.
Tapping into the Engine’s Pulse: Vacuum/Pressure Source Connection
This is arguably the most critical part of the installation for mechanical gauges, and equally important for electrical sensor placement. You need to connect your gauge or its sensor to a reliable source that accurately reflects the intake manifold pressure.
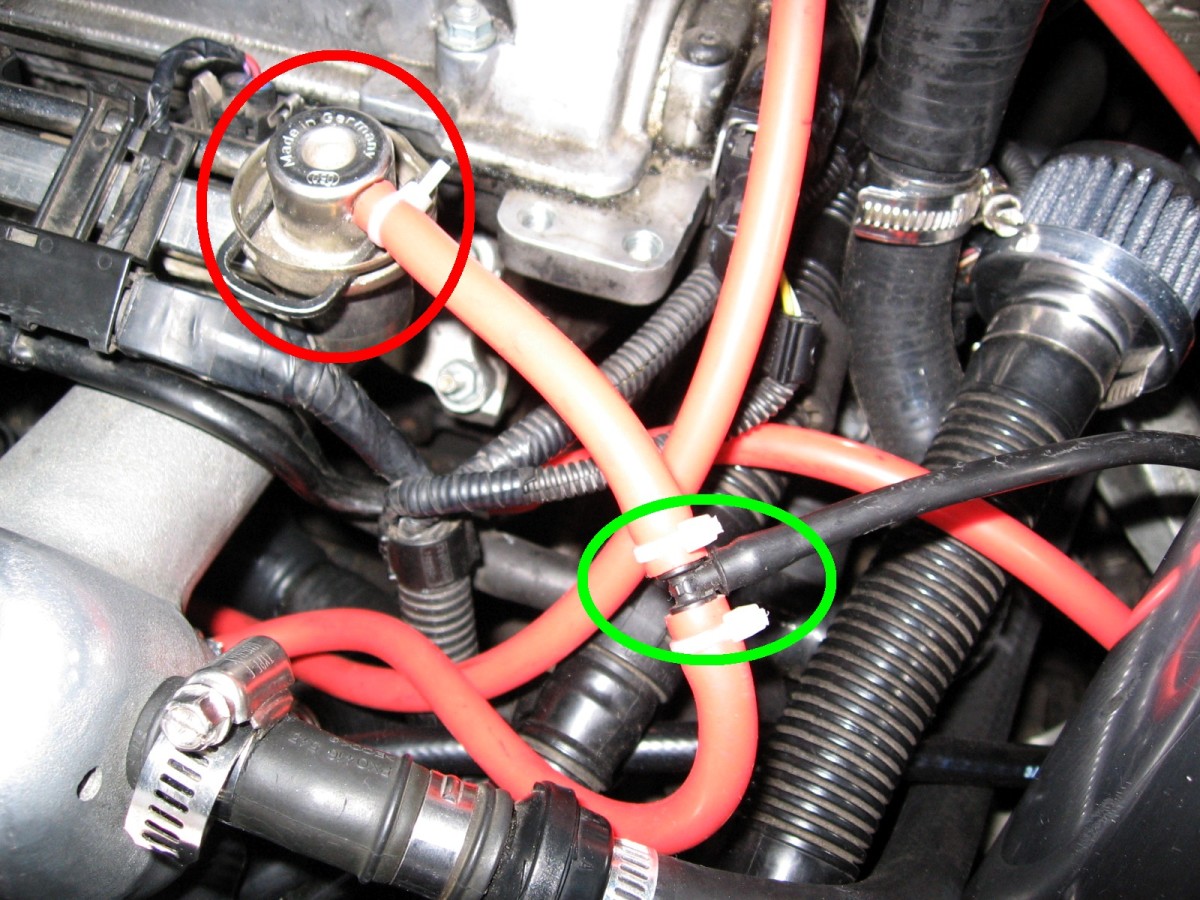
- Identify a Suitable Vacuum Line: For most turbocharged/supercharged vehicles, there will be multiple vacuum lines running off the intake manifold. You need to find a line that provides a strong, consistent vacuum signal at idle and positive pressure under boost. Good candidates are often lines leading to the fuel pressure regulator, PCV valve, or brake booster (though tapping the brake booster line is generally discouraged due to safety implications). Avoid lines related to critical emissions equipment or anything that might be overly complex.
- Tip: A vacuum diagram for your specific engine found in a service manual or online can be incredibly helpful here.
- Locate the Ideal T-Fitting Spot: Once you’ve identified a suitable line, you’ll need to cut it to insert the T-fitting. Choose a straight section of the hose, away from sharp bends or engine heat sources.
- Install the T-Fitting:
- Carefully cut the chosen vacuum line with a sharp utility knife. Ensure the cut is clean and straight.
- Insert the T-fitting into the cut line. The two “straight through” ends connect to the original vacuum line, and the “branch” of the T-fitting will connect to your boost gauge.
- Secure the connections with small hose clamps on all three points of the T-fitting. This is crucial for preventing boost/vacuum leaks, which can negatively impact engine performance.
- Connect Gauge Line/Sensor:
- For Mechanical Gauges: Attach one end of your dedicated boost gauge vacuum line to the T-fitting’s branch. Secure it with a hose clamp.
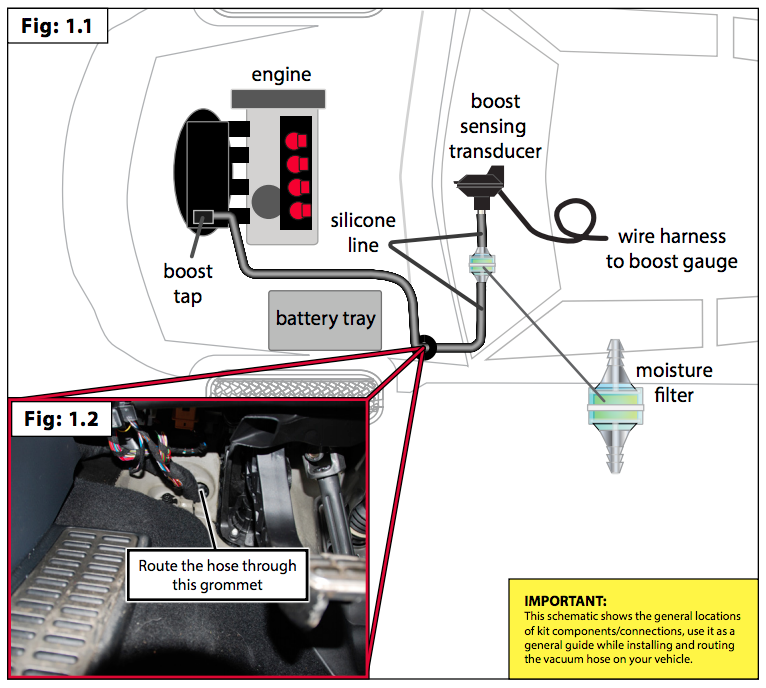
- For Electrical Gauges: Mount the boost sensor (if provided separately) in the engine bay, ideally close to the T-fitting. Connect a short length of vacuum line from the T-fitting’s branch to the sensor’s input port, securing with clamps.
- Route the Line/Wiring: Carefully route the vacuum line (mechanical) or sensor wiring (electrical) from the engine bay towards the firewall, preparing it for entry into the cabin. Use zip ties to secure it away from hot or moving engine components.
Routing Lines and Wires Through the Firewall
Getting the vacuum line or sensor wiring from the engine bay into the cabin requires careful planning and execution to maintain a neat, safe, and watertight seal.
- Find an Existing Grommet: The safest and cleanest method is to utilize an existing, unused grommet in the firewall. Many vehicles have these, often under the dashboard or near the steering column. Look for thick rubber plugs that can be carefully punctured or removed to pass your line/wires through.
- Consider Drilling (As a Last Resort): If no suitable grommet exists, you may need to drill a small hole. This should be a last resort and undertaken with extreme caution.
- Crucial Step: Before drilling, check both sides of the firewall to ensure you won’t hit any existing wiring harnesses, brake lines, or other critical components. Use a small pilot drill bit first.
- Protection: Once the hole is drilled, insert a rubber grommet (available at hardware stores) into the hole to protect your line/wires from chafing on the sharp metal edge.
- Pass Through: Carefully feed the vacuum line or sensor wires through the chosen grommet or drilled hole, ensuring there’s enough slack on both sides.
- Seal and Secure: Apply silicone sealant around the grommet or hole on both sides of the firewall to prevent water intrusion. Once inside the cabin, route the line/wires discreetly under the dash and trim panels towards your chosen gauge mounting location. Use zip ties to secure them and prevent them from dangling or interfering with pedals.
Powering Up and Illuminating Your Gauge
For electrical gauges, and for the illumination of mechanical gauges, you’ll need to tap into your vehicle’s electrical system. This involves finding suitable power, ground, and illumination sources.
- Identify Power Source (Switched 12V):
- You need a “switched” 12V source, meaning it only receives power when the ignition is on. This prevents the gauge from draining your battery when the car is off.
- The easiest and safest method is to use a fuse tap (add-a-circuit) in your interior fuse box. Locate a fuse that powers an accessory that only turns on with the ignition (e.g., radio, cigarette lighter, power windows – consult your owner’s manual).
- Using a Multimeter: With your battery reconnected (temporarily, for testing), use a multimeter to verify which side of the fuse slot is the “hot” side (always powered) and which is the “load” side (only powered when the fuse is installed). You want to connect the fuse tap to the load side.
- Fuse Tap Installation: Insert an appropriately sized fuse for the boost gauge into the top slot of the fuse tap, and the original fuse into the bottom slot. Plug the fuse tap into the chosen fuse slot in your fuse box. Connect the gauge’s positive power wire to the wire extending from the fuse tap.
- Identify Ground Source:
- You need a clean, reliable chassis ground. Look for an existing bolt under the dashboard or kick panel that bolts directly to the vehicle’s metal frame.
- Clean any paint or rust from the contact point to ensure good conductivity.
- Connect the gauge’s ground wire to this bolt, ensuring a tight connection.
- Identify Illumination Source (Optional but Recommended):
- To illuminate your gauge with your dashboard lights and allow it to dim with your interior dimmer, tap into a wire that powers one of your existing dash lights (e.g., head unit, climate control unit).
- Use your multimeter to identify a wire that receives 12V when your headlights are on and dims with your dimmer switch.
- Carefully tap into this wire using a T-tap or by splicing and soldering, then connect it to your gauge’s illumination wire.
- Connect Electrical Sensor (for Electrical Gauges): Route the wires from your boost sensor in the engine bay into the cabin and connect them to the appropriate terminals on your gauge, following the manufacturer’s instructions.
Final Mounting and Connection
Once all lines and wires are routed and connected, it’s time to secure the gauge itself.
- Mount the Gauge Pod: Securely attach the gauge pod to your chosen location using screws (if applicable, ensuring they don’t damage anything behind the panel) or strong double-sided automotive tape. Ensure it’s stable and won’t vibrate loose.
- Insert the Gauge: Carefully push the boost gauge into its mounting pod.
- Final Connections:
- Mechanical Gauges: Connect the vacuum line from the firewall to the back of the mechanical gauge, securing it with a small hose clamp.
- Electrical Gauges: Connect the power, ground, illumination, and sensor wires to the appropriate terminals on the back of the electrical gauge.
- Neaten Up: Use zip ties to neatly bundle and secure any excess wiring or vacuum line behind the dash, ensuring they are clear of pedals, steering components, and airbags. Reinstall any interior trim panels you removed.
Post-Installation: Testing, Calibration, and Troubleshooting
The physical installation is complete, but the job isn’t done until you’ve verified everything works correctly and addressed any potential issues. This final stage is crucial for ensuring accuracy and reliability.
Initial Start-up and Leak Checks
This step involves bringing your system to life and performing essential diagnostics.
- Reconnect the Battery: Once all connections are secure and panels are reinstalled, reconnect the negative terminal of your car battery.
- Inspect for Leaks (Mechanical Gauges): Before starting the engine, double-check all vacuum line connections in the engine bay and at the gauge for tightness. Start the engine and listen carefully for any hissing sounds indicative of a vacuum leak. You can also spray a small amount of soapy water around connections; if bubbles form, you have a leak. Address any leaks immediately as they can severely impact engine performance and potentially cause damage.
- Check Gauge Functionality:
- Ignition On: Turn the ignition key to the “on” position (engine off). If you have an electrical gauge, it should power up and perform an initial sweep.
- Engine Start: Start the engine.
- Vacuum: At idle, your boost gauge should show a vacuum reading (negative pressure). The exact reading will vary by engine, but typically it will be between -18 to -22 inHg (inches of mercury) or -0.6 to -0.7 Bar. If it reads 0 or positive pressure, something is wrong.
- Illumination: Turn on your headlights. The gauge’s illumination should activate and dim with your dashboard lights.
- Road Test (Carefully): Take your vehicle for a short, gentle drive. Under light acceleration, you should see the needle move from vacuum towards 0. Under heavier acceleration, you should see positive boost pressure build. Monitor the gauge’s readings, ensuring they seem consistent with your vehicle’s known performance characteristics. Do not push your engine to its limits until you are confident the gauge is reading accurately.
Common Issues and Quick Fixes
Even with careful installation, you might encounter minor hiccups. Here’s a quick troubleshooting guide for common problems:
- Gauge Reads 0 or Stuck on Vacuum (No Boost):
- Mechanical: Check for kinks in the vacuum line, disconnected lines, or a clogged T-fitting. Ensure all hose clamps are tight.
- Electrical: Verify the sensor is connected correctly and receiving power. Check wiring for breaks or loose connections.
- Gauge Reads Incorrectly (Too High/Too Low):
- Mechanical: Could be a very small, hard-to-find leak in the vacuum system. Ensure the gauge itself isn’t faulty (rare).
- Electrical: Sensor calibration might be off (though most modern gauges are pre-calibrated), or there’s an issue with the sensor’s connection to the gauge.
- Gauge Not Lighting Up:
- Check the illumination wire connection to your dash light circuit.
- Verify the fuse for the illumination circuit in your fuse box isn’t blown.
- Ensure the gauge itself has a working bulb or LED.
- Gauge Not Powering On (Electrical Gauge):
- Check your fuse tap connection and ensure the fuse isn’t blown.
- Verify the ground connection is solid.
- Use your multimeter to confirm 12V is reaching the gauge’s power wire.
- Whistling/Hissing Sound (Mechanical Gauge):
- Almost certainly a vacuum leak. Recheck all connections, especially those made with the T-fitting and at the back of the gauge. Tighten all hose clamps.
Patience is key during troubleshooting. Systematically re-check each connection and consult your gauge’s instruction manual for specific diagnostic procedures.
Maximizing Your Investment: The Long-Term Value of a Boost Gauge
Installing a boost gauge isn’t just a technical task; it’s an investment in understanding, controlling, and preserving your vehicle. While the initial motivation might be performance monitoring, the long-term benefits extend far beyond the thrill of seeing the needle climb.
From a Tech standpoint, the boost gauge puts crucial engine data directly at your fingertips. It transforms abstract engine parameters into tangible visual information, fostering a deeper understanding of forced induction systems and how they interact with your driving style. This data empowers you to make smarter decisions, whether it’s adjusting your driving habits, considering future performance upgrades, or simply appreciating the engineering marvel under your hood.
When we consider Brand, the choice of a quality boost gauge and its seamless integration into your car’s interior speaks volumes. A well-installed, aesthetically pleasing gauge enhances the vehicle’s interior, reflecting a driver’s attention to detail and commitment to quality modifications. It’s not just a functional tool; it’s an extension of your personal brand as an automotive enthusiast. Opting for reputable brands in the aftermarket industry ensures reliability and accuracy, crucial aspects of both performance and longevity.
Perhaps most significantly, from a Money perspective, a boost gauge serves as a powerful diagnostic and preventative maintenance tool. Early detection of issues like boost leaks, wastegate malfunctions, or compressor wheel damage can literally save you hundreds, if not thousands, of dollars in potential repair costs. Instead of waiting for a “check engine” light and costly professional diagnostics, your boost gauge provides instant, continuous feedback, allowing you to identify minor deviations before they escalate into major failures. This proactive approach to vehicle health is an astute financial decision, protecting your automotive investment.
In conclusion, the installation of a boost gauge is a rewarding project that marries technical skill with practical benefits. It’s a journey that enhances your technological literacy, refines your vehicle’s aesthetic appeal, and ultimately contributes to the financial prudence of car ownership. By following this guide, you’ve not only added a valuable piece of instrumentation to your vehicle but also gained a deeper, more intimate connection with its mechanical heart. Drive safely, and enjoy the newfound insights into your boosted machine!
aViewFromTheCave is a participant in the Amazon Services LLC Associates Program, an affiliate advertising program designed to provide a means for sites to earn advertising fees by advertising and linking to Amazon.com. Amazon, the Amazon logo, AmazonSupply, and the AmazonSupply logo are trademarks of Amazon.com, Inc. or its affiliates. As an Amazon Associate we earn affiliate commissions from qualifying purchases.