
Google Earth has long been celebrated as a pinnacle of geospatial software, allowing users to traverse the globe from the comfort of their workstations. However, buried within the layers of satellite imagery and 3D terrain lies one of the tech world’s most enduring “Easter eggs”: a fully functional flight simulator. While Google Earth Pro is primarily used for geographic analysis, urban planning, and education, its flight simulation module offers a surprisingly robust look into the mechanics of flight and the power of real-time data rendering.
Whether you are a software enthusiast exploring the hidden corners of Google’s desktop applications or a tech-savvy hobbyist looking to test your hardware’s rendering capabilities, mastering the Google Earth flight simulator requires an understanding of both the software interface and the fundamentals of aeronautical controls.
Unlocking the Flight Simulator: Software Requirements and Initialization
To access the flight simulator, you must ensure you are using the desktop version of the software, known as Google Earth Pro. While the web-based and mobile versions of Google Earth offer impressive 3D browsing, the sophisticated flight simulator engine is currently exclusive to the Pro desktop client. This version is free to download and remains a staple for power users who require advanced data layers and offline functionality.
Launching the Interface
Once the software is installed and running, you can enter the cockpit through two primary methods:
-
Keyboard Shortcuts: This is the most efficient method. For Windows users, press
Ctrl + Alt + A. For macOS users, the command isCmd + Opt + A. -
Menu Navigation: Navigate to the “Tools” tab in the top menu bar and select “Enter Flight Simulator.”
Upon activation, a configuration window will appear, presenting you with your first set of technical choices: aircraft selection and start location.
Choosing Your Aircraft
The simulator provides two distinct flight models, each coded with unique physics and handling characteristics:
-
F-16 Fighting Falcon: This model is designed for users seeking high-speed maneuvers and rapid altitude gains. Its flight logic is sensitive, requiring precise inputs. It is the ideal choice for testing the software’s ability to stream high-resolution 3D data at high velocities.
-
Cirrus SR22: A slower, more stable propeller plane. The SR22 is better suited for beginners or for users who want to perform low-altitude reconnaissance of specific geographic features. Its forgiving physics model makes it an excellent tool for learning the software’s control scheme.
Command and Control: Navigating the Technical Interface
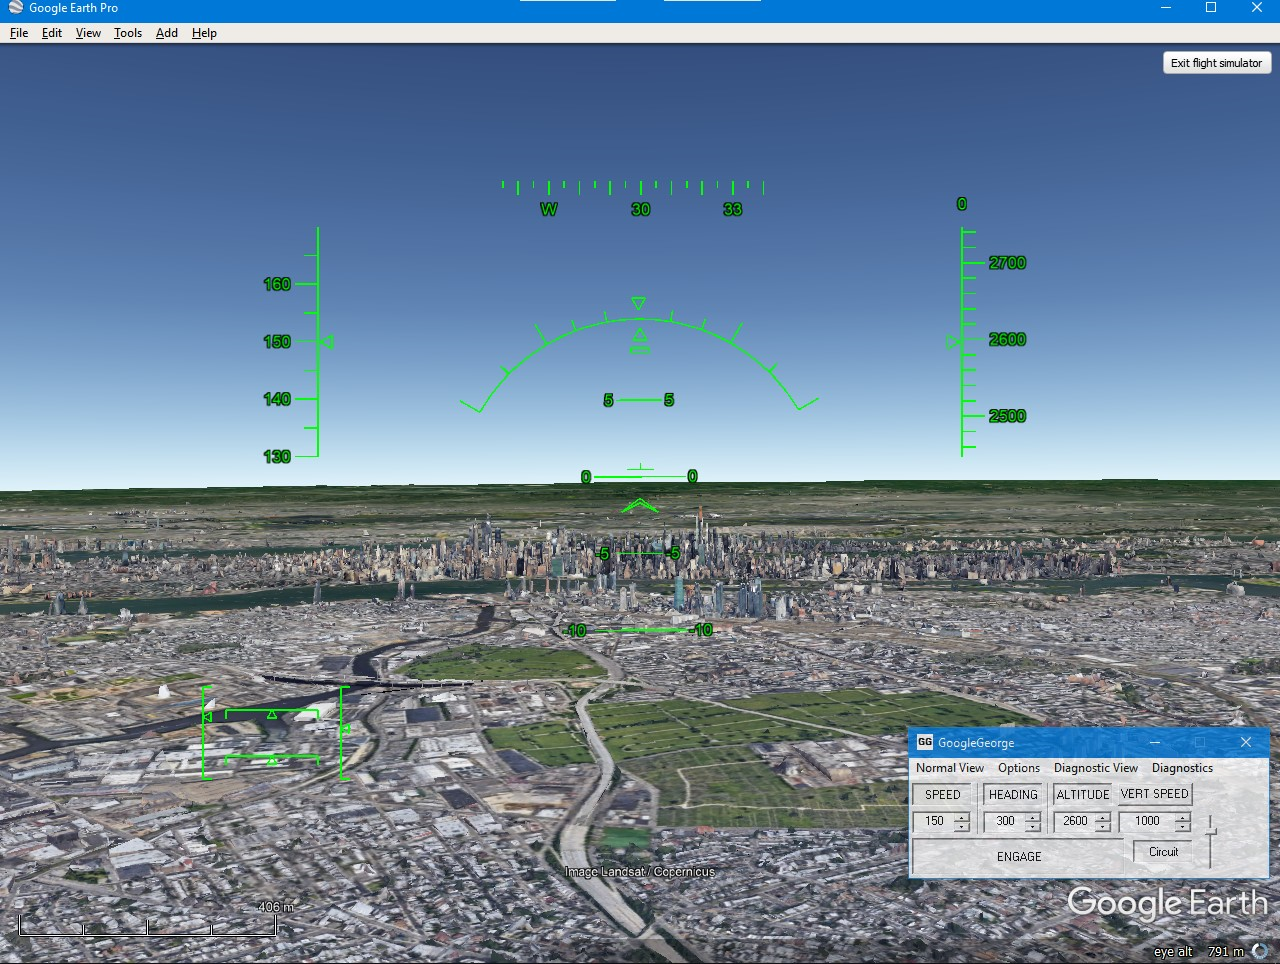
Unlike arcade-style flight games, the Google Earth flight simulator utilizes a sophisticated Heads-Up Display (HUD) that mimics real-world avionics. Understanding the HUD is essential for maintaining flight stability and navigating the virtual world.
The Heads-Up Display (HUD) Architecture
When you enter the simulation, several critical data points are overlaid on your screen:
-
Speed (Knots): Located in the upper left corner, this indicates your current airspeed.
-
Heading: The numbers at the top center represent your compass heading in degrees.
-
Bank Angle: The lines in the center indicate the aircraft’s roll relative to the horizon.
-
Altitude (Feet): Located on the right side, showing your height above sea level.
-
Vertical Speed: Measured in feet per minute, this indicates how fast you are climbing or descending.
Input Methods: Keyboard vs. Joystick
The software supports both keyboard inputs and external hardware. For a professional-grade experience, Google Earth Pro is compatible with most USB joysticks and flight controllers. However, the majority of users will rely on keyboard and mouse inputs.
The mouse acts as the primary yoke. When you click in the center of the screen, the cursor becomes a crosshair. Moving the mouse down pulls the nose up (climbing), while moving it up pushes the nose down (diving). Moving the mouse left or right controls the ailerons, initiating a roll.
Key technical shortcuts include:
-
Thrust:
Page Upto increase power;Page Downto decrease. -
Flaps:
Fincreases flap increments (useful for takeoff and landing), whileShift + Fretracts them. -
Landing Gear: The
Gkey toggles the landing gear. -
Brakes: Use
,(comma) for left wheel brakes and.(period) for right wheel brakes. -
Pause: The
Spacebarallows you to freeze the simulation, which is particularly useful if the software is struggling to buffer 3D imagery during high-speed flight.
The Geospatial Engine: How Google Earth Renders the World
The true brilliance of the Google Earth flight simulator lies not just in its flight physics, but in the underlying technology that renders the environment. The software utilizes a massive distributed database of satellite imagery, aerial photography, and GIS (Geographic Information System) data.
Real-Time Data Streaming
As you fly, the software is constantly making requests to Google’s servers to fetch “tiles” of imagery. This is a dynamic process where the level of detail (LOD) scales based on your altitude and speed. When flying an F-16 at Mach 1, the engine prioritizes lower-resolution textures to maintain a consistent frame rate. Conversely, when hovering at low altitudes in a Cirrus SR22, the software attempts to pull high-resolution 3D mesh data for buildings and vegetation.
3D Mesh and Terrain Modeling
Google Earth Pro uses a combination of LiDAR (Light Detection and Ranging) and photogrammetry to create 3D representations of cities. In the simulator, these aren’t just static images; they are physical objects within the 3D space. This means you can fly between skyscrapers in Manhattan or navigate the ridges of the Himalayas. The software calculates the “collision” between your aircraft’s coordinates and the elevation data provided by the digital elevation model (DEM). If your altitude variable drops below the terrain elevation variable, the simulation triggers a “crash” and resets.
Optimizing Performance for Smooth Simulation
Because the flight simulator is resource-intensive, hardware optimization is key to a professional experience. Users running the simulation on older hardware or integrated graphics may experience stuttering as the software struggles to render complex 3D geometry and handle the flight physics simultaneously.
Graphics Settings and Cache Management
To ensure a smooth flight, navigate to the “Options” or “Preferences” menu in Google Earth Pro. Under the “3D View” tab, you can adjust several parameters:
-
Graphics Mode: Switching between OpenGL and DirectX can significantly impact performance depending on your GPU. Generally, DirectX is more stable on Windows machines, while OpenGL is the standard for macOS.
-
Texture Colors: Reducing to 16-bit color can save video memory.
-
Memory Cache Size: Increasing the memory cache allows Google Earth to store more imagery in your RAM, reducing the need for constant server pings and mitigating “pop-in” of textures.
-
Atmospheric Rendering: Disabling the “Atmospheric” setting removes the realistic haze and sun glints, which can free up processing power for more accurate terrain rendering.
Network Bandwidth
Since the environment is streamed, your internet connection is as vital as your GPU. A connection speed of at least 10-20 Mbps is recommended for high-speed flight in the F-16. Without sufficient bandwidth, the ground will appear as a blurry, low-resolution texture, breaking the immersion of the simulation.

The Evolution of Simulation in GIS Software
The inclusion of a flight simulator in a professional-grade mapping tool highlights an important trend in technology: the convergence of simulation and data visualization. While it began as a hidden feature, it demonstrates the capacity of modern software to handle multi-dimensional data sets in a way that is interactive and engaging.
For developers and tech professionals, the Google Earth flight simulator is a masterclass in how to implement a secondary engine (the flight physics) on top of a massive primary database (the global map). It serves as a precursor to modern digital twin technology, where entire cities are modeled in 3D for simulation purposes—ranging from airflow analysis to autonomous vehicle training.
In conclusion, flying a plane in Google Earth is more than just a novelty; it is an exploration of one of the world’s most sophisticated software ecosystems. By mastering the controls and understanding the technical requirements of the rendering engine, users can gain a unique perspective on the planet, viewing the world not just as a flat map, but as a dynamic, three-dimensional space waiting to be navigated. Whether you are performing a low-pass over the Grand Canyon or navigating the urban canyons of Tokyo, the Google Earth flight simulator remains a powerful testament to the capabilities of modern geospatial software.
aViewFromTheCave is a participant in the Amazon Services LLC Associates Program, an affiliate advertising program designed to provide a means for sites to earn advertising fees by advertising and linking to Amazon.com. Amazon, the Amazon logo, AmazonSupply, and the AmazonSupply logo are trademarks of Amazon.com, Inc. or its affiliates. As an Amazon Associate we earn affiliate commissions from qualifying purchases.