
Encountering an unfamiliar or incorrect charge on your credit card statement can be a source of immediate stress and confusion. Whether it’s a suspected fraudulent transaction, a billing error, or an issue with a product or service you purchased, knowing how to effectively dispute a charge is a crucial skill for responsible financial management. For Chase credit card holders, understanding the specific procedures and regulations involved can make all the difference in achieving a favorable resolution. This comprehensive guide will walk you through the process, empowering you to protect your finances and ensure the accuracy of your account.
Understanding What Constitutes a Disputable Charge
Before initiating a dispute, it’s essential to confirm that your situation qualifies under the typical parameters for chargebacks. Not every unsatisfactory purchase is grounds for a formal dispute, and understanding the nuances can save you time and improve your chances of success. The Fair Credit Billing Act (FCBA) is the cornerstone of consumer protection in this area, outlining your rights regarding billing errors.
Identifying Unauthorized or Fraudulent Transactions
This is perhaps the most straightforward category for disputes. If you see a charge on your Chase statement that you did not authorize, it is considered fraudulent. This could stem from your card number being stolen and used without your knowledge, or a merchant mistakenly charging you for someone else’s purchase. Fraudulent charges are a serious matter and credit card companies, including Chase, have robust systems to investigate and resolve them. The key here is quick action; reporting fraud promptly minimizes your liability.
Recognizing Billing Errors and Merchant Disputes
Beyond outright fraud, many disputes arise from legitimate transactions that contain errors or issues. These can include:
- Incorrect amounts: You were charged more than the agreed-upon price.
- Duplicate charges: You were charged twice for the same transaction.
- Failed to cancel: You canceled a subscription or service, but the merchant continued to charge you.
- Wrong date: A transaction appears on a different date than when it occurred, which might impact billing cycles or interest calculations.
- Credit not processed: A return or refund was approved by the merchant, but the credit never appeared on your statement.
- Misleading descriptions: The merchant description on your statement doesn’t match the actual purchase, making it hard to identify.
These types of errors are often unintentional on the merchant’s part but still require your attention to correct.
Services Not Rendered or Goods Not Received
Another common ground for dispute involves situations where you paid for something but did not receive it, or what you received was significantly different from what was promised. This includes:
- Product never delivered: You ordered an item online, but it never arrived.
- Service not provided: You paid for a service (e.g., car repair, home cleaning) that was never performed.
- Defective or misrepresented goods: The item you received was broken, not as described, or entirely different from what you ordered.
- Cancellation issues: You properly canceled a travel booking or event ticket, but were still charged or not refunded as per the terms.
For these types of disputes, communication with the merchant is often the first and best course of action, as they may be able to resolve the issue directly.
The Critical Steps Before Contacting Chase
While your first instinct might be to immediately contact Chase, taking a few preparatory steps can significantly streamline the dispute process and improve your chances of a successful outcome. Thorough documentation and a good understanding of your consumer rights are your strongest allies.
Gathering Comprehensive Documentation and Evidence
The more information you can provide to Chase, the stronger your case will be. Before making any contact, gather all relevant documents related to the disputed charge. This typically includes:
- Credit card statements: Highlight the specific charge(s) you are disputing.
- Receipts: Digital or physical receipts, order confirmations, and invoices.
- Communication records: Emails, chat logs, or documented phone calls with the merchant, noting dates, times, and names of individuals you spoke with.
- Proof of non-delivery: Tracking information showing an item was never delivered, or screenshots of communication where a service was confirmed as not rendered.
- Photographs/Videos: For disputes involving defective or misrepresented goods, visual evidence can be extremely powerful.
- Terms and conditions: If applicable, any terms of sale, return policies, or service agreements that support your claim.
Organize this information in a clear, accessible manner. This evidence will be crucial during Chase’s investigation.
Attempting Resolution with the Merchant First
In many non-fraudulent cases, especially those involving billing errors or issues with goods/services, attempting to resolve the matter directly with the merchant is a recommended first step. Many companies have customer service departments equipped to handle such issues efficiently.
- Contact the merchant promptly: Explain the situation clearly and concisely, providing all relevant details.
- Refer to their policies: If you’re disputing based on a return policy or service guarantee, cite it.
- Document everything: Keep a record of who you spoke with, when, what was discussed, and any resolutions or promised actions.
- Set a reasonable timeframe: If the merchant promises a refund or resolution, note their expected timeline.
If the merchant is unresponsive, uncooperative, or unable to resolve the issue to your satisfaction within a reasonable period (e.g., 1-2 weeks), then it’s time to escalate the dispute with Chase. Having documented your attempts to resolve it directly will strengthen your case with the bank.
Understanding Key Timelines and Regulatory Protections (FCBA)
The Fair Credit Billing Act (FCBA) provides critical protections for consumers regarding billing errors. It’s vital to be aware of the FCBA’s timelines:
- Reporting window: You generally have 60 days from the date the first statement containing the error was mailed or electronically transmitted to notify your credit card issuer (Chase). While Chase and other card networks often extend this courtesy beyond the 60 days, adhering to the FCBA window provides the strongest legal protection.
- Investigation timeline: Once you notify Chase, they must acknowledge your dispute in writing within 30 days and resolve the error within two billing cycles (but no more than 90 days).
- Payment protection: During the investigation, you are not required to pay the disputed amount or any associated finance charges, though you are still responsible for the undisputed portions of your bill.
Knowing these timelines ensures you act promptly and understand your rights throughout the process. For fraudulent charges, the Electronic Fund Transfer Act (EFTA) also applies, offering similar protections, often with different liability limits depending on how quickly you report the fraud.
Navigating the Chase Dispute Process
Once you’ve done your preparatory work, it’s time to formally initiate the dispute with Chase. They offer several convenient channels, and understanding what happens next will help you stay informed.
Initiating Your Dispute: Online, Phone, or Mail
Chase provides multiple avenues for you to report a disputed charge:
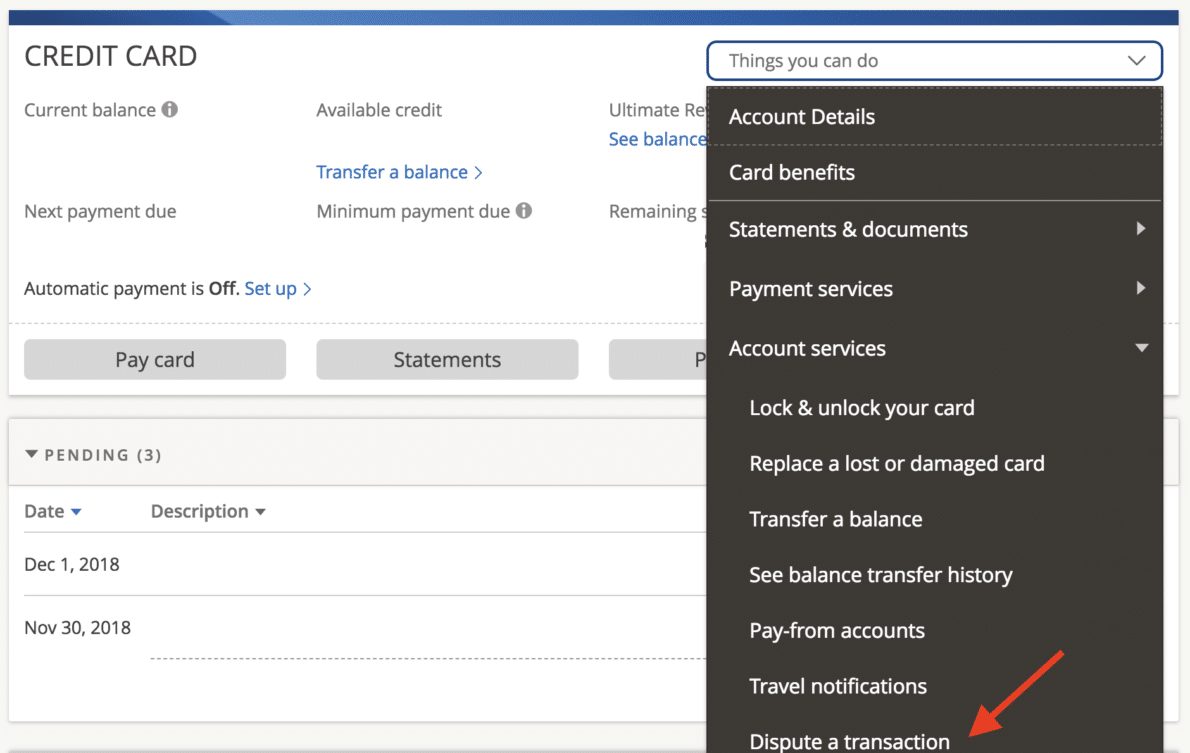
- Online via Chase.com: This is often the quickest and most efficient method. Log into your Chase online account, navigate to your credit card activity, locate the specific transaction, and look for an option to “Dispute charge” or “Report an issue.” The online portal will guide you through submitting details and often allows you to upload supporting documents directly.
- By Phone: You can call the customer service number on the back of your Chase credit card. Be prepared to provide your account information and details about the disputed charge. The representative will open a dispute case for you.
- By Mail: While less common in the digital age, you can also write a letter to Chase’s billing error address, clearly stating your account number, the disputed amount, the merchant, the date of the transaction, and why you are disputing it. Include copies (not originals) of your supporting documentation. This method is slower but can be useful for creating a formal paper trail.
Regardless of the method, ensure you receive a confirmation number or reference ID for your dispute. This is crucial for tracking its progress.
What to Expect During Chase’s Investigation
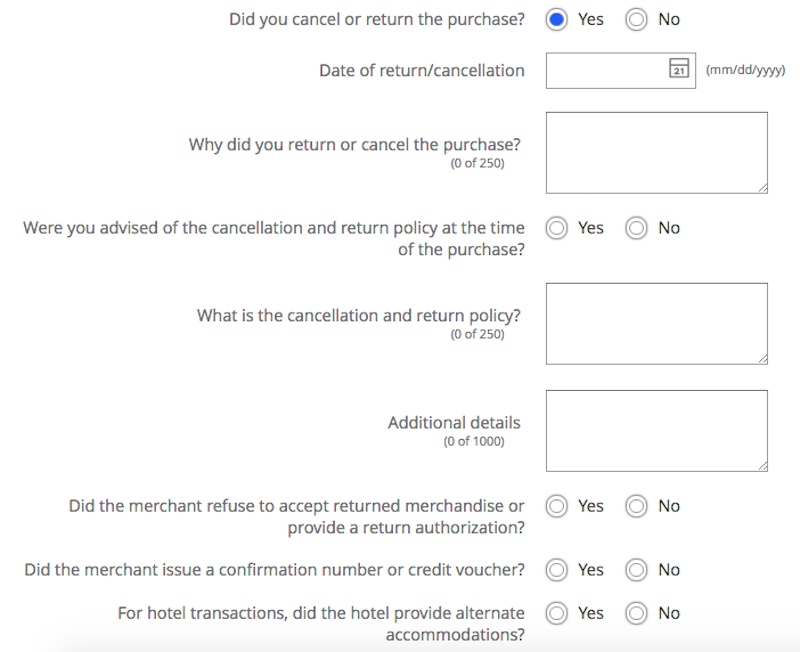
Once you initiate a dispute, Chase will begin its investigation. This process can vary in length depending on the complexity of the case but generally follows these steps:
- Initial Review: Chase will review the information you provided and determine if it falls under dispute parameters.
- Merchant Contact: Chase typically contacts the merchant or the merchant’s bank to get their side of the story and request evidence (e.g., proof of delivery, signed receipts, service agreements).
- Information Exchange: There might be an exchange of information where Chase presents your evidence to the merchant and vice-versa. You may be asked to provide additional details or clarification.
- Resolution Decision: Based on the evidence gathered, Chase will make a decision. They may rule in your favor, in the merchant’s favor, or sometimes reach a partial resolution.
Throughout this process, it’s important to remain patient and cooperative. Respond promptly to any requests for additional information from Chase.
The Role of Temporary Credit and Next Steps
For most credit card disputes, Chase will typically issue a temporary credit to your account for the disputed amount while the investigation is ongoing. This means you won’t have to pay that portion of your bill or incur interest on it during the dispute period, in accordance with FCBA guidelines.
- If the dispute is resolved in your favor: The temporary credit will become permanent, and the charge will be removed from your account. You will receive notification of this resolution.
- If the dispute is resolved in the merchant’s favor: The temporary credit will be reversed, and the charge will be reinstated on your account. You will be responsible for paying the amount, potentially with any accrued interest from the original transaction date. Chase will provide an explanation for their decision.
- Appealing a decision: If Chase rules in the merchant’s favor and you believe their decision is incorrect, you generally have the right to appeal. This often involves providing new evidence or a more detailed explanation of why you disagree with their finding.
Always keep an eye on your account statements and correspondence from Chase regarding the dispute’s status.
Maximizing Your Chances for a Successful Dispute
While the process can seem daunting, there are several best practices that can significantly improve your odds of a successful outcome when disputing a Chase credit card charge.
Providing Clear and Concise Communication
When communicating with Chase, whether online, over the phone, or in writing, clarity is paramount.
- Be specific: Clearly state the transaction date, merchant name, and exact amount of the disputed charge.
- Explain your reasoning: Articulate precisely why you are disputing the charge (e.g., “This is an unauthorized transaction,” “I did not receive the goods I paid for,” “This is a duplicate charge”).
- Refer to your evidence: Mention that you have supporting documentation and be ready to provide it.
- Avoid emotional language: Stick to the facts. A professional and objective tone is more effective.
Confusing or vague communication can delay the investigation or lead to an unfavorable outcome.
Following Up Regularly and Keeping Records
Once you’ve initiated a dispute, your role isn’t entirely passive.
- Note all interactions: Keep a detailed log of every communication with Chase and the merchant, including dates, times, names of representatives, what was discussed, and any reference numbers.
- Check dispute status: Regularly check the status of your dispute through your online Chase account or by calling customer service.
- Respond promptly: If Chase requests additional information, provide it as quickly as possible. Delays on your part can negatively impact the timeline and outcome.
- Keep copies of everything: Maintain a physical and/or digital folder with all dispute-related documents, including your initial submission, correspondence from Chase, and any new evidence.
This meticulous record-keeping acts as your safety net, providing a clear audit trail should any discrepancies arise.
Understanding Potential Outcomes and Appeals
While many disputes are resolved in the cardholder’s favor, it’s important to be prepared for all potential outcomes.
- Full credit: The charge is permanently removed.
- Partial credit: Sometimes a compromise is reached, or only a portion of the charge is deemed disputable.
- Dispute denied: The charge is deemed valid, and the temporary credit (if issued) is reversed.
If your dispute is denied, carefully review Chase’s explanation. If new evidence comes to light or you believe Chase overlooked crucial details, you generally have the right to appeal their decision. This usually requires a formal letter outlining your grounds for appeal and any new supporting documentation. If an appeal is unsuccessful and you still believe you are in the right, you can consider filing a complaint with the Consumer Financial Protection Bureau (CFPB) or seeking legal advice.
Preventing Future Disputes and Protecting Your Finances
Disputing charges can be time-consuming, so prevention is always better than cure. Adopting proactive financial habits can significantly reduce your chances of needing to dispute charges in the first place.
Regularly Monitoring Your Account Statements
This is perhaps the single most effective preventative measure.
- Check frequently: Don’t wait for your monthly statement. Log into your Chase online account or app regularly (daily or every few days) to review recent transactions. This allows you to catch suspicious activity or errors almost immediately.
- Set up alerts: Chase offers various alert options. Set up notifications for large transactions, international purchases, or any activity that falls outside your normal spending patterns.
- Reconcile with receipts: If you’re meticulous, compare your digital or physical receipts with your online statement to ensure all charges match.
Early detection of an issue allows for quicker resolution and minimizes potential financial damage, especially in cases of fraud.
Utilizing Digital Security Measures
Protecting your credit card information is paramount in the digital age.
- Strong, unique passwords: Use complex passwords for your Chase online account and any online shopping sites where you store card details. Enable two-factor authentication (2FA) wherever possible.
- Secure networks: Avoid making purchases or accessing financial accounts on public, unsecured Wi-Fi networks.
- Reputable merchants: Only shop with well-known, secure online retailers. Look for “https://” in the website address and a padlock icon.
- Be wary of phishing: Never click suspicious links or provide personal financial information in response to unsolicited emails or texts claiming to be from Chase or other financial institutions. Chase will never ask for your full card number or PIN via email.
- Use virtual card numbers: Some banks and payment services offer virtual card numbers that can be used for online purchases, adding an extra layer of security.
These measures reduce the likelihood of your card details being compromised.
Educating Yourself on Consumer Rights
Knowledge is power. Familiarize yourself with your rights as a consumer, particularly concerning credit card transactions.
- Fair Credit Billing Act (FCBA): Understand what constitutes a “billing error” and your rights regarding investigation timelines and payment obligations.
- Electronic Fund Transfer Act (EFTA): If you use a debit card, the EFTA governs disputes, which have slightly different rules and liability limits.
- Merchant return policies: Always review a merchant’s return, refund, and cancellation policies before making a purchase, especially for large items or services.
By understanding your rights, you can approach any potential dispute with confidence and ensure you’re utilizing all available protections.
In conclusion, while encountering an erroneous or fraudulent charge on your Chase credit card can be unsettling, the process for disputing it is well-defined and accessible. By understanding what types of charges are disputable, meticulously documenting your case, adhering to timelines, and communicating effectively, you can navigate the dispute process successfully and safeguard your financial well-being. Proactive monitoring and robust security practices further empower you to prevent such issues, maintaining peace of mind in your personal finance journey.
aViewFromTheCave is a participant in the Amazon Services LLC Associates Program, an affiliate advertising program designed to provide a means for sites to earn advertising fees by advertising and linking to Amazon.com. Amazon, the Amazon logo, AmazonSupply, and the AmazonSupply logo are trademarks of Amazon.com, Inc. or its affiliates. As an Amazon Associate we earn affiliate commissions from qualifying purchases.