
In the intricate world of personal finance, encountering an unfamiliar, incorrect, or unauthorized charge on your bank statement can be a jarring experience. While the immediate reaction might be panic or frustration, it’s crucial to understand that financial institutions like Chase Bank have established processes to address such discrepancies. Navigating these procedures effectively is key to protecting your financial well-being and ensuring you’re not held responsible for erroneous transactions.
This comprehensive guide aims to demystify the process of disputing a charge with Chase Bank. We’ll delve into understanding when and why you should file a dispute, outline the step-by-step procedures for initiating and managing your claim, emphasize the critical role of documentation and follow-up, and finally, provide actionable strategies for preventing future unauthorized transactions. By equipping yourself with this knowledge, you can approach the situation with confidence and clarity, safeguarding your hard-earned money.
Understanding When and Why to Dispute a Charge
Before initiating a dispute with Chase Bank, it’s essential to understand what constitutes a legitimate reason for a dispute and the critical factors that influence the success of your claim. Not every questionable transaction warrants a formal dispute, and timing plays a significant role in the resolution process.
Types of Charges You Can Dispute
Disputes typically arise from various scenarios, often categorized into fraud or merchant disputes. Understanding these distinctions helps in preparing your case:
- Unauthorized Transactions (Fraud): This is perhaps the most serious type of dispute, occurring when someone makes a purchase using your account details without your permission. This can range from stolen physical cards to compromised online credentials.
- Duplicate Charges: Sometimes, due to technical glitches or human error, a merchant might charge you twice for the same transaction. This is a common and usually straightforward dispute.
- Incorrect Amounts: The amount charged to your account differs from the agreed-upon price. This could be an overcharge, an incorrect item price, or a discrepancy in tax or shipping fees.
- Goods or Services Not Received: You were charged for a product or service that was never delivered or rendered. This includes online orders that don’t arrive or services that were paid for but not provided.
- Subscription Issues: You canceled a subscription service but continued to be charged, or you were charged for a free trial you thought you’d opted out of.
- Merchandise Not as Described/Defective: The product or service you received was significantly different from what was advertised, or it arrived damaged, defective, or unusable.
- Credit Not Processed: You returned an item or canceled an order and were promised a refund, but the credit never appeared on your statement.
Importance of Timely Action
Time is a critical factor when disputing a charge. Regulatory protections, such as the Fair Credit Billing Act (FCBA) for credit cards and the Electronic Fund Transfer Act (EFTA) for debit cards, impose specific deadlines for reporting errors.
- Credit Cards (FCBA): For billing errors, you generally have 60 days from the date the first statement containing the error was mailed or made available to you to notify the creditor in writing. While Chase may accept disputes beyond this, adhering to this timeframe ensures you retain full legal protections, including the ability to withhold payment on the disputed amount during the investigation.
- Debit Cards (EFTA): For unauthorized electronic fund transfers, you typically have 60 days after your statement showing the error was sent to you to report it. Reporting within two business days of discovery can limit your liability significantly (e.g., to $50), whereas delays beyond 60 days could lead to unlimited liability.
Acting swiftly not only protects your rights but also increases the likelihood of a successful resolution. Merchants are often more cooperative when issues are raised promptly, and the trail of evidence is fresher.
Gathering Essential Information
Before contacting Chase, compile all relevant details pertaining to the suspicious charge. This documentation will form the bedrock of your dispute and expedite the investigation process.
- Transaction Details: Date and time of the transaction, exact amount, merchant’s name (as it appears on your statement), and the transaction ID or reference number if available.
- Proof of Purchase: Receipts, order confirmations, invoices, or statements that show the correct amount or the agreed-upon terms.
- Communication with Merchant: Records of any attempts to resolve the issue directly with the merchant. This includes dates and times of phone calls, names of customer service representatives, email exchanges, chat logs, and any reference numbers provided.
- Supporting Evidence: Depending on the type of dispute, this could include photos of damaged goods, shipping tracking information showing non-delivery, screenshots of misleading advertisements, or cancellation confirmations for subscriptions.
Having this information readily available will make your interaction with Chase much smoother and provide them with the necessary details to launch an effective investigation.
Navigating Chase Bank’s Dispute Process
Once you’ve identified a disputable charge and gathered your documentation, the next step is to formally initiate the dispute with Chase Bank. Chase offers several convenient channels for this, each with its own advantages.
Initial Steps: Checking Your Statements and Contacting the Merchant
Before escalating to Chase, a crucial first step is to thoroughly review your bank or credit card statements. Sometimes, an unfamiliar merchant name might be a parent company or payment processor for a familiar service. Always double-check your own purchase history and that of authorized users on your account.
If the charge still seems incorrect, the most efficient path is often to contact the merchant directly first. Many issues, such as duplicate charges, unapplied refunds, or incorrect billing, can be resolved quickly through their customer service. Document these interactions meticulously (date, time, representative’s name, resolution promised, reference numbers). If the merchant is unresponsive, uncooperative, or unable to resolve the issue, then it’s time to involve Chase.
How to Initiate a Dispute with Chase
Chase provides multiple avenues to report a dispute, catering to different preferences and urgency levels.
-
Online Banking/Mobile App: This is often the quickest and most convenient method for many customers.
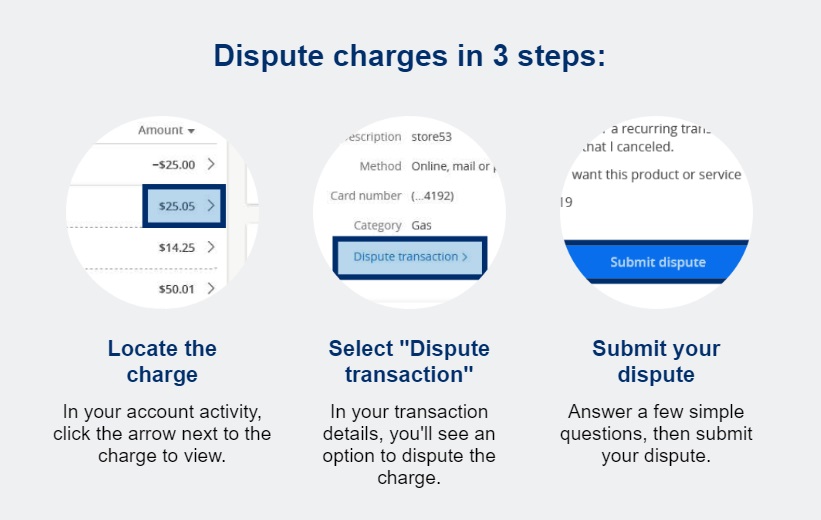
- Log in: Access your Chase online account via a web browser or the Chase Mobile app.
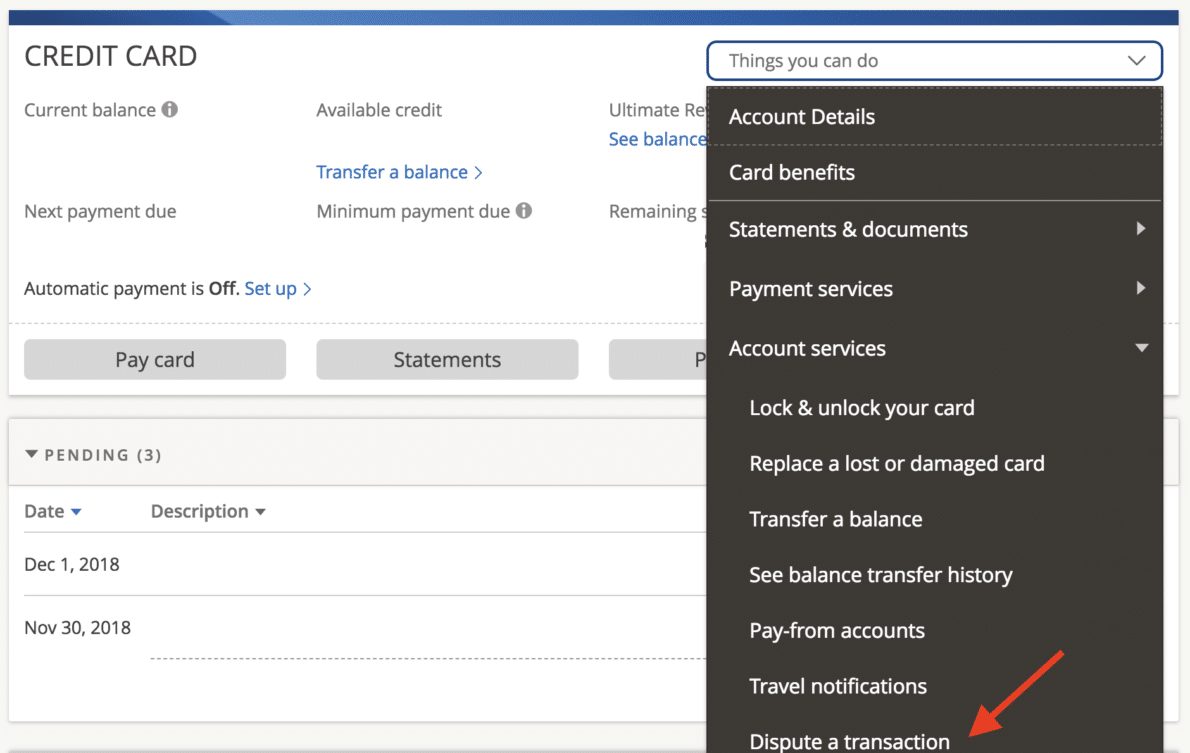
- Locate Transaction: Navigate to your account activity and find the specific transaction you wish to dispute.
- Initiate Dispute: Most online platforms have an option like “Dispute Transaction,” “Report Fraud,” or “Question a Charge” next to the transaction details.
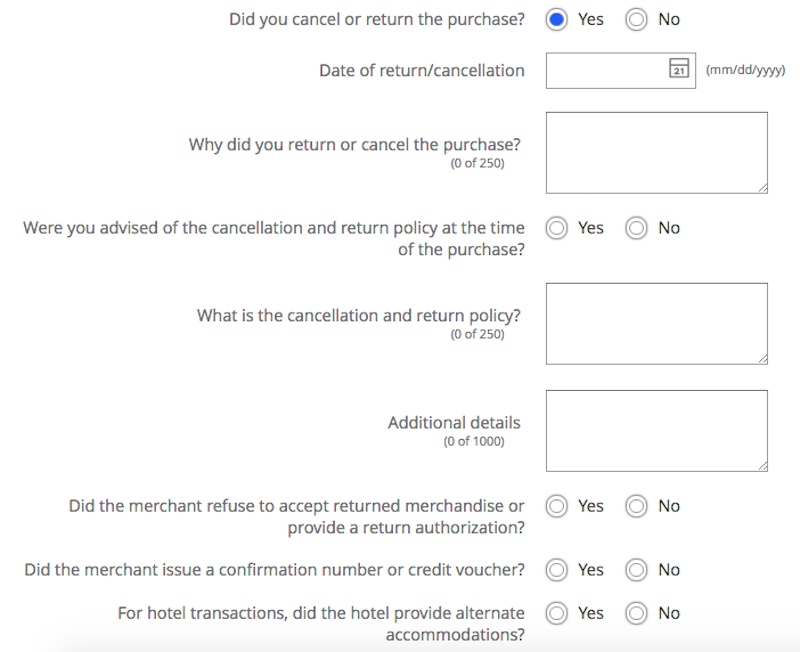
- Follow Prompts: The system will guide you through a series of questions, asking for details about the charge and why you’re disputing it. You may also be able to upload supporting documents.
- Submit: Review all information before submitting your claim. You’ll usually receive a confirmation number.
-
Phone Call: For more complex situations, or if you prefer speaking directly with a representative, a phone call is ideal.
- Contact Customer Service: Call the number on the back of your Chase credit card or debit card, or find the appropriate number on Chase’s official website (e.g., 1-800-935-9935 for general banking, 1-800-432-3117 for credit cards).
- State Your Intent: Clearly inform the representative that you wish to dispute a charge.
- Provide Details: Have all your gathered information ready (transaction date, amount, merchant, reason for dispute).
- Follow Instructions: The representative will walk you through the process, take down the details, and explain the next steps. Request a confirmation number or case ID for your records.
-
In-Person (Branch Visit): While less common for initial disputes, visiting a Chase branch can be helpful for those who prefer face-to-face interaction, need help filling out forms, or have very complex cases.
- Locate a Branch: Use the Chase branch locator to find a convenient location.
- Bring Documentation: Take all your supporting documents with you.
- Speak with a Representative: A banker can guide you through the process and help you fill out any necessary paperwork.
-
Written Communication: For credit card disputes under the FCBA, sending a written letter is the only way to guarantee certain legal protections (like the ability to withhold payment). This should be sent to the address provided on your statement for “billing inquiries,” not the payment address. While slower, it creates a clear paper trail.
What Happens After You File a Dispute
Once your dispute is initiated, Chase will begin its investigation process.
- Temporary Credit (Credit Cards): For credit card disputes, Chase often provides a temporary credit for the disputed amount while the investigation is ongoing. This allows you to avoid paying interest on the disputed sum and ensures you’re not out of pocket during the process. This temporary credit can be reversed if the dispute is ultimately resolved in the merchant’s favor. Debit card disputes typically do not receive temporary credit.
- Investigation: Chase will contact the merchant’s bank to obtain their side of the story and any supporting evidence. This process can involve reviewing transaction records, charge slips, and communication between you and the merchant.
- Timeline: The dispute resolution process can take time. By law, credit card disputes must be resolved within two billing cycles (but no more than 90 days). Debit card disputes generally have a faster turnaround, often within 10 business days for preliminary resolution, though a full investigation can take up to 45 or 90 days. Chase will keep you informed of the progress.
- Communication: Expect to receive communications from Chase requesting additional information, providing updates on the investigation, or notifying you of the final decision. Respond promptly to any requests for further details.
Crucial Documentation and Follow-Up
The success of your dispute largely hinges on the quality of evidence you provide and your diligence in following up. Think of yourself as building a case – the more compelling your evidence, the stronger your position.
What Documentation to Provide
While you might provide initial details when filing, be prepared for Chase to request more specific documentation as their investigation progresses. Proactively organizing and submitting these can significantly aid your case:
- Copies of Transaction Records: Bank statements highlighting the charge, original receipts, invoices, or order confirmations.
- Correspondence with the Merchant: Emails, chat logs, screenshots of text messages, or detailed notes from phone calls (including dates, times, and names of representatives) demonstrating your attempts to resolve the issue directly.
- Proof of Non-Receipt or Return: Shipping tracking numbers, delivery confirmations, return receipts, or photos of the returned item. If an item was never received, provide evidence of attempted contact with the shipping carrier.
- Evidence of Goods Not as Described/Damaged: High-quality photographs or videos clearly showing the discrepancy, damage, or defect. Side-by-side comparisons with the advertised product can be very powerful.
- Cancellation Confirmations: If disputing a subscription, provide email confirmations of cancellation requests or screenshots from your account showing the subscription status.
- Police Reports (in cases of significant fraud): For substantial fraudulent activity, especially if other accounts or personal information have been compromised, filing a police report and providing Chase with a copy can strengthen your fraud claim.
- Affidavits: In some cases, Chase might ask you to sign an affidavit attesting to the facts of your dispute.
Always keep copies of everything you submit to Chase for your own records.
Monitoring Your Dispute and Next Steps
Once you’ve submitted your dispute, your role isn’t entirely passive. Active monitoring and follow-up are crucial:
- Check Status Regularly: You can often check the status of your dispute online through your Chase account or by calling customer service.
- Respond Promptly: If Chase requests additional information or documentation, provide it as quickly as possible. Delays on your part can prolong the investigation or even lead to a denial.
- What if You Disagree with Chase’s Resolution? If Chase denies your dispute and you believe the decision is incorrect, you have avenues for appeal. Gather any new evidence you might have, carefully review Chase’s reasoning for the denial, and formally request a reconsideration.
- Escalation Options: If you exhaust Chase’s internal appeal process and still feel your case is unresolved, you can escalate the matter to external regulatory bodies. The Consumer Financial Protection Bureau (CFPB) is a federal agency that supervises banks and can mediate disputes between consumers and financial institutions. You can file a complaint with them, which will prompt Chase to respond directly to the CFPB. Additionally, for credit card issues, you can report concerns to the Office of the Comptroller of the Currency (OCC).
Understanding Potential Outcomes
The resolution of a dispute can fall into a few categories:
- Dispute Resolved in Your Favor: This is the ideal outcome. Chase will permanently credit your account for the disputed amount, and the case will be closed. You will receive official notification of this.
- Dispute Denied: If Chase finds sufficient evidence from the merchant or determines the charge is legitimate, your dispute may be denied. The temporary credit (if applicable) will be reversed, and you will be responsible for the charge. Chase should provide you with a detailed explanation for their decision.
- Partial Resolution: In some cases, the dispute might be partially resolved, meaning you receive a credit for only a portion of the disputed amount, or a different resolution is reached through negotiation.
Preventing Future Unauthorized Charges
While knowing how to dispute a charge is essential, proactive measures to prevent unauthorized transactions are equally, if not more, important. Vigilance and secure financial practices can significantly reduce your risk.
Vigilant Account Monitoring
- Set Up Alerts: Utilize Chase’s online banking features to set up alerts for various account activities. This includes alerts for transactions above a certain amount, international purchases, online purchases, or any activity on your debit or credit card. Receiving real-time notifications allows you to identify suspicious activity immediately.
- Regularly Check Online Banking: Make it a habit to log into your Chase online account or mobile app at least a few times a week, if not daily. Review your recent transactions and reconcile them against your own records. Don’t wait for your monthly statement to arrive.
- Review All Statements Thoroughly: When your monthly statements (bank and credit card) do arrive, review every single transaction carefully. It’s easier to spot unfamiliar charges when they’re compiled on a statement.
Secure Shopping Practices
- Use Secure Websites (HTTPS): When shopping online, always ensure the website address begins with “https://” and look for a padlock icon in your browser’s address bar. This indicates that your connection to the site is encrypted and more secure.
- Be Cautious with Public Wi-Fi: Avoid making financial transactions or accessing sensitive financial information while connected to unsecured public Wi-Fi networks. These networks are often vulnerable to eavesdropping. Use a Virtual Private Network (VPN) if you must use public Wi-Fi.
- Strong, Unique Passwords: Use complex and unique passwords for all your online banking and shopping accounts. Consider using a reputable password manager to help you create and store these securely.
- Two-Factor Authentication (2FA): Enable 2FA whenever possible for your online banking and email accounts. This adds an extra layer of security, requiring a second form of verification (like a code sent to your phone) in addition to your password.
- Avoid Phishing Scams: Be wary of suspicious emails, texts, or phone calls requesting personal or financial information. Chase will never ask for your full card number, PIN, or online banking password via unsolicited communication. If in doubt, contact Chase directly using their official channels.
Managing Subscriptions and Recurring Payments
- Keep a Record: Maintain a list of all your recurring subscriptions and services, including their renewal dates and associated payment methods.
- Review Periodically: Regularly review your subscriptions and cancel any services you no longer use or need. Many people lose money on “ghost subscriptions” they forgot about.
- Consider Virtual Card Numbers: Some financial institutions and payment services offer virtual card numbers. These are temporary, single-use, or merchant-locked card numbers that shield your actual card details, adding an extra layer of protection for online purchases and subscriptions.
Encountering an unauthorized or incorrect charge can be stressful, but by understanding Chase Bank’s dispute process and adhering to diligent financial practices, you can effectively resolve issues and protect your accounts. Proactivity, meticulous documentation, and timely communication are your strongest allies in navigating the complexities of financial disputes. Remember, you have rights as a consumer, and Chase Bank has procedures in place to help you exercise them. Stay vigilant, stay informed, and take control of your financial security.
aViewFromTheCave is a participant in the Amazon Services LLC Associates Program, an affiliate advertising program designed to provide a means for sites to earn advertising fees by advertising and linking to Amazon.com. Amazon, the Amazon logo, AmazonSupply, and the AmazonSupply logo are trademarks of Amazon.com, Inc. or its affiliates. As an Amazon Associate we earn affiliate commissions from qualifying purchases.