
In the dynamic world of gaming, competitive esports, and digital content creation, moments of brilliance, epic fails, and unforgettable interactions unfold at lightning speed. Capturing these fleeting instances has become an essential aspect for players and creators alike, transforming transient gameplay into lasting memories and shareable content. For those who wield NVIDIA graphics cards, a powerful and remarkably efficient suite of tools comes bundled, offering seamless clipping and recording capabilities without the need for extensive third-party software or a significant performance hit. This comprehensive guide will delve into the intricacies of “how to clip NVIDIA,” focusing primarily on the robust features offered by NVIDIA GeForce Experience, ensuring you never miss a beat.
Understanding the Power of NVIDIA’s Clipping Capabilities
At its core, “clipping” in the context of gaming refers to the act of recording a short segment of past gameplay or live action with the press of a button. NVIDIA has democratized this capability through its GeForce Experience (GFE) software, which includes the renowned ShadowPlay technology. This system is designed to leverage the dedicated video encoding hardware present in NVIDIA GPUs, allowing for high-quality recordings with minimal impact on your game’s performance.
The Value of In-Game Footage
Why is clipping so crucial in today’s digital landscape? The reasons are manifold, catering to a diverse audience from casual gamers to professional streamers:
-
Showcasing Skill and Achievements: Landed an impossible headshot? Pulled off a clutch play that saved the game? Clipped moments serve as tangible proof of your prowess, perfect for sharing on social media or with friends.
-
Creating Engaging Content: For YouTubers, Twitch streamers, and TikTok creators, clips are the building blocks of montages, highlights reels, “best moments” compilations, and educational content. They provide raw material that can be edited, narrated, and transformed into captivating videos.
-
Analyzing Gameplay and Strategy: Competitive gamers often use clips to review their performance, identify mistakes, and refine strategies. Analyzing positioning, reaction times, and decision-making can be pivotal for improvement.
-
Reporting Bugs or Cheaters: Encountered a game-breaking bug or suspicious player activity? A clear video clip is often the most effective way to report such instances to game developers or administrators, providing irrefutable evidence.
-
Preserving Memories: Beyond competitive aspects, clips simply allow you to relive funny moments with friends, memorable story beats, or aesthetically pleasing in-game vistas. They’re digital keepsakes of your gaming journey.
Why GeForce Experience is Your Go-To
NVIDIA GeForce Experience is more than just a driver updater; it’s an optimization hub and a powerful multimedia tool. Its integration with your NVIDIA GPU allows for an incredibly efficient recording process. Unlike some third-party solutions that might rely heavily on your CPU, ShadowPlay offloads the encoding task to the GPU’s dedicated hardware encoder (NVENC), ensuring that your CPU remains focused on running the game smoothly. This efficiency is paramount, especially in fast-paced or graphically demanding titles, where every frame counts. GFE’s intuitive overlay and straightforward controls make it accessible to everyone, from novice users to seasoned content creators.
Getting Started with NVIDIA GeForce Experience: Setup and Configuration
Before you can unleash your inner content creator, you need to ensure GeForce Experience is properly set up and configured on your system. The process is straightforward, designed to get you capturing moments as quickly as possible.
Downloading and Installing
If you have an NVIDIA GPU, you likely already have GeForce Experience installed as part of your driver package. If not, or if you need to update it, follow these steps:
-
Visit the Official NVIDIA Website: Navigate to
nvidia.com/geforce-experience/. -
Download: Click the “Download Now” button to get the latest installer.
-
Install: Run the installer. Follow the on-screen prompts, agreeing to the terms and conditions. You may need to create or log in to an NVIDIA account (which is free and recommended for accessing all features).
Once installed, GFE will automatically detect your compatible NVIDIA GPU and scan your system for installed games, allowing it to optimize game settings and enable the in-game overlay.
Initial Settings Walkthrough
The heart of NVIDIA’s clipping capabilities lies within the in-game overlay, which you can typically access by pressing Alt+Z (the default hotkey) while in a game or even on your desktop.
-
Enable In-Game Overlay: From the GFE home screen, click the “Settings” gear icon in the top right. Scroll down to the “In-Game Overlay” section and ensure the toggle is switched to “ON.”
-
Performance and Privacy Settings: Within the overlay settings (accessed via Alt+Z > Gear Icon > “Recordings”), you can specify the default save location for your videos and screenshots. It’s advisable to choose a drive with ample space, ideally an SSD, to minimize any potential bottlenecks during recording.
- Privacy Control: This crucial setting (Alt+Z > Gear Icon > “Privacy Control”) allows you to enable desktop capture. If you want to record anything outside of a full-screen game, like a windowed application or your entire desktop, ensure this is turned on. Without it, ShadowPlay will only work within games.
System Requirements Check
While GFE is highly optimized, it does have some basic requirements to function effectively:
-
NVIDIA GPU: A GeForce GTX 600 series or newer, or any RTX series GPU. (The newer the GPU, the more efficient the encoder.)
-
Operating System: Windows 7, 8, 8.1, 10, or 11.
-
Processor: Intel Core i3, i5, i7, i9, or AMD FX, Ryzen 3, 5, 7, 9 or higher.
-
RAM: 4GB system memory (8GB or more recommended for smoother operation, especially during recording).
-
Storage: Sufficient free disk space for recordings.
Ensure your drivers are always up to date through GFE itself, as new updates often bring performance improvements and bug fixes.
Utilizing Instant Replay: Never Miss a Moment
Instant Replay is the flagship feature for capturing those unexpected, golden moments. Instead of manually starting and stopping recordings, Instant Replay continuously records your gameplay in the background, storing it in a temporary buffer. When something noteworthy happens, a simple hotkey press saves the preceding moments to a permanent file.
Activating Instant Replay
-
Open the Overlay: While in a game or on your desktop (if desktop capture is enabled), press Alt+Z.
-
Navigate to Instant Replay: In the overlay menu, you’ll see a section for “Instant Replay.” It might initially be off.
-
Turn On: Click on “Instant Replay” and then select “Turn On.” A notification will usually appear, confirming it’s active. You’ll often see an indicator icon (e.g., a green circle) appear briefly on your screen.
Customizing Replay Length and Quality
This is where you fine-tune Instant Replay to match your needs and system capabilities.
-
Access Instant Replay Settings: From the Alt+Z overlay, click on “Instant Replay” and then select “Settings.”
-
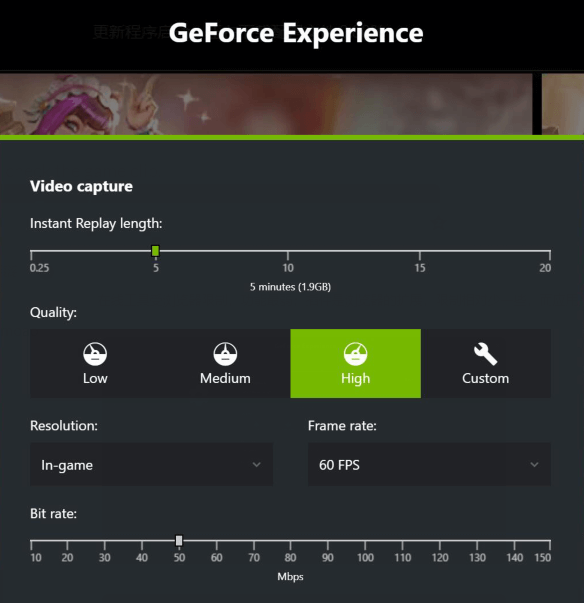
Replay Length: This is perhaps the most crucial setting. It determines how far back in time the saved clip will go. You can usually choose durations ranging from 30 seconds up to 20 minutes. For quick highlights, 30-60 seconds is often sufficient. For more narrative segments or complex plays, 2-5 minutes might be better. Keep in mind that longer durations require more temporary system resources (RAM/VRAM and potentially disk I/O).
-
Quality Settings (Resolution, Frame Rate, Bitrate):
-
Resolution: Matches your game’s resolution by default (e.g., 1080p, 1440p, 4K). You can downscale if you want smaller file sizes or if your system struggles, but generally, match your display.
-
Frame Rate (FPS): Options typically include 30 FPS or 60 FPS. For smooth gaming footage, 60 FPS is highly recommended, especially for fast-paced games.
-
Bitrate: This controls the video’s quality and file size. Measured in Mbps (megabits per second). Higher bitrate means better visual quality but larger file sizes.
- Recommendations: For 1080p at 60 FPS, a bitrate between 30-50 Mbps is generally excellent. For 1440p 60 FPS, 50-80 Mbps. For 4K 60 FPS, 80-130 Mbps or more. Experiment to find a balance between quality and manageable file sizes.
-
Saving Your Highlight
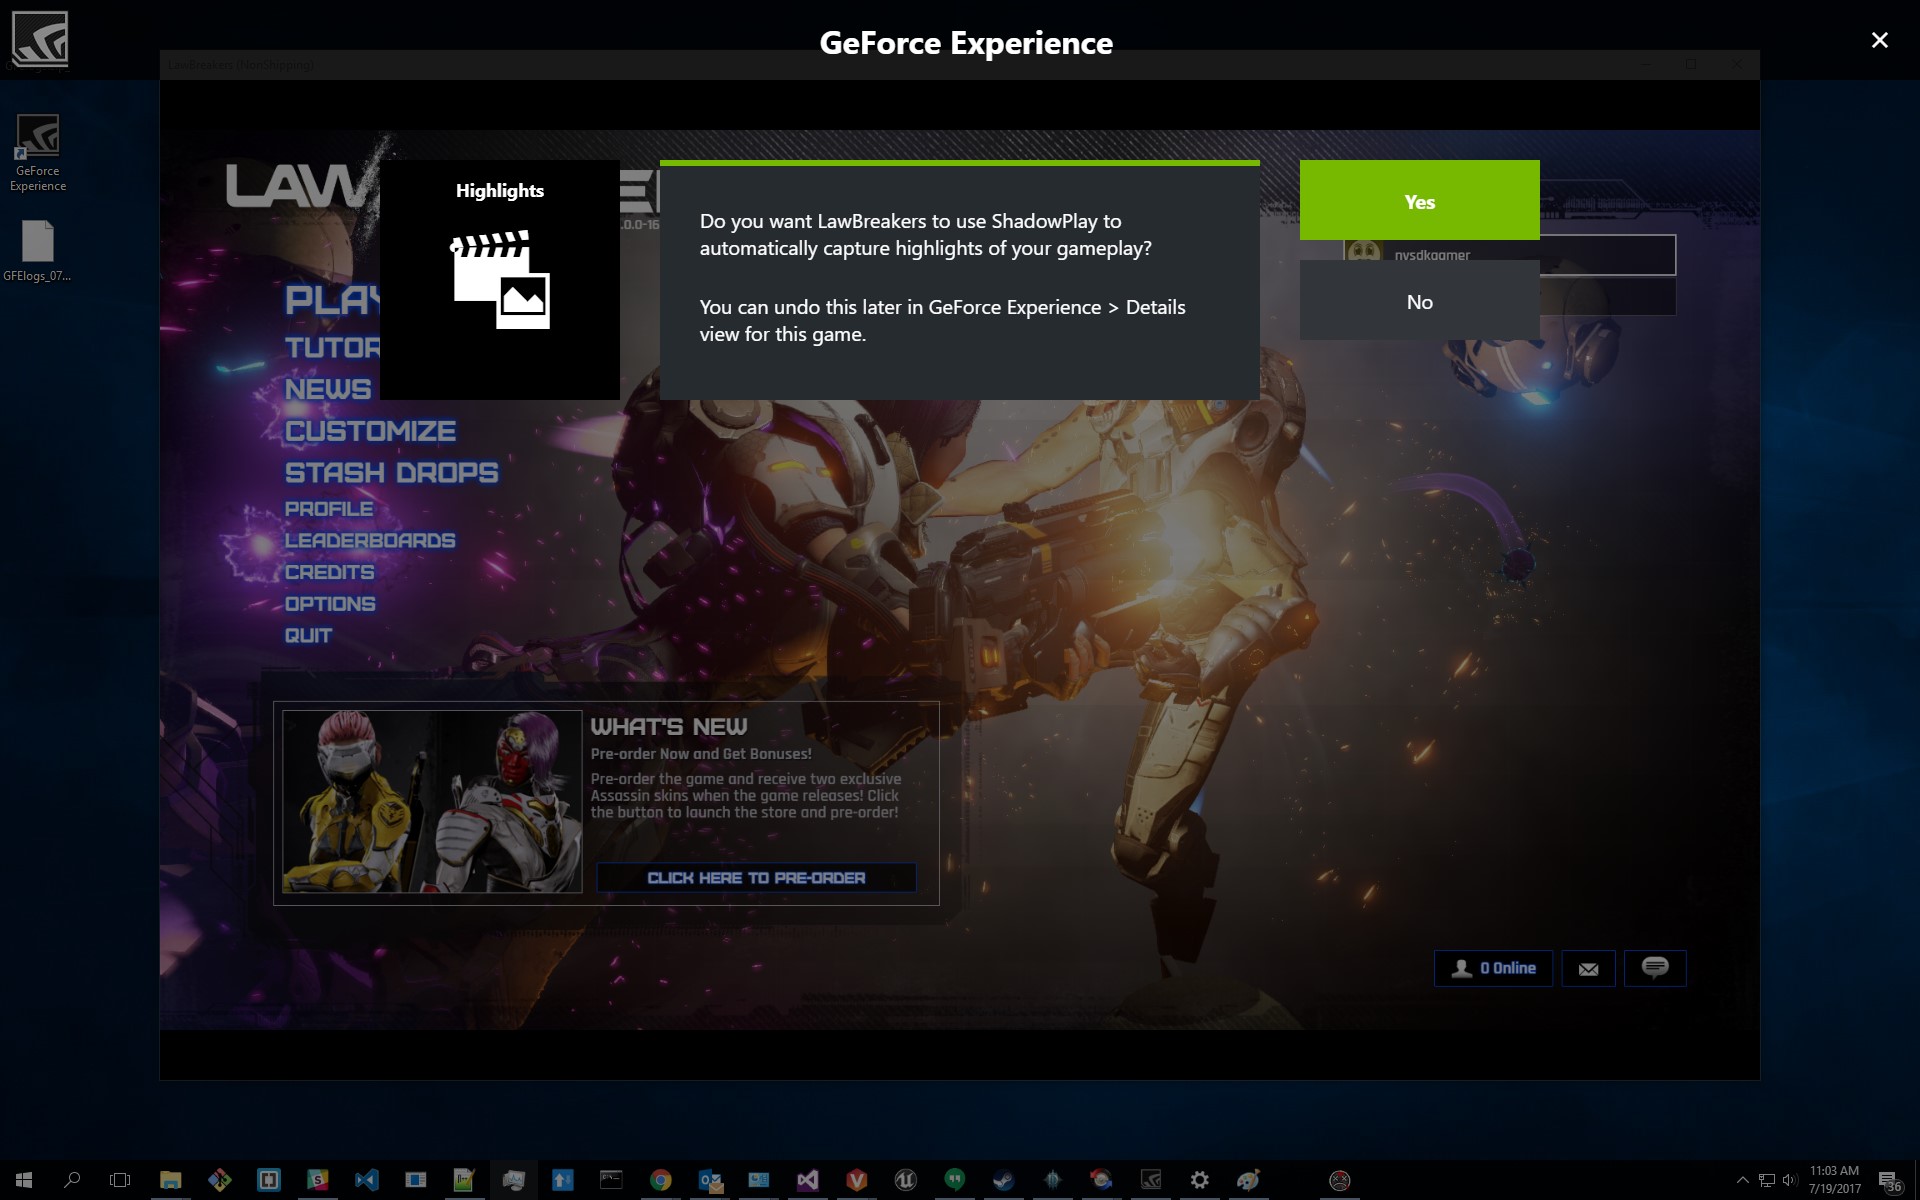
Once Instant Replay is active and configured, saving a moment is incredibly simple:
-
Perform the Action: Play your game as usual.
-
Press the Hotkey: Immediately after the memorable event, press Alt+F10 (the default “Save Instant Replay” hotkey).
-
Confirmation: A notification will appear, typically in the top right corner of your screen, confirming that the last X minutes/seconds have been saved.
-
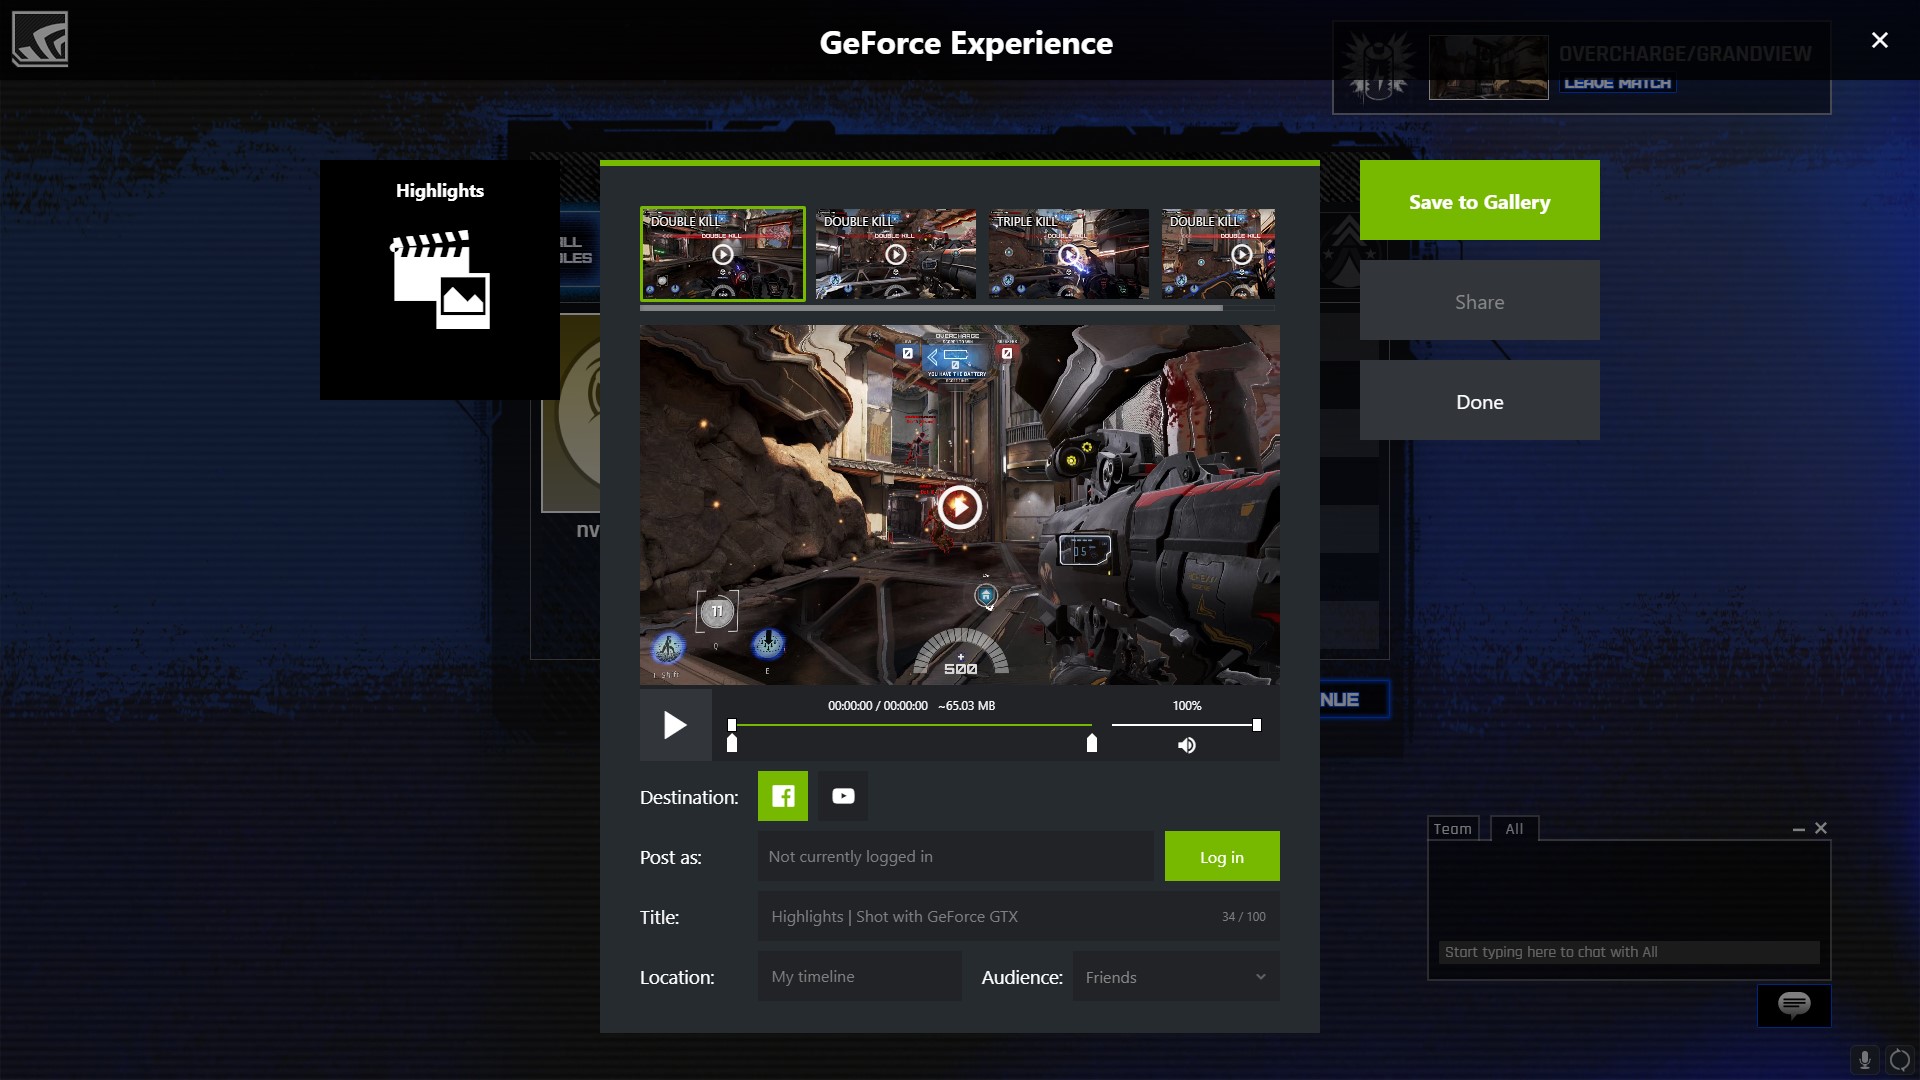
Locate Your Clip: The clip will be saved to the default or specified recording location on your PC. You can access it directly from the GFE overlay by going to “Gallery” or by navigating to the folder via File Explorer.
Manual Recording and Broadcasting: Beyond Instant Clips
While Instant Replay is perfect for reactive captures, sometimes you need to record longer sessions or live stream your gameplay. GeForce Experience offers robust solutions for these scenarios too.
Starting and Stopping Manual Recordings
For planned recordings, whether it’s an entire game session, a specific mission, or a tutorial, manual recording provides complete control.
-
Open the Overlay: Press Alt+Z.
-
Start Recording: Click on “Record” and then select “Start” (or simply use the hotkey Alt+F9).
-
Recording Indicator: A recording indicator will appear on your screen, letting you know that the footage is being captured.
-
Stop Recording: When you’re finished, open the overlay again (Alt+Z), click “Record,” and select “Stop” (or press Alt+F9 again).
-
Locate Your Recording: The full recording will be saved to your designated folder, similar to Instant Replay clips.
Manual recording is ideal for creating structured content, where you know exactly when you want the recording to begin and end. The quality settings (resolution, frame rate, bitrate) for manual recording are generally shared with Instant Replay settings, ensuring consistent output.
Live Streaming with NVIDIA Broadcast and GFE’s Direct Streaming
NVIDIA offers excellent tools for streamers, too. While GFE provides direct integration with popular streaming platforms, NVIDIA Broadcast takes live streaming to a professional level with AI-powered enhancements.
-
GFE Direct Streaming: From the Alt+Z overlay, you’ll see a “Broadcast” section. Here, you can quickly link your Twitch, YouTube, or Facebook Live accounts and start streaming directly from GFE. You can configure bitrate, resolution, and frame rate for your stream, and even add a webcam overlay. This is a quick and easy way to go live without additional software.
-
NVIDIA Broadcast (Separate Application): For serious streamers, NVIDIA Broadcast is a dedicated application that leverages AI to enhance your microphone and webcam. It offers features like:
-
Noise Removal: Eliminates background noise from your microphone (keyboard clicks, fan hum, pet noises).
-
Room Echo Removal: Reduces echo in your room, making your voice clearer.
-
Virtual Background: Removes or blurs your webcam background without a green screen, or replaces it with an image/video.
-
Auto Frame: Keeps you centered in your webcam feed as you move.
-
While NVIDIA Broadcast doesn’t clip in the same way GFE does, it significantly elevates the quality of your live broadcasts, making your recorded clips (if captured during a stream) sound and look more professional. It integrates seamlessly with popular streaming software like OBS Studio and Streamlabs Desktop.
-
Advanced Recording Features
Beyond basic recording, GFE offers a few advanced options within the overlay settings (Alt+Z > Gear Icon > “Recordings”):
-
Audio Tracks: You can choose to record your game audio and microphone audio on separate tracks. This is invaluable for content creators who want more control over their audio in post-production (e.g., adjusting game volume independently of commentary, or removing microphone audio if a segment goes awry).
-
Webcam Overlay: Easily add a webcam feed to your recordings and streams. You can customize its position, size, and even add a border.
-
Performance Monitoring: While not directly a recording feature, GFE’s performance overlay (Alt+Z > “Performance”) can display real-time FPS, GPU usage, temperatures, and more. This data can be incredibly useful for troubleshooting performance issues in your clips.
Optimizing Your Clips: Quality, Performance, and Storage
Capturing clips is one thing; optimizing them for quality, managing their impact on system performance, and handling storage effectively are equally important for a seamless experience.
Balancing Visual Fidelity and File Size
The “Quality” settings (Resolution, Frame Rate, Bitrate) for both Instant Replay and Manual Recording are a balancing act:
-
Resolution: Higher resolutions (e.g., 4K) offer crisp details but dramatically increase file sizes and demand more from your GPU during encoding. For most online sharing, 1080p is perfectly adequate, and 1440p provides a nice visual upgrade without the extreme demands of 4K.
-
Frame Rate (FPS): 60 FPS offers a smooth, fluid viewing experience crucial for fast-paced action. 30 FPS is acceptable for slower-paced games or when prioritizing smaller file sizes, but the difference in smoothness is noticeable.
-
Bitrate: This is the most direct control over visual quality and file size. A higher bitrate captures more detail but generates larger files.
-
Too Low: Can result in compression artifacts, blockiness, or “muddy” visuals, especially in fast-moving scenes.
-
Too High: Creates unnecessarily large files that are harder to upload, store, and edit, without a perceptible gain in visual quality beyond a certain point.
-
Recommendation: Start with the suggested bitrates mentioned earlier (e.g., 50 Mbps for 1080p 60 FPS) and adjust based on your visual preference and storage capacity. Many platforms like YouTube re-encode videos, so a very high bitrate isn’t always necessary for the final uploaded version.
-
Managing Storage Space
Video files, especially high-quality ones, can consume a significant amount of disk space.
-
Choose a Dedicated Drive: Configure GFE to save recordings to a separate, large-capacity drive if possible, rather than your primary OS drive. An SSD is always preferable for faster writing speeds.
-
Regular Cleanup: Don’t let unwanted clips accumulate. Periodically review your recorded footage and delete anything you don’t intend to use or share.
-
Cloud Storage/Backup: For important clips, consider backing them up to cloud storage services (Google Drive, OneDrive, Dropbox) or external hard drives.
Common Clipping Issues and Solutions
Even with efficient tools, you might encounter issues. Here are some common problems and their solutions:
-
“In-Game Overlay Not Appearing” (Alt+Z not working):
-
Ensure GFE is running in the background.
-
Check if the “In-Game Overlay” is enabled in GFE settings.
-
Try restarting GFE or your computer.
-
Ensure your NVIDIA drivers are up to date.
-
-
“Clips Not Saving” or “Recording Failed”:
-
Check your default recording folder: Is there enough free space?
-
Verify the recording path is valid and accessible.
-
Ensure Instant Replay/Manual Record is actually “ON.”
-
Check if you have any conflicting software that might be hooking into the display or recording.
-
-
“Poor Performance While Recording”:
-
Lower your recording quality settings (resolution, bitrate, FPS).
-
Ensure your GPU drivers are up to date.
-
Close unnecessary background applications.
-
Monitor your GPU and CPU usage with an overlay (like GFE’s performance overlay) to identify bottlenecks.
-
-
“No Audio in Clips” or “Incorrect Audio”:
-
In the Alt+Z overlay settings (“Audio”), ensure the correct input device (microphone) and output device (system sounds) are selected.
-
Check the “Audio Tracks” setting; if you’re expecting separate tracks, ensure your video editor supports them.
-
Verify your game’s audio settings aren’t muted or too low.
-
-
“Desktop Capture Not Working”:
- Go to Alt+Z > Gear Icon > “Privacy Control” and ensure “Desktop capture” is enabled.
Exporting and Sharing Your Masterpiece
Once your clips are captured, they are typically saved in MP4 format, which is widely compatible.
-
Basic Sharing: You can directly upload these MP4 files to social media platforms, YouTube, Twitch, TikTok, or send them to friends.
-
Post-Production: For more polished content, you might want to use video editing software (e.g., Adobe Premiere Pro, DaVinci Resolve, Shotcut, CapCut) to:
-
Trim, cut, and splice clips together.
-
Add music, sound effects, or voiceovers.
-
Include text overlays, transitions, and special effects.
-
Color grade or adjust visual settings.
-
Conclusion
NVIDIA’s GeForce Experience offers an incredibly powerful, yet user-friendly, solution for clipping and recording your gaming moments. By understanding how to activate Instant Replay, configure recording settings, and troubleshoot common issues, you empower yourself to capture every noteworthy event, transform fleeting gameplay into lasting memories, and fuel your content creation journey. From showcasing your epic plays to analyzing your strategies or simply reliving funny moments with friends, mastering “how to clip NVIDIA” is an indispensable skill for any modern gamer or digital creator. Dive in, experiment with the settings, and start building your collection of unforgettable gaming highlights today.
aViewFromTheCave is a participant in the Amazon Services LLC Associates Program, an affiliate advertising program designed to provide a means for sites to earn advertising fees by advertising and linking to Amazon.com. Amazon, the Amazon logo, AmazonSupply, and the AmazonSupply logo are trademarks of Amazon.com, Inc. or its affiliates. As an Amazon Associate we earn affiliate commissions from qualifying purchases.