
In an increasingly interconnected world, where travel often serves as a cornerstone of both personal and professional life, efficient organization is paramount. Gone are the days of shuffling through paper itineraries or cross-referencing multiple apps to keep track of your journey details. Google Calendar, a ubiquitous tool for managing time and appointments, offers robust features for seamlessly integrating your flight information, transforming it into a powerful travel companion.
This guide delves into the mechanisms, benefits, and practical steps for adding your flight details to Google Calendar, ensuring you’re always informed, punctual, and prepared for your next adventure. We’ll explore both the intelligent automation Google provides and the precision of manual entry, equipping you with the knowledge to optimize your travel planning experience.
The Seamless Integration: Automating Flight Entries from Gmail
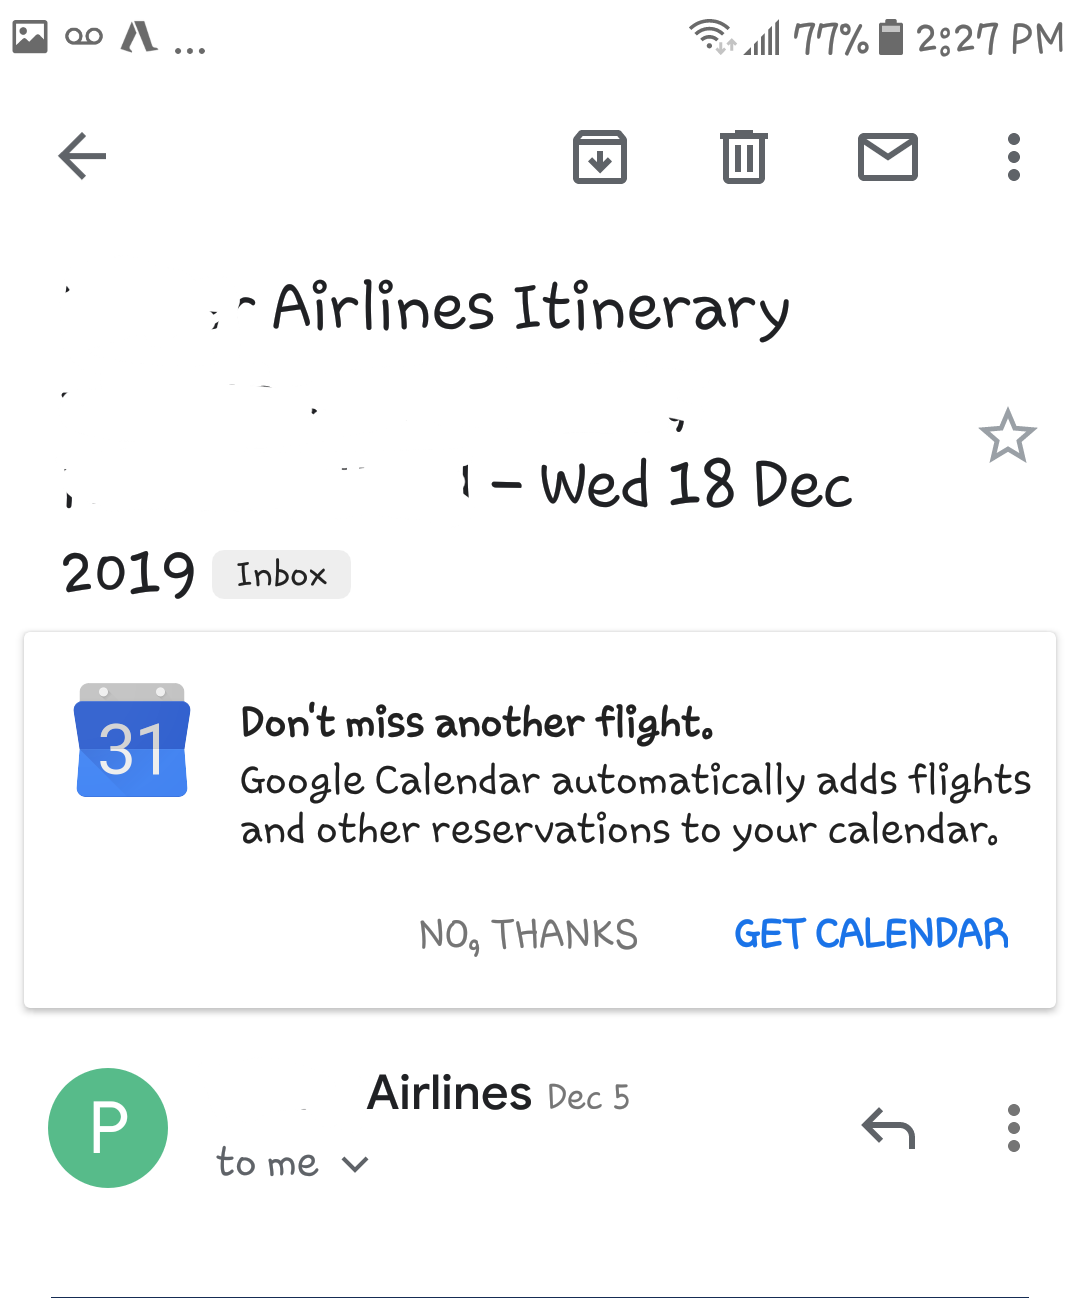
One of Google Calendar’s most impressive and often underutilized features is its ability to automatically detect and add flight information directly from your Gmail inbox. This intelligent integration leverages the power of AI to parse your emails for key travel details, alleviating the need for manual data entry.
Understanding Google’s Smart Features
Google’s ecosystem is designed for interconnectedness. When you receive flight confirmation emails in your Gmail account, Google’s algorithms are constantly scanning for structured data related to reservations, appointments, and travel. This isn’t just about keywords; it’s about understanding the context and extracting specific entities like flight numbers, departure and arrival times, airports, and airline names. This feature, often part of Google Assistant’s broader intelligence, aims to proactively assist you in managing your schedule.
How Automatic Detection Works
The process is remarkably simple from a user perspective:
- Email Receipt: You receive a flight confirmation email from an airline, online travel agency (OTA), or a travel booking site in your Gmail account.
- Smart Parsing: Google’s automated systems read and interpret the content of this email, specifically looking for booking references, flight details (flight numbers, dates, times), and itinerary information.
- Event Creation: If sufficient and clear information is found, Google Calendar will automatically create an event. This event typically includes the flight number, departure and arrival airports, times, and often a link back to the original email for quick reference.
- Notification: Depending on your Google Calendar notification settings, you might receive an alert informing you that a new event has been added.
This automation extends beyond flights to other travel-related bookings such as hotel reservations and car rentals, providing a holistic view of your trip within your calendar.
Requirements for Automatic Addition
For this automation to work effectively, a few conditions generally need to be met:
- Gmail Account: The flight confirmation must be sent to the Gmail account associated with your Google Calendar.
- Standard Format: The email should be in a relatively standard and parsable format. While Google is intelligent, highly custom or image-heavy emails might sometimes be harder to interpret.
- Web & App Activity: Ensure “Web & App Activity” is turned on in your Google Account settings, as this helps Google understand your preferences and provide personalized experiences, including calendar integrations.
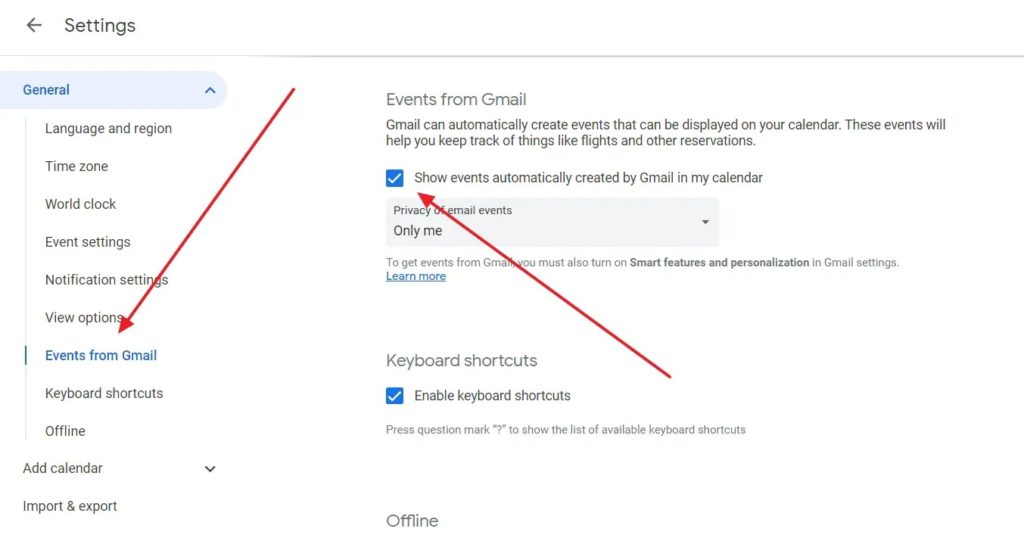
- Event Settings: Within Google Calendar settings, verify that “Events from Gmail” is enabled. You can usually find this under “General” settings.
Verifying Automatically Added Flights
While automation is incredibly convenient, it’s always good practice to verify the details:
- Open Google Calendar: Access your calendar via a web browser or the mobile app.
- Locate Event: Look for a new event around your flight date. Automatically added events often appear with a small airplane icon or are subtly distinct.
- Review Details: Click on the event to open it. Check the departure and arrival times, flight number, and airports to ensure they match your booking confirmation exactly.
- Edit if Necessary: If any detail is incorrect or missing, you can easily edit the event as you would any other calendar entry.
Mastering Manual Entry: When Automation Isn’t Enough
Despite Google’s sophisticated automation, there are instances where manual input becomes necessary. Perhaps your booking was made via an obscure airline, forwarded from a different email address, or simply didn’t trigger the automatic detection. Manual entry ensures accuracy and completeness, giving you full control over your calendar’s travel data.
Step-by-Step Guide to Manual Event Creation
Adding a flight manually is straightforward and provides the flexibility to include specific details that might be critical for your journey.
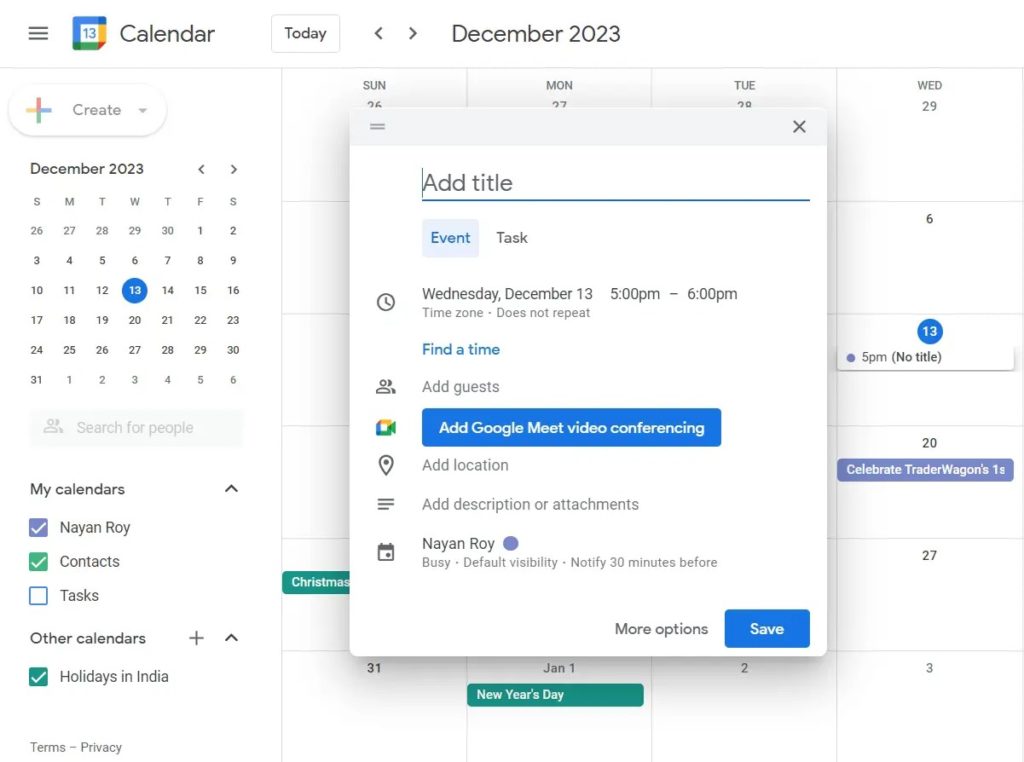
- Open Google Calendar: Access your calendar application on desktop or mobile.
- Create New Event:
- Desktop: Click the “Create” button (usually a plus sign or “Create” text) on the left sidebar.
- Mobile: Tap the plus sign (+) icon, then select “Event.”
- Enter Title: Start with a clear title, such as “Flight to [Destination City] – [Flight Number]”. Example: “Flight to London – BA287”.
- Set Date and Time: Crucially, set the local departure time for your flight. If it’s an overnight flight spanning two days, ensure both the start and end dates/times are accurate, considering time zone changes.
- Add Guests (Optional): If you’re traveling with others, or want to inform colleagues/family, you can add their email addresses as guests.
- Add Location: Input the departure airport’s name and code (e.g., “Heathrow Airport (LHR)”). You can also add the arrival airport in the description.
- Choose Calendar: If you use multiple calendars (e.g., “Work,” “Personal,” “Travel”), select the appropriate one.
- Save: Click “Save” to create the event.
Key Information to Include
For a truly useful manual entry, go beyond the basics. Leverage the “Description” field to add comprehensive details:
- Flight Number and Airline: Reiterate this clearly.
- Departure/Arrival Airports & Terminals: Specify terminal numbers if known (e.g., “LHR Terminal 5”).
- Departure/Arrival Times (Local & UTC if relevant): Clearly state both local times. For international travel, it might be insightful to note UTC times or the original time zone’s equivalent to avoid confusion.
- Booking Reference/PNR: Crucial for check-in.
- Gate Number: If known in advance, or leave space to update.
- Seat Number: If pre-selected.
- Baggage Allowance: A quick note can be helpful.
- Check-in Deadlines: Especially for international flights.
- Confirmation Email Link: Copy and paste the URL to your online booking or a direct link to the airline’s “manage booking” page.
Adding Reminders and Notifications
Google Calendar’s notification system is a powerful asset for travel.
- Default Notifications: You can set default notifications for all events (e.g., 30 minutes before).
- Custom Notifications: For flights, consider adding multiple reminders:
- 24 hours before: For online check-in.
- 3-4 hours before: To leave for the airport.
- 1 hour before: For final departure gate check.
- Notification Types: Choose between push notifications, email alerts, or both, depending on your preference.
Attaching Relevant Documents
Google Calendar allows you to attach files directly to an event. This is incredibly useful for travel:
- Save Documents: Download your e-ticket, visa copies, hotel confirmations, or car rental vouchers as PDF files to your Google Drive.
- Attach to Event: When editing the flight event, click the “Add attachment” icon (paperclip). You can then select files directly from your Google Drive.
This centralizes all critical travel documents, making them accessible even offline if you configure your Google Drive for offline access.
Beyond Basic Entry: Optimizing Your Travel Calendar
Integrating your flight isn’t just about knowing when you depart and arrive. Google Calendar, when used strategically, can become the central hub for your entire trip logistics, encompassing a wider range of travel-related information and functionalities.
Integrating Other Travel Details
Your journey doesn’t start and end with the flight. Expand your calendar’s utility by adding:
- Hotel Reservations: Include check-in/check-out times, hotel name, address, and booking reference. Use the location feature for easy navigation.
- Car Rental Pick-up/Drop-off: Add times, location, and confirmation number.
- Meeting Schedules: If traveling for business, integrate all your meeting times, locations, and attendees.
- Leisure Activities: Booked tours, museum visits, or restaurant reservations can all be added as separate events.
The goal is to create a comprehensive, day-by-day itinerary directly within your calendar.
Sharing Your Travel Plans with Others
Collaborative travel planning or simply keeping loved ones informed is easy with Google Calendar:
- Individual Sharing: When creating or editing an event, add specific individuals as “guests.” They will receive an invitation and the event will appear on their calendar (with options to accept/decline).
- Calendar Sharing: For more extensive sharing (e.g., with a travel partner for the entire trip), you can create a dedicated “Travel” calendar and share it with specific people, granting them view-only or even editing access. This ensures everyone is on the same page regarding the itinerary.
Leveraging Google Calendar for Trip Logistics
Google Calendar is more than a simple schedule; it’s a smart assistant.
- Time Zone Adjustments: Google Calendar automatically handles time zone conversions for events. When you land in a new time zone, your calendar will display event times correctly based on your device’s local time, but it’s crucial to initially enter times based on the event’s local time.
- Local Events and Reminders: Beyond travel bookings, use your calendar to remind you of local nuances like currency exchange, emergency numbers, or even packing reminders before you leave.
- “Out of Office” Settings: If traveling for work, integrate your travel dates with your “out of office” or “working hours” settings in Google Calendar, which can automatically decline meetings or inform colleagues of your unavailability.
Utilizing Google Maps Integration for Navigation
Every event with a location added in Google Calendar automatically integrates with Google Maps.
- Direct Navigation: Tapping on the location in an event will instantly open Google Maps, providing directions, estimated travel times, and public transport options. This is invaluable for navigating airports, finding hotels, or reaching meeting venues in unfamiliar cities.
- Traffic Estimates: On mobile, Google Calendar often provides proactive notifications about “time to leave” based on current traffic conditions to ensure you arrive on time for your flight or next activity.
Troubleshooting and Best Practices for a Smooth Travel Experience
While Google Calendar is a powerful tool, understanding its nuances and preparing for potential issues can further enhance your travel planning and execution.
What to Do When Automatic Sync Fails
If your flight doesn’t automatically appear in your calendar:
- Check Gmail Settings: Ensure “Events from Gmail” is enabled in your Google Calendar settings.
- Search Gmail: Confirm the original booking confirmation email is indeed in your Gmail inbox and hasn’t been accidentally archived or moved to spam.
- Forward to Yourself: If the email came to a different account, forward it to your primary Gmail account. Sometimes, this can trigger the automatic detection.
- Manual Entry: When all else fails, resort to comprehensive manual entry as detailed above. It’s reliable and gives you full control.
Maintaining Accurate Flight Information
Flight details can change:
- Monitor Notifications: Keep an eye on email or SMS notifications from your airline for schedule changes, gate changes, or delays.
- Update Calendar Promptly: If a change occurs, immediately edit the corresponding event in Google Calendar. This ensures your primary reference point is always up-to-date.
- Add “Flexibility” Buffers: When scheduling pre-flight activities or connecting flights, always build in buffer time to account for unforeseen delays.
Privacy Concerns and Managing Shared Calendars
When sharing your calendar or adding guests, be mindful of privacy:
- Permission Levels: Understand the different permission levels when sharing a calendar (e.g., “See only free/busy,” “See all event details,” “Make changes and manage sharing”). Choose the most appropriate level for each person.
- Sensitive Information: Be judicious about adding highly sensitive personal information to shared events. While booking references are standard, you might want to avoid things like passport numbers unless absolutely necessary for specific shared planning.
- Individual Events vs. Full Calendar: If you only want to share a single flight, use the “Add guests” feature for that specific event, rather than sharing your entire calendar.
Leveraging Third-Party Apps (Briefly)
While the focus remains on Google Calendar, some third-party travel apps (like TripIt or FlightAware) offer advanced features such as real-time delay tracking, terminal maps, and alternative flight suggestions. Many of these apps can integrate with Google Calendar, importing your itinerary once processed. For the most critical and frequently changing data (like real-time flight status), using the airline’s official app or a dedicated flight tracker alongside Google Calendar can offer an extra layer of reassurance.
Conclusion
Integrating your flight details into Google Calendar is a fundamental step towards modern, organized travel. Whether through its intelligent automatic detection from Gmail or the precision of manual entry, Google Calendar transforms from a simple scheduler into an indispensable travel assistant. By meticulously inputting essential information, leveraging reminders, and consolidating all trip details, you can ensure a smoother, less stressful, and ultimately more enjoyable journey. Embrace these technological advantages to streamline your travel logistics and focus on the experiences that matter most.
aViewFromTheCave is a participant in the Amazon Services LLC Associates Program, an affiliate advertising program designed to provide a means for sites to earn advertising fees by advertising and linking to Amazon.com. Amazon, the Amazon logo, AmazonSupply, and the AmazonSupply logo are trademarks of Amazon.com, Inc. or its affiliates. As an Amazon Associate we earn affiliate commissions from qualifying purchases.