
Owning a Tesla is more than just driving an advanced electric vehicle; it’s about embracing a new lifestyle. Central to this experience is the convenience and efficiency of home charging. While public charging networks offer flexibility, the unparalleled ease of waking up to a fully charged car in your own garage is a game-changer for many EV owners. But before you can plug in with abandon, there’s a crucial question to address: how much does it cost to install a Tesla charger at home?
The investment in a home charging solution for your Tesla can vary significantly, typically ranging from $500 to $1,700 for standard installations. However, this figure can easily climb to $4,000 or even higher if your home requires substantial electrical upgrades. This article will meticulously break down the costs involved, explore the various factors that influence the final price, and guide you through the process of making an informed decision that aligns with both your technological needs and financial strategy.
Decoding Tesla Charging Options for Your Home
Before diving into the financials, it’s essential to understand the different charging solutions available for your Tesla. Your choice of charger will directly impact both the upfront cost of the unit and the complexity, and thus cost, of its installation. Each option offers a different balance of speed, convenience, and investment, catering to various ownership needs and home electrical setups.
The Tesla Wall Connector: The Gold Standard
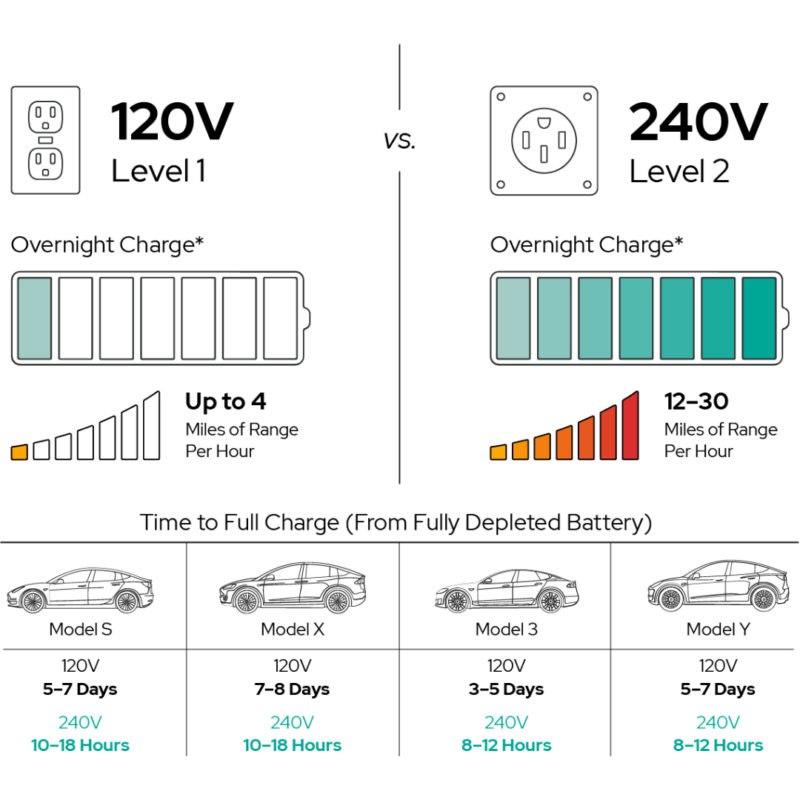
For most Tesla owners, the Tesla Wall Connector represents the pinnacle of home charging. This dedicated Level 2 (240-volt) charger is designed specifically for Teslas, offering the fastest possible AC charging rates at home. Depending on your Tesla model and home electrical setup, it can add up to 44 miles of range per hour, meaning a full charge overnight is easily achievable for most drivers.
The Wall Connector itself typically costs around $475-$500. Beyond its speed, it boasts several smart features, including Wi-Fi connectivity for over-the-air updates, charge scheduling, and even load sharing if you have multiple Tesla vehicles and Wall Connectors. Its sleek design and seamless integration with the Tesla ecosystem make it a premium choice for those seeking maximum convenience and efficiency. Investing in a Wall Connector is not just about charging; it’s about future-proofing your home charging infrastructure and enhancing your overall Tesla ownership experience.
Leveraging the Mobile Connector: Practical Versatility
Every new Tesla comes equipped with a Mobile Connector, which offers surprising versatility for home charging. This portable unit allows you to plug into various outlets using different adapters.
- Level 1 Charging: Out of the box, with the standard NEMA 5-15 adapter, the Mobile Connector can plug into any standard 120-volt household outlet. This “trickle charge” provides about 2-4 miles of range per hour. While incredibly slow, it’s a free and convenient option for those with minimal daily driving needs or as a backup. No installation cost is typically associated with Level 1 charging, beyond the electricity itself.
- Level 2 Charging with Adapters: The Mobile Connector truly shines when paired with a NEMA 14-50 adapter and a corresponding 240-volt outlet. A NEMA 14-50 outlet is commonly found in RV parks or for electric dryers and stoves. When plugged into a properly installed NEMA 14-50 outlet, the Mobile Connector can deliver up to 30 miles of range per hour, making it a viable Level 2 charging solution. The primary installation cost here is for the NEMA 14-50 outlet itself, which involves similar electrical work to installing a Wall Connector, but potentially at a slightly lower material cost as you are not buying a dedicated charger unit. The cost of the NEMA 14-50 adapter for the Mobile Connector is usually around $45.
Choosing the Mobile Connector with a NEMA 14-50 setup can be a cost-effective alternative to the Wall Connector, especially if you already have a suitable 240-volt outlet or prefer the flexibility of a portable charger.
Third-Party Alternatives: Expanding Your Choices
While the Tesla Wall Connector is optimized for Teslas, the company also provides an adapter for J1772 charging, which is the standard connector for most other electric vehicles in North America. This means you can use a wide range of third-party Level 2 EV chargers. These chargers vary in features, design, and price, with some offering advanced smart home integration, energy management tools, or unique aesthetics.
The cost of third-party chargers typically ranges from $300 to $800, and their installation requirements are very similar to that of a Tesla Wall Connector, needing a dedicated 240-volt circuit. While they might not offer the native integration with the Tesla app that the Wall Connector does, many provide excellent performance and come with their own smart charging capabilities, allowing you to compare features and prices across a broader market.
The Financial Blueprint: Breaking Down Installation Costs
The true cost of installing a Tesla charger goes far beyond the price tag of the charging unit itself. A significant portion of your budget will be allocated to the electrical work required to safely and efficiently power your vehicle. Understanding each component of this financial blueprint is key to accurate budgeting and avoiding unexpected expenses. This is where the “Money” aspect of your website comes heavily into play, requiring careful financial planning.
The Charger Unit Itself: An Initial Investment
As discussed, the cost of the actual charging hardware is your first significant expense.
- Tesla Wall Connector: Expect to pay around $475-$500 directly from Tesla.
- NEMA 14-50 Outlet Installation (for Mobile Connector): If you opt for this route, you won’t buy a dedicated charger, but you’ll still need to factor in the cost of the NEMA 14-50 receptacle, which is a minor material cost (around $10-$20). The bulk of the expense here will be the electrical installation for the outlet itself.
- Third-Party EVSE: These typically range from $300-$800.
Electrician’s Labor: Expertise Comes at a Price
The electrician’s labor is often the largest single component of the installation cost. Professional electricians are indispensable for ensuring safety, code compliance, and optimal performance of your charging setup. Their rates typically range from $75 to $150 per hour, depending on your geographic location, the electrician’s experience, and the complexity of the job.
For a straightforward installation (e.g., Wall Connector mounted on a garage wall, close to the electrical panel, with sufficient existing capacity), the job might take 2-4 hours. This translates to a labor cost of $150-$600. However, for more complex installations involving longer wire runs, drilling through multiple walls, or outdoor conduit, labor hours can quickly add up, potentially reaching 8-12 hours or more, pushing labor costs into the $600-$1,800+ range. The “Tech” aspect here is crucial, as a skilled electrician understands the specific electrical demands of EV chargers and how to integrate them safely into your home’s system.
Essential Materials: Wires, Breakers, and More
Beyond the charger unit, a variety of electrical materials are required to complete the installation. These costs are influenced by the distance from your electrical panel to the charging location and the amperage of the circuit.
- Wire: Heavy-gauge copper wire (e.g., 6-gauge or 8-gauge, depending on amperage) is needed to safely carry the significant electrical load of a Level 2 charger. The cost of wire can be substantial, especially for longer runs, varying from $2-$5 per foot. A 50-foot run could easily add $100-$250 to your bill.
- Conduit: If the wiring needs to be run through walls, attics, or outdoors, conduit (PVC or metal piping) is often required to protect the wiring and comply with electrical codes. This adds to both material and labor costs.
- Circuit Breaker: A dedicated 40-amp or 50-amp double-pole circuit breaker is essential for a Level 2 charger. These typically cost $15-$50.
- Junction Boxes and Outlets: If installing a NEMA 14-50 outlet, the cost of the outlet itself and any necessary junction boxes will be included, usually totaling $20-$50.
- Miscellaneous: Staples, connectors, wall anchors, and other small components also contribute to the material costs.
In total, material costs for a standard installation typically range from $100 to $500, but can easily exceed this for very long runs or specialized conduit.
Permits and Inspections: Ensuring Safety and Compliance
Do not overlook the importance of permits and inspections. Most municipalities require an electrical permit for installing a Level 2 EV charger to ensure the work adheres to local building codes and safety standards. This is a critical “Tech” and “Money” intersection, as skipping this step can lead to fines, safety hazards, and issues with insurance or home resale.
Permit fees generally range from $50 to $200, depending on your location. After installation, a qualified inspector from your local jurisdiction will review the work. This inspection is crucial for validating the safety and compliance of your new charging system. While it adds a small administrative cost and a waiting period, it provides peace of mind and is a non-negotiable step for responsible homeowners. Your electrician will typically handle the permit application process, but it’s good to be aware of this component.
Potential Electrical Upgrades: The Hidden Variable
This is where installation costs can skyrocket. If your home’s existing electrical panel lacks the necessary capacity (amperage) to support a new Level 2 EV charger, you might need an electrical panel upgrade or a subpanel installation. This is a significant factor in cost variation and a key area for “Money” management.
- Subpanel Installation: If your main panel is full but has enough overall amperage, an electrician might install a smaller subpanel near your main panel or near the charging location. This can cost anywhere from $500 to $1,500.
- Main Electrical Panel Upgrade: If your entire home’s electrical service (e.g., a 100-amp service) is insufficient, you’ll need to upgrade your main electrical panel to a higher capacity (e.g., 200-amp service). This is a major electrical project that can involve coordinating with your utility company and often costs $2,000 to $4,000 or more. Factors like trenching for new service lines or extensive rewiring can push this even higher.
The need for an electrical upgrade is assessed during the initial site visit by your electrician. It’s a critical component of the “Tech” assessment and requires careful financial planning.
Key Factors Driving Your Installation Bill
Beyond the base costs, several specific elements can significantly influence the final price you pay for your Tesla charger installation. These factors are often unique to your home’s layout and existing infrastructure, making personalized quotes essential.
Proximity to the Electrical Panel: A Matter of Length
The distance between your main electrical panel and where you want to install the charger is arguably the most significant cost driver.
- Short Run (under 10 feet): This is ideal, minimizing material (wire, conduit) and labor costs.
- Medium Run (10-50 feet): Costs increase proportionally with the length of wire and conduit needed.
- Long Run (over 50 feet): This can substantially increase costs due to the quantity of materials and the increased labor time for pulling wires through walls, attics, or crawl spaces, potentially requiring larger gauge wire to prevent voltage drop over distance. Each additional foot adds to the material bill, and complex routing adds to labor.
Your Home’s Existing Electrical Infrastructure: Capacity is Key
As mentioned, your home’s current electrical panel capacity is critical.
- Sufficient Capacity (e.g., 200-amp panel with available breaker slots): This is the best-case scenario, leading to a simpler, less expensive installation.
- Full Panel but Sufficient Overall Amperage: May require a subpanel, adding $500-$1,500.
- Insufficient Overall Amperage (e.g., an older 100-amp panel in a home with other high-demand appliances): This necessitates a full main panel upgrade, the most expensive scenario, potentially $2,000-$4,000+. A professional electrician will conduct a load calculation to determine if your panel can handle the additional demand without compromising safety.
Installation Complexity: From Simple Mounts to Trenching
The physical challenges of the installation site also play a major role:
- Surface-Mounted Wiring: If the wiring can be run along surfaces (e.g., inside an unfinished garage), it’s generally less expensive than fishing wires through finished walls.
- In-Wall Wiring/Drywall Repair: Running wires invisibly through finished walls requires more labor, potentially involving cutting into and repairing drywall, increasing costs.
- Outdoor Installation/Conduit: If the charger is installed outdoors or in a detached garage, the wiring will likely need to be run in weatherproof conduit, possibly requiring trenching if underground. Trenching can be a labor-intensive and costly process, adding hundreds to thousands of dollars depending on the distance and ground conditions.
- Obstacles: Dealing with brick walls, concrete, or other structural challenges can increase labor and material costs.
Geographic Location and Local Labor Rates
Like most service industries, electrician labor rates vary significantly by region. Major metropolitan areas and areas with a high cost of living generally have higher labor rates compared to rural areas. Local permit fees also fluctuate. Getting multiple quotes from electricians in your specific area is crucial for understanding the prevailing rates and securing a competitive price. This ties into “Brand” reputation for local businesses and finding a trusted provider.
Navigating the Installation Journey: From Quote to Charge
Once you understand the costs and factors, the next step is to navigate the actual installation process. This requires careful planning and due diligence to ensure a safe, compliant, and cost-effective setup for your Tesla charger. This phase involves both “Tech” and “Productivity” aspects.
The DIY vs. Professional Dilemma: Safety First
For Level 2 EV charger installations, the consensus among experts is clear: always hire a qualified, licensed electrician. While some highly skilled DIY enthusiasts might feel confident tackling such a project, the risks associated with high-voltage electrical work are substantial. Incorrect wiring can lead to electrical fires, electric shock, damage to your Tesla, or voiding your home insurance.
Professional electricians have the specialized knowledge of electrical codes, safety protocols, and the specific requirements for EV charging equipment. They will ensure the installation is safe, reliable, and compliant with all local regulations, saving you potential headaches and dangers down the line. Attempting a DIY installation to save money could prove to be a false economy, costing far more in repairs or damages in the long run.
Selecting the Right Electrician: Experience Matters
Choosing the right professional is paramount. Don’t just pick the cheapest quote; prioritize experience and reputation.
- Licensed and Insured: Always verify that the electrician is licensed in your state and carries appropriate liability insurance. This protects you from any accidents or damages during the installation.
- EV Charger Experience: Look for electricians who specifically mention experience with EV charger installations. They will be familiar with the unique electrical demands and proper setup for Tesla Wall Connectors or NEMA 14-50 outlets. Tesla’s website often provides a list of certified installers, which can be a great starting point.
- Multiple Quotes: Obtain at least three detailed quotes from different electricians. This allows you to compare pricing, understand the scope of work proposed, and ask questions. A good quote will clearly itemize the charger unit, labor, materials, permits, and any potential electrical upgrades.
- References and Reviews: Check online reviews and ask for references. A reputable electrician will have a positive track record.
The “Brand” of your chosen electrician matters; a strong reputation often signifies reliable, high-quality work.
Understanding Permits and Local Building Codes
Your chosen electrician should handle the permit application process, but it’s important for you to understand why it’s necessary. Local building codes are in place to ensure the safety and structural integrity of installations within your home. An EV charger, being a significant electrical load, falls under these regulations.
The permit process typically involves:
- Application: Your electrician submits plans to your local building department.
- Inspection: After the installation, a city or county inspector will visit your home to verify that the work was done correctly and according to code.
Passing the inspection is crucial. It confirms the safety of your system and can be important for insurance purposes and when selling your home. Never allow an electrician to bypass the permit process.
Smart Financial Moves: Maximizing Your Investment
Beyond the initial installation costs, there are strategic financial considerations that can significantly impact the long-term value and affordability of your Tesla home charging setup. This aligns perfectly with the “Money” focus, offering ways to optimize your investment and reduce operational costs.
Tapping into Tax Credits and Rebates: A Welcome Relief
The federal government and many state and local entities offer incentives to encourage EV adoption and the installation of charging infrastructure.
- Federal Tax Credit: Currently, a federal tax credit is available for up to 30% of the cost of new, qualified alternative fuel vehicle refueling property, up to $1,000. This can significantly offset the cost of your charger unit and installation. Ensure you meet the eligibility criteria and keep all receipts.
- State and Local Rebates: Many states, counties, and even specific cities offer their own rebate programs for EV charger installations. These can vary widely, from a few hundred dollars to substantial reimbursements.
- Utility Company Programs: Your local electric utility provider is an excellent resource for potential incentives. Many utilities offer rebates for smart charger installations, provide off-peak charging discounts, or even free home energy assessments.
Researching these programs (check websites of your state energy office, local utility, and federal energy.gov site) before installation can lead to substantial savings, reducing your overall out-of-pocket expenses.
Optimizing with Time-of-Use (TOU) Electricity Rates: Charge Smarter
Many utility companies offer Time-of-Use (TOU) electricity rates, where the price of electricity varies depending on the time of day. Electricity is typically cheaper during off-peak hours (e.g., overnight, weekends) and more expensive during peak demand times (e.g., late afternoon/early evening).
By installing a Level 2 charger, especially one with smart charging capabilities (like the Tesla Wall Connector), you can leverage TOU rates to your advantage. Scheduling your Tesla to charge exclusively during off-peak hours can result in significant savings on your electricity bill over time. This is a crucial “Tech” feature that directly translates into “Money” savings, allowing you to manage your personal finance effectively. A dedicated home charger makes this optimization effortless, as you simply plug in and let the car’s or charger’s intelligence handle the rest.
The Long-Term Value Proposition: Convenience and Beyond
While the upfront cost of installing a Tesla charger might seem significant, it’s an investment that offers substantial long-term value.
- Unmatched Convenience: The ability to charge your Tesla overnight at home eliminates range anxiety, saves time spent at public charging stations, and integrates seamlessly into your daily routine.
- Cost Savings Over Public Charging: While electricity costs vary, home charging is almost invariably cheaper per kilowatt-hour than public fast chargers, especially if you utilize TOU rates. These savings accumulate over years of ownership.
- Increased Home Value: As EVs become more prevalent, homes equipped with EV charging infrastructure are becoming increasingly attractive to potential buyers, potentially boosting your property’s resale value. It signals a modern, tech-ready home.
- Environmental Benefits: By charging at home, you often have more control over the source of your electricity, potentially aligning with renewable energy sources if your utility offers green power options or if you have solar panels.
- Battery Health: Consistent, slower Level 2 charging at home is generally better for your Tesla’s battery health compared to frequent reliance on high-speed DC fast charging.
Considering these benefits, the cost of installing a Tesla charger transforms from an expense into a strategic investment in convenience, financial prudence, and the future value of your home.
Conclusion
Installing a Tesla charger at home is a foundational step in maximizing the convenience and enjoyment of your electric vehicle. While the initial investment can range from a modest $500 for a straightforward installation to over $4,000 for complex electrical upgrades, understanding the various cost components—from the charger unit itself to labor, materials, permits, and potential panel upgrades—is paramount for effective financial planning.
The choice between a Tesla Wall Connector, a NEMA 14-50 outlet for your Mobile Connector, or a third-party EVSE will set the stage, but the true cost hinges on your home’s unique electrical infrastructure and the complexity of the installation. Factors like the distance to your electrical panel, its current capacity, and any physical challenges will significantly influence your final bill.
To navigate this process successfully, prioritize safety by always engaging a licensed and experienced electrician. Seek multiple detailed quotes, inquire about EV charger-specific experience, and ensure all necessary permits and inspections are obtained. Furthermore, be proactive in exploring available financial incentives, such as federal tax credits, state rebates, and utility programs, which can substantially reduce your out-of-pocket expenses. Finally, leverage smart charging practices, like utilizing Time-of-Use electricity rates, to optimize long-term operational costs.
Ultimately, installing a home Tesla charger is more than just an electrical upgrade; it’s an investment in unparalleled convenience, long-term savings, and a seamlessly integrated EV ownership experience. By making informed decisions and planning meticulously, you can ensure your home is perfectly equipped to power your Tesla for years to come.
aViewFromTheCave is a participant in the Amazon Services LLC Associates Program, an affiliate advertising program designed to provide a means for sites to earn advertising fees by advertising and linking to Amazon.com. Amazon, the Amazon logo, AmazonSupply, and the AmazonSupply logo are trademarks of Amazon.com, Inc. or its affiliates. As an Amazon Associate we earn affiliate commissions from qualifying purchases.