
In the ever-evolving landscape of operating systems, Linux stands as a beacon of flexibility, security, and open-source innovation. While Windows and macOS dominate the commercial market, Linux offers a compelling alternative for millions, from tech enthusiasts and developers to everyday users seeking a robust, customizable, and often free computing experience. The idea of “how to install Linux” might seem daunting at first, conjuring images of complex command lines and obscure procedures. However, modern Linux distributions have made the installation process remarkably user-friendly, rivalling, and in some cases surpassing, the simplicity of proprietary OS installations.

This comprehensive guide is designed to demystify the process, breaking down each step into easy-to-follow instructions. Whether you’re looking to revitalize an old computer, enhance your digital security, or simply explore a powerful open-source ecosystem, installing Linux is a gateway to a world of possibilities. We’ll cover everything from choosing the right distribution for your needs to preparing your system, creating bootable media, navigating the installation wizard, and taking your first steps in your new Linux environment. By the end of this article, you’ll not only understand how to install Linux but also appreciate the distinct advantages it brings to the table, aligning perfectly with a philosophy of smart technology choices, personal brand empowerment through digital literacy, and intelligent financial decisions. Let’s embark on this exciting journey to unlock the full potential of your hardware with Linux.
I. Preparing for Your Linux Journey: Essential Pre-Installation Steps
Before diving into the actual installation, a thorough preparation phase is crucial. This ensures a smooth process, protects your existing data, and helps you make informed decisions that will shape your Linux experience. This section focuses on the groundwork, from selecting your ideal Linux flavor to safeguarding your valuable files and getting your installation media ready.
A. Choosing Your Linux Distribution: A Flavor for Every User
One of Linux’s greatest strengths, and sometimes its initial complexity, is the sheer variety of distributions (often shortened to “distros”). Each distro is essentially a complete operating system built on the Linux kernel, bundled with different software packages, desktop environments, and philosophies. Your choice here significantly impacts your user experience, so it’s vital to select one that aligns with your technical proficiency, hardware, and intended use.
-
For Beginners & Everyday Users:
- Ubuntu: Arguably the most popular and user-friendly distribution, Ubuntu is an excellent starting point. It boasts a massive community, extensive documentation, and a polished user interface (GNOME desktop by default, though other flavors exist). Its focus on ease of use makes it perfect for those transitioning from Windows or macOS. Its consistent update cycle and vast software repositories make it a reliable choice for productivity and general computing.
- Linux Mint: Based on Ubuntu, Linux Mint often appeals to users seeking a more traditional desktop experience, particularly those migrating from Windows. It offers desktop environments like Cinnamon, MATE, and XFCE, which are intuitive and familiar. Mint also comes pre-installed with many codecs and media software, making it ready for multimedia consumption right out of the box.
- Pop!OS: Developed by System76, Pop!OS is another Ubuntu-based distribution gaining significant traction, especially among developers and gamers. It offers a highly refined GNOME desktop experience with excellent tiling window management and out-of-the-box support for NVIDIA graphics drivers, making it a compelling choice for performance-oriented users.
-
For Developers & Advanced Users:
- Fedora: Known for adopting the latest open-source technologies, Fedora is a cutting-edge distribution sponsored by Red Hat. It’s an excellent choice for developers who want to work with the newest software versions and contribute to the open-source ecosystem. While it requires a bit more technical comfort than Ubuntu, its innovation is a major draw.
- Debian: The foundational distribution for Ubuntu and many others, Debian is renowned for its stability and commitment to free software principles. It offers a vast collection of packages and is a solid choice for servers and users who prioritize rock-solid stability over the absolute latest software versions.
- Arch Linux: For the truly adventurous and hands-on user, Arch Linux offers a “do-it-yourself” approach. It provides a minimal base system, allowing users to build their environment from the ground up. This offers unparalleled customization and a deep understanding of how Linux works, but it’s not recommended for beginners.
When making your decision, consider your hardware specifications. Lighter desktop environments like XFCE (found in Xubuntu, Linux Mint XFCE) or LXDE are better suited for older or less powerful machines, extending their lifespan and making them productive again – a great “money” aspect of Linux, saving on new hardware costs. Most modern distros will run well on systems with at least 4GB RAM and a dual-core processor.
B. System Requirements and Backing Up Your Data
Before proceeding, confirm your system meets the minimum requirements for your chosen distribution. Most modern distros require:
- Processor: 2 GHz dual-core processor or better.
- RAM: 4 GB system memory (though 2 GB might suffice for lighter distros/DEs).
- Disk Space: 25 GB of free hard drive space (more for dual-booting or extensive software).
- Graphics: VGA compatible with 1024×768 screen resolution.
- Connectivity: Internet access is highly recommended for updates during installation.
Crucially, back up all your important data. Whether you’re installing Linux alongside an existing operating system (dual-booting) or replacing it entirely, there’s always a small risk of data loss if something goes wrong during disk partitioning. Use an external hard drive, cloud storage (Google Drive, Dropbox, Nextcloud), or a USB stick to secure your documents, photos, videos, and any other irreplaceable files. This step cannot be overstated and is a cornerstone of responsible digital security, ensuring peace of mind throughout the process.
C. Creating a Bootable USB Drive (or DVD)
To install Linux, you’ll need to create a bootable installation medium. A USB flash drive is the most common and convenient method, though DVDs are still an option for older systems.
- Download the ISO Image: Visit the official website of your chosen Linux distribution (e.g., ubuntu.com, linuxmint.com) and download the
.isofile. This file is a disk image containing the entire operating system. Ensure you download the correct architecture (64-bit is standard for most modern computers). - Verify the ISO (Optional but Recommended): For enhanced security and to ensure the file wasn’t corrupted during download, you can verify the ISO’s integrity using checksums (MD5, SHA256). Most distro websites provide these checksums.
- Choose Your Tool:
- Rufus (Windows): A popular and robust utility for creating bootable USB drives. It’s user-friendly and highly effective.
- balenaEtcher (Windows, macOS, Linux): An excellent open-source tool known for its simplicity and reliability across platforms. It’s often recommended for beginners due to its intuitive interface.
- dd command (Linux/macOS): For more experienced users, the
ddcommand in the terminal offers a powerful way to write ISOs to USB drives. Be extremely careful with this command, as incorrect usage can wipe the wrong disk.
- Create the Bootable Drive:
- Insert your USB flash drive (at least 8GB recommended).
- Open your chosen tool (Rufus or Etcher).
- Select your downloaded ISO file.
- Select your USB drive (double-check you’ve chosen the correct drive to avoid overwriting other storage devices).
- Start the process. This will format the USB drive and write the Linux ISO to it, making it bootable. This process may take several minutes.
Once completed, you’ll have a bootable USB drive ready to launch the Linux installer.
II. The Installation Process: Bringing Linux to Life
With your bootable media ready and your data backed up, you’re prepared for the main event: installing Linux on your computer. This section guides you through booting from your USB drive and navigating the graphical installer, covering critical decisions like disk partitioning.
A. Booting from the Installation Media
The first step is to instruct your computer to boot from the USB drive instead of its internal hard drive.
- Restart Your Computer: With the bootable USB drive inserted, restart your machine.
- Access Boot Menu/BIOS/UEFI Settings: As your computer starts, you’ll need to press a specific key repeatedly to enter the BIOS/UEFI setup or a temporary boot menu. Common keys include
F2,F10,F12,Del, orEsc. The exact key often flashes briefly on the screen during startup. - Select USB Drive:
- Boot Menu: If you access a temporary boot menu, simply select your USB drive from the list (it might be labeled as “USB-HDD,” “EFI USB Device,” or by the brand of your USB drive).
- BIOS/UEFI: If you enter the BIOS/UEFI setup, navigate to the “Boot Options,” “Boot Order,” or “Boot Priority” section. Change the boot order to prioritize your USB drive above your internal hard drive. Save changes and exit.
- Start the Linux Live Environment: Your computer should now boot from the USB drive. You’ll likely see a boot menu for the Linux distribution, offering options like “Try Ubuntu without installing” or “Install Ubuntu.”
- “Try without installing” (Live Environment): It’s highly recommended to try the “live” environment first. This allows you to test drive the operating system directly from the USB without making any changes to your hard drive. You can check hardware compatibility (Wi-Fi, sound, graphics), browse the web, and get a feel for the desktop environment. This is an excellent way to ensure everything works before committing to an installation.
- “Install”: If you’re confident, you can directly choose to install.
B. Navigating the Installer Wizard: Step-by-Step Installation
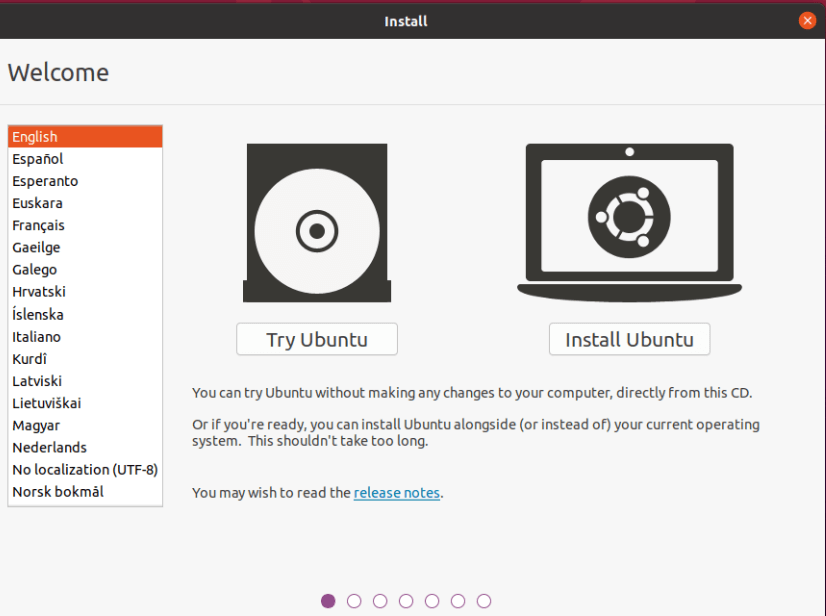
Once you select “Install” (either directly or from within the live environment), the graphical installer will launch. While exact screens may vary slightly between distributions, the core steps are remarkably similar. We’ll use a general approach applicable to most user-friendly distros.
- Language Selection: Choose your preferred language for the installer and the operating system.
- Keyboard Layout: Select your keyboard layout. The installer usually offers a test area to ensure your keys map correctly.
- Network Configuration: If you have an Ethernet connection, it might connect automatically. For Wi-Fi, you’ll be prompted to select your network and enter the password. Connecting to the internet during installation allows the system to download updates and additional software, saving time later.
- Installation Type (Crucial Step): This is one of the most critical decisions.
- “Install alongside [Existing OS]”: If you have Windows or macOS already installed, this option will automatically resize your existing partition and create new partitions for Linux, setting up a dual-boot system. This is often the easiest option for dual-booters. A boot manager (GRUB) will be installed, allowing you to choose which OS to boot into each time you start your computer.
- “Erase disk and install [Distro]”: This option will wipe your entire hard drive, deleting all existing operating systems and data, and install Linux as the sole OS. Only choose this if you are absolutely sure you want to dedicate the entire disk to Linux and have backed up all your data.
- “Something else” (Manual Partitioning): This option provides full control over disk partitioning. It’s recommended for experienced users or those with specific partitioning needs (e.g., dedicated
/homepartition, multiple operating systems, complex setups).- For dual-booting with more control: You’d typically need to create at least two partitions:
- Root partition (
/): This is where the core Linux system files reside. A size of 20-30 GB is usually sufficient, formatted asext4. - Swap partition: Acts as virtual RAM. A general rule of thumb is to make it equal to your RAM size (if RAM < 8GB) or a few GBs (if RAM >= 8GB).
- Home partition (
/home– Optional but Recommended): This partition stores all your personal files and user settings. Separating/homeallows you to reinstall the OS without losing your personal data. Give it the majority of your remaining disk space, formatted asext4. - EFI System Partition (ESP): If your system uses UEFI, you’ll need a small FAT32 partition (100-500 MB) for bootloaders. If Windows is already installed, you likely have one.
- Root partition (
- For dual-booting with more control: You’d typically need to create at least two partitions:
- Time Zone Selection: Click on your location on the map or select it from a drop-down menu.
- Create User Account: You’ll be prompted to enter your full name, a username, and a strong password. You can also choose whether to log in automatically or require a password at startup. Choose a strong, unique password for security. This account will be your primary administrative user.
- Review and Install: The installer will present a summary of your choices. Review everything carefully, especially the disk partitioning, before clicking “Install Now.” Once you confirm, the installation process will begin. This can take anywhere from 15 minutes to an hour, depending on your system’s speed and internet connection (if downloading updates).
- Installation Complete & Restart: Once the installation finishes, you’ll be prompted to restart your computer. Remove the USB drive when instructed, and your system will reboot. If you dual-booted, you should see the GRUB bootloader menu, allowing you to choose between Linux and your other operating system.
Congratulations! You have successfully installed Linux.
III. Post-Installation Essentials: Getting Started with Your New OS
Installing Linux is just the beginning. The real magic happens once you start customizing it, installing your favorite applications, and making it truly yours. This section covers crucial steps to take immediately after your first boot into the new system, ensuring it’s up-to-date, secure, and ready for your daily tasks.
A. Updating Your System and Drivers
The very first thing you should do after logging into your new Linux desktop is to update your system. This ensures you have the latest security patches, bug fixes, and software versions available since the ISO was released.
- Open the Software Updater: Most distributions have a graphical software updater utility (e.g., “Software Updater” in Ubuntu, “Update Manager” in Linux Mint). Launch it.
- Apply All Updates: The updater will check for available updates. Review the list (though usually, you’ll want to apply all recommended updates) and proceed. You may be prompted for your password. This process can take a while, especially after a fresh install.
- Restart if Prompted: Some kernel updates or critical system changes require a reboot.
- Install Proprietary Drivers (if needed): If you have NVIDIA or AMD graphics cards, or certain Wi-Fi adapters, your distribution might offer proprietary drivers for better performance or functionality.
- In Ubuntu/Mint: Go to “Software & Updates” -> “Additional Drivers” tab.
- In Pop!_OS: Drivers are often handled automatically.
- In Fedora: You might need to enable third-party repositories for certain drivers.
- Install any recommended proprietary drivers, then restart your system.
Keeping your system updated is fundamental to maintaining a secure and stable computing environment, a core tenet of digital security that resonates with the “Tech” aspect of our website.
B. Installing Essential Software and Customizing Your Desktop
Now that your system is up-to-date, it’s time to populate it with the applications you need for productivity, creativity, and entertainment. The beauty of Linux is the vast ecosystem of free and open-source software (FOSS) available, alongside many proprietary options.
- Explore the Software Center: Most user-friendly distributions come with a graphical “Software Center” or “App Store” (e.g., Ubuntu Software, GNOME Software, Mint Software Manager, Pop!_Shop). This is the easiest way to browse, search, and install applications without using the command line.
- Common Applications to Consider:
- Web Browsers: Firefox (usually pre-installed), Chrome, Brave, Vivaldi.
- Office Suite: LibreOffice (pre-installed in most distros, a powerful alternative to Microsoft Office), OnlyOffice.
- Media Players: VLC (for video), Audacious (for audio).
- Image Editing: GIMP (powerful Photoshop alternative), Krita (digital painting).
- Video Editing: Kdenlive, DaVinci Resolve (free version available for Linux).
- Communication: Discord, Slack, Zoom, Telegram.
- Productivity: Thunderbird (email client), Planner, Joplin (note-taking).
- Development Tools: VS Code, Git, various programming language interpreters/compilers.
- Common Applications to Consider:
- Using the Command Line (Optional but Powerful): For more experienced users, or for installing software not easily found in the Software Center, the terminal is your friend.
- Debian/Ubuntu/Mint-based systems:
sudo apt update && sudo apt upgrade(for updates),sudo apt install [package-name](to install). - Fedora-based systems:
sudo dnf update,sudo dnf install [package-name]. - Arch-based systems:
sudo pacman -Syu,sudo pacman -S [package-name].
The command line, while intimidating to some, is a powerful tool for productivity and system management, representing a deeper level of engagement with technology.
- Debian/Ubuntu/Mint-based systems:
- Customize Your Desktop Environment: Linux offers unparalleled customization.
- Themes and Icons: Explore settings to change desktop themes, icon packs, cursors, and fonts. Websites like GNOME-Look.org or Pling.com offer a plethora of options.
- Wallpapers and Widgets: Personalize your desktop with dynamic wallpapers, conky widgets for system monitoring, or custom panels.
- Dock/Panel Configuration: Adjust your dock or panel (e.g., Latte Dock, Plank) to suit your workflow, adding launchers for frequently used applications.
Customization not only makes your system aesthetically pleasing but also can boost productivity by tailoring the environment to your specific needs, fostering a sense of personal ownership and digital “brand.”
IV. Embracing the Linux Ecosystem: Beyond the Installation
Installing Linux is more than just putting a new operating system on your computer; it’s an entry point into a vibrant global community and a philosophy of openness and collaboration. Your journey with Linux is a continuous learning experience that offers significant benefits, both technical and personal.
A. The Advantages of Choosing Linux
Why bother with Linux when commercial alternatives are so prevalent? The reasons are compelling and align perfectly with themes of informed technological choices and financial acumen:
- Security: Linux is inherently more secure than Windows due to its permission-based file system, open-source nature (allowing for peer review of code), and smaller attack surface (fewer users, less target for malware). While not impervious, it requires significantly less vigilance against viruses and spyware. This makes it a prime choice for digital security, a critical aspect of modern “Tech” trends.
- Stability and Reliability: Linux systems are renowned for their stability. They often run for months or even years without needing a reboot, making them ideal for servers and workstations where uptime is critical.
- Performance: Linux can breathe new life into older hardware, thanks to its efficient resource management and a variety of lightweight desktop environments. This extends the lifespan of your gadgets, saving you “Money” on new purchases.
- Customization: As discussed, Linux offers unparalleled control over your operating system’s appearance and behavior. You can tailor it precisely to your preferences and workflow.
- Open Source & Free: The vast majority of Linux and its associated software is free to use, modify, and distribute. This eliminates licensing costs, making it a highly attractive option from a “Money” perspective, particularly for businesses and educational institutions.
- Community Support: A massive, active, and helpful global community backs Linux. Forums, wikis, and online communities are readily available to assist with any questions or issues you encounter. This collaborative spirit is a hallmark of the open-source “Brand.”
- Learning Opportunity: Using Linux often encourages a deeper understanding of how computers work, fostering technical literacy and problem-solving skills, valuable assets in today’s tech-driven world.
B. Common Troubleshooting and Resources
While modern Linux installations are generally smooth, issues can occasionally arise. Here’s how to approach them:
- Black Screen after Install: Often related to graphics drivers. Try booting into a recovery mode or using GRUB boot options (e.g.,
nomodeset) to get to a desktop, then install proprietary drivers. - Wi-Fi Not Working: Your Wi-Fi card might require proprietary drivers or specific firmware. Check your distribution’s documentation or forums for your specific hardware model.
- Dual-Boot Issues: If Windows isn’t detected, or Linux won’t boot, you might need to repair the GRUB bootloader or ensure UEFI settings (like Secure Boot) are configured correctly.
- Resources:
- Distribution-Specific Forums/Wikis: Each distro has its dedicated community. Ubuntu Forums, Ask Ubuntu, Arch Wiki are invaluable resources.
- Stack Exchange (Ask Ubuntu, Unix & Linux): Excellent for specific technical questions.
- Reddit: Subreddits like
r/linux,r/linux4noobs, and distro-specific subs are very active. - Official Documentation: Always check the official installation guides and troubleshooting sections on your chosen distro’s website.
Embracing the troubleshooting process is part of the Linux learning curve, turning potential frustrations into opportunities for skill development.
Conclusion: Your Gateway to Digital Freedom and Innovation
You’ve successfully navigated the path of “how to install Linux,” transforming your machine into a powerful, secure, and highly customizable computing platform. This journey is more than just a technical installation; it’s an investment in digital autonomy, an exploration of cutting-edge open-source technology, and a step towards a more informed and efficient digital life.
Linux stands as a testament to collaborative innovation, offering solutions that are not only technologically superior in many respects but also economically advantageous by reducing software expenditures and extending hardware utility. For anyone looking to enhance their digital security, improve system performance, or simply gain a deeper understanding and control over their computing environment, Linux provides an unparalleled experience.
As you begin your new chapter with Linux, remember that a vast and supportive community is always at hand. Experiment, customize, and explore the endless possibilities that this remarkable operating system offers. Welcome to the world of Linux – a world where your creativity and productivity know no bounds.
aViewFromTheCave is a participant in the Amazon Services LLC Associates Program, an affiliate advertising program designed to provide a means for sites to earn advertising fees by advertising and linking to Amazon.com. Amazon, the Amazon logo, AmazonSupply, and the AmazonSupply logo are trademarks of Amazon.com, Inc. or its affiliates. As an Amazon Associate we earn affiliate commissions from qualifying purchases.