
Java, a cornerstone of the modern digital world, powers everything from enterprise-level applications and mobile devices to complex scientific software and web servers. For developers, students, or even end-users needing to run specific applications, understanding how to install Java correctly is a fundamental skill. This comprehensive guide will walk you through the entire process, ensuring a smooth setup on various operating systems, while touching upon best practices for digital security and productivity. As a critical piece of software, its proper installation and configuration are vital for both seamless functionality and safeguarding your system, directly impacting your technological fluency and even your financial or professional opportunities in the tech landscape.

Decoding Java: JRE, JDK, and Why It Matters
Before diving into the installation process, it’s crucial to understand what Java actually entails and which component you need. The term “Java” can refer to a few different things, and choosing the right one is the first step towards a successful setup.
JRE vs. JDK: Choosing Your Path
At its core, Java is a programming language and a platform. When you’re looking to install Java, you’re primarily concerned with two main components:
- Java Runtime Environment (JRE): This is for users who only need to run Java applications. The JRE contains the Java Virtual Machine (JVM), core classes, and supporting files. If you’re simply using software built with Java (e.g., Minecraft, LibreOffice on some systems, or various desktop tools), the JRE is what you need. It allows your computer to execute Java bytecode but doesn’t provide tools for development.
- Java Development Kit (JDK): This is for developers who need to write, compile, and debug Java applications. The JDK includes everything in the JRE, plus development tools like the compiler (javac), debugger (jdb), and other utilities. If you’re a programmer, studying computer science, or managing enterprise software, the JDK is your essential toolkit. Installing the JDK will inherently install the JRE components needed to run Java applications.
For most users visiting a website focused on Tech, Brand, and Money, it’s often the JDK that will be more relevant, as it unlocks the full potential for software development, innovation, and ultimately, career growth and financial opportunity within the tech sphere. However, if your need is purely to run an existing application, the JRE is sufficient and often lighter.
Understanding Java Versions and Vendors
Java has evolved significantly over the years, leading to numerous versions (Java 8, Java 11, Java 17, Java 21, etc.) and different vendors (Oracle, OpenJDK, Amazon Corretto, Adoptium, Microsoft OpenJDK, etc.).
- Long-Term Support (LTS) Versions: Oracle, the primary steward of Java, designates certain versions as Long-Term Support (LTS) releases. These versions receive extended maintenance and support, making them popular choices for stable production environments (e.g., Java 8, 11, 17, 21). For most users and developers, sticking to an LTS version is recommended for stability and security.
- Vendors: While Oracle provides an official JDK, its licensing for commercial use changed for newer versions, leading to the rise of various OpenJDK distributions. OpenJDK is the open-source reference implementation of Java, and many companies package and distribute it with their own support and optimizations. Popular choices include Adoptium (Eclipse Temurin), Amazon Corretto, and Microsoft OpenJDK. These are generally free for all uses and are perfectly suitable, often identical in functionality to Oracle’s offering.
When choosing, consider the requirements of the specific applications or development projects you’ll be working on. Most modern projects are shifting towards Java 11 or Java 17, with Java 8 still widely used in legacy systems.
Essential Preparations Before Installation
A smooth installation begins with proper preparation. Ignoring these preliminary steps can lead to conflicts, errors, or security vulnerabilities down the line, affecting your productivity and potentially your digital security.
Checking System Compatibility and Existing Installations
Before you download anything, quickly assess your system:
- Operating System: Determine your operating system (Windows, macOS, Linux) and its architecture (32-bit or 64-bit). Almost all modern systems are 64-bit.
- Existing Java Versions: It’s good practice to check if Java is already installed on your system.
- Windows: Open Command Prompt (CMD) and type
java -version. Also checkjavac -versionif you suspect a JDK is present. - macOS/Linux: Open Terminal and type
java -versionandjavac -version.
If you find older versions, especially if they are conflicting or unnecessary, consider uninstalling them to prevent conflicts and enhance digital security. On Windows, use “Add or Remove Programs.” On macOS, you might need to manually delete specific directories (/Library/Java/JavaVirtualMachines/). On Linux, use your package manager (e.g.,sudo apt remove openjdk-*orsudo yum remove java-*).
- Windows: Open Command Prompt (CMD) and type
Sourcing Your Java Installer: Official Channels
To maintain optimal digital security and avoid malware, always download Java from official and reputable sources. Never download from third-party sites that look suspicious.
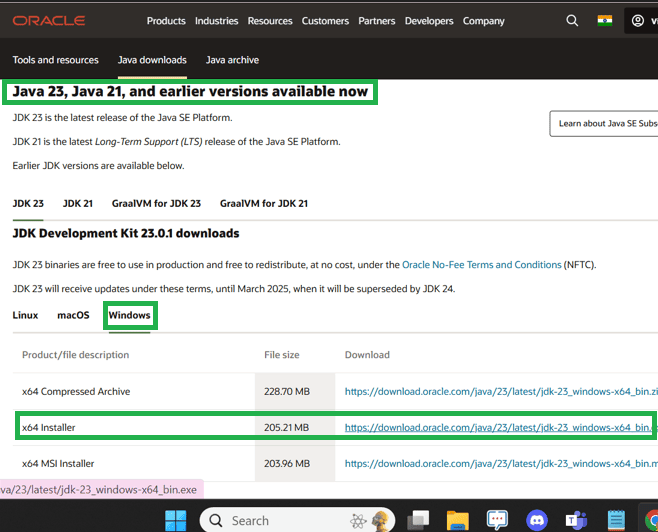
- Oracle JDK: For Oracle’s official distributions (note the licensing for commercial use on newer versions), visit the official Oracle Java SE Downloads page.
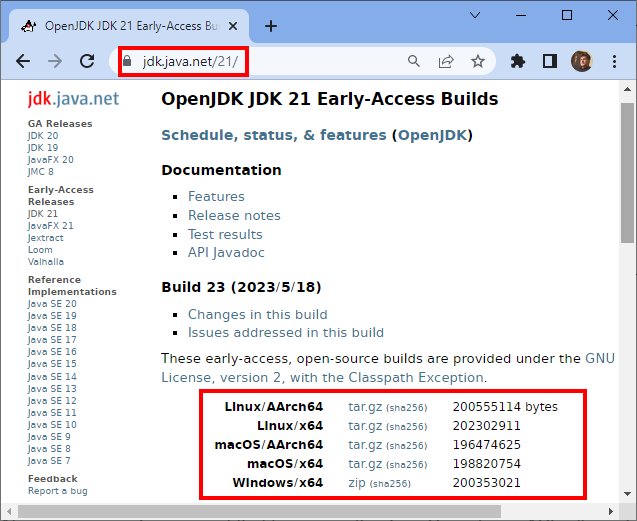
- OpenJDK Distributions: For free and open-source alternatives, which are widely recommended and used:
- Adoptium (Eclipse Temurin): A very popular and reliable source for OpenJDK builds. Visit their website,
adoptium.net. - Amazon Corretto: Amazon’s free, multiplatform, production-ready distribution of OpenJDK. Visit
aws.amazon.com/corretto. - Microsoft OpenJDK: Microsoft’s build of OpenJDK. Find it on the Microsoft Docs website.
- Adoptium (Eclipse Temurin): A very popular and reliable source for OpenJDK builds. Visit their website,
Choose the appropriate version (e.g., Java 17 LTS) and your operating system for the download. This step is crucial for productivity, as a compromised download can lead to system instability and security breaches, impacting your brand as a reliable tech user or developer.
Step-by-Step Installation Across Major Operating Systems
The installation process varies slightly depending on your operating system. Follow the instructions for your specific environment carefully.
Installing Java on Windows
Windows is a common environment for Java development and application usage.
- Download the Installer: Go to your chosen vendor’s website (e.g., Adoptium) and download the appropriate Windows installer (usually an
.msifile) for the desired Java version (e.g.,jdk-17_windows-x64_bin.msi). - Run the Installer: Locate the downloaded
.msifile and double-click it. - Follow the Wizard:
- Click “Next” on the welcome screen.
- You can change the installation directory if desired, but the default location (usually
C:Program FilesJavajdk-<version>) is generally fine. Click “Next.” - The installer will proceed. You might see a progress bar.
- Once completed, click “Close.”
- Verify Installation: Open Command Prompt (CMD) and type
java -version. You should see the newly installed Java version displayed. To verify the JDK, also typejavac -version. If these commands are not recognized, you’ll need to manually configure environment variables, which we’ll cover in the next section.
Installing Java on macOS
macOS users also rely heavily on Java for various applications and development tasks.
- Download the Installer: Head to your chosen vendor’s website and download the macOS installer. This is typically a
.pkgfile or sometimes a.dmgfile that contains the.pkg. Choose the correct architecture (x64 for Intel, ARM64 for Apple Silicon like M1/M2/M3). - Mount and Run: If it’s a
.dmgfile, double-click it to mount the disk image. Then, double-click the.pkgfile inside. - Follow the Wizard:
- Click “Continue” through the introduction.
- Agree to the license terms.
- Click “Install.” You might be prompted for your macOS password.
- Wait for the installation to complete.
- Click “Close.”
- Verify Installation: Open Terminal and type
java -version. You should see the installed Java version. For JDK verification, also typejavac -version. macOS often manages the default Java version in/usr/libexec/java_home, but individual installations might require manual path configuration for specific projects or IDEs.
Installing Java on Linux Distributions
Linux offers flexibility, but installation methods vary depending on your distribution (e.g., Ubuntu/Debian, CentOS/RHEL).
Using Package Managers (Recommended for OpenJDK)
This is the easiest and most secure method for OpenJDK distributions on most Linux systems.
For Ubuntu/Debian-based systems:
- Update Package Index: Open Terminal and run:
bash

sudo apt update
- Install JDK (e.g., OpenJDK 17):
bash

sudo apt install openjdk-17-jdk
(Replaceopenjdk-17-jdkwithopenjdk-11-jdkor another version if needed.) - Set Default Java (if multiple versions):
bash

sudo update-alternatives --config java

sudo update-alternatives --config javac
Choose the desired version from the list.
For CentOS/RHEL/Fedora-based systems:
- Update Packages: Open Terminal and run:
bash

sudo yum update
or
bash

sudo dnf update
- Install JDK (e.g., OpenJDK 17):
bash

sudo yum install java-17-openjdk-devel
or
bash

sudo dnf install java-17-openjdk-devel
(Replacejava-17-openjdk-develwithjava-11-openjdk-develor another version.)
Manual Installation (for specific distributions or vendor builds)
If you’re installing a specific vendor’s build (e.g., Oracle JDK) or prefer a manual setup:
-
Download the
.tar.gzarchive: From your chosen vendor, download the Linux x64.tar.gzarchive for your desired Java version. -
Extract the Archive: Move the downloaded file to a preferred location (e.g.,
/opt/java/or/usr/local/java/). Create the directory if it doesn’t exist.
bash

sudo mkdir -p /usr/local/java

sudo mv jdk-<version>_linux-x64_bin.tar.gz /usr/local/java/

cd /usr/local/java

sudo tar -xzf jdk-<version>_linux-x64_bin.tar.gz

sudo rm jdk-<version>_linux-x64_bin.tar.gz
-
Set Environment Variables: This is crucial and covered in the next section.
-
Verify Installation: Open Terminal and type
java -versionandjavac -version.
Verifying Your Java Setup and Environment Configuration
Once installed, it’s essential to confirm that Java is correctly recognized by your system and to configure environment variables for optimal use, especially for developers and scripting. This step is critical for seamless productivity and avoiding frustrating “command not found” errors.
Confirming Installation with the Command Line
After installation, the first thing you should always do is verify it. This confirms that the executables are in your system’s PATH.
- Open Command Prompt (Windows) or Terminal (macOS/Linux).
- Type:
bash

java -version
You should see output similar to this (version numbers will vary):
openjdk version "17.0.8" 2023-07-18

OpenJDK Runtime Environment Temurin-17.0.8+7 (build 17.0.8+7)

OpenJDK 64-Bit Server VM Temurin-17.0.8+7 (build 17.0.8+7, mixed mode, sharing)
- For JDK users, also type:
bash

javac -version
You should see:
javac 17.0.8
If these commands return a “command not found” or an incorrect version, you likely need to configure your environment variables.
Configuring JAVA_HOME and PATH Variables
Environment variables tell your operating system where to find Java executables and associated files. This is particularly important for development tools and IDEs.
- PATH Variable: The
PATHvariable tells your system directories where executable programs are located. When you typejavaorjavac, the system searches these directories. - JAVA_HOME Variable: The
JAVA_HOMEvariable points to the root directory of your Java installation (e.g.,C:Program FilesJavajdk-17or/usr/local/java/jdk-17). Many Java applications, build tools (like Maven or Gradle), and IDEs rely onJAVA_HOMEto locate the correct Java installation.
Setting Environment Variables on Windows
- Find Java Path: Navigate to your Java installation directory (e.g.,
C:Program FilesJavajdk-17). Copy this path. - Open System Properties: Search for “Environment Variables” in the Windows search bar and select “Edit the system environment variables.” Click “Environment Variables…” button.
- Set JAVA_HOME:
- Under “System variables,” click “New.”
- Variable name:
JAVA_HOME - Variable value: Paste your Java installation path (e.g.,
C:Program FilesJavajdk-17). - Click “OK.”
- Update PATH:
- Under “System variables,” find and select the “Path” variable. Click “Edit.”
- Click “New” and add
%JAVA_HOME%bin. Make sure this entry is moved up in the list if there are other Java paths that might conflict. - Click “OK” on all windows to close.
- Test: Open a new Command Prompt and re-run
java -versionandjavac -version. Also, typeecho %JAVA_HOME%to confirm the variable is set.
Setting Environment Variables on macOS/Linux
- Find Java Path: The location depends on your installation. If you used a manual
.tar.gzextraction, it’s where you extracted it (e.g.,/usr/local/java/jdk-17.0.8). If installed via package manager, it might be in/usr/lib/jvm/java-17-openjdkor similar. - Edit Shell Configuration: Open your shell configuration file (e.g.,
.bashrc,.zshrc,.profile) in your home directory with a text editor.
bash

nano ~/.bashrc  # or ~/.zshrc for Zsh users
- Add Lines: Add the following lines to the end of the file, replacing the path with your actual Java installation path:
bash

export JAVA_HOME=/usr/local/java/jdk-17.0.8 # Replace with your actual path

export PATH=$JAVA_HOME/bin:$PATH
- Apply Changes: Save the file and close the editor. Then, apply the changes by sourcing the file:
bash

source ~/.bashrc # or source ~/.zshrc
- Test: Open a new Terminal window and run
java -version,javac -version, andecho $JAVA_HOME.
Troubleshooting Common Installation Issues
- “java: command not found” / “javac: command not found”: This almost always means your
PATHenvironment variable is not correctly configured or the changes haven’t taken effect (open a new terminal/CMD). - Wrong Java Version Detected: If
java -versionshows an older version, multiple JREs/JDKs might be installed. Ensure yourPATHvariable prioritizes the desired Java version, andJAVA_HOMEpoints to it. On Linux,update-alternativescan help. - Installer Errors: Check system requirements (OS version, architecture), disk space, and antivirus software that might interfere. Redownload the installer if you suspect corruption.
- Permissions Issues: On Linux/macOS, ensure you have
sudoprivileges for system-wide installations. For manual installations, ensure the Java directory has appropriate read/execute permissions for the user.
Addressing these issues promptly ensures that your investment in setting up your tech environment translates into improved productivity and efficiency.
Maintaining Your Java Environment and Beyond
Installing Java is a one-time process, but maintaining it is ongoing. Regular updates and understanding its broader context are crucial for digital security, peak performance, and leveraging Java’s enduring role in technology.
Staying Secure with Regular Updates
Security is paramount in the digital world. Java, like any widely used software, can be a target for vulnerabilities.
- Patch Releases: Vendors regularly release critical patch updates (CPUs) that address security flaws and bugs. Always keep your Java installation updated to the latest minor version within your chosen major release (e.g., if using Java 17, update to 17.0.8, then 17.0.9, etc.).
- Upgrade LTS Versions: When new LTS versions become available (e.g., moving from Java 11 to Java 17), assess the benefits and plan for an upgrade. Newer versions often bring performance improvements and new language features, enhancing productivity and enabling new technological trends.
- Source Updates Securely: Always download updates from the same official vendor channels you used for the initial installation to prevent malicious software.
Maintaining an updated Java environment is a fundamental aspect of digital security and ensures your applications run smoothly and efficiently, protecting your data and your system’s integrity.
Java’s Role in a Dynamic Tech Landscape
Beyond just installation, understanding Java’s ongoing relevance connects directly with the “Tech” and “Money” aspects of our website’s main topics. Java remains a critical language for:
- Enterprise Applications: Many large-scale systems, financial services, and back-end services run on Java, driven by its stability, scalability, and robust ecosystem.
- Android Development: While Kotlin is growing, Java remains fundamental for Android application development, offering extensive libraries and a massive existing codebase.
- Big Data Technologies: Frameworks like Apache Hadoop, Spark, and Kafka, essential for data science and AI, are often built with Java or Scala (which runs on the JVM).
- Cloud Computing: Java applications are widely deployed in cloud environments, benefiting from its cross-platform compatibility and performance.
Proficiency in Java development or even just managing Java-based systems can significantly impact your career trajectory and earning potential in the tech industry. From contributing to cutting-edge AI tools to building resilient financial platforms, Java skills are highly valued. A well-maintained Java environment ensures you’re always ready to engage with these powerful technologies, supporting both your personal branding as a capable tech professional and your financial growth.
By diligently following these steps, you not only ensure a functional Java installation but also establish a foundation for secure and productive engagement with a vast array of technologies powered by this enduring programming language.
aViewFromTheCave is a participant in the Amazon Services LLC Associates Program, an affiliate advertising program designed to provide a means for sites to earn advertising fees by advertising and linking to Amazon.com. Amazon, the Amazon logo, AmazonSupply, and the AmazonSupply logo are trademarks of Amazon.com, Inc. or its affiliates. As an Amazon Associate we earn affiliate commissions from qualifying purchases.