
In an era defined by digital interactions, your web browser isn’t just a tool; it’s your gateway to information, productivity, and entertainment. While macOS comes equipped with Safari, many users seek alternative browsers that align with their specific needs for privacy, customization, and performance. Mozilla Firefox stands out as a leading contender, celebrated for its robust privacy features, open-source development, and commitment to user empowerment. If you’re looking to enhance your browsing experience on your Apple device, installing Firefox on your Mac is a straightforward process that unlocks a world of possibilities. This comprehensive guide will walk you through every step, from download to optimization, ensuring a seamless transition and a powerful new browsing partner.
Why Choose Firefox for Your Mac?
Before delving into the technicalities of installation, it’s worth understanding why millions of users worldwide, including a significant number of Mac users, opt for Firefox. Its reputation is built on a foundation of user-centric values, offering distinct advantages over its competitors, particularly in areas critical to modern digital citizenship: privacy, customization, and performance.
A Commitment to Privacy and Security
In an increasingly data-driven world, privacy is paramount. Firefox has long been at the forefront of the fight for user data protection. Unlike some browsers tied to advertising empires, Mozilla, the non-profit organization behind Firefox, prioritizes your online anonymity. It boasts an Enhanced Tracking Protection feature that automatically blocks a wide range of common trackers, cryptominers, and fingerprinters, giving you greater control over who collects your data. Furthermore, Firefox offers robust built-in password management, secure DNS over HTTPS (DoH) for encrypted lookups, and a clear, transparent privacy policy, making it an ideal choice for users concerned about their digital security posture.
Unleash Customization and Open-Source Power
For users who appreciate tailoring their software to their precise workflow, Firefox offers unparalleled flexibility. Its open-source nature means a vibrant community constantly contributes to its development and a rich ecosystem of add-ons and extensions is readily available. From productivity tools that streamline your tasks to privacy extensions that further harden your browsing, the Firefox Add-ons store provides thousands of options. Beyond functionality, you can personalize Firefox’s appearance with themes, customize toolbar layouts, and even tweak advanced settings, transforming it from a generic browser into a personalized command center perfectly suited to your Mac.
Seamless Performance Across Your Devices
While known for its feature set, Firefox doesn’t compromise on speed or efficiency. Mozilla consistently invests in performance optimizations, ensuring a fast, fluid browsing experience even with multiple tabs open. Furthermore, Firefox Sync allows for seamless integration across all your devices – Mac, iPhone, iPad, Windows, or Android. Your bookmarks, browsing history, open tabs, passwords, and even add-ons can be synchronized securely, meaning you can pick up exactly where you left off, regardless of the device you’re using. This cross-device capability significantly enhances productivity and ensures a consistent user experience.
Step-by-Step Guide to Installing Firefox on macOS
The installation process for Firefox on a Mac is designed to be intuitive and user-friendly, consistent with the macOS experience. Follow these steps to get Firefox up and running on your system in minutes.
Downloading the Firefox Installer
The first step is to obtain the official Firefox installer. Always download software from its official source to ensure authenticity and security.
- Open your current web browser (e.g., Safari) on your Mac.
- Navigate to the official Mozilla Firefox download page: Type
www.mozilla.org/firefox/download/into the address bar and press Enter. - On the download page, the website should automatically detect your operating system (macOS) and offer the correct version.
- Click the “Download Firefox” button. The installer file, typically named something like
Firefox.dmg, will begin downloading to your Mac’s “Downloads” folder. This file is usually several hundred megabytes, so the download time will vary depending on your internet connection speed.
Dragging Firefox to Your Applications Folder
Once the download is complete, you’ll need to move Firefox into your Applications folder, which is the standard procedure for installing most software on macOS.
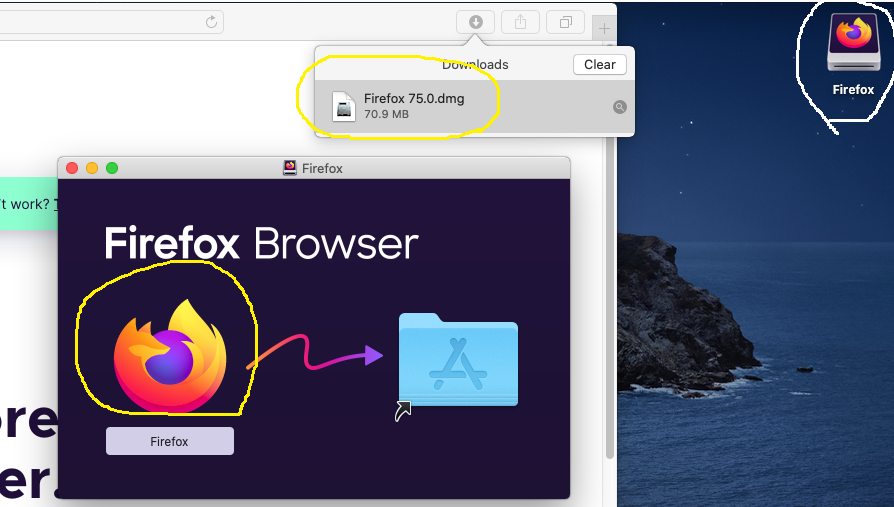
- Locate the downloaded
Firefox.dmgfile. You can find it in your “Downloads” folder, or it might appear directly on your desktop or in the Safari downloads list. - Double-click the
Firefox.dmgfile. This will open a new Finder window displaying a disk image. Inside, you’ll typically see the Firefox application icon and an arrow pointing to your Applications folder. - Drag the “Firefox” application icon from this window directly into the “Applications” folder alias. This action copies the Firefox application to your Mac’s main applications directory.
- Once the copying process is complete, you can eject the disk image. Simply drag the “Mozilla Firefox” disk image icon from your desktop (or sidebar in Finder) to the Trash, or right-click it and choose “Eject ‘Mozilla Firefox’.” You can also delete the original
Firefox.dmgfile from your Downloads folder to save space, as it’s no longer needed.
Launching Firefox for the First Time
With Firefox now in your Applications folder, you’re ready to launch it and begin your browsing journey.
- Open your “Applications” folder. You can do this by clicking on its icon in the Finder sidebar or by navigating through Finder.
- Locate the “Firefox” application icon and double-click it.
- The first time you launch an application downloaded from the internet, macOS Gatekeeper security features will prompt you with a message like: “Firefox is an app downloaded from the Internet. Are you sure you want to open it?” Click “Open” to confirm. This is a standard security measure and does not indicate an issue with Firefox.
- Firefox will now launch, presenting you with its welcome screen. Here, you’ll have options to import data from another browser (like Safari or Chrome), set Firefox as your default browser, or simply start browsing.
Post-Installation: Optimizing Your Firefox Experience
Installing Firefox is just the beginning. To truly harness its power and make it work best for your workflow, there are a few post-installation steps you can take to customize and optimize your new browser.
Setting Firefox as Your Default Browser

Making Firefox your default browser means that all web links clicked from emails, documents, or other applications will automatically open in Firefox.
- When you launch Firefox for the first time, you’ll likely see a prompt asking if you want to make it your default. If you do, click “Use Firefox as my default browser.”
- If you missed the prompt or want to change it later, go to Firefox’s menu bar > Firefox > Preferences (or Settings on newer macOS versions).
- In the “General” panel, look for the “Startup” section. You’ll see an option that says “Make Firefox the default browser.” Click the button next to it.
- Your Mac’s System Settings (or System Preferences) will open to the “Desktop & Dock” (or “General”) section. Here, you can select Firefox from the “Default web browser” dropdown menu.
Importing Data and Customizing Settings
Transitioning to a new browser is easier when your existing data comes along. Firefox makes it simple to import your bookmarks, passwords, history, and more.
- Upon first launch, Firefox often offers an “Import Data” option. Follow the on-screen prompts to select which browser you’d like to import from (e.g., Safari, Chrome) and what data you wish to transfer.
- To import data later or to fine-tune your settings, go to Firefox’s menu bar > Firefox > Preferences (or Settings).
- Explore the various panels:
- General: Manage startup settings, language, downloads, and performance.
- Search: Set your default search engine and manage search shortcuts.
- Privacy & Security: This is a crucial section. Configure Enhanced Tracking Protection (Standard, Strict, or Custom), manage cookies, site permissions, login and passwords, and enable DNS over HTTPS for enhanced security.
- Sync: Set up Firefox Sync to synchronize your data across devices.
- Visit the Firefox Add-ons site (accessible via Preferences > Extensions & Themes or by typing
about:addonsin the address bar) to discover and install extensions that enhance productivity, security, or add new functionalities.
Enhancing Security and Privacy Further
Firefox offers robust built-in privacy tools, but you can take additional steps to harden your browser’s security profile.
- Fine-tune Enhanced Tracking Protection (ETP): In Settings > Privacy & Security, review the ETP options. While “Standard” is good, consider “Strict” for maximum blocking, though it might occasionally break some websites. “Custom” allows you to manually select what to block.
- Enable DNS over HTTPS (DoH): This encrypts your DNS queries, making it harder for third parties to snoop on your browsing habits. In Settings > General > Network Settings, click “Settings…” and check “Enable DNS over HTTPS.” You can choose a provider like Cloudflare or NextDNS.
- Regularly review permissions: Under Settings > Privacy & Security > Permissions, you can manage which websites have access to your camera, microphone, location, and notifications.
- Consider privacy-focused extensions: While Firefox’s built-in tools are strong, extensions like uBlock Origin (an efficient blocker), HTTPS Everywhere (ensures encrypted connections), or a VPN extension can further bolster your online privacy and security.
Maintaining and Managing Firefox
Like any software, Firefox requires occasional maintenance to ensure it runs optimally, securely, and with the latest features.
Keeping Firefox Up-to-Date
Updates are vital for security patches, performance improvements, and new features. Firefox typically updates automatically in the background.
- To manually check for updates, go to Firefox’s menu bar > Firefox > About Firefox.
- A window will appear, and Firefox will automatically check for and download any available updates. Once downloaded, you’ll be prompted to restart Firefox to apply the update. It’s crucial to always run the latest version for the best security and performance.
How to Uninstall Firefox from Your Mac
Should you ever decide that Firefox is no longer for you, uninstalling it from your Mac is straightforward.
- Quit Firefox completely. Go to Firefox’s menu bar > Firefox > Quit Firefox, or press
Command (⌘) + Q. - Open your “Applications” folder in Finder.
- Drag the “Firefox” application icon to the Trash.
- Empty the Trash.
- Optional: Remove profile data. If you want a truly clean uninstall, you may also want to remove your Firefox profile folder, which contains your bookmarks, history, passwords, and settings. To do this:
- Open Finder and press
Shift (⇧) + Command (⌘) + Gto open the “Go to Folder” dialog. - Type
~/Library/Application Support/Firefox/Profiles/and click “Go.” - This folder contains subfolders with random names (e.g.,
xxxxxxxx.default-release). Drag these profile folders (or the entire “Firefox” folder if you’re sure you want to remove all data) to the Trash. Be aware that this will permanently delete all your user data associated with Firefox.
- Open Finder and press
Troubleshooting Common Firefox Installation Issues
While the installation process is generally smooth, occasionally users might encounter minor hurdles. Here are solutions to some common problems.
“Cannot Open Because Developer Cannot Be Verified” Error
This is a standard macOS security feature (Gatekeeper) for apps downloaded outside the App Store.
- Instead of double-clicking the app, right-click (or Control-click) the Firefox icon in your Applications folder.
- Select “Open” from the contextual menu.
- You’ll get a similar warning, but this time, clicking “Open” will allow Firefox to launch and bypass the block for future launches.
Installation Freezes or Fails
If the .dmg mounting or file copying process freezes or fails:
- Ensure your internet connection is stable during the download.
- Try re-downloading the
Firefox.dmgfile. The original download might have been corrupted. - Close other applications that might be consuming significant system resources.
- Restart your Mac and try the installation process again.
Firefox Not Launching After Installation
If Firefox doesn’t open after successful installation:
- Restart your Mac. Sometimes a system restart can resolve minor software glitches.
- Check for existing Firefox processes. Open “Activity Monitor” (Applications > Utilities), search for “Firefox,” and if any processes are running, select and quit them. Then try launching Firefox again.
- Perform a clean reinstallation. Follow the uninstall steps above (including deleting profile data) and then reinstall Firefox from scratch.

Conclusion
Installing Firefox on your Mac is a straightforward process that grants you access to a powerful, privacy-focused, and highly customizable web browser. By following the steps outlined in this guide, you can quickly get Firefox up and running, optimize its settings for your needs, and enjoy a browsing experience tailored for security, performance, and personal preference. Embrace the open web with Firefox, knowing that your digital journey is supported by a browser committed to putting you in control.
aViewFromTheCave is a participant in the Amazon Services LLC Associates Program, an affiliate advertising program designed to provide a means for sites to earn advertising fees by advertising and linking to Amazon.com. Amazon, the Amazon logo, AmazonSupply, and the AmazonSupply logo are trademarks of Amazon.com, Inc. or its affiliates. As an Amazon Associate we earn affiliate commissions from qualifying purchases.