In the ever-evolving landscape of technology, few components hold as much sway over a computer’s performance as the graphics card, or GPU. Whether you’re a hardcore gamer chasing the highest frame rates, a content creator rendering intricate 3D models, or simply someone looking to breathe new life into an aging system, understanding how to install a graphics card is a fundamental skill. It’s an empowering DIY project that not only saves you money but also deepens your understanding of the technology that drives your digital life. This guide will walk you through every step, ensuring a smooth, secure, and successful upgrade, touching upon not just the technical “how-to” but also the financial wisdom and strategic thinking behind such an investment.
The Essential Pre-Installation Checklist: Gearing Up for Success
Before you even think about opening your PC case, thorough preparation is paramount. This initial phase involves selecting the right hardware, gathering your tools, and making critical software preparations. Neglecting these steps can lead to compatibility issues, installation headaches, or even damage to your valuable components.
Selecting the Right GPU for Your Needs
The first and arguably most crucial step is choosing a graphics card that aligns with your performance goals, budget, and existing system specifications. This decision is a blend of technological prowess and financial savvy.
- Compatibility is Key: Your new GPU must be compatible with your motherboard’s PCIe slot (most modern GPUs use PCIe x16, but check generations like PCIe 3.0, 4.0, or 5.0). More importantly, your Power Supply Unit (PSU) must have sufficient wattage and the correct PCIe power connectors (e.g., 6-pin, 8-pin, or the newer 12VHPWR). Underpowering a GPU can lead to instability or even prevent it from booting. Consult online PSU calculators to estimate your system’s total power draw with the new GPU.
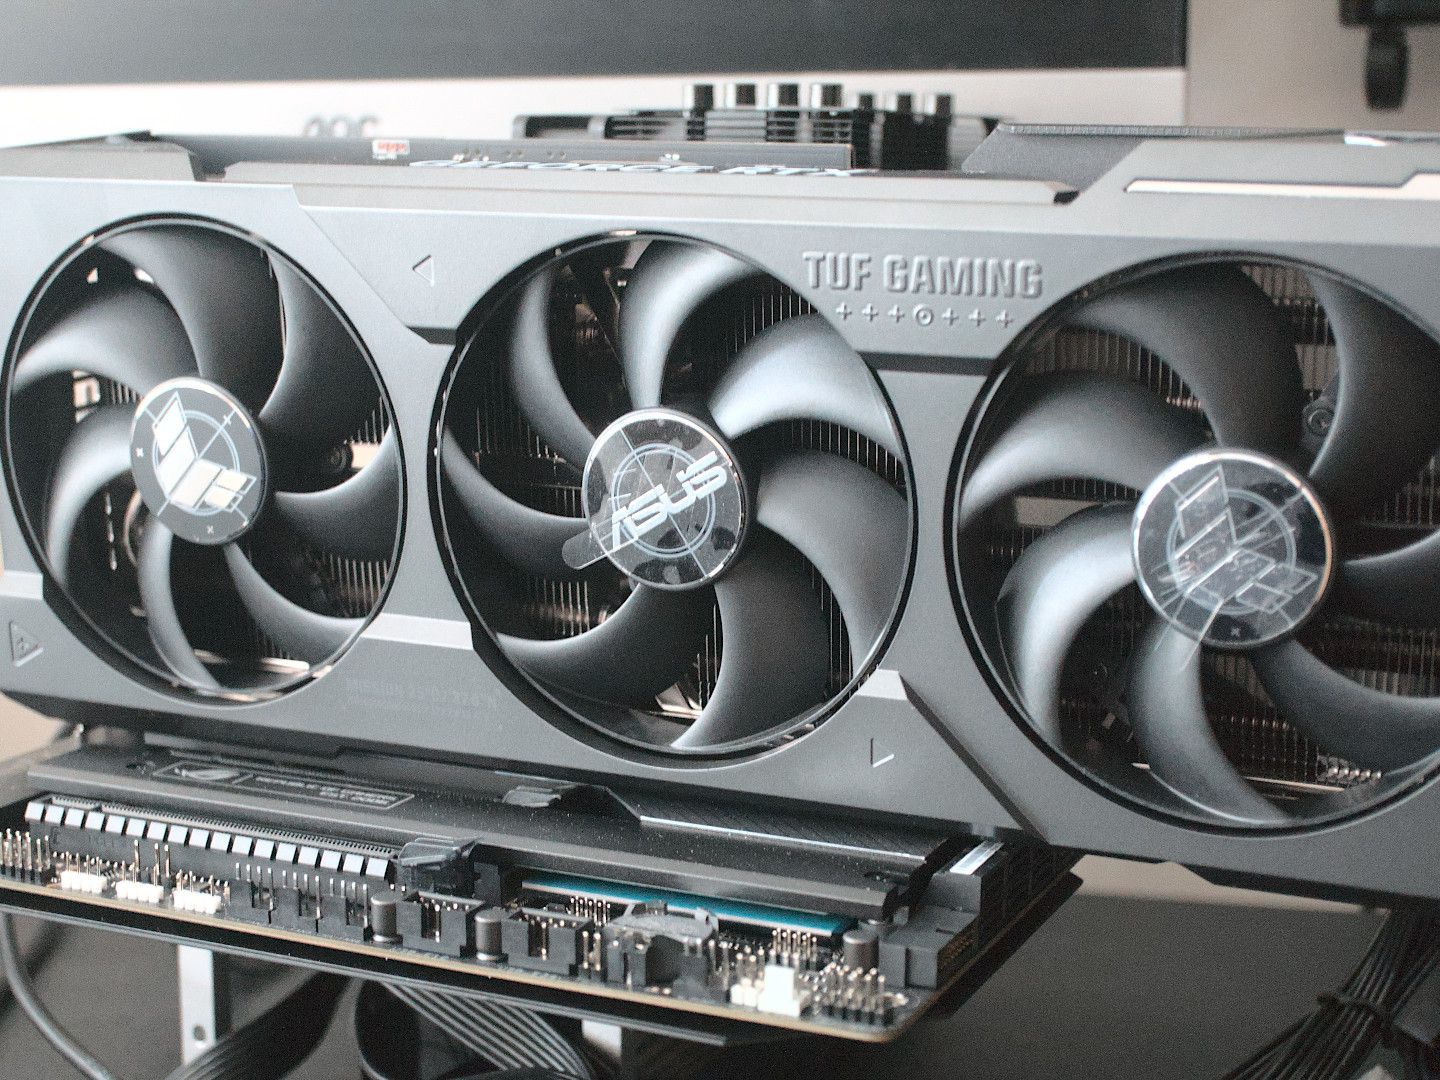
- Physical Fit: Ensure your PC case has enough physical clearance for the card’s length, height, and width. High-end GPUs can be surprisingly large, often occupying two or even three expansion slots.
- Performance vs. Budget: This is where the “Money” aspect of our website truly comes into play. Evaluate your use case:
- Gaming: Are you aiming for 1080p, 1440p, or 4K resolution? What refresh rate is your monitor? Higher resolutions and refresh rates demand more powerful (and expensive) cards. Research benchmarks for the games you play.
- Content Creation/Productivity: Video editing, 3D rendering, AI development, and graphic design heavily leverage GPU acceleration. Consider cards with ample VRAM (Video RAM) and strong compute performance from brands like NVIDIA (known for CUDA cores) or AMD (known for OpenCL).
- Budgeting for the Future: Sometimes, spending a bit more now can save you from needing another upgrade sooner, offering better long-term value. Conversely, don’t overspend if a mid-range card meets your needs perfectly. Understanding the market, monitoring sales, and comparing price-to-performance ratios are crucial “Money” skills here.
Gathering Your Toolkit
Having the right tools at hand makes the process smoother and safer.
- Phillips Head Screwdriver: The most essential tool for opening your case, removing expansion slot covers, and securing the GPU. Magnetic tips are a bonus for preventing dropped screws.
- Anti-Static Wrist Strap: This is non-negotiable for digital security. Static electricity, even a small discharge, can permanently damage sensitive computer components. An anti-static strap safely grounds you to the PC chassis, neutralizing any static buildup.
- Flashlight or Headlamp: PC interiors can be dark, and a good light source helps locate small screws, connectors, and ensure proper seating.
- Zip Ties or Velcro Cable Ties: For neatening up power cables and improving airflow once the card is installed (contributing to overall system productivity and longevity).
- Can of Compressed Air: Useful for dusting out your case and existing components before installation, improving cooling efficiency.
Critical Software Preparations
Preparing your software environment before hardware changes can prevent conflicts and ensure a clean slate for your new GPU.
- Backup Your Data: While a GPU installation is generally safe, it’s always prudent to back up critical data (documents, photos, projects) to an external drive or cloud service. This falls under good “Digital Security” practices and provides peace of mind.
- Download New Drivers: Visit the website of your new GPU’s manufacturer (NVIDIA or AMD) and download the latest drivers for your specific card and operating system. Having them ready means you won’t be stuck with a basic display after installation.
- Uninstall Old Drivers (If Replacing an Existing Card): If you’re swapping out an old GPU, especially one from a different manufacturer (e.g., AMD to NVIDIA), it’s crucial to uninstall the old drivers before removing the card. Tools like Display Driver Uninstaller (DDU) can help perform a clean and thorough removal in Safe Mode, preventing potential software conflicts and performance issues with your new card.
Disassembly and Safeguarding Your System: Clearing the Path
With your preparations complete, it’s time to physically interact with your PC. This phase focuses on safely opening your system and removing the old graphics card, if applicable, while protecting against static discharge.
Powering Down and Disconnecting
Safety is paramount when working with electronics.
- Complete Shutdown: Perform a full shutdown of your operating system. Do not just put the computer to sleep.
- Unplug Everything: Disconnect the power cable from the wall outlet and from the back of your PC’s power supply. This is a critical safety step to prevent electric shock.
- Discharge Residual Power: Press and hold the power button on your PC for 10-15 seconds. This helps discharge any residual electricity stored in the capacitors, further safeguarding your components.
- Disconnect Peripherals: Unplug your monitor, keyboard, mouse, speakers, and any other USB devices or cables connected to your PC. This clears your workspace and prevents accidental tugging.
Opening the PC Case and Grounding Yourself
Accessing the internals requires opening the case. This is also the point where anti-static measures become critical.
- Locate Screws: Most PC cases have thumbscrews or standard screws at the rear that secure the side panel. Unscrew these and carefully slide or swing open the side panel, usually the left side when viewed from the front.
- Work on a Flat, Clean Surface: A large table or desk provides ample space. Avoid working on carpet, which can generate static electricity.
- Ground Yourself: Put on your anti-static wrist strap and attach its clip to an unpainted metal part of your PC case. This ensures you are constantly grounded, equalizing electrical potential between you and the components, thus preventing static discharge. If you don’t have a strap, frequently touch an unpainted metal part of the case.
Removing the Old Graphics Card (If Applicable)
If you’re upgrading an existing GPU, you’ll need to carefully remove the old one.
- Unplug Power Cables: Locate any PCIe power cables (6-pin, 8-pin, or 12VHPWR) connected to the old graphics card. Gently squeeze the release clip on the connector and pull the cable straight out. Never yank the cables.
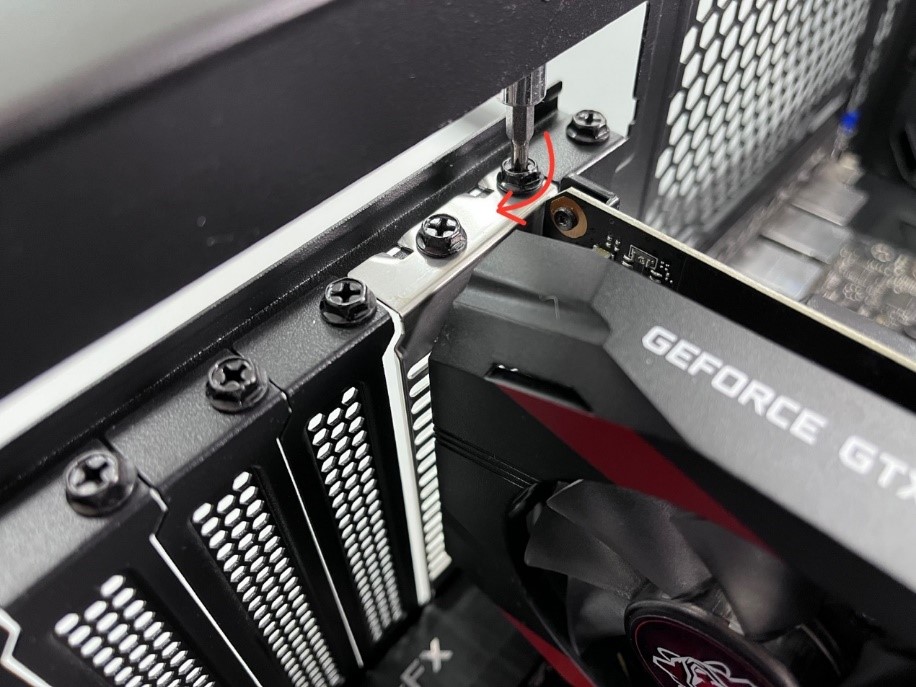
- Unscrew Mounting Bracket: The graphics card is typically secured to the PC case at the rear with one or two screws that go through its mounting bracket into the expansion slot area. Unscrew these and set them aside.
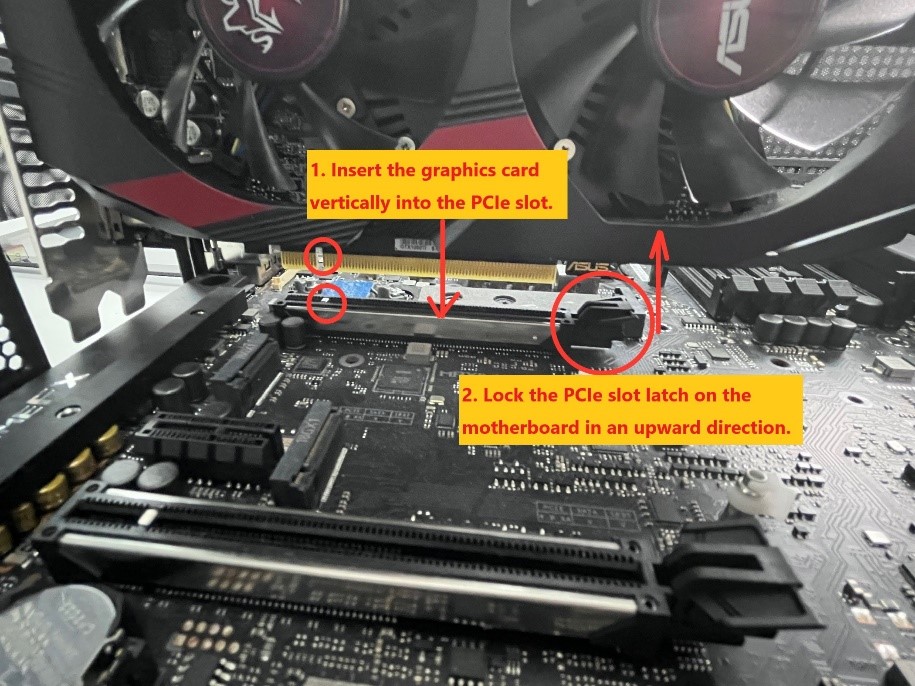
- Release PCIe Latch: At the end of the PCIe slot on the motherboard, you’ll find a small plastic or metal latch. This latch secures the graphics card in place. Gently push or pull this latch away from the card to release it. Be careful not to force it, as these latches can be delicate.
- Gently Remove the Card: With the power cables unplugged, screws removed, and the PCIe latch released, carefully grasp the old graphics card firmly but gently. Wiggle it slightly and pull it straight up and out of the PCIe slot. Avoid bending or twisting it. Place it in an anti-static bag or its original packaging for storage or resale.
The Core Installation: Seating Your New GPU
This is the moment of truth – installing your brand-new graphics card. Precision and a gentle touch are key here.
Positioning and Securing the New Card
Proper alignment and seating are crucial for the card to function correctly.
- Identify the Primary PCIe Slot: Most motherboards have multiple PCIe x16 slots. For optimal performance, always use the top-most (closest to the CPU) full-length PCIe x16 slot, as this is typically the primary slot offering the highest bandwidth.
- Remove Expansion Slot Covers: Your new GPU will occupy one, two, or even three expansion slots at the back of your case. Remove the corresponding metal covers by unscrewing them or twisting them off, depending on your case design. Store these covers in case you ever need to reinstall them.
- Align and Insert: Carefully align the gold contacts on the bottom edge of your new graphics card with the PCIe x16 slot on the motherboard. Ensure the back bracket of the GPU aligns with the open expansion slots. Gently but firmly push the card straight down into the slot. You should feel it click into place, and the PCIe latch at the end of the slot should automatically close and secure the card. If it doesn’t click, gently push it until it does. Do not force it; if it doesn’t go in easily, double-check the alignment.
- Secure with Screws: Once the card is fully seated and the latch is closed, use the screws you set aside (or new ones that came with your case/GPU) to secure the graphics card’s mounting bracket to the PC case. This prevents the card from sagging or coming loose during transport or operation.
Connecting Auxiliary Power
High-performance GPUs require more power than the PCIe slot alone can provide, necessitating auxiliary power connections directly from your PSU.
- Identify Power Connectors: Locate the 6-pin, 8-pin, or newer 12VHPWR power connectors on the side or top edge of your graphics card. Some cards may require two or even three such connectors.
- Route Cables Neatly: Take the appropriate PCIe power cables from your power supply (they are typically labeled “PCIe” or “VGA”). Route them from behind the motherboard tray or through designated cutouts in your case to maintain good airflow and aesthetics. This attention to detail contributes to a more efficient and productive system by ensuring optimal cooling.
- Plug in Connectors: Gently but firmly plug the power connectors into the corresponding ports on your graphics card. Ensure they click into place and are fully seated. An improperly connected power cable is a common cause of no-display issues.
- Cable Management: Use zip ties or Velcro straps to bundle and secure loose cables. Good cable management isn’t just for looks; it improves airflow within the case, leading to better cooling for all components, including your new GPU.
Reassembling Your PC
With the GPU firmly installed and powered, it’s time to close up the case.
- Replace Side Panel: Carefully slide or swing the side panel back into place and secure it with the screws you removed earlier.
- Reconnect Peripherals: Reconnect your monitor, keyboard, mouse, and other peripherals to the back of your PC. Ensure your monitor is connected to the new graphics card’s display outputs (HDMI, DisplayPort), not the motherboard’s integrated graphics ports (unless you specifically intend to use integrated graphics).
Post-Installation & Optimization: Unleashing Your GPU’s Potential
The physical installation is just the beginning. The next steps involve bringing your GPU to life through software and fine-tuning it for peak performance.
Initial Boot-Up and Driver Installation
The moment of truth: powering on your newly upgraded system.
- First Boot Check: Plug your PC back into the wall outlet and power it on. Your computer should boot up normally, though you might initially see a lower resolution or generic display output as Windows typically uses basic drivers before the dedicated ones are installed. If you get no display, check the “Troubleshooting” section below.
- Install Downloaded Drivers: Once Windows loads, navigate to the driver file you downloaded earlier and run the installer. Follow the on-screen prompts. This process usually involves agreeing to terms, choosing an installation type (often “Express” or “Custom”), and several screen flickers as the drivers are installed. Your screen might go black briefly, which is normal.
- Restart Your PC: After the driver installation is complete, the software will usually prompt you to restart your computer. Do so to finalize the installation and ensure all drivers are loaded correctly.
- Windows Update Considerations: After a restart, Windows might try to automatically install its own version of the graphics drivers. It’s usually best to let the manufacturer’s drivers take precedence. You can often pause Windows updates or ensure your manufacturer’s drivers are installed first.
Testing and Benchmarking Your New Hardware
To truly understand the impact of your upgrade and ensure everything is working as it should, testing is essential.
- System Monitoring Tools: Download and install tools like MSI Afterburner (for monitoring temps, clock speeds, and usage) or HWMonitor. These provide crucial real-time data on your GPU’s performance and health.
- Stress Tests: Run a synthetic benchmark or stress test (e.g., FurMark, Heaven Benchmark, 3DMark) to push your GPU to its limits. Monitor temperatures and stability during these tests. If temperatures consistently exceed safe limits (typically above 85-90°C), you may have cooling issues (case airflow, fan curves).
- Real-World Testing: Launch your favorite games or productivity applications. Test different settings, resolutions, and workloads. Compare performance to your previous setup. For content creators, try rendering a project to see the speed improvement. This direct impact on productivity is a clear ROI (Return on Investment) for your “Money” spent.
Fine-Tuning for Peak Performance
Beyond driver installation, a few tweaks can further optimize your GPU’s performance.
- Graphics Control Panel: Open the NVIDIA Control Panel or AMD Radeon Software. Explore settings like G-Sync/FreeSync (if your monitor supports it), resolution, refresh rate, and global 3D settings. You can often create game-specific profiles.
- In-Game Settings: Experiment with in-game graphics settings. While you want to maximize visuals, finding the sweet spot between visual fidelity and frame rate is key. Monitor your GPU usage and VRAM usage to understand bottlenecks.
- Overclocking (Advanced Tech): For experienced users, carefully overclocking your GPU can squeeze out extra performance. This involves increasing the core clock speed and memory clock speed using software like MSI Afterburner. Always proceed with caution, make small adjustments, and thoroughly test for stability and temperatures. This is an advanced “Tech” skill that can yield significant gains but carries risks.
- Power Settings: Ensure your Windows power plan is set to “High Performance” to allow your GPU to consistently operate at its full potential.
Troubleshooting Common Issues: Navigating Potential Hurdles
Even with meticulous preparation, issues can arise. Knowing how to diagnose and resolve common problems is a valuable skill for any PC enthusiast.
No Display Output
This is perhaps the most common and frustrating issue after a GPU installation.
- Check Monitor Connection: Ensure the display cable (HDMI, DisplayPort) is firmly connected to both your monitor and the new graphics card’s output port. Make sure your monitor is set to the correct input source.
- Check PCIe Power Cables: Double-check that all required PCIe power cables are fully and securely plugged into the graphics card. An unpowered or partially powered card will not output video.
- Reseat the GPU: Power down your PC, unplug it, and open the case. Carefully remove the graphics card and re-seat it firmly into the PCIe slot, ensuring the latch clicks into place. Sometimes, it just needs a second attempt to seat correctly.
- Try a Different PCIe Slot: If your motherboard has multiple PCIe x16 slots, try installing the card in a different one to rule out a faulty slot.
- Clear CMOS: If your PC still won’t POST, try clearing your motherboard’s CMOS (Complementary Metal-Oxide Semiconductor) battery. This resets your BIOS settings to default, which can resolve boot issues. Consult your motherboard manual for the exact procedure (usually involves removing a small battery or shorting specific pins).
- Test with Old GPU/Integrated Graphics: If you have your old GPU, or if your CPU has integrated graphics, try reinstalling/enabling them to verify that the rest of your system is functional. This helps isolate the problem to the new GPU.
Driver-Related Problems
Issues like crashes, artifacts, or poor performance after driver installation often point to driver conflicts.
- Clean Driver Installation with DDU: If you experience driver issues, perform a clean driver installation. Boot into Windows Safe Mode, run Display Driver Uninstaller (DDU) to completely remove all traces of graphics drivers, then reboot and install the latest drivers you downloaded.
- Roll Back Drivers: If a new driver version causes issues, try rolling back to a previous, stable version from the manufacturer’s website.
- Update Windows: Ensure your Windows operating system is fully up to date. Sometimes, older Windows versions can have compatibility issues with the very latest GPU drivers.
Performance Underwhelming
Your new GPU is installed, but the performance isn’t what you expected.
- Check Power Supply (PSU): If your PSU is insufficient for your new GPU, it might lead to performance throttling or crashes under load. Verify your PSU wattage and ensure it meets or exceeds the manufacturer’s recommendation for your GPU.
- CPU Bottleneck: Your CPU might be too old or not powerful enough to keep up with your new, powerful GPU, limiting its full potential. Use system monitoring tools to check CPU usage while gaming/working; if it’s consistently at 90-100%, while GPU usage is lower, your CPU might be the bottleneck.
- Overheating: High temperatures can cause your GPU to throttle its performance to prevent damage. Monitor your GPU temps during heavy loads. Improve case airflow, clean dust, or consider better cooling solutions if temperatures are consistently high.
- Incorrect PCIe Slot: Ensure your GPU is installed in the primary PCIe x16 slot, which offers the full bandwidth (e.g., x16 lanes). Installing it in a lower bandwidth slot (e.g., x8 or x4) can limit performance.
Upgrading your graphics card is a rewarding experience that directly impacts your PC’s capabilities, whether for cutting-edge gaming, professional content creation, or simply extending the life of your system. By following these steps, you not only ensure a successful installation but also gain valuable insights into your computer’s hardware, empowering you to make informed decisions about future upgrades and maintenance. Embracing these “Tech” tutorials allows you to take control of your digital tools, maximizing your “Money” investments by extending hardware longevity and boosting “Productivity” in all your computing endeavors.
aViewFromTheCave is a participant in the Amazon Services LLC Associates Program, an affiliate advertising program designed to provide a means for sites to earn advertising fees by advertising and linking to Amazon.com. Amazon, the Amazon logo, AmazonSupply, and the AmazonSupply logo are trademarks of Amazon.com, Inc. or its affiliates. As an Amazon Associate we earn affiliate commissions from qualifying purchases.