
In an era defined by rapidly evolving technology, our vehicles are no longer just modes of transport; they’ve become extensions of our digital lives. A premium car stereo system can transform commutes into concerts, road trips into immersive audio experiences, and even integrate seamlessly with our smartphones for navigation, communication, and entertainment. While the idea of upgrading your car’s audio system might seem daunting, installing an aftermarket car stereo is a surprisingly accessible DIY project for many car owners. This guide will walk you through the entire process, empowering you to enhance your driving experience while potentially saving a significant sum on professional installation costs.

Far from being just a simple gadget swap, car stereo installation touches upon several key areas relevant to our daily lives: it’s a deep dive into practical Tech skills, offers insights into Money management through DIY savings, and even subtly influences the Brand perception and resale value of your vehicle. Whether you’re a tech enthusiast looking to get hands-on or simply someone who appreciates a good tune, understanding the mechanics behind your car’s sound system is an invaluable skill.
I. The Prerequisites: Laying the Groundwork for a Seamless Upgrade
Before you even think about pulling out tools, thorough preparation is paramount. This initial phase involves critical decision-making and gathering the necessary components to ensure your installation is not just successful, but also safe and perfectly tailored to your needs. Skimping on preparation can lead to frustration, compatibility issues, and even costly damage.
1. Choosing the Right Head Unit: Tech, Brand, and Compatibility
The head unit, often referred to as the car stereo or receiver, is the central command center of your vehicle’s audio system. Its selection is perhaps the most critical step, impacting everything from sound quality to functionality and future upgrade potential.
- Form Factor Compatibility: The first consideration is physical size. Most cars come with either a “single-DIN” (roughly 7×2 inches) or “double-DIN” (7×4 inches) opening. It’s crucial to measure your existing stereo’s opening or consult your car’s manual or an online car audio database to determine the correct size. Attempting to force an incompatible unit will not only look bad but can also damage your dashboard.
- Feature Set: Modern head units boast an impressive array of features. Do you need Apple CarPlay or Android Auto for seamless smartphone integration? Is Bluetooth connectivity a must for wireless audio streaming and hands-free calling? Do you desire a touch screen, built-in navigation, USB ports, or satellite radio compatibility? Prioritize features that align with your daily usage and technology preferences. For example, a unit with robust equalizer settings caters to audiophiles, while one with multiple camera inputs appeals to those enhancing vehicle safety.
- Power Output: While aftermarket head units generally offer more power than factory stereos, dedicated audiophiles might look for higher RMS (Root Mean Square) wattage per channel. Understand that an aftermarket head unit alone might not drastically improve sound if your speakers are still factory and low quality; however, it lays the foundation for future upgrades like amplifiers and subwoofers.
- Brand Reputation and Reliability: Just like any tech gadget, car stereos come from a multitude of manufacturers. Investing in a reputable brand (e.g., Pioneer, Kenwood, Alpine, Sony, JVC) often translates to better build quality, reliable performance, and superior customer support. While a cheaper, lesser-known brand might seem like a good “money” saver upfront, poor audio quality, buggy software, or early failure can quickly make it a regrettable decision. Research reviews and user experiences to inform your choice. A quality brand head unit can also contribute positively to your car’s overall perceived “brand” and resale value.
2. Essential Tools and Materials: Your DIY Arsenal
Having the right tools is half the battle. While a basic installation might only require a few items, having a comprehensive kit will make the process smoother and prevent unnecessary trips to the hardware store. This is where an initial “money” investment in tools pays off in long-term DIY savings.
- Dash Trim Removal Tools: These plastic or nylon pry tools are indispensable for safely removing dashboard panels without scratching or marring them. Do not use metal screwdrivers, as they will almost certainly leave marks.
- Screwdriver Set: You’ll need various Phillips and flathead screwdrivers, sometimes Torx bits, to unmount the old stereo and secure the new one.
- Wire Strippers and Crimpers: Crucial for connecting the wiring harness. A good quality stripper/crimper will ensure secure, reliable connections.
- Electrical Tape or Heat Shrink Tubing: For insulating wire connections. Heat shrink tubing offers a more professional and durable finish.
- Multimeter/Test Light: Essential for identifying constant power, accessory power, ground, and illumination wires if you’re not using a pre-wired harness adapter. This is a vital “tech” tool for diagnostics.
- Wiring Harness Adapter: This is a non-negotiable component. It allows you to connect your new aftermarket stereo to your car’s factory wiring without cutting or splicing the original wires. This preserves your car’s original wiring, making future reinstallation of the factory stereo (for resale, for instance) much easier and preventing potential electrical issues. Each car model typically has a specific adapter.
- Dash Kit (Mounting Kit/Faceplate Adapter): If your new stereo is a different size than your factory unit (e.g., single-DIN into a double-DIN opening), or if it doesn’t fit flush, a dash kit will provide a clean, professional-looking installation and secure mounting.
- Soldering Iron and Solder (Optional but Recommended): For the most robust and permanent wire connections. While crimping is acceptable, soldering provides superior conductivity and longevity, a true mark of a meticulous “tech” installation.
- Zip Ties: For tidying up wiring and preventing rattles.
3. Safety First: Disconnecting Power
Before you begin any work on your car’s electrical system, the absolute first and most critical step is to disconnect the negative terminal of your car battery. This prevents accidental short circuits, electrical damage to your vehicle’s components, and personal injury. Use a wrench to loosen the nut on the negative terminal (marked with a minus sign or “NEG”) and carefully remove the cable, ensuring it doesn’t accidentally touch the battery post. This simple “tech” safety precaution protects both you and your investment.
II. Step-by-Step Installation Process: From Removal to Reassembly
With your tools ready and safety measures in place, you can now embark on the hands-on process of replacing your car stereo. This section breaks down the installation into manageable steps, guiding you through the intricate “tech” details of disassembling and reassembling your vehicle’s dashboard.
1. Removing the Old Stereo: Deconstructing the Dash
The most challenging part of this step is often navigating your vehicle’s specific dashboard design. Automakers use various clips, screws, and panel configurations.
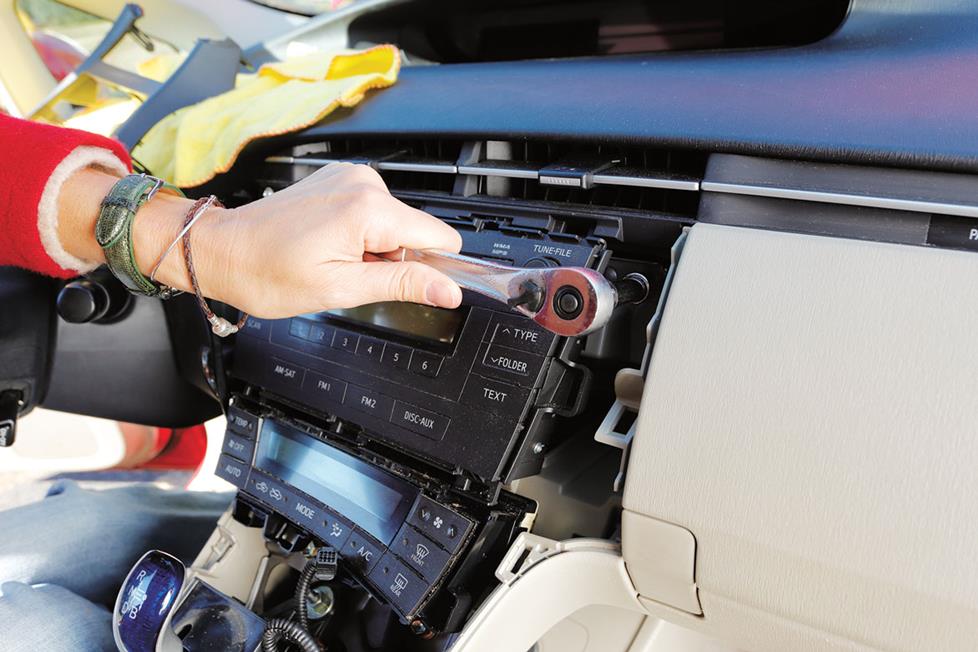
- Locate and Remove Dash Panels: Use your plastic trim removal tools to carefully pry off the trim pieces surrounding your factory stereo. Start at an edge or seam and gently work your way around. Be patient and avoid excessive force to prevent breaking clips or damaging the plastic. Consult your car’s service manual or an online resource (like YouTube tutorials specific to your car model) if you’re unsure how your dash panels are secured. This is where knowing your vehicle’s specific “tech” layout is crucial.
- Unscrew the Factory Stereo: Once the surrounding trim is removed, you’ll typically find screws (often Phillips head) holding the factory stereo in place. Remove these screws and carefully slide the stereo out of its slot.
- Disconnect Wiring and Antenna: With the old stereo partially out, you’ll see a series of connectors plugged into its back. These usually include a main wiring harness (a large plastic connector), an antenna cable, and potentially other smaller connectors for auxiliary inputs, satellite radio, or USB. Press any release tabs and carefully unplug all connectors. Take note of their positions or snap a picture for reference, especially if you plan to reinstall the factory unit later.
2. Wiring the New Stereo: The Heart of the Connection
This is arguably the most critical “tech” step, where the factory wiring is adapted to your new aftermarket unit. Precision here ensures proper functionality and prevents electrical issues.
- Connect Aftermarket Harness to Head Unit: Lay out your new stereo’s wiring harness and your vehicle-specific wiring harness adapter. You’ll notice that the wires on both harnesses are color-coded (e.g., yellow for constant power, red for accessory power, black for ground, purple for rear right speaker, etc.). Your goal is to connect the corresponding colored wires from the aftermarket stereo’s harness to the matching colored wires on the vehicle-specific adapter harness.
- Speaker Wires: Typically, these come in pairs (e.g., white/white-black stripe for front left). Connect solid colors to solid colors and striped colors to striped colors.
- Power Wires: Yellow (constant 12V), Red (switched 12V/accessory), Black (ground).
- Antenna Remote/Amplifier Turn-on: Blue or blue-white wires are for powering up an aftermarket antenna booster or external amplifier.
- Illumination: Orange or orange-white wires control the stereo’s lighting with your car’s headlights.
- Parking Brake/Reverse Gear: Some modern head units require connection to the parking brake (for video playback) or reverse gear (for backup cameras) for safety functions.
- Making the Connections:
- Crimping: Strip about 1/2 inch of insulation from each corresponding wire. Twist the bare copper strands of matching wires together. Insert them into a crimp cap (butyl connector) and use your crimping tool to secure the connection firmly. Pull gently to ensure it’s secure. Wrap each crimped connection with electrical tape for added insulation and protection, or use heat shrink tubing for a cleaner, more robust seal.
- Soldering (Recommended): Strip the wires, twist them together, and apply heat with a soldering iron while feeding solder into the joint until it’s fully coated. Allow it to cool completely before applying heat shrink tubing over the connection and shrinking it with a heat gun or lighter. Soldering provides the best electrical contact and mechanical strength, a true mark of quality “tech” work.
- Connect Antenna Adapter (if needed): Some cars have a unique antenna connector that requires an adapter to plug into the new stereo. Connect this now.
3. Mounting the New Stereo: Secure and Aesthetic Integration
Once the wiring harness is prepared, it’s time to integrate the new stereo into your dashboard.
- Attach Dash Kit to Stereo: If you’re using a dash kit, follow its instructions to attach it to your new head unit. This typically involves screwing the stereo’s sides to the mounting brackets of the dash kit. Ensure the stereo is centered and flush.
- Connect Wiring to New Stereo: Before sliding the stereo fully into the dash, connect the newly assembled wiring harness from your car to the back of your new stereo. Also, plug in the antenna cable and any other auxiliary inputs (USB extensions, microphone, etc.).
- Slide Stereo into Dash: Carefully slide the new stereo (with the dash kit attached) into the opening in your dashboard. Guide the wires into the dash cavity, ensuring they don’t get pinched.
- Secure the Stereo: Screw the dash kit’s brackets into the appropriate mounting points in your dashboard. Make sure the stereo is firmly secured and doesn’t wobble.
4. Reassembling the Dash: The Final Touches
This is essentially the reverse of the removal process.
- Reconnect Dash Panels: Carefully reattach all the dashboard trim pieces you removed. Align the clips and push firmly until they snap into place. Take your time to ensure all panels fit flush and there are no gaps. A clean reassembly enhances the “brand” perception of your vehicle’s interior.
III. Testing and Troubleshooting: Ensuring Flawless Operation
Once everything is physically in place, the moment of truth arrives. It’s time to power up your new system and ensure all functions are working correctly. This phase involves systematic “tech” diagnostics.
1. Initial Power-Up and Functionality Check
- Reconnect Battery: Go back to your car battery and securely reconnect the negative terminal.
- Turn on Ignition: Turn your car’s ignition to the accessory (ACC) position or start the engine. Your new stereo should power on.
- Basic Functionality Test:
- Power On/Off: Does the stereo turn on and off with the ignition?
- Radio: Can you tune into FM/AM stations clearly?
- Volume/Balance/Fade: Test all audio controls.
- Bluetooth/USB/Aux: Test all input sources.
- Clock/Settings: Ensure you can access and adjust the stereo’s settings.
- Any Added Features: Test Apple CarPlay/Android Auto, backup camera, steering wheel controls, etc.
2. Common Issues and Solutions: Diagnosing Tech Glitches
Even with careful installation, minor issues can arise. Here’s a quick troubleshooting guide:
- No Power to Stereo:
- Check Fuses: Verify the stereo’s fuse (usually on the back of the unit) and relevant car fuses (in the fuse box).
- Wiring Check: Ensure the yellow (constant 12V) and red (switched 12V) wires are correctly connected and receiving power (use a multimeter to test). Black (ground) also needs a solid connection.
- Battery Connection: Double-check that the battery’s negative terminal is securely reconnected.
- Stereo Powers On, But No Sound:
- Speaker Wires: Recheck all speaker wire connections for looseness or incorrect pairing. Ensure no bare speaker wires are touching each other or the car’s metal chassis (which can cause a short).
- Fader/Balance Settings: Ensure these are centered.
- Mute Function: Check if the stereo is accidentally muted.
- Only One or Some Speakers Work:
- Specific Speaker Wire Checks: Trace the wiring for the non-working speakers back to the stereo.
- Stereo Output Settings: Verify that the stereo isn’t set to 2-channel mode if you have 4 speakers, or if balance/fade are heavily skewed.
- Distorted Sound:
- Speaker Impedance: Ensure your speakers are compatible with the stereo’s output impedance (most car speakers are 4 ohms).
- Gain Settings: If you have an external amplifier, its gain might be set too high.
- Wiring Shorts: Check for any frayed wires touching metal.
- Loss of Memory (Radio Presets, Clock):
- Constant Power Wire (Yellow): This wire provides continuous power to retain settings. If it’s not connected or not receiving power, the stereo will lose memory every time the ignition is turned off.
IV. Enhancing Your Car Audio Experience: Beyond Basic Installation
Installing a new head unit is often just the first step in a journey towards truly exceptional in-car audio. For tech enthusiasts and audiophiles, there’s a whole world of upgrades that can elevate the sound quality and functionality to professional levels.
1. Integrating with Advanced Vehicle Systems
Modern cars are complex networks, and a new head unit can often be integrated with existing vehicle features for a seamless user experience.
- Steering Wheel Control Adapters: If your car has steering wheel controls, you’ll likely need a separate interface module to retain their functionality with your new aftermarket stereo. These modules convert the car’s signals into a format your new stereo understands, allowing you to control volume, change tracks, and answer calls without taking your hands off the wheel. This is a significant “tech” convenience feature.
- Backup Cameras and Parking Sensors: Many aftermarket head units with screens can display video input from a backup camera. If your car doesn’t have one, installing a universal camera is a common and relatively easy upgrade that enhances safety. Some units can also interface with factory parking sensors.
- On-Board Diagnostics (OBD-II) Integration: Certain advanced head units or dedicated interfaces can display vehicle data (like speed, RPM, fuel economy, engine codes) directly on the stereo screen, providing a smart “tech” dashboard.
2. Considering Amplifiers and Subwoofers: Unleashing True Audio Potential
While a new head unit improves sound, factory speakers and built-in head unit amplification often limit the audio experience.
- External Amplifiers: A dedicated amplifier provides more power, cleaner signal, and better sound quality to your speakers than the head unit’s internal amplifier. This allows speakers to perform at their best, delivering greater clarity, dynamics, and volume without distortion. Installing an amplifier is a more advanced DIY project involving running power cables directly from the battery and signal cables from the head unit.
- Subwoofers: For deep, rich bass that factory systems often lack, a subwoofer is essential. Subwoofers come in various sizes and enclosures, from compact under-seat units to large trunk-mounted boxes. Paired with a dedicated amplifier, a subwoofer dramatically enhances the low-frequency response, adding depth and impact to your music. This is a significant “tech” upgrade for bass lovers.
- Speaker Upgrades: Even with a great head unit and amplifier, poor quality speakers will limit sound. Upgrading to aftermarket component or coaxial speakers designed for better sound reproduction is a logical next step for audio enthusiasts.
3. The “Brand” Aspect: Impact on Resale Value and Aesthetics
While a new stereo enhances your driving experience, it also subtly impacts your vehicle’s overall “brand” and potential resale value.
- Professional Appearance: A cleanly installed aftermarket stereo, fitted with the correct dash kit, will look like it belongs in the car. A sloppy installation with exposed wires, ill-fitting panels, or an amateurish aesthetic can detract from your car’s interior appeal and potentially lower its resale value. The DIY approach allows you to control this aesthetic outcome directly.
- Quality Components: Choosing reputable “brand” head units and speakers indicates a commitment to quality. A prospective buyer might view a well-installed system from a respected brand as an asset, while a no-name, cheap stereo could be a red flag.
- Reversibility: The use of wiring harness adapters and dash kits makes the installation reversible. If you ever sell your car, you can reinstall the factory stereo (if you kept it) and move your aftermarket unit to your next vehicle or sell it separately. This flexibility protects your “money” investment and maintains the car’s original condition.
V. DIY vs. Professional Installation: Weighing Your Options
Deciding whether to tackle the installation yourself or hire a professional boils down to a balance of cost, complexity, and confidence.
1. Cost-Benefit Analysis: The Money Angle
- DIY Savings: The primary motivator for a DIY installation is undoubtedly “money” savings. Professional installation can range from $100 to several hundred dollars, depending on the car and the complexity of the system. For many, the cost of the stereo and necessary adapters is the only expense when doing it yourself. This means more of your budget can go towards a better head unit or future audio upgrades.
- Time and Effort: DIY requires a significant time commitment, especially for a first-timer. You’ll need to research your specific vehicle, gather tools, and meticulously follow each step. If your time is more valuable, or if you simply don’t enjoy hands-on projects, the “money” saved might not outweigh the effort.
- Learning Opportunity: For those interested in “tech” and automotive mechanics, a DIY stereo install is an excellent learning experience, fostering a deeper understanding of your vehicle’s electrical system.
2. When to Call a Pro: Recognizing Your Limits
While many installations are straightforward, there are legitimate reasons to entrust the job to a professional.
- Complex Vehicles: Some modern vehicles have highly integrated infotainment systems, fiber optic networks, or complex CAN-BUS systems that make aftermarket stereo installation extremely challenging or require specialized interfaces and expertise. European luxury cars, in particular, can be notoriously difficult.
- Advanced Systems: If you’re planning a full-blown custom audio system with multiple amplifiers, subwoofers, custom speaker enclosures, and digital sound processors, a professional installer with experience in sound design and system tuning will ensure optimal performance.
- Lack of Confidence or Time: If you’re uncomfortable working with car electronics, fear damaging your vehicle, or simply lack the time and patience, a professional installation provides peace of mind and often comes with a warranty on their work. The “money” spent on a professional ensures a guaranteed quality “tech” outcome without the personal stress.
- Maintaining Warranty: While a stereo installation itself typically won’t void your car’s warranty, improper installation that leads to electrical issues could potentially impact warranty claims on related components. A professional installation can mitigate this risk.
Conclusion
Installing a car stereo is a rewarding DIY project that combines practical “tech” skills, smart “money” management, and an eye for the “brand” aesthetic of your vehicle. By carefully selecting your new head unit, gathering the right tools, and meticulously following the step-by-step process outlined in this guide, you can transform your in-car audio experience, enjoying superior sound quality and modern features tailored to your preferences. Remember, patience, precision, and prioritizing safety are your best allies throughout this process. Whether you opt for a basic upgrade or envision a sophisticated audio system, empowering yourself with the knowledge to improve your vehicle is a valuable skill in today’s technologically driven world. So, crank up the tunes and enjoy the fruits of your labor!
aViewFromTheCave is a participant in the Amazon Services LLC Associates Program, an affiliate advertising program designed to provide a means for sites to earn advertising fees by advertising and linking to Amazon.com. Amazon, the Amazon logo, AmazonSupply, and the AmazonSupply logo are trademarks of Amazon.com, Inc. or its affiliates. As an Amazon Associate we earn affiliate commissions from qualifying purchases.