
Virtualization has revolutionized how we develop, test, and deploy software, offering unparalleled flexibility and efficiency. At the heart of a seamless virtual machine experience lies VMware Tools, a critical suite of utilities that bridges the gap between your host operating system and the guest virtual machine. Without it, your virtualized environment, whether it’s a Windows workstation, a Linux server, or even a macOS testbed, operates much like a physical machine running on generic drivers – sluggish, visually limited, and lacking crucial integration features.
This comprehensive guide will walk you through the essential steps of installing VMware Tools, detailing why it’s indispensable, preparing your environment, and providing specific instructions for various guest operating systems. Whether you’re a seasoned IT professional managing an ESXi cluster or a casual user experimenting with a new OS in VMware Workstation or Fusion, understanding and implementing VMware Tools is the first step toward unlocking the full potential of your virtual machines.

Understanding VMware Tools: Why They Are Indispensable
Before diving into the “how-to,” it’s crucial to grasp the “why.” VMware Tools is not merely an optional add-on; it’s a fundamental component designed to enhance the performance, management, and user experience of your guest operating systems running on VMware platforms. It comprises a set of drivers and utilities that replaces generic operating system drivers with optimized VMware-specific versions, ensuring that your virtual hardware functions as efficiently as possible.
Let’s break down the key benefits:
- Enhanced Graphics and Display Performance: One of the most noticeable improvements is in display capabilities. VMware Tools installs an optimized SVGA display driver that allows the guest OS to support higher screen resolutions, more color depths, and smoother graphics performance. Without it, your VM might be stuck at a low resolution, making it cumbersome to work with, especially on modern high-DPI displays.
- Seamless Mouse Integration: Have you ever experienced your mouse cursor getting “trapped” within the VM window, requiring a keyboard shortcut (like Ctrl+Alt) to release it? VMware Tools eliminates this frustration by providing a seamless mouse experience. The cursor moves effortlessly between the host and guest operating systems, behaving as if they were a single desktop environment.
- Improved Network Performance: VMware Tools installs optimized network drivers that significantly improve the guest’s network throughput and reduce latency. This is vital for any networked application, from web browsing and file transfers to database interactions and server deployments.
- Shared Folders and Drag-and-Drop Functionality: This feature is a game-changer for productivity. VMware Tools enables shared folders, allowing you to easily access files on your host machine directly from your guest OS. Furthermore, drag-and-drop and copy-paste functionalities become available, facilitating effortless transfer of text, images, and files between the host and guest environments.
- Time Synchronization: Keeping accurate time is crucial for many applications and services. VMware Tools ensures that the guest operating system’s clock remains synchronized with the host’s clock, preventing time drift that can cause issues with logging, security protocols, and distributed systems.
- Graceful Shutdown and Restart: When you initiate a shutdown or restart from your VMware host interface (e.g., in vSphere or Workstation), VMware Tools allows the guest OS to perform a graceful shutdown, just as if you were doing it directly within the OS. This prevents data corruption and ensures applications close properly, unlike a hard power-off which can lead to system instability.
- Optimized Memory Management: The suite includes drivers that assist in optimizing memory utilization within the virtual machine, contributing to overall system stability and performance.
- Guest Operating System Information: VMware Tools provides valuable information about the guest OS to the host, such as IP addresses, disk usage, and running processes, which is particularly useful for monitoring and management in larger environments like vSphere.
In essence, VMware Tools transforms a basic, generic virtual machine into a highly integrated, high-performing, and user-friendly environment. Its absence is immediately noticeable through sluggish performance, poor display resolution, and a lack of host-guest interaction capabilities. Therefore, installing VMware Tools should be one of the very first steps after installing any guest operating system in a VMware environment.
Preparing for Installation: Essential Prerequisites
Before you initiate the installation of VMware Tools, a few preparatory steps can ensure a smooth process and prevent common pitfalls. Taking these precautions will save you time and potential headaches down the line, especially if you encounter any unexpected issues.
-
Verify VMware Platform and Guest OS Compatibility:
- Ensure your VMware hypervisor (Workstation, Fusion, ESXi, Player, vSphere) is up-to-date or at least supports the version of VMware Tools you intend to install.
- Confirm that your guest operating system (Windows, Linux, macOS) is officially supported by your VMware product. While VMware Tools works with many older OS versions, compatibility can sometimes be an issue with very new or very old distributions.
-
Update Your Guest Operating System:
- Before installing new drivers, it’s best practice to ensure your guest OS is fully patched and updated. This mitigates potential conflicts with existing drivers or system components.
- For Windows: Run Windows Update.
- For Linux: Use your distribution’s package manager (e.g.,
sudo apt update && sudo apt upgradefor Debian/Ubuntu,sudo yum updateorsudo dnf updatefor RHEL/CentOS/Fedora).
-
Create a Snapshot of Your Virtual Machine:
- This is arguably the most crucial preparatory step. A snapshot creates a point-in-time backup of your VM’s state, allowing you to revert to it if anything goes wrong during the VMware Tools installation. If the installation fails or causes instability, you can simply roll back your VM to its pre-installation state without losing any data or configuration.
- To take a snapshot: While the VM is powered on or off, navigate to
VM > Snapshot > Take Snapshot(in Workstation/Fusion) or use the snapshot management interface in vSphere.
-
Ensure Administrative Privileges:
- You will need an account with administrative rights (or root privileges on Linux) within the guest operating system to install VMware Tools. The installation involves installing system drivers and services, which requires elevated permissions.
-
Check for Disk Space:
- Although VMware Tools isn’t a massive application, ensure your guest OS has sufficient free disk space (a few hundred MB should be ample) for the installation files and drivers.
-
Temporarily Disable Antivirus/Security Software (Optional but Recommended for Troubleshooting):
- In rare cases, overly aggressive antivirus or security software within the guest OS might interfere with the installation process, particularly when new drivers are being installed. If you encounter issues, consider temporarily disabling these until the installation is complete, then re-enable them immediately.
-
Ensure Basic Network Connectivity (for Open-VM-Tools):
- If you plan to install Open-VM-Tools on a Linux guest using the distribution’s package manager, your VM will need a working internet connection to download the packages.
By diligently following these preparatory steps, you establish a solid foundation for a successful and trouble-free VMware Tools installation, laying the groundwork for an optimized virtual machine experience.
Step-by-Step Installation Guides
The method for installing VMware Tools varies slightly depending on the guest operating system. We’ll cover the most common scenarios: Windows and Linux.
Installing VMware Tools on Windows Guest OS
Installing VMware Tools on a Windows virtual machine is a straightforward process, largely guided by an intuitive installer.
- Power On Your Virtual Machine: Start your Windows guest OS and log in with an administrator account.
- Initiate the Installation from the VMware Menu:
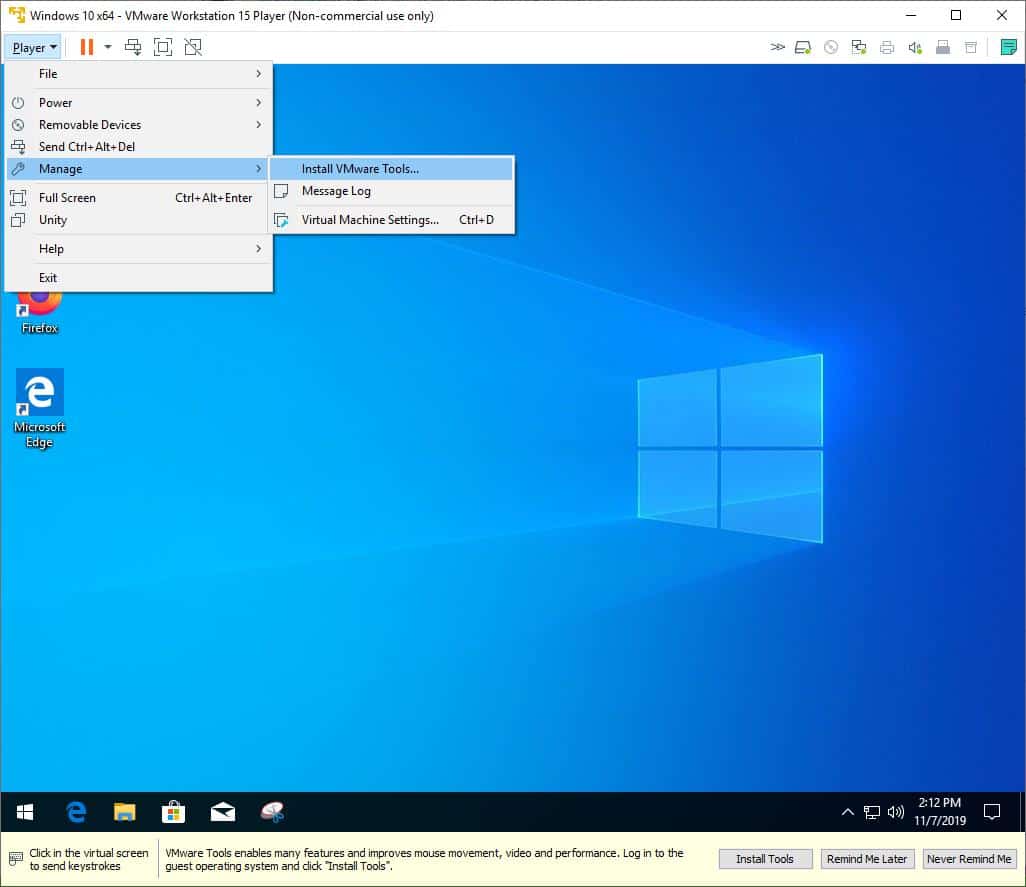
- VMware Workstation/Player/Fusion: Go to
VM > Install VMware Tools...orVirtual Machine > Install VMware Tools...in the menu bar. If it’s already installed and you’re updating, the option might sayVM > Reinstall VMware Tools.... - VMware ESXi/vSphere: Select your VM from the inventory, right-click, and choose
Guest OS > Install VMware ToolsorGuest OS > Upgrade VMware Tools. - This action virtually mounts a VMware Tools ISO image to your VM’s CD/DVD drive.
- VMware Workstation/Player/Fusion: Go to
- Run the Installer within the Guest OS:
- Autoplay: In most modern Windows versions, the installer will automatically pop up, prompting you to run
setup.exeorsetup64.exe. ClickRun setup.exe(orsetup64.exe) to start the wizard. - Manual Launch: If autoplay doesn’t work, open File Explorer, navigate to “This PC,” and double-click the CD/DVD drive letter (often labeled “VMware Tools”). Then, double-click
setup.exe(for 32-bit Windows) orsetup64.exe(for 64-bit Windows) to begin.
- Autoplay: In most modern Windows versions, the installer will automatically pop up, prompting you to run
- Follow the Installation Wizard:
- Welcome Screen: Click
Nextto proceed. - Setup Type: You’ll typically be presented with “Typical,” “Complete,” and “Custom” options.
- Typical (Recommended for most users): Installs all common components. This is sufficient for the vast majority of users.
- Complete: Installs all VMware Tools features and components.
- Custom: Allows you to select specific components to install or exclude. Only choose this if you have specific needs or are troubleshooting.
- Select
Typicaland clickNext. - Ready to Install: Click
Installto begin the file copy and driver installation process.
- Welcome Screen: Click
- Driver Installation Prompts (Older Windows Versions):
- For older Windows versions (e.g., Windows XP), you might see prompts about installing unsigned drivers. Always click
Continue AnywayorInstall this driver software anywayas these are legitimate VMware drivers.
- For older Windows versions (e.g., Windows XP), you might see prompts about installing unsigned drivers. Always click
- Completion and Reboot:
- Once the installation is complete, the wizard will prompt you to restart your virtual machine. It is critical to restart the VM for all the new drivers and services to take effect properly. Click
Finishand thenYeswhen asked to restart.
- Once the installation is complete, the wizard will prompt you to restart your virtual machine. It is critical to restart the VM for all the new drivers and services to take effect properly. Click
- Verification: After the VM reboots, you should immediately notice improvements:
- The mouse cursor will move seamlessly between the host and guest.
- The display resolution should automatically adjust or offer higher resolution options.
- You can verify the installation by checking
Control Panel > Programs and Features(Windows 7/8/10/11) where “VMware Tools” should be listed. Also, inDevice Manager, check under “Display Adapters” for “VMware SVGA 3D” and under “Network Adapters” for “VMware Accelerated AMD PCNet Adapter” or “VMware VMXNET3 Adapter.”
Installing VMware Tools on Linux Guest OS
For Linux guest operating systems, there are two primary methods: installing Open-VM-Tools (the recommended approach for modern distributions) or performing a manual installation from the mounted ISO.
Using Open-VM-Tools (Recommended for Modern Linux)
Open-VM-Tools is an open-source implementation of VMware Tools, maintained by VMware and readily available in the package repositories of most major Linux distributions. It offers easier installation, updates, and better integration with the host OS.
- Ensure Network Connectivity: Your Linux VM needs an active internet connection to download packages from its distribution’s repositories.
- Open a Terminal: Log in to your Linux guest OS and open a terminal window.
- Update Package Lists: It’s good practice to update your package lists before installing new software.
- Debian/Ubuntu/Mint:
sudo apt update - CentOS/RHEL (older)/Fedora (older):
sudo yum update - Fedora/RHEL (newer):
sudo dnf update
- Debian/Ubuntu/Mint:
- Install Open-VM-Tools: Use the appropriate command for your distribution:
- Debian/Ubuntu/Mint (for server/desktop):
bash

sudo apt install open-vm-tools

# For desktop environments, also install the desktop-specific package for better integration:

sudo apt install open-vm-tools-desktop
- CentOS/RHEL (older)/Fedora (older):
bash

sudo yum install open-vm-tools

# For desktop environments, install the desktop-specific package:

sudo yum install open-vm-tools-desktop
- Fedora/RHEL (newer):
bash

sudo dnf install open-vm-tools

# For desktop environments:

sudo dnf install open-vm-tools-desktop
- Debian/Ubuntu/Mint (for server/desktop):
- Enable and Start the Service: The service usually starts automatically after installation, but you can ensure it’s running and enabled to start on boot:
bash

sudo systemctl enable vmtoolsd

sudo systemctl start vmtoolsd
- Reboot (Recommended): While often not strictly required for Open-VM-Tools, a reboot can help ensure all components are properly loaded.
bash

sudo reboot
- Verification: After rebooting, you can verify the installation:
- Check the service status:
systemctl status vmtoolsd - Check the version:
vmware-toolbox-cmd -vorvmware-toolbox-cmd --version
- Check the service status:
Manual Installation from VMware Tools ISO (Legacy/Specific Cases)
This method is suitable if Open-VM-Tools is not available for your distribution, if you prefer the official VMware package, or for older Linux versions.
- Power On Your Virtual Machine: Start your Linux guest OS and log in.
- Initiate the Installation from the VMware Menu:
- Similar to Windows, use the
VM > Install VMware Tools...orGuest OS > Install VMware Toolsoption to mount the VMware Tools ISO.
- Similar to Windows, use the
- Prepare the Guest OS:
- Install Build Essentials: Many Linux distributions require development tools to compile the kernel modules for VMware Tools.
- Debian/Ubuntu/Mint:
sudo apt install build-essential linux-headers-$(uname -r) - CentOS/RHEL/Fedora:
sudo yum install gcc make kernel-devel-$(uname -r)orsudo dnf install gcc make kernel-devel-$(uname -r)
- Debian/Ubuntu/Mint:
- Create a Mount Point:
bash

sudo mkdir -p /mnt/cdrom
- Install Build Essentials: Many Linux distributions require development tools to compile the kernel modules for VMware Tools.
- Mount the VMware Tools ISO:
bash

sudo mount /dev/cdrom /mnt/cdrom

# If /dev/cdrom doesn't work, try /dev/sr0 or check dmesg for the correct device name.
- Extract the Installer:
- The mounted ISO contains a compressed tarball (e.g.,
VMwareTools-x.x.x-xxxx.tar.gz). Copy and extract it to a temporary directory.
bash

cp /mnt/cdrom/VMwareTools-*.tar.gz /tmp/

cd /tmp

tar -zxvf VMwareTools-*.tar.gz
- The mounted ISO contains a compressed tarball (e.g.,
- Run the Installer Script:
- Navigate into the extracted directory and run the
vmware-install.plscript.
bash

cd vmware-tools-distrib

sudo ./vmware-install.pl
- Navigate into the extracted directory and run the
- Follow Installer Prompts:
- The script will ask a series of questions. For most users, pressing
Enterto accept the default values is sufficient. - The script will compile and install the necessary kernel modules and components.
- The script will ask a series of questions. For most users, pressing
- Unmount the ISO and Clean Up:
bash

sudo umount /mnt/cdrom

rm -rf /tmp/vmware-tools-distrib /tmp/VMwareTools-*.tar.gz
- Reboot:
bash

sudo reboot
- Verification:
vmware-toolbox-cmd -vorvmware-toolbox-cmd --versionlsmod | grep vmto see if VMware kernel modules are loaded.- Check display resolution and mouse integration.

Installing VMware Tools on macOS Guest OS (Specific Scenarios)
Virtualizing macOS itself is often more complex and limited by Apple’s licensing agreements, typically restricted to Apple hardware (e.g., running macOS in VMware Fusion on a Mac host). The installation process, however, mirrors that of Windows.
- Power On and Mount: Power on your macOS VM and choose
Virtual Machine > Install VMware Toolsfrom the Fusion menu bar. - Run Installer: A virtual DVD will mount on the macOS desktop. Double-click it, then double-click the
Install VMware Tools.pkgfile. - Follow Wizard: Proceed through the installer wizard.
- Security & Privacy: During or after installation, macOS might prompt you about system extensions being blocked. Go to
System Settings (or System Preferences) > Privacy & Security > Generaland clickAlloworDetailsnext to “System software from developer VMware, Inc. was blocked from loading.” You might need to authenticate with your password. - Reboot: Restart your macOS VM.
Due to the specific nature and licensing complexities of macOS virtualization, this section is kept concise. Users generally opt for other virtualization solutions like Parallels Desktop for macOS guests when possible.
Troubleshooting Common VMware Tools Installation Issues
While the installation process is generally smooth, you might occasionally encounter issues. Here’s a rundown of common problems and their solutions:
-
“Install VMware Tools” Option is Greyed Out or Unavailable:
- VM Powered Off: VMware Tools can only be installed when the virtual machine is powered on.
- Tools Already Installed/Up-to-date: If the tools are already installed, the option might change to “Reinstall VMware Tools” or be greyed out if it detects they are the latest version.
- Corrupted VM Configuration: In rare cases, the VM’s configuration file (
.vmx) might be corrupted. Try creating a new VM and attaching the existing virtual disk, or contact VMware support.
-
Installer Doesn’t Launch Automatically on Windows:
- Manually browse to the mounted CD/DVD drive in File Explorer and double-click
setup.exeorsetup64.exe. - Ensure the virtual CD/DVD drive is “Connected” in the VM settings.
- Manually browse to the mounted CD/DVD drive in File Explorer and double-click
-
Failed to Mount ISO on Linux Guest:
- Device Path: The CD-ROM device might not be
/dev/cdrom. Checkdmesg | grep -i cdromorlsblkto identify the correct device (e.g.,/dev/sr0,/dev/sr1). - Existing Mount: The mount point might already be in use. Try
sudo umount /mnt/cdromorsudo umount /dev/cdrombefore attempting to mount again. - Permissions: Ensure you are running the mount command with
sudo.
- Device Path: The CD-ROM device might not be
-
Error Messages During Installation (Windows/Linux):
- Insufficient Permissions: Ensure you are logged in as an administrator (Windows) or using
sudo(Linux) for all commands. - Conflicting Software: Temporarily disable antivirus or other security software that might interfere with driver installations.
- Missing Prerequisites (Linux): For manual Linux installations, ensure
build-essential(Debian/Ubuntu) orgcc,make,kernel-devel(RHEL/CentOS/Fedora) packages are installed. - Specific Error Codes: If you get a specific error message or code, search the VMware knowledge base or community forums; these often have documented solutions.
- Insufficient Permissions: Ensure you are logged in as an administrator (Windows) or using
-
Drivers Not Taking Effect After Installation (e.g., Low Resolution, Mouse Stuck):
- Reboot: The most common cause is forgetting to reboot the VM. A restart is essential for new drivers and services to load.
- Check Device Manager (Windows): Look for any “Unknown Devices” or devices with yellow exclamation marks. Try right-clicking and “Update driver,” pointing it to the VMware Tools installation directory (
C:Program FilesVMwareVMware ToolsDriversor similar). - Verify Service Status (Linux): Ensure the
vmtoolsdservice is running (systemctl status vmtoolsd). - Guest OS Updates: Sometimes, an outdated guest OS can prevent proper driver loading. Ensure the guest OS is fully updated.
- Snapshot Rollback: If all else fails and you took a snapshot, revert to the snapshot and try the installation again, carefully following each step.
-
Shared Folders Not Working:
- Ensure VMware Tools is fully installed and the VM has been rebooted.
- Verify shared folder settings in the VM’s configuration (
VM > Settings > Options > Shared Folders). - On Linux, the
vmhgfskernel module must be loaded (lsmod | grep vmhgfs). If not, you might need to re-run thevmware-install.plscript or reinstall Open-VM-Tools.
By systematically addressing these common issues, you can often resolve installation problems and get your VMware Tools up and running efficiently.
Beyond Installation: Maximizing Your Virtual Machine Performance
Installing VMware Tools is a pivotal step, but the journey to a fully optimized virtual environment doesn’t end there. To truly maximize your VM’s performance and leverage all the integrated features, consider the following:
Verification of Successful Installation
Even if you don’t encounter errors, it’s good practice to confirm VMware Tools is functioning as expected:
- Windows:
- Open
Device Manager. Check under “Display adapters” for “VMware SVGA 3D”, under “Network adapters” for “VMware VMXNET3 Adapter” (or similar VMware adapter), and under “System devices” for “VMware SVGA II”. - Open
Task Manager, go to the “Services” tab, and ensure “VMTools” or “VMware Tools” service is running. - Check
Control Panel > Programs and Featuresfor “VMware Tools.”
- Open
- Linux:
- In a terminal, run
vmware-toolbox-cmd -vorvmware-toolbox-cmd --version. This command should return the version of VMware Tools. - Verify the
vmtoolsdservice is running:systemctl status vmtoolsd. - Check if VMware kernel modules are loaded:
lsmod | grep vm. Look for modules likevmwgfx,vmci,vsock,vmhgfs(for shared folders), etc.
- In a terminal, run
Keeping VMware Tools Updated
Just like any other software, VMware Tools receives updates that bring performance improvements, bug fixes, and compatibility with newer operating systems and VMware platforms.
- Open-VM-Tools (Linux): This is the easiest to update. Since it’s integrated with your distribution’s package manager, simply running your regular system updates will update Open-VM-Tools:
sudo apt update && sudo apt upgrade(Debian/Ubuntu)sudo yum updateorsudo dnf update(RHEL/CentOS/Fedora)
- Windows/Manual Linux Installation:
- When a new version of VMware Tools is available, the “Install VMware Tools” option in the VMware menu (e.g., Workstation, vSphere client) might change to “Update VMware Tools” or “Reinstall VMware Tools.” Selecting this will mount the newer ISO, and you can run the installer as you did initially.
- Alternatively, you can manually download the latest VMware Tools ISO from VMware’s official website or the vCenter server content library.
- It’s generally recommended to keep VMware Tools aligned with the version of your VMware hypervisor for optimal compatibility and performance.
Advanced Features and Configuration
VMware Tools offers more than just basic performance enhancements:
- Shared Folders Configuration: Beyond enabling the feature, you can configure which host folders are shared and whether they are read-only. This is accessed via
VM > Settings > Options > Shared Foldersin Workstation/Fusion, or through the VM’s settings in vSphere. - Time Synchronization Settings: While typically enabled by default, you can configure how often the guest OS synchronizes its time with the host. This can be critical for domain controllers or time-sensitive applications.
- VMware Toolbox Command-Line Interface (
vmware-toolbox-cmd): This powerful command-line utility (available in both Windows and Linux guests) allows for advanced management and scripting. You can use it to:- Query guest OS information.
- Shrink virtual disks.
- Manage shared folders.
- Control time synchronization.
- Execute scripts within the guest from the host (via
vmrunon the host, interacting withvmtoolsdin the guest).
- Guest Customization: In larger deployments (e.g., with vSphere and vCenter), VMware Tools facilitates guest OS customization during VM deployment, allowing for automated IP configuration, hostname changes, and more.
Uninstallation
If you ever need to remove VMware Tools (e.g., for troubleshooting, or if migrating the VM to another hypervisor that doesn’t support them), the process is straightforward:
- Windows: Use
Control Panel > Programs and Features(orSettings > Apps > Apps & featuresin Windows 10/11) to uninstall “VMware Tools” like any other program. - Linux (Open-VM-Tools): Use your distribution’s package manager:
sudo apt remove open-vm-tools open-vm-tools-desktop(Debian/Ubuntu)sudo yum remove open-vm-tools open-vm-tools-desktoporsudo dnf remove open-vm-tools open-vm-tools-desktop(RHEL/CentOS/Fedora)
- Linux (Manual Install): Navigate to the installation directory (usually
/usr/local/binor/usr/bin) and look for an uninstall script, or re-runvmware-install.pland select the uninstall option.
Security Implications
While primarily a performance enhancer, VMware Tools does run with elevated privileges within the guest OS and interacts with the host. Ensure both your host and guest operating systems are kept secure with up-to-date patches, robust firewall rules, and antivirus software. Avoid installing VMware Tools from untrusted sources.
Conclusion
Installing VMware Tools is not just a recommended step; it is an absolute necessity for anyone utilizing VMware’s virtualization products. It transforms a rudimentary virtual machine into a powerful, responsive, and fully integrated environment, unlocking features critical for both productivity and efficient management. From enhanced graphics and seamless mouse interaction to optimized network performance and robust host-guest communication, the benefits are immediately apparent and profoundly impact your overall virtualization experience.
By following the detailed steps outlined in this guide – whether you’re setting up a new Windows workstation, configuring a Linux server with Open-VM-Tools, or addressing common troubleshooting scenarios – you empower your virtual machines to operate at their full potential. Remember to keep your tools updated, leverage their advanced features, and always prioritize security in your virtualized infrastructure. Embrace the full power of virtualization; install VMware Tools, and elevate your digital workspace today.
aViewFromTheCave is a participant in the Amazon Services LLC Associates Program, an affiliate advertising program designed to provide a means for sites to earn advertising fees by advertising and linking to Amazon.com. Amazon, the Amazon logo, AmazonSupply, and the AmazonSupply logo are trademarks of Amazon.com, Inc. or its affiliates. As an Amazon Associate we earn affiliate commissions from qualifying purchases.