Linux, a powerful and versatile open-source operating system, has long been the backbone of the internet and countless technological innovations. From the servers powering your favorite websites to the smartphones in your pockets (via Android), its influence is undeniable. Yet, for many, the prospect of installing Linux can seem daunting, often shrouded in technical jargon and perceived complexity. This guide aims to demystify the process, breaking down the installation of Linux into manageable steps and demonstrating why it’s an increasingly accessible and beneficial choice for a wide range of users, regardless of their technical background. Whether you’re a seasoned tech enthusiast looking to explore new horizons, a creative professional seeking enhanced control and customization, or simply someone interested in a more secure and private computing experience, understanding how to install Linux is your gateway to a world of possibilities.

Understanding Your Linux Installation Goals
Before diving into the “how,” it’s crucial to understand the “why” and “what” of your Linux installation. Linux isn’t a single monolithic entity; it’s a kernel upon which numerous “distributions,” or distros, are built. Each distro offers a unique user experience, catering to different needs and preferences. Your installation goals will dictate which distro you choose, how you install it, and what you hope to achieve with your new operating system.
Choosing the Right Linux Distribution
The sheer variety of Linux distributions can be overwhelming at first. Think of them as different flavors of ice cream – all are ice cream, but they offer distinct tastes and textures. For beginners, user-friendliness and community support are paramount.
-
For the Absolute Beginner: Distributions like Ubuntu and Linux Mint are often recommended. They boast intuitive graphical interfaces that closely resemble Windows or macOS, making the transition smoother. They also come pre-loaded with essential software and have vast online communities that can readily assist with any queries. Ubuntu, in particular, is renowned for its extensive documentation and widespread adoption, making it a solid choice for those new to the Linux ecosystem. Linux Mint, a derivative of Ubuntu, further refines the user experience with a focus on familiarity and ease of use.
-
For the Tech-Savvy and Enthusiast: If you’re looking for more control, customization, or a lightweight system, distributions like Fedora, Debian, or Arch Linux might appeal. Fedora is known for its cutting-edge software and close ties to Red Hat, a major player in enterprise Linux. Debian, the parent of Ubuntu, offers rock-solid stability and a vast software repository, favored by many who prioritize long-term reliability. Arch Linux, on the other hand, is for the truly hands-on user, offering a minimalist base system that you build up from scratch, providing ultimate control but demanding a steeper learning curve.
-
For Specific Use Cases: Beyond general-purpose distros, there are specialized Linux versions. Kali Linux is a popular choice for penetration testing and digital security professionals due to its pre-installed security tools. Tails is designed for anonymity and privacy, routing all internet traffic through the Tor network.
The key is to research and perhaps even try out a few different distros in a virtual machine environment before committing to a full installation. This allows you to get a feel for their interfaces and workflows without impacting your current operating system.
Deciding on Your Installation Method
Once you’ve selected your distro, you need to decide how you want to install it. Several methods exist, each with its own advantages and considerations:
-
Dual Booting: This is a popular method where you install Linux alongside your existing operating system (e.g., Windows). When you start your computer, you’ll be presented with a menu allowing you to choose which operating system to boot into. This is ideal for those who want to experiment with Linux without fully abandoning their current setup. It allows you to switch between operating systems as needed.
-
Full Installation (Replacing Existing OS): In this scenario, Linux becomes your sole operating system, wiping everything else on your hard drive. This offers the most streamlined experience and allows Linux to fully utilize your hardware resources. It’s a good option if you’re confident in your choice and ready to embrace the Linux environment completely.
-
Virtual Machine (VM): This is the safest and easiest way to try Linux without making any changes to your primary operating system or hardware. You install a virtualization software (like VirtualBox or VMware) on your current OS, and then install Linux within a virtual environment. It runs as a program on your existing OS, allowing you to experiment freely. If you mess something up, you can simply delete the virtual machine without affecting your main system.
-
Live USB/DVD: Most Linux distributions offer a “Live” version that can be booted directly from a USB drive or DVD. This allows you to try out the operating system without installing it. It’s an excellent way to test hardware compatibility and get a feel for the distro before making a decision. You can often perform the installation directly from a Live USB.
The Technical Steps: Preparing for Installation
Regardless of your chosen method, some preparatory steps are essential for a smooth installation process. These steps ensure you have everything you need and minimize the risk of data loss or complications.
Gathering Your Essential Tools and Information
Before you begin, make sure you have the following:
-
Linux Distribution ISO Image: This is the installation file for your chosen Linux distro. You’ll download this from the official website of the distribution. These files are typically quite large, so ensure you have a stable internet connection and sufficient storage space.
-
USB Drive or DVD: For a Live USB or direct installation, you’ll need a USB drive (typically 8GB or larger) or a blank DVD.
-
USB Bootable Media Creator: Software is needed to write the ISO image to your USB drive, making it bootable. Popular choices include Rufus (for Windows), Etcher (cross-platform), or UNetbootin (cross-platform). For macOS or Linux, the
ddcommand-line tool can also be used. -
Backup of Your Data: This is the most critical step, especially if you are dual-booting or performing a full installation. Back up all your important files, documents, photos, and any other data to an external hard drive, cloud storage, or another safe location. While Linux installations are generally safe, accidents can happen, and having a backup is your ultimate safety net.
-
Internet Connection: A stable internet connection is highly recommended during and after the installation. Many distributions require downloading updates and additional software post-installation.
Creating Bootable Media
Once you have your ISO image and a USB drive, you need to make the USB drive bootable.
- Download and install your chosen USB bootable media creator tool (e.g., Rufus, Etcher).
- Launch the tool and select the downloaded Linux ISO image.
- Choose your USB drive as the target device. Double-check that you’ve selected the correct drive, as this process will erase all data on it.
- Start the process. The tool will write the ISO image to the USB drive, making it bootable. This can take several minutes.
Preparing Your Hard Drive (for Dual Booting)
If you’re planning to dual-boot with Windows, you’ll need to shrink your Windows partition to create unallocated space for Linux.
- Boot into your Windows operating system.
- Open Disk Management: Search for “Disk Management” in the Windows search bar and open it.
- Identify your main partition (usually C: drive).
- Right-click on the partition and select “Shrink Volume.”
- Enter the amount of space you want to shrink by. This space will be used for your Linux installation. It’s recommended to allocate at least 20-30GB for Linux, but more is always better if you plan to install many applications.
- Click “Shrink.” You will now see “Unallocated Space” on your hard drive. This is where Linux will be installed.
Important Note: While Windows Disk Management is generally safe, it’s always best to perform this operation with a backup of your data readily available.
The Installation Process: Step-by-Step
With your bootable media ready and your hard drive prepared, you’re ready to begin the installation. The exact screens and options may vary slightly depending on your chosen distribution, but the core process remains consistent.
Booting from Your Installation Media
- Insert your bootable Linux USB drive into your computer.
- Restart your computer.
- Enter your BIOS/UEFI settings: As your computer starts up, you’ll need to press a specific key to access the BIOS or UEFI firmware. Common keys include F2, F10, F12, DEL, or ESC. This key is usually displayed on the screen for a few seconds during the boot process.
- Change the boot order: In the BIOS/UEFI settings, navigate to the “Boot” or “Boot Order” section. You need to set your USB drive (or DVD drive if you’re using a DVD) as the primary boot device. This tells your computer to boot from the installation media rather than your existing hard drive.
- Save changes and exit: Once you’ve adjusted the boot order, save your changes and exit the BIOS/UEFI. Your computer will restart.
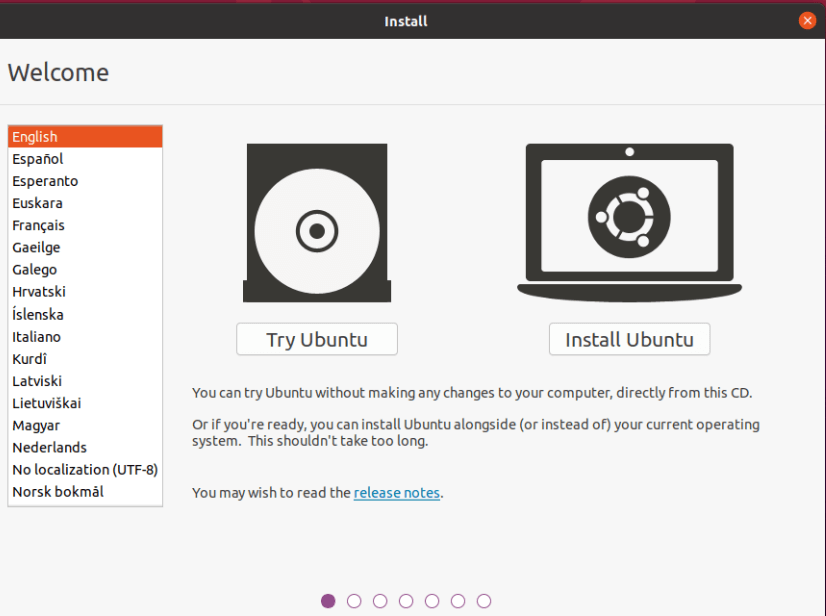
The Installation Wizard
Your computer should now boot from the USB drive, and you’ll be presented with the Linux installer.
-
Welcome Screen: You’ll typically see a welcome screen offering options to “Try [Distro Name]” or “Install [Distro Name].”
- “Try [Distro Name]” (Live Environment): This loads the operating system from the USB drive without making any changes to your computer. It’s perfect for testing hardware compatibility and getting a feel for the interface. From here, you can usually launch the installer.
- “Install [Distro Name]”: This starts the installation process directly.
-
Language and Keyboard Layout: Choose your preferred language for the installation process and your system. You’ll also be asked to select your keyboard layout.
-
Network Connection: The installer will attempt to connect to your Wi-Fi or Ethernet network. This is important for downloading updates during installation.
-
Installation Type (The Crucial Step): This is where you choose how to install Linux.
- “Install [Distro Name] alongside Windows Boot Manager” (or similar): If you’re dual-booting and the installer detects Windows, this option will appear. It automates the process of resizing partitions and installing Linux in the unallocated space. This is often the easiest option for beginners.
- “Erase disk and install [Distro Name]”: This will format your entire hard drive and install Linux. Use this with extreme caution, as it will delete all existing data.
- “Something else” (Manual Partitioning): This option gives you full control over partitioning your hard drive. It’s for advanced users who want to create custom partition layouts (e.g., separate partitions for
/home,/var, etc.). For beginners, it’s best to avoid this unless you have a specific reason.
-
Partitioning (if “Something else” is chosen or manual confirmation is needed): If you’re manually partitioning, you’ll need to create partitions for Linux. At a minimum, you’ll need:
- Root Partition (
/): This is where the core operating system files will reside. Format it asext4and mount it at/. - Swap Partition: This acts as virtual RAM. A good rule of thumb is to make it equal to your RAM size, or a bit more.
- Home Partition (
/home): This is where your personal files and user settings will be stored. Separating/homemakes it easier to reinstall or upgrade Linux later without losing your personal data.
- Root Partition (
-
Location and Timezone: Select your geographical location to set the correct timezone for your system.
-
User Account Creation: You’ll be prompted to create a user account. This includes:
- Your Name: Your full name.
- Computer’s Name: A hostname for your computer on the network.
- Username: A short, lowercase name for your login.
- Password: Choose a strong, memorable password. You’ll likely need to confirm it.
-
Installation Progress: The installer will now begin copying files and installing the system. This process can take anywhere from 15 minutes to over an hour, depending on your computer’s speed and the distribution.
-
Restart: Once the installation is complete, you’ll be prompted to restart your computer. Remember to remove the USB drive before restarting to avoid booting from it again.
Post-Installation Essentials and Beyond
Congratulations! You’ve successfully installed Linux. However, the journey doesn’t end here. A few post-installation steps will ensure your system is up-to-date, secure, and ready for your daily tasks.
Initial System Updates and Configuration
After restarting and logging into your new Linux system, the first order of business is to update it.
-
Open the Terminal: Most Linux distributions have a terminal application. You can usually find it by searching for “Terminal” in your application menu.
-
Update Package Lists: Type the following command and press Enter. You’ll likely be prompted for your password:
bash

sudo apt update
(This command is for Debian/Ubuntu-based systems. For Fedora/Red Hat, it would besudo dnf check-update). -
Upgrade Installed Packages: Once the package lists are updated, upgrade all installed packages:
sudo apt upgrade(For Fedora/Red Hat, it would be
sudo dnf upgrade).
This process can take some time as it downloads and installs the latest software versions. -
Install Additional Drivers (if needed): While most hardware is supported out-of-the-box, some proprietary drivers (especially for graphics cards, Wi-Fi adapters, or printers) might require manual installation. Your distribution’s software center or documentation will guide you through this.
Exploring the Linux Ecosystem and Embracing its Strengths
Now that your system is running, it’s time to explore the vast ecosystem of Linux.
-
Software Management: Linux distributions use package managers to install, update, and remove software easily. Most distros have a graphical “Software Center” or “App Store” that functions similarly to mobile app stores, allowing you to browse and install applications with a few clicks. For more advanced users, the command-line package managers (like
aptordnf) offer a powerful way to manage software. -
Customization and Personalization: One of Linux’s greatest strengths is its customizability. You can change desktop environments, themes, icons, and virtually every aspect of the user interface to suit your aesthetic preferences and workflow.
-
Command Line Interface (CLI): The terminal, or command line, is a powerful tool in Linux. While it might seem intimidating at first, learning basic commands can significantly boost your productivity and offer deeper control over your system. Many advanced tasks, automation, and system administration are performed via the CLI.
-
Security and Privacy: Linux is renowned for its robust security features and granular control over permissions. Its open-source nature means that vulnerabilities are often discovered and patched quickly by the community. Combined with smart user practices, Linux can offer a significantly more secure and private computing experience.
-
Community and Support: The Linux community is one of its strongest assets. Online forums, wikis, mailing lists, and dedicated websites offer a wealth of information and assistance. If you encounter a problem, chances are someone else has already faced it and found a solution.
Installing Linux is no longer an arcane ritual reserved for the technically elite. With user-friendly distributions and straightforward installation processes, it’s an accessible and rewarding endeavor for anyone looking to gain more control, enhance their security, or simply explore a powerful and flexible operating system. By following these steps and embracing the spirit of learning, you’ll soon find yourself comfortable navigating and utilizing the vast potential of the Linux world.
aViewFromTheCave is a participant in the Amazon Services LLC Associates Program, an affiliate advertising program designed to provide a means for sites to earn advertising fees by advertising and linking to Amazon.com. Amazon, the Amazon logo, AmazonSupply, and the AmazonSupply logo are trademarks of Amazon.com, Inc. or its affiliates. As an Amazon Associate we earn affiliate commissions from qualifying purchases.