The iPhone is a powerful and versatile device, and at its core, it’s a communication hub. One of the most fundamental aspects of digital communication is email. Whether you’re setting up a brand-new iPhone or adding a new email account to an existing one, understanding how to install and configure your email is essential. This guide will walk you through the process, covering everything from the initial setup of your mail app to managing multiple accounts and troubleshooting common issues. We’ll delve into the technical aspects of getting your email up and running, touching upon the importance of digital security and productivity that comes with seamless email integration.

Getting Started: Adding Your First Email Account
The native Mail app on your iPhone is designed to be user-friendly, making the process of adding an email account straightforward. This section will guide you through the initial setup, assuming you have the necessary login credentials for your email provider.
Understanding the Basics: What You’ll Need
Before you begin, ensure you have the following information readily available:
- Your Email Address: This is the address you use to send and receive emails (e.g.,
yourname@example.com). - Your Email Password: The password associated with your email account.
- Your Email Provider’s Settings: Most major email providers (like Gmail, Outlook.com, Yahoo Mail, iCloud Mail) are automatically configured by the iPhone. However, for less common providers or work/school accounts, you might need to know their incoming and outgoing mail server details (IMAP/POP and SMTP settings), port numbers, and whether SSL/TLS encryption is required. You can usually find this information on your email provider’s website or by contacting their support.
Step-by-Step: Adding an Account in the Mail App
- Open the Settings App: Locate and tap the grey gear icon on your iPhone’s home screen.
- Scroll Down to “Mail”: Navigate through the settings until you find the “Mail” option and tap on it.
- Tap on “Accounts”: Within the Mail settings, select “Accounts.”
- Tap “Add Account”: This will present you with a list of common email providers and an “Other” option.
- Select Your Email Provider (if listed): If your email provider is listed (e.g., iCloud, Microsoft Exchange, Google, Yahoo, AOL), tap on it. You’ll then be prompted to enter your email address and password. The iPhone will attempt to automatically configure the server settings.
- Choose “Other” for Unlisted Providers: If your provider isn’t on the list, tap “Other.”
- Tap “Add Mail Account”: This opens a form to manually enter your details.
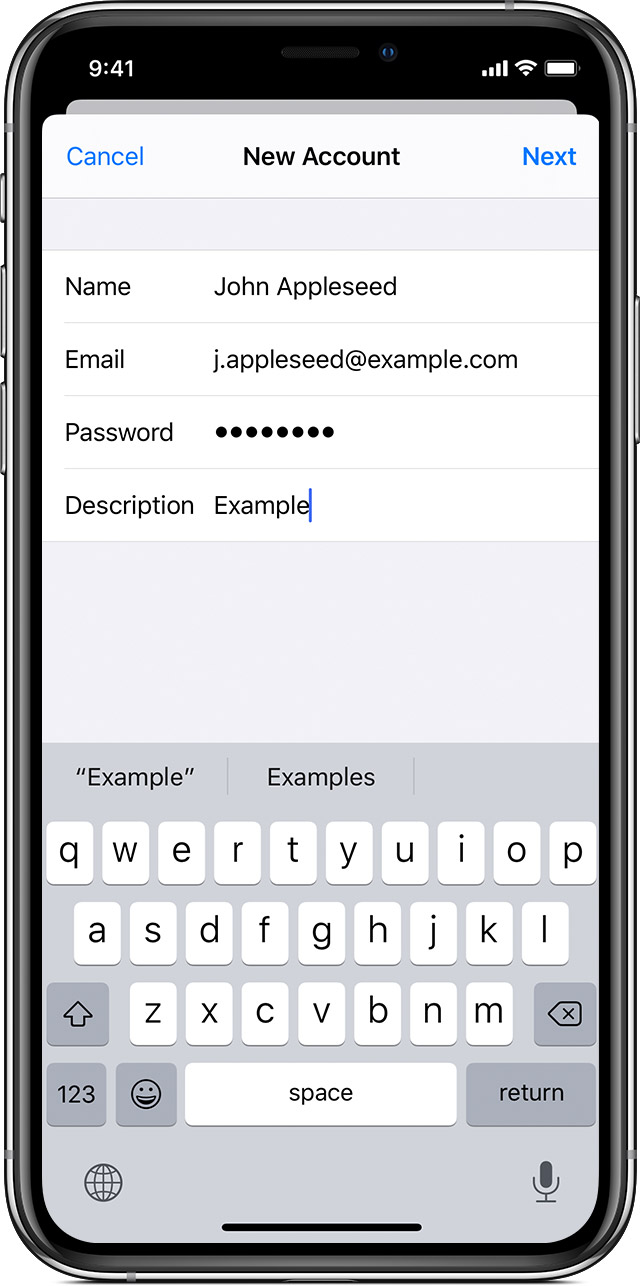
- Enter Your Name, Email, Password, and Description:
- Name: This is how your name will appear to recipients.
- Email: Your full email address.
- Password: Your email account password.
- Description: A label for this account (e.g., “Work Email,” “Personal Gmail”).
- Tap “Next”: The iPhone will attempt to find the server settings.
Manual Configuration: When Automatic Fails
If the iPhone cannot automatically configure your account, you’ll need to enter the server details manually. This typically happens when using a custom domain email address or an email service not widely recognized by Apple’s automatic setup.
-
Incoming Mail App:
- IMAP vs. POP: You’ll likely need to choose between IMAP and POP. IMAP is generally recommended as it synchronizes your emails across all your devices. POP downloads emails to your device and can remove them from the server.
- Host Name: This is the incoming mail server address (e.g.,
imap.example.comorpop.example.com). - User Name: Your full email address.
- Password: Your email account password.
-
Outgoing Mail Server (SMTP):
- Host Name: This is the outgoing mail server address (e.g.,
smtp.example.com). - User Name (Optional): Sometimes required for authentication.
- Password (Optional): Sometimes required for authentication.
- Host Name: This is the outgoing mail server address (e.g.,
After filling in these details, tap “Next.” The iPhone will verify the information. If all details are correct, your account will be added.
Leveraging the Mail App: Features and Productivity
Once your email account is installed on your iPhone, the Mail app becomes a central tool for managing your communications. Understanding its features can significantly boost your productivity and digital security.
Organizing Your Inbox for Efficiency
A cluttered inbox can be a major drain on productivity. The iPhone Mail app offers several tools to help you stay organized:
- Flagging Emails: Tap and hold on an email and select “Flag” to mark important messages that you need to revisit. You can then filter your inbox to show only flagged emails.
- Moving Emails: Swipe left on an email to reveal options like “More.” From there, you can choose “Move Message” to organize emails into specific mailboxes or folders. This is crucial for separating work from personal correspondence or archiving completed tasks.
- Creating Mailboxes: Within the Mail app, navigate to your “Accounts” list. You can create new mailboxes (folders) within any account to further categorize your emails.
- VIPs: For important contacts, you can designate them as VIPs. Emails from VIPs will be highlighted and can be filtered separately, ensuring you don’t miss critical communications. To set this up, go to
Settings > Mail > VIP.
Enhancing Security and Privacy

Digital security is paramount, and your email account is often the gateway to many other online services. The iPhone Mail app incorporates several features to enhance your security:
- SSL/TLS Encryption: Ensure that when you add your account, SSL/TLS is enabled for both incoming and outgoing servers. This encrypts the data transmitted between your iPhone and the mail server, protecting your login credentials and email content from eavesdropping. The Mail app usually enforces this by default for popular providers.
- Two-Factor Authentication (2FA): For major email providers like Gmail and Outlook, enabling 2FA is highly recommended. This adds an extra layer of security by requiring a second verification step (e.g., a code from your phone or an authenticator app) when logging in from a new device. While not directly configured within the Mail app, it’s a crucial step to take with your email provider.
- Beware of Phishing: Always be cautious of suspicious emails. Phishing attempts often try to trick you into revealing personal information or clicking on malicious links. The Mail app itself doesn’t prevent phishing, but being aware of its signs and using strong, unique passwords for your accounts significantly mitigates the risk.
Managing Multiple Email Accounts and Advanced Tips
Many users have multiple email addresses for different purposes – personal, professional, subscriptions, etc. The iPhone Mail app handles these with ease, and there are several advanced tips to optimize your experience.
Consolidating Your Communications
Adding multiple email accounts to your iPhone is as simple as repeating the steps outlined in the “Getting Started” section for each account. Once added, you can manage them all from a single inbox view or switch between individual account inboxes.
- Unified Inbox: In the Mail app, you’ll see an “All Inboxes” option. Tapping this displays a consolidated view of all incoming emails from all your configured accounts. This is incredibly convenient for a quick overview of your communications.
- Switching Between Accounts: From the main Mail app screen, you can tap on any of your listed accounts to view emails specific to that account.
- Setting a Default Account: You can choose which email account is used by default when you compose a new email. Go to
Settings > Mail > Default Accountand select your preferred account. This is useful if one account is used more frequently than others.
Advanced Tips for a Seamless Experience
- Rich Text Formatting: When composing emails, you can use rich text formatting to make your messages more visually appealing and professional. Tap the arrow icon to the left of the subject line, then tap the formatting bar at the bottom to access options for bold, italics, underline, font size, and color.
- Attaching Files and Photos: Tap the paperclip icon in the compose window to attach files from your iPhone’s Files app or photos from your Photos library.
- Using Swipe Actions: Customize swipe actions for faster email management. Go to
Settings > Mail > Swipe Actions. You can set what happens when you swipe left or right on an email (e.g., Archive, Delete, Mark as Read/Unread, Move Message). - Push vs. Fetch: In
Settings > Mail > Accounts > Fetch New Data, you can configure how often your iPhone checks for new emails. “Push” means your email provider actively sends new emails to your iPhone as they arrive (available for some providers like iCloud, Exchange, Gmail). “Fetch” means your iPhone periodically checks for new emails at set intervals (e.g., every 15 minutes, 30 minutes, hourly, or manually). Push offers the most immediate experience but can consume more battery. Fetch provides a balance between battery life and timeliness.
Troubleshooting Common Email Installation Issues
Even with straightforward setup, you might encounter occasional problems. Here are some common issues and their solutions:
“Cannot Get Mail” or “Cannot Send Mail” Errors
This is a frequent error message indicating a problem with connecting to the mail server.
- Check Your Internet Connection: Ensure your iPhone is connected to Wi-Fi or has a strong cellular data signal.
- Verify Login Credentials: Double-check your email address and password. Typos are common. If you’ve recently changed your password with your provider, ensure you’ve updated it on your iPhone.
- Confirm Server Settings: If you’re using manual configuration, re-verify the host names, port numbers, and SSL/TLS settings with your email provider’s documentation.
- Restart Your iPhone: A simple restart can often resolve temporary glitches.
- Remove and Re-add the Account: If the issue persists, try removing the problematic email account from your iPhone (
Settings > Mail > Accounts, tap the account, then “Delete Account”) and then adding it again.
Emails Not Syncing Across Devices
If emails are sent or read on one device but not reflected on your iPhone, or vice-versa, it’s usually a sync issue.
- Ensure IMAP is Used: As mentioned earlier, IMAP is essential for syncing. POP accounts do not sync.
- Check Account Settings: Verify that the account is set up to sync mail (not just contacts or calendars).
- Check Mail Server Settings: Ensure the correct IMAP settings are configured.
Account Not Verified or Invalid Information
This error typically means the server settings or login details you’ve entered are incorrect.
- Re-enter Password Carefully: Even a small mistake can cause this.
- Contact Your Email Provider: They can confirm the exact server settings and any specific requirements for mobile access. Some providers might require you to generate an “app password” for third-party apps if you have 2FA enabled.
By following these steps, you should be able to successfully install and configure your email on your iPhone, ensuring you stay connected and productive wherever you go. Remember that while the technology is powerful, maintaining good digital security practices is your first line of defense.
aViewFromTheCave is a participant in the Amazon Services LLC Associates Program, an affiliate advertising program designed to provide a means for sites to earn advertising fees by advertising and linking to Amazon.com. Amazon, the Amazon logo, AmazonSupply, and the AmazonSupply logo are trademarks of Amazon.com, Inc. or its affiliates. As an Amazon Associate we earn affiliate commissions from qualifying purchases.