
In the vast digital landscape, where visual appeal reigns supreme and communication is increasingly visual, the choice of typeface is no longer a mere stylistic preference—it’s a critical component of personal expression, brand identity, and even productivity. Whether you’re a burgeoning graphic designer, a seasoned content creator, an aspiring entrepreneur building an online presence, or simply someone looking to personalize their digital workspace, the ability to install and utilize custom fonts is an invaluable skill. This guide will demystify the process of installing downloaded fonts, transforming a seemingly technical task into an empowering step toward enhancing your digital creativity and professionalism.

This isn’t just about making your documents look pretty; it’s about leveraging technology to articulate your unique voice, solidify your brand messaging, and optimize your workflow. From understanding the different font file types to navigating the installation nuances across operating systems, and even touching upon the strategic implications for your personal brand or business, we’ll cover everything you need to know.
Understanding Font Files: A Quick Tech Dive for the Modern Creator
Before diving into the installation process, it’s crucial to understand what you’re actually dealing with. Font files are specialized digital assets that contain all the necessary information for displaying a typeface—its shape, size, spacing, and other intricate details. Knowing the common file types will not only help you identify what you’ve downloaded but also understand their capabilities and compatibility across different platforms. This technical insight, firmly rooted in our “Tech” focus, ensures you’re equipped to make informed decisions.
Common Font Formats and Their Distinctions
The world of digital typography is rich with various font formats, each designed with specific strengths and uses. The three most prevalent you’ll encounter are TrueType, OpenType, and more recently, Web Open Font Format.
-
TrueType Font (.ttf): Developed by Apple and Microsoft in the late 1980s, TTF files are perhaps the most ubiquitous font format. They are widely compatible across almost all operating systems and applications. TTF fonts are known for their ease of use and good display quality on screen and in print. If you’re downloading a font for general document creation or basic graphic design, chances are it will be in a TTF format. Their simplicity makes them a go-to for everyday users.
-
OpenType Font (.otf): A successor to TrueType, OpenType was developed jointly by Microsoft and Adobe. OTF fonts offer several advantages over TTF, primarily their expanded character sets and advanced typographic features. This includes support for ligatures, alternate characters, small caps, old-style figures, and more precise kerning, which are vital for professional design work and branding. OTF fonts can embed more characters (up to 65,536) than TTF fonts, making them ideal for multilingual projects or sophisticated typographic layouts. They are cross-platform compatible, meaning an OTF file will work seamlessly on both Windows and macOS, streamlining workflows for designers who switch between environments. From a “Brand” perspective, the subtle enhancements offered by OTF can significantly elevate the polish and distinctiveness of your visual identity.
-
Web Open Font Format (.woff, .woff2): As the internet evolved, the need for optimized fonts for web display became apparent. WOFF and WOFF2 are specifically designed for web pages. They are essentially OpenType or TrueType fonts with metadata and compression, making them load faster and consume less bandwidth. WOFF2 offers even better compression than WOFF. While you won’t typically install these directly onto your operating system for desktop use, understanding their existence is important if you’re involved in web development or managing a website where consistent brand typography is crucial. This aligns with “Tech” in terms of web standards and “Brand” for consistent online presence.
-
Variable Fonts (a brief mention): A newer innovation, variable fonts pack multiple stylistic variations (like weight, width, and slant) into a single font file. This dramatically reduces file size and offers unparalleled design flexibility, allowing designers to interpolate between different styles seamlessly. While still gaining widespread adoption, they represent the future of typography, offering a glimpse into advanced “Tech” capabilities.
Where to Find Quality Fonts and Licensing Considerations
The internet is a treasure trove of fonts, both free and paid. However, navigating this landscape requires a keen eye for quality and, more importantly, an understanding of licensing—a critical component that ties into both “Brand” and “Money” for anyone using fonts professionally.
-
Free Sources:
- Google Fonts: An excellent library of open-source fonts, primarily for web use but also downloadable for desktop. High quality and widely supported.
- DaFont, Font Squirrel, 1001 Free Fonts: These platforms offer a vast array of free fonts. Crucially, always check the license! Many are free for personal use only and require a commercial license for business applications.
- Creative Market (free goods section): Often offers free fonts as part of their weekly freebies.
-
Paid Sources:
- Adobe Fonts (formerly Typekit): Included with Adobe Creative Cloud subscriptions, offering a vast library of high-quality fonts for both desktop and web use. Ideal for designers already invested in the Adobe ecosystem.
- MyFonts, Fontspring, Fontfabric: These are premium marketplaces where you can purchase individual font licenses or entire font families.
- Independent Type Foundries: Many designers choose to purchase directly from smaller foundries, supporting independent artists and often finding unique, high-quality typefaces.
Licensing is Paramount: This cannot be stressed enough. A font license dictates how and where you can use a font.
- Personal Use: Typically for non-commercial projects, hobbies, or school work.
- Commercial Use: Required for anything that generates revenue, directly or indirectly (e.g., logos, marketing materials, product packaging, websites for your business, social media graphics promoting your brand).
- Web Licenses: Specific licenses often required for embedding fonts on websites.
- App/Ebook Licenses: For embedding fonts in applications or digital publications.
Ignoring font licensing can lead to legal issues, fines, and reputational damage for your “Brand.” For “Money”-focused individuals and businesses, investing in proper licenses is not an expense but a necessary safeguard and a mark of professionalism. Always read the End User License Agreement (EULA) before using a font, especially for commercial projects.
The Installation Process: Step-by-Step Guides for Seamless Integration
Once you’ve selected your desired fonts and ensured their licensing is appropriate for your intended use, the actual installation process is straightforward. While the basic principle is similar, there are slight variations between Windows and macOS. This section provides detailed “Tech” tutorials to get your new typefaces up and running.
Before you begin, almost all downloaded fonts will come in a compressed .zip file. You must extract these files first. Right-click the .zip file and select “Extract All” (Windows) or simply double-click it (macOS) to reveal the actual font files (.ttf, .otf).
Installing Fonts on Windows
Windows offers a couple of simple methods for installing fonts, catering to different user preferences.
Method 1: The Quick Right-Click Install
This is the fastest and most common method for installing one or a few fonts.
- Locate the Font File: Navigate to the folder where you extracted your font files. You’ll see files ending in
.ttfor.otf. - Right-Click and Install: Select the font file (or multiple files by holding
Ctrland clicking them). Right-click on the selected file(s) and choose “Install” from the context menu. - Confirm Installation: A small pop-up window might appear, quickly installing the font. If the font is already installed, Windows will ask if you want to replace it.
- Admin Rights (if prompted): For system-wide installation, Windows may prompt you for administrator permission. Click “Yes.”
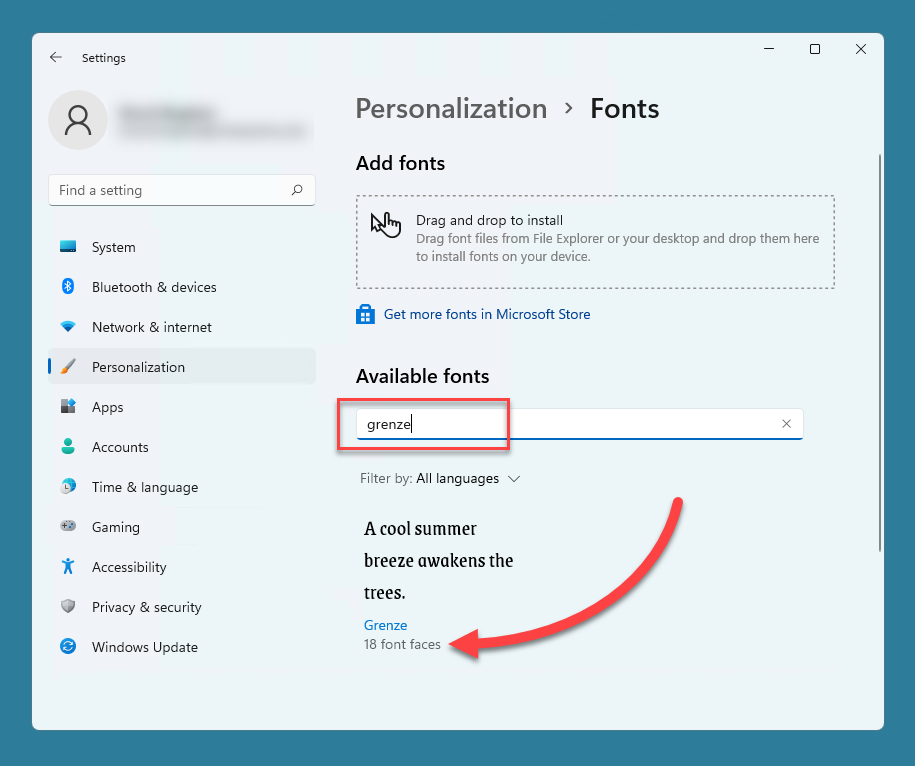
Method 2: Using the Windows Settings App (Windows 10/11)
This method offers a more centralized approach and can be useful for managing your font library.
- Open Settings: Click the Start button, then click the gear icon to open “Settings.”
- Navigate to Personalization: In the Settings window, click on “Personalization.”
- Select Fonts: In the left-hand pane, click on “Fonts.”
- Drag and Drop: You’ll see a section that says “Drag and drop to install fonts.” Simply drag your
.ttfor.otffiles from your folder directly into this area. - Confirmation: Windows will display a brief message confirming the installation. The newly installed font will then appear in the list below.
Method 3: Using the Control Panel (Older Windows Versions or for More Control)
- Open Control Panel: Search for “Control Panel” in the Start menu and open it.
- Navigate to Fonts: Change the “View by” option to “Large icons” or “Small icons” if necessary, then click “Fonts.”
- Install New Font: In the “Fonts” window, go to “File” > “Install New Font…” (or sometimes there’s a button for it in the toolbar).
- Browse for Fonts: A dialog box will appear. Navigate to the folder containing your extracted font files.
- Select and Install: Select the fonts you wish to install (hold
Ctrlto select multiple) and click “Install.”
Installing Fonts on macOS
macOS, with its strong emphasis on design, makes font installation incredibly intuitive through its built-in Font Book application.
Method 1: Double-Click and Install
This is the simplest and most common method for Mac users.
- Locate the Font File: Navigate to the folder where you extracted your font files (.ttf or .otf).
- Double-Click the Font: Double-click on the font file you wish to install.
- Open in Font Book: The Font Book application will automatically open, displaying a preview of the font.
- Click “Install Font”: In the Font Book window, click the “Install Font” button at the bottom right.
- Validation: Font Book will quickly validate the font for any errors. If there are no issues, the font will be added to your system and listed in Font Book. If it finds minor issues, it will often allow you to proceed anyway, but it’s good practice to be aware.

Method 2: Drag and Drop into Font Book
This method is efficient if you’re installing multiple fonts or prefer to manage them directly within Font Book.
- Open Font Book: Find “Font Book” in your Applications folder or search for it using Spotlight (
Cmd + Space). - Locate Font Files: Open your folder containing the extracted font files.
- Drag and Drop: Drag your
.ttfor.otffiles directly into the Font Book window, specifically into the “All Fonts” or a custom collection you’ve created. - Installation and Validation: Font Book will automatically install and validate the fonts, adding them to your system.
Refreshing Applications After Installation
It’s a common point of frustration: you’ve installed a new font, but it’s not showing up in Word, Photoshop, or your other design software. The solution is usually simple: restart the applications. Most applications load their available font list when they launch. If an application was open during the font installation, it won’t know about the new font until it’s restarted. Close and reopen any software where you intend to use your newly installed fonts.
Optimizing Your Font Library for Productivity and Design
Installing fonts is only the first step. To truly harness their power for your “Tech,” “Brand,” and even “Money” goals, effective management and strategic application are key. A cluttered font library can hinder productivity, while a well-curated one enhances efficiency and reinforces your professional image.
Managing Your Fonts (The Productivity Angle)
As your font collection grows, managing it can become cumbersome. A disorganized font library can lead to wasted time searching for the right typeface, slow down your system, and generally detract from your creative flow—a direct hit to “Productivity.”
-
Font Managers: For serious designers or those with extensive font libraries, a dedicated font manager (like Adobe Fonts integration, Suitcase Fusion, RightFont, or even Font Book’s collection features) is invaluable. These tools allow you to:
- Activate/Deactivate Fonts: Instead of having all fonts active and potentially slowing down your system, you can activate only the fonts you need for a current project.
- Organize into Collections: Group fonts by project, style, client, or personal preference. This makes finding specific fonts much quicker.
- Preview Fonts: Easily browse and compare different typefaces before activating them.
- Identify Duplicates/Corrupt Fonts: Font managers often have tools to help clean up your library.
-
Organizing Files: Even without a dedicated manager, maintain an organized folder structure for your downloaded font files. Create folders for “Commercial Fonts,” “Free for Personal Use,” “Project-Specific Fonts,” etc. This makes it easier to track licenses and re-install if needed.
-
Deactivating Unused Fonts: On both Windows and macOS, having too many active fonts can consume system resources and potentially slow down your computer and applications. Regularly review your installed fonts and deactivate or uninstall those you rarely use. In Windows, you can uninstall fonts via the Settings > Personalization > Fonts menu or the Control Panel. In macOS, you can disable fonts in Font Book.
Beyond Aesthetics: Fonts and Your Digital Brand
The impact of fonts extends far beyond mere aesthetics; they are a silent yet powerful ambassador for your “Brand.” The right typeface communicates professionalism, trustworthiness, creativity, or even rebelliousness, influencing how your audience perceives you or your business.
-
Consistency Across Platforms: A strong brand identity demands consistency. Use your chosen brand fonts uniformly across your website, social media, marketing materials, presentations, and even email signatures. This creates a cohesive and recognizable experience, reinforcing your “Brand” at every touchpoint.
-
Readability and User Experience (UX): While unique fonts can be tempting, prioritize readability, especially for body text. A beautiful but illegible font will frustrate your audience and detract from your message. Good typography enhances UX, making your content more accessible and enjoyable. This impacts retention and engagement, crucial for online “Money” generation.
-
Psychology of Typefaces: Different font styles evoke different emotions and associations.
- Serif fonts (like Times New Roman, Georgia): Often convey tradition, authority, respectability, and classic elegance. Great for formal documents or established brands.
- Sans-serif fonts (like Arial, Helvetica, Open Sans): Modern, clean, minimalist, and easy to read on screens. Popular for tech companies, startups, and contemporary brands.
- Script fonts (like brush scripts, calligraphic fonts): Personal, elegant, creative, or sophisticated. Best used sparingly for headings or accents to maintain readability.
- Display fonts (unique, decorative fonts): Bold, expressive, and attention-grabbing. Perfect for logos, headlines, or short phrases where impact is key.
Understanding this psychology allows you to select fonts that genuinely resonate with your “Brand Strategy” and target audience.
- Legal Aspects of Font Licensing (Revisited for Business): For businesses and professionals, properly licensed fonts are non-negotiable. Using unlicensed fonts for commercial purposes can lead to costly lawsuits, forcing you to redesign entire marketing campaigns or websites. Factor font licenses into your “Business Finance” and “Brand Reputation” strategy. Choosing fonts from reputable sources with clear licensing terms protects your “Money” and your peace of mind.
Troubleshooting Common Font Installation Issues
Even with the best guides, sometimes things go awry. Here’s a quick “Tech” troubleshooting guide for common font installation problems.
Font Not Appearing in Applications
- Restart Applications: This is the most frequent fix. Close and reopen any software where you expect to see the font.
- Check Installation: Verify that the font is actually listed in your system’s font folder (Windows Control Panel > Fonts, or macOS Font Book).
- Corrupted File: The font file itself might be corrupted. Try re-downloading it from the source or trying a different font file if available.
- Conflicting Font Names: Very rarely, a new font might have an internal name identical to an existing one, causing conflicts. This is harder to diagnose but can sometimes be fixed by renaming the font file (though this is not recommended for licensed fonts).
Performance Slowdown After Installing Fonts
- Too Many Active Fonts: As mentioned, a huge number of active fonts can bog down your system. Use a font manager or your OS’s built-in tools to deactivate fonts you don’t regularly use.
- Corrupted Fonts: A single corrupted font can sometimes cause system instability or slowdowns. Font Book on macOS has a validation feature; Windows users might need to use third-party tools or manually identify recent additions causing issues.
- System Resources: Ensure your computer meets the minimum requirements for the applications you are running, especially memory-intensive design software.
“Invalid Font File” or Similar Error
- Re-download from Source: The file may have been corrupted during download. Try downloading it again.
- Check File Integrity: Ensure the file type is indeed
.ttfor.otf. Sometimes files can be mislabeled or partially downloaded. - Unsupported Format: Very occasionally, a font might be in an obscure or very old format not natively supported by your operating system.
Conclusion
The ability to install and manage downloaded fonts is a foundational skill in today’s digital world. It’s a skill that empowers you to transcend the limitations of default typefaces, injecting personality and professionalism into every digital creation. From a “Tech” perspective, understanding font formats and installation nuances ensures smooth operation. From a “Brand” standpoint, carefully chosen and consistently applied fonts are crucial for building a strong, recognizable identity. And for anyone focused on “Money”—whether through online income, a side hustle, or a full-fledged business—investing time in mastering typography and adhering to licensing agreements can significantly enhance professional appeal and mitigate legal risks.
So, go forth and explore the rich universe of typefaces! Experiment responsibly, manage your library wisely, and let your chosen fonts eloquently communicate your message, enhance your designs, and ultimately, elevate your entire digital presence. Remember to always download fonts from trusted sources to maintain digital security, protecting your system from potential vulnerabilities. The world of typography awaits your creative touch.
aViewFromTheCave is a participant in the Amazon Services LLC Associates Program, an affiliate advertising program designed to provide a means for sites to earn advertising fees by advertising and linking to Amazon.com. Amazon, the Amazon logo, AmazonSupply, and the AmazonSupply logo are trademarks of Amazon.com, Inc. or its affiliates. As an Amazon Associate we earn affiliate commissions from qualifying purchases.