
Navigating the nuances of thread cutting is a fundamental skill in countless technical and DIY projects, from assembling custom electronics enclosures to fabricating specialized mechanical components. A precise pilot hole is the bedrock of a strong, reliable tapped thread. Among the myriad thread specifications, the 10-24 screw is a common fastener, widely utilized across various industries. However, the seemingly simple question of selecting the correct drill bit for a 10-24 tap can often lead to uncertainty, with the outcome directly impacting the integrity and strength of the resulting thread. This guide delves into the essential considerations for preparing to tap a 10-24 thread, ensuring optimal results for your technical endeavors.
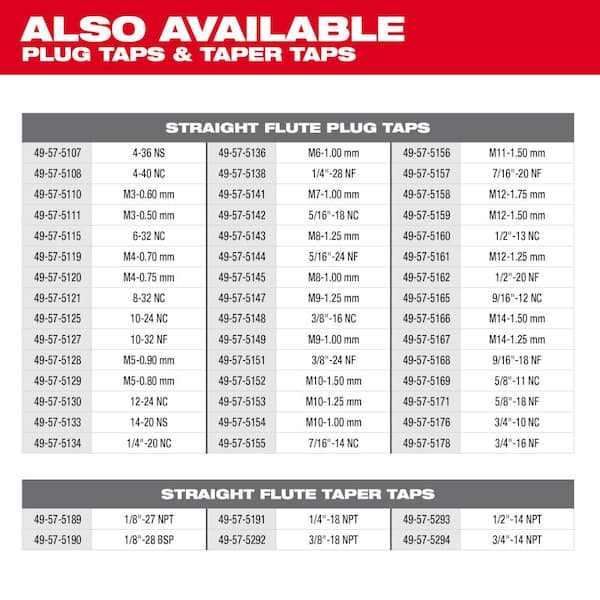
Understanding Tap and Drill Bit Sizing Fundamentals
To accurately select the appropriate drill bit for any given tap, a foundational understanding of threading standards and terminology is crucial. The relationship between a tap and its pilot hole is not arbitrary; it’s governed by engineering specifications designed to achieve a specific thread engagement.
The Unified Thread Standard (UTS)
The 10-24 designation refers to a specific standard within the Unified Thread Standard (UTS), which is prevalent in the United States and Canada. In this nomenclature:
- “10” represents the major diameter of the screw. For numbered screws (0 through 12), the major diameter increases with the number. A #10 screw has a major diameter of approximately 0.190 inches.
- “24” indicates the number of threads per inch (TPI). This directly influences the pitch of the thread, which is the distance between adjacent threads.
- “UNC” (Unified National Coarse) or “UNF” (Unified National Fine) sometimes follows, specifying the thread series. A 10-24 is typically a UNC thread, known for its coarser pitch and greater resistance to stripping in softer materials.
The tap itself is a cutting tool designed to create internal threads by removing material from the pilot hole. Its geometry, including the cutting edges and flutes, is engineered to match the specific thread profile (major diameter, pitch, and thread angle) of the fastener it’s intended for.
Tap Drills vs. Clearance Drills
It’s vital to distinguish between a “tap drill” and a “clearance drill.”
- Tap Drill: This is the specific drill bit size used to create the pilot hole before tapping. Its diameter is smaller than the major diameter of the tap, allowing the tap to cut into the material and form the thread crests. The size is carefully chosen to achieve a desired percentage of thread engagement, typically 75%, which offers an optimal balance of strength and ease of tapping.
- Clearance Drill: This is a larger drill bit used when you want a through-hole for a fastener to pass freely without threading. For instance, if you wanted a 10-24 screw to pass through one plate and thread into another, you would use a clearance drill for the first plate and a tap drill for the second. For a #10 screw, a common clearance drill size might be 3/16″ (0.1875″) or slightly larger. Confusing these two can lead to either a stripped hole (if the tap drill is too large) or a broken tap (if the tap drill is too small).
Precision in Practice: The 10-24 Tap and Its Pilot Hole
For the 10-24 tap, the goal is to create an internal thread that perfectly mates with a 10-24 screw. Achieving this requires meticulous attention to the pilot hole’s diameter.
Recommended Drill Bit Size for 10-24 Taps
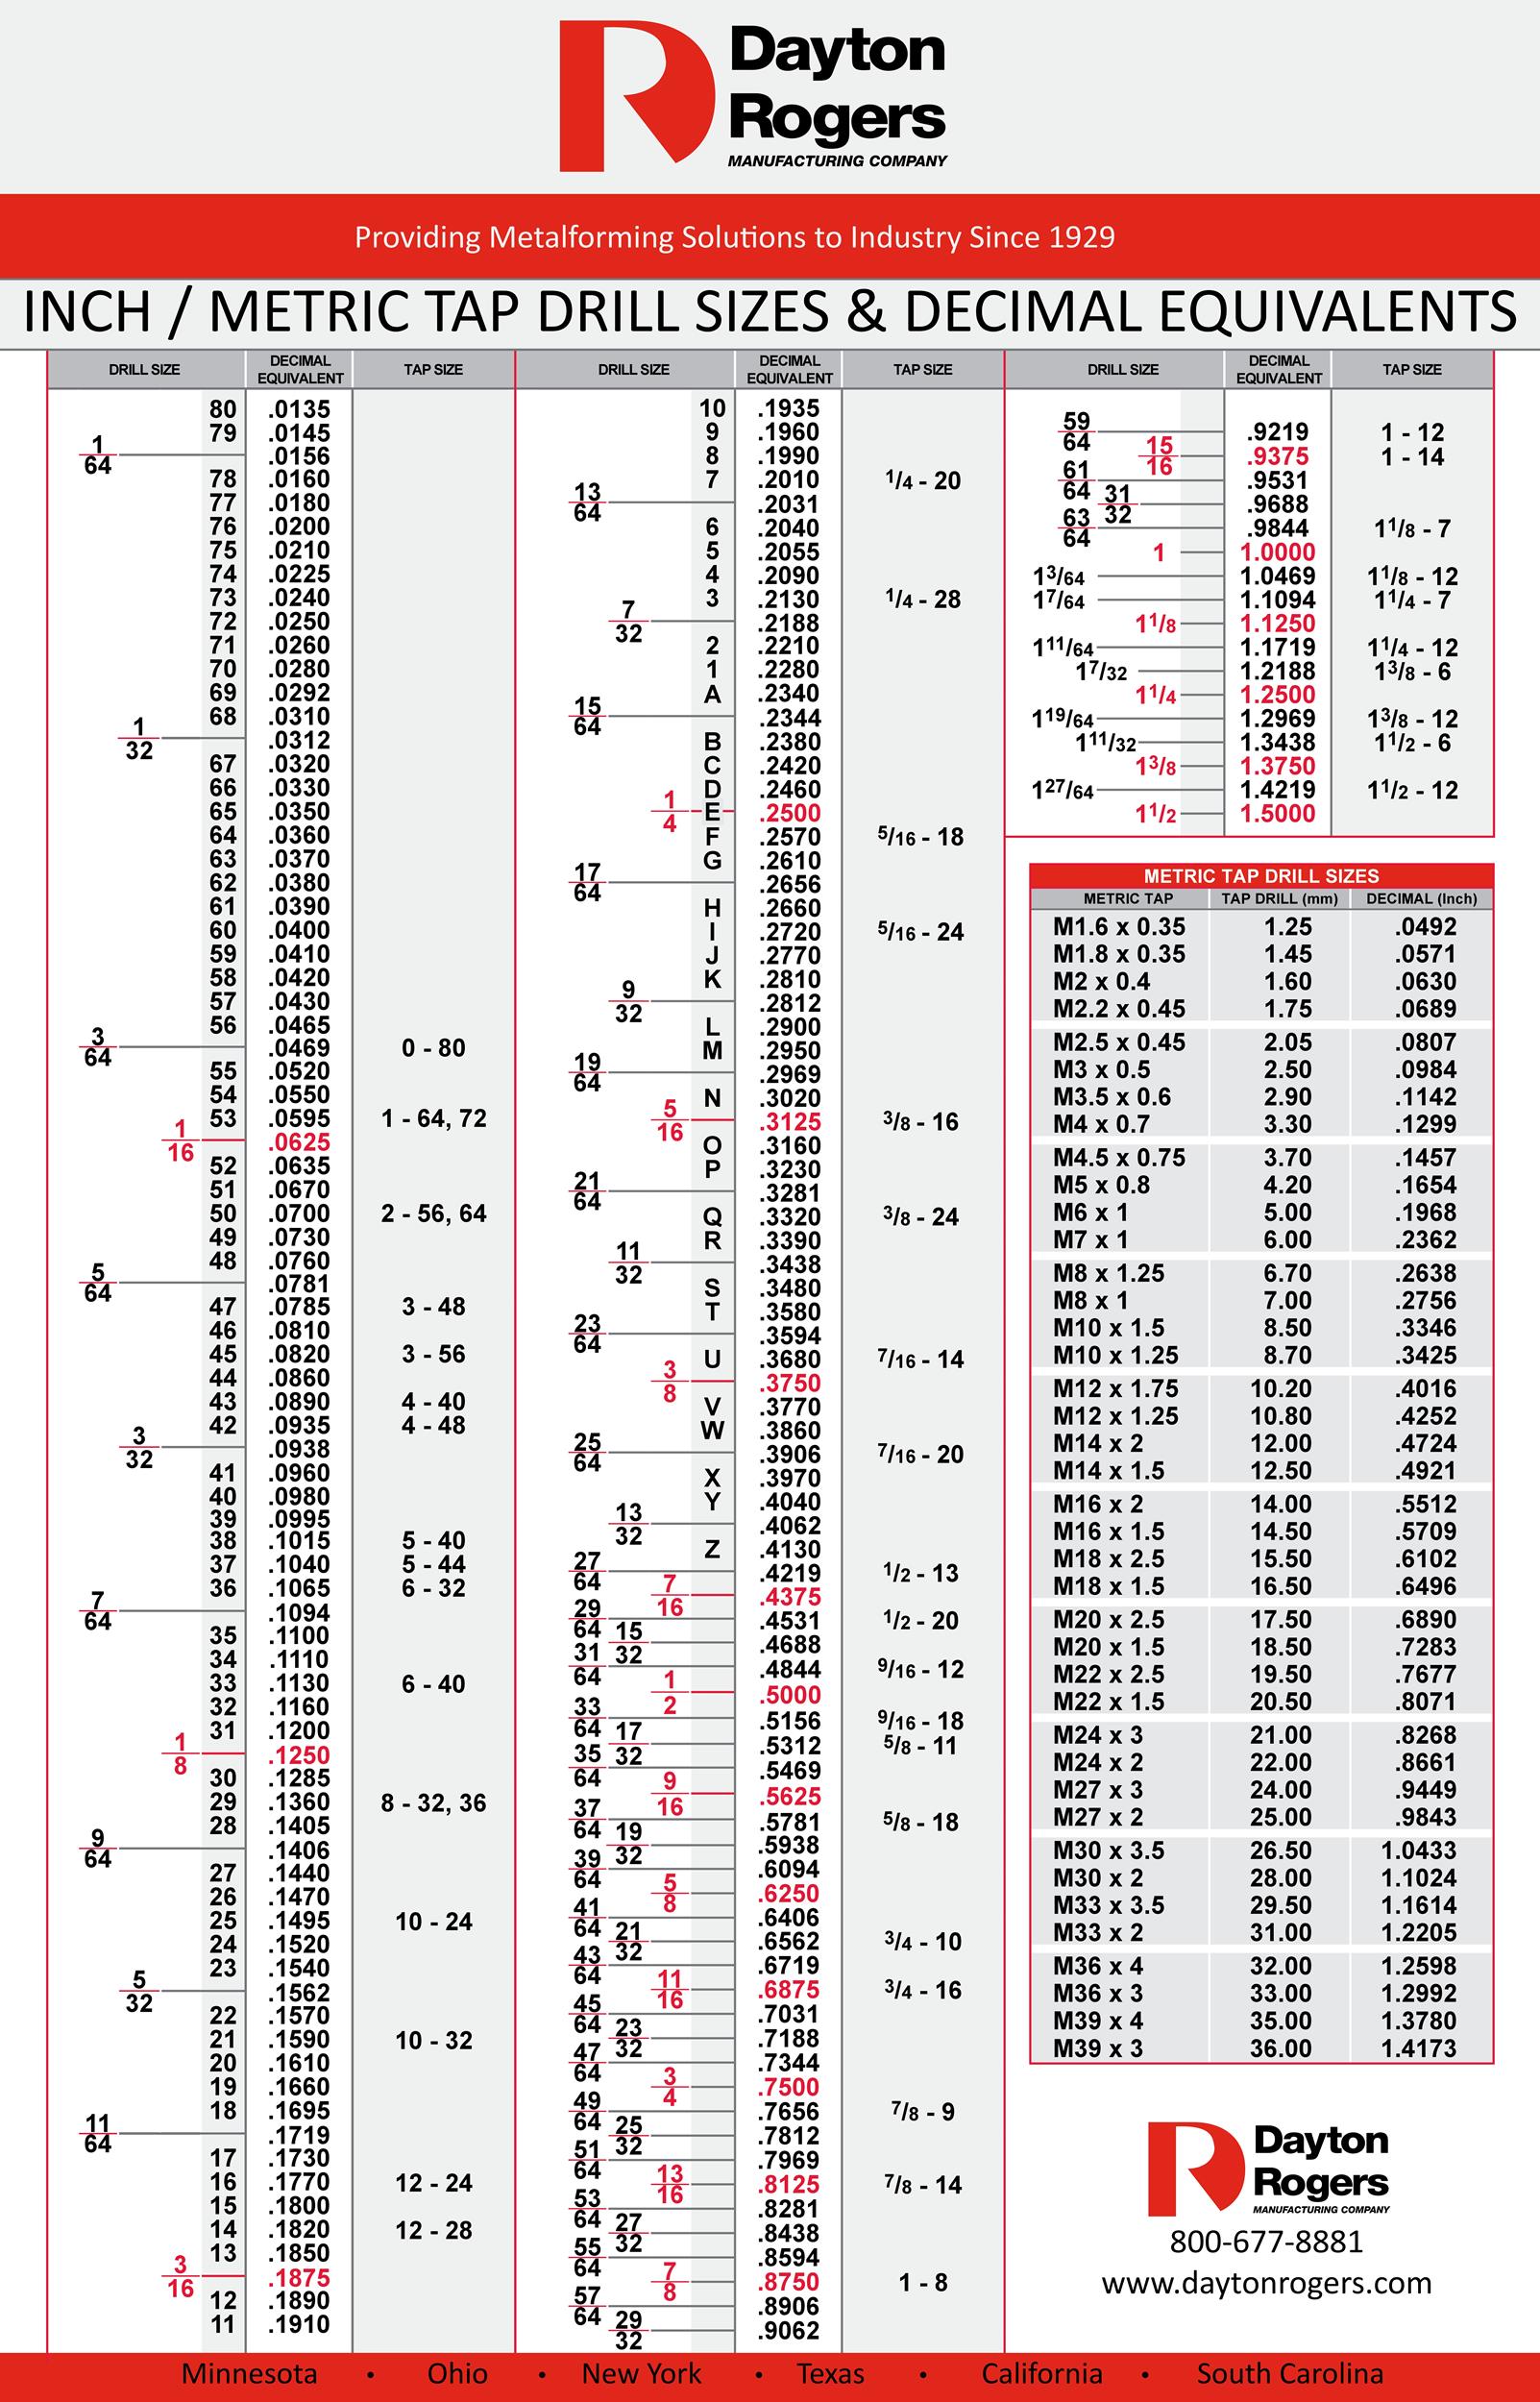
For a standard 10-24 UNC tap, the universally recommended tap drill size is #25.
- #25 Drill Bit Diameter: 0.1495 inches (or approximately 3.80 mm).
This size is engineered to produce approximately 75% thread engagement, which is generally considered the sweet spot for most materials. While 100% thread engagement sounds ideal, it’s rarely achieved in practice and, more importantly, is often counterproductive. Trying to cut a 100% thread significantly increases the torque required to turn the tap, drastically elevating the risk of tap breakage and producing an overly tight, potentially weaker thread due to material stress. Conversely, a drill bit that is too large will result in a weak thread with insufficient engagement, prone to stripping under load.
Why the “Tap Drill Size” Matters
The calculation for tap drill size considers several factors: the major diameter of the screw, the pitch of the thread, and the desired percentage of thread engagement. For a 10-24 UNC tap, a 75% thread engagement is a standard for several reasons:
- Strength: A 75% thread engagement provides approximately 90-95% of the strength of a 100% thread engagement. The marginal gain in strength beyond 75% is typically outweighed by the increased tapping difficulty and risk of tap breakage.
- Tapping Ease: It significantly reduces the torque required to tap the hole, making the process smoother and less prone to tap snapping, especially in harder materials.
- Material Compatibility: This percentage works well across a range of common materials like aluminum, steel, brass, and various plastics. For very soft materials, some machinists might opt for a slightly smaller drill (e.g., 70% thread engagement) to ensure better grip, while for extremely hard materials, a slightly larger drill (e.g., 65-70%) might be chosen to reduce tapping forces. However, for general purposes, #25 remains the standard.
Factors Influencing Drill Bit Selection
While #25 is the standard for a 10-24 tap, understanding the variables that can affect this choice is crucial for advanced or specific applications. These factors primarily relate to the material being tapped and the desired performance of the threaded connection.
Material Type and Hardness
The material you are drilling and tapping plays a significant role in the entire process.
- Softer Materials (Aluminum, Brass, Soft Plastics): These materials are generally easier to tap. The #25 drill bit will work perfectly, yielding a robust thread. In some cases, to compensate for the material’s lower shear strength, some might slightly undersize the drill (e.g., use a slightly smaller drill bit than #25, aiming for 80-85% engagement) to ensure maximum thread contact, but this increases tapping effort.
- Medium Hardness Materials (Mild Steel, Cast Iron): The #25 drill bit is ideal for these common engineering materials. The 75% thread engagement provides an excellent balance of strength and tapability.
- Harder or Abrasive Materials (Stainless Steel, Tool Steel): Tapping these materials is inherently challenging. Using the precise #25 drill bit is critical to minimize tap breakage. Some professionals might even opt for a slightly larger drill (e.g., a #24 or even 5/32″ drill, yielding closer to 70% engagement) to reduce the risk of tap failure, accepting a minor compromise in thread strength for a significantly easier and safer tapping operation. The correct lubrication and a sharp tap are even more important here.
Desired Thread Engagement
As discussed, 75% thread engagement is the industry standard. However, specific applications might call for deviations:
- Maximum Strength Requirement: In critical applications where every ounce of clamping force matters, one might consider slightly increasing the thread engagement by using a drill bit marginally smaller than #25 (e.g., #26, 0.1470″). Be prepared for higher tapping forces and a greater risk of tap breakage.
- Reduced Tapping Force/Easier Tapping: For production environments or when working with very hard materials where tap breakage is costly, a slightly larger drill bit (e.g., #24, 0.1520″) might be chosen to reduce the tapping torque. This sacrifices a small amount of thread strength for increased efficiency and reduced tool wear. Always consult engineering specifications before deviating significantly.
Lubrication and Drill Bit Sharpness
While not directly about drill size, the state of your tools significantly impacts the final hole and the subsequent tapping process.
- Sharp Drill Bit: A sharp drill bit cuts cleanly, producing a precisely sized hole with minimal burring. A dull drill bit can wander, create an oversized or undersized hole, and induce work hardening in the material, making tapping much harder.
- Proper Lubrication (for drilling): Using a suitable cutting fluid during drilling helps to reduce friction, dissipate heat, and carry away chips. This prolongs the life of the drill bit and ensures a cleaner, more accurate hole. Different materials require different lubricants.
The Tapping Process: Beyond the Drill Bit
Once the correct pilot hole is drilled, the tapping process itself requires careful execution to produce a functional thread. The best drill bit won’t compensate for poor tapping technique.
Secure Workholding
The workpiece must be securely clamped in a vise or other fixture. Any movement during tapping can lead to misaligned threads, tap breakage, or damage to the workpiece. Use soft jaws or protective pads if the material is delicate or its finish is critical.
Starting the Tap Correctly
Initial alignment is paramount.
- Tap Handle: Use a tap wrench that is appropriately sized for the tap.
- Perpendicularity: Start the tap perfectly perpendicular to the surface of the hole. A tapping guide block or a drill press (with the machine off) can be used to ensure the tap starts straight. Even a slight angle can result in a crooked, weak, or cross-threaded hole.
- Initial Engagement: Apply light, even downward pressure while rotating the tap clockwise (for right-hand threads). Once the tap starts to bite and cut a few threads, the pressure can be eased, as the tap will then guide itself.
Chip Management and Lubrication
Tapping generates chips, and managing them is crucial.
- Back-and-Forth Motion: After advancing the tap approximately a quarter to a half turn (depending on the material and tap size), rotate the tap backward (counter-clockwise) a quarter turn. This “break and clear” motion breaks the chips and clears them from the cutting flutes, preventing them from jamming and potentially breaking the tap.
- Cutting Fluid: Continuously apply an appropriate cutting fluid or tapping oil throughout the tapping process. This lubricates the cutting edges, reduces friction and heat, improves chip evacuation, and results in a smoother, more accurately formed thread. The type of lubricant depends on the material; specialized tapping fluids are available for various metals.
Avoiding Common Tapping Mistakes
Even with the correct drill bit and proper technique, mistakes can happen. Being aware of common pitfalls can save time, materials, and frustration.
Incorrect Drill Size
- Too Small: This is a leading cause of tap breakage. An undersized hole requires excessive force to cut the thread, putting immense stress on the tap. It also produces too much chip material, leading to jamming.
- Too Large: An oversized hole results in insufficient thread engagement, leading to weak threads that are prone to stripping. The fastener will not hold securely. Always double-check the drill bit size against a tap drill chart.
Misaligned Tapping
Starting the tap at an angle is a common error that leads to crooked threads. A screw inserted into such a hole will not sit flush, can bind, and will apply uneven stress, compromising the integrity of the connection. Always ensure the tap is perfectly perpendicular to the workpiece throughout the initial engagement.

Forcing the Tap
Tapping should feel like a controlled cutting action, not a struggle. If excessive force is required, stop immediately. The issue could be:
- Dull Tap: A worn or dull tap requires more force to cut.
- Insufficient Lubrication: Lack of cutting fluid increases friction.
- Chips Jamming: Failure to back off and clear chips.
- Incorrect Drill Size: Most commonly, the pilot hole is too small.
Forcing a tap is almost always a precursor to a broken tap, which can be extremely difficult and time-consuming to extract, often rendering the part unusable. Patience and a keen feel for the cutting action are essential for successful tapping.
By meticulously following these guidelines, from selecting the correct #25 drill bit for your 10-24 tap to executing the tapping process with precision, you can consistently achieve strong, reliable threads for all your technical projects.
aViewFromTheCave is a participant in the Amazon Services LLC Associates Program, an affiliate advertising program designed to provide a means for sites to earn advertising fees by advertising and linking to Amazon.com. Amazon, the Amazon logo, AmazonSupply, and the AmazonSupply logo are trademarks of Amazon.com, Inc. or its affiliates. As an Amazon Associate we earn affiliate commissions from qualifying purchases.