
The graphics processing unit (GPU) is the heart of any modern computer’s visual experience, from crisp desktop rendering to immersive gaming and professional content creation. NVIDIA, a titan in the GPU industry, provides powerful hardware that relies heavily on its accompanying software—the drivers—to function optimally. Over time, these drivers can become corrupted, outdated, or conflict with other system components, leading to a myriad of issues such as performance drops, graphical glitches, system crashes, and even preventing games or applications from launching. Knowing how to properly reinstall NVIDIA drivers is a fundamental skill for any PC user looking to maintain a stable, high-performing system. This guide will walk you through the entire process, ensuring your NVIDIA GPU operates at its peak.
Understanding NVIDIA Drivers and Their Importance
Before diving into the reinstallation process, it’s crucial to understand what graphics drivers are and why they play such a critical role in your system’s health and performance.
What are Graphics Drivers?
At their core, graphics drivers are software programs that enable your operating system and applications to communicate with your graphics card. They act as a translator, allowing the complex hardware components of your NVIDIA GPU to understand and execute commands from games, video editors, web browsers, and the operating system itself. Without appropriate drivers, your GPU might not be recognized, or it would operate at a vastly reduced capacity, if at all. Modern drivers often include optimizations for new games, performance enhancements, bug fixes, and support for the latest display technologies and APIs (like DirectX and Vulkan).
Why Drivers Degrade or Corrupt?
Graphics drivers are complex pieces of software, and like any software, they can encounter issues over time. Several factors can lead to driver degradation or corruption:
- Improper Updates: An interrupted driver update, an update that failed to install correctly, or installing a driver that isn’t fully compatible with your specific hardware or operating system version can lead to instability.
- Software Conflicts: Other installed software, especially security suites, background utilities, or even other hardware drivers, can sometimes conflict with NVIDIA drivers, causing them to malfunction.
- System Corruption: Malware infections, unexpected system shutdowns, or errors within the operating system itself can corrupt driver files.
- Hardware Changes: Swapping out components, particularly other graphics cards or even motherboards, without a clean driver sweep can leave residual files that interfere with new installations.
- Overclocking and Instability: Aggressive GPU overclocking or an unstable system power supply can sometimes lead to driver crashes and subsequent corruption.
When to Reinstall NVIDIA Drivers?
Reinstalling your NVIDIA drivers isn’t something you need to do every week, but it becomes a crucial troubleshooting step in specific scenarios:
- Persistent Performance Issues: If you notice a sudden drop in gaming framerates, stuttering, or general sluggishness that wasn’t present before.
- Graphical Glitches or Artifacts: Unusual visual anomalies on your screen, such as flickering textures, distorted images, or strange patterns.
- System Crashes or Blue Screens of Death (BSODs): Especially if these errors frequently point to graphics-related files or occur during graphically intensive tasks.
- After Major Operating System Updates: A significant Windows update can sometimes interfere with existing drivers, necessitating a clean reinstallation.
- When Installing a New Graphics Card: Always perform a clean driver installation when upgrading or replacing your GPU to prevent conflicts with old drivers.
- Troubleshooting Specific Game or Application Issues: If a particular game or software consistently crashes or displays errors related to graphics, a driver reinstall is a good starting point.
- Before or After Installing Major Driver Updates (Optional but Recommended): While not always necessary, some users prefer a clean installation for every major driver release to ensure maximum stability and performance.
Pre-Reinstallation Checklist: Preparing Your System
A successful driver reinstallation begins with proper preparation. Skipping these steps can lead to further frustration or an incomplete fix.
Backing Up Important Data
While a driver reinstallation rarely affects user data, it’s always prudent to have recent backups of critical files. This is a general best practice for any significant system change and provides peace of mind. Use cloud services, external hard drives, or network storage to safeguard your documents, photos, and other important files.
Downloading the Latest NVIDIA Drivers
Always obtain drivers directly from the official NVIDIA website (nvidia.com). This ensures you’re getting genuine, uncorrupted, and the latest stable version of the drivers for your specific GPU model and operating system.
- Navigate to the NVIDIA driver download page.
- Select your Product Type (e.g., GeForce), Product Series (e.g., GeForce RTX 40 Series), Product (e.g., RTX 4090), and Operating System (e.g., Windows 11).
- Choose the ‘Game Ready Driver (GRD)’ unless you have a specific need for the ‘Studio Driver’.
- Click ‘Search’ and then ‘Download’. Save the executable file to an easily accessible location, like your desktop.
Disconnecting from the Internet
Windows Update can be overly enthusiastic in automatically installing drivers, potentially interfering with your manual reinstallation process. Temporarily disconnecting your PC from the internet (by unplugging an Ethernet cable or disabling Wi-Fi) prevents Windows from automatically installing a generic or older driver version during the process.
Creating a System Restore Point
A System Restore Point is a snapshot of your system files, installed applications, Windows Registry, and settings. In the unlikely event that something goes wrong during the driver reinstallation, you can revert your system to this stable state.
- Search for “Create a restore point” in the Windows search bar and open it.
- In the System Properties window, ensure “Protection” is “On” for your system drive. If not, click “Configure” to enable it.
- Click “Create…”
- Give the restore point a descriptive name (e.g., “Before NVIDIA Driver Reinstall”) and click “Create.”
The Step-by-Step Reinstallation Process
This is the core of the tutorial. For a truly clean installation, we will utilize a third-party utility called Display Driver Uninstaller (DDU), which is highly recommended by tech enthusiasts and professionals alike for removing all traces of old drivers.
Uninstalling Existing Drivers with Display Driver Uninstaller (DDU)
While you can uninstall drivers via Windows Device Manager or the Control Panel, these methods often leave residual files and registry entries that can cause conflicts. DDU is designed to completely remove all traces of graphics card drivers (NVIDIA, AMD, and Intel), ensuring a pristine environment for your new installation.
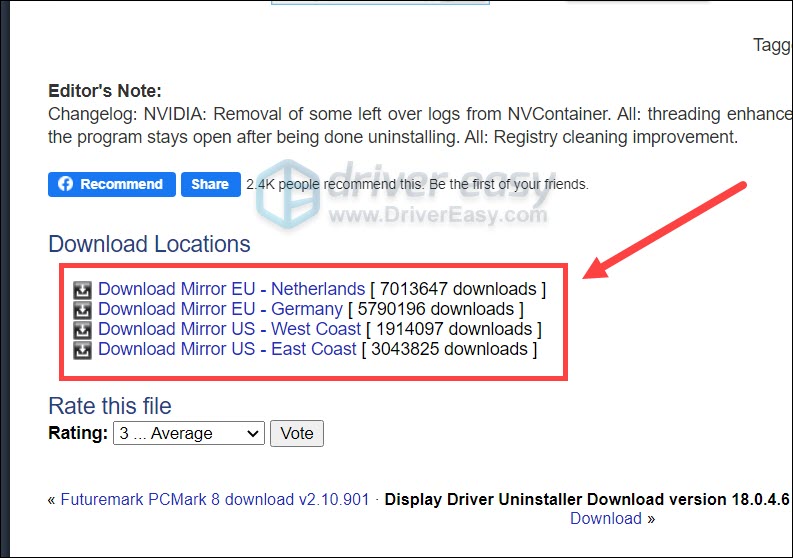
- Download DDU: Obtain the latest version of DDU from its official Guru3D download page. Extract the downloaded zip file to a folder on your desktop.
- Boot into Safe Mode: It is crucial to run DDU in Windows Safe Mode to prevent Windows from loading any graphics drivers, allowing DDU to perform a thorough clean-up.
- Save all your work and close applications.
- Go to Start > Power, then hold down the Shift key while clicking “Restart.”
- On the “Choose an option” screen, select “Troubleshoot” > “Advanced options” > “Startup Settings” > “Restart.”
- After the PC restarts, you’ll see a list of options. Press
4orF4to enter “Enable Safe Mode.”
- Run DDU:
- Once in Safe Mode, navigate to the extracted DDU folder and run
Display Driver Uninstaller.exe. - DDU might prompt you about recommended options. For “Select device type,” choose “GPU.”
- For “Select Vendor,” choose “NVIDIA.”
- Click the “Clean and restart (Recommended)” button. DDU will now completely remove all NVIDIA driver components and then automatically restart your system into normal Windows mode.
- Note: If you are planning to install a new GPU immediately after uninstalling, choose “Clean and shutdown” instead.
- Once in Safe Mode, navigate to the extracted DDU folder and run
Installing the New Drivers
After DDU has done its work and your system has restarted, you’ll be back in normal Windows mode, likely with a very basic display driver (low resolution, generic driver).
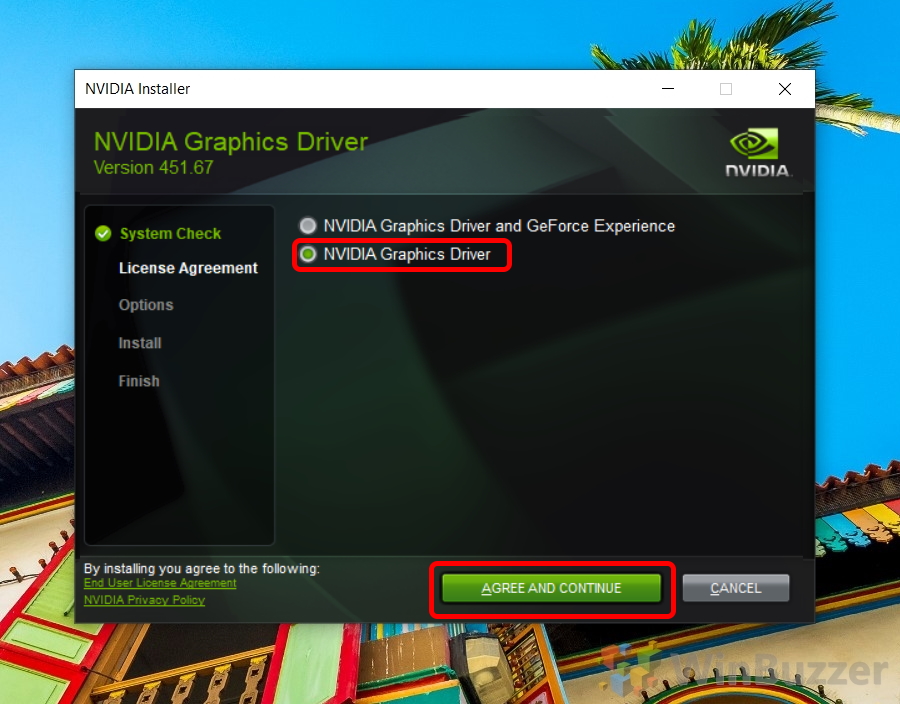
- Run the NVIDIA Driver Installer: Locate the NVIDIA driver executable file you downloaded earlier and double-click it.
- Extraction Path: The installer will ask where to extract the files. The default location is usually fine.
- License Agreement: Read and accept the NVIDIA software license agreement.
- Installation Options: This is a crucial step for a clean installation:
- “Graphics Driver and GeForce Experience” (Recommended): This typically installs both the core graphics driver and NVIDIA’s GeForce Experience utility.
- “Custom (Advanced)”: Select this option if you want more control, especially if you want to perform a true clean installation.
- After selecting “Custom (Advanced),” click “Next.”
- On the next screen, you’ll see a list of components. You can usually leave them all checked.
- Crucially, check the box next to “Perform clean installation”. This option instructs the NVIDIA installer to remove any leftover previous driver profiles and settings before installing the new ones, which is complementary to DDU’s work.
- Complete Installation: Click “Next” and let the installer complete the process. Your screen may flicker or go black momentarily during installation; this is normal.
- Restart (if prompted): The installer might prompt you to restart your computer. Do so to finalize the installation.
- Reconnect Internet: Once your system has fully restarted, you can reconnect to the internet.
Post-Installation Verification
After restarting, it’s a good idea to confirm that the drivers have been installed correctly.
- Device Manager:
- Right-click the Start button and select “Device Manager.”
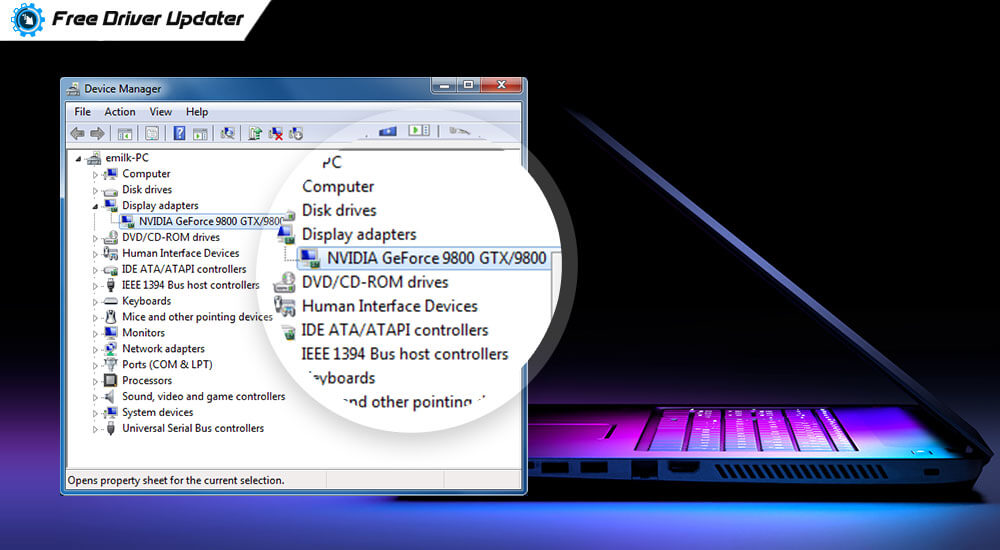
- Expand “Display adapters.” You should see your NVIDIA GPU listed without any warning signs (e.g., yellow exclamation marks).
- Right-click your NVIDIA GPU and select “Properties.” Under the “Driver” tab, verify that the driver version and date match the one you just installed.
- NVIDIA Control Panel:
- Right-click on your desktop and select “NVIDIA Control Panel.” If it opens and you can navigate its settings, it confirms a successful installation.
- Test Applications: Launch a few games or graphics-intensive applications. Monitor their performance and check for any remaining visual artifacts or stability issues.
Troubleshooting Common Reinstallation Issues
Even with careful steps, problems can sometimes arise. Here are solutions to common issues:
Installation Failures
- Antivirus Interference: Temporarily disable your antivirus software during the driver installation. Remember to re-enable it afterward.
- Corrupted Download: The driver file itself might be corrupted. Delete the downloaded file and re-download it from NVIDIA’s website.
- DDU Not Used Properly: If you didn’t use DDU or didn’t run it in Safe Mode, residual files might be causing conflicts. Go back and perform the DDU process correctly.
- Insufficient Disk Space: Ensure you have enough free space on your system drive for the installation.
Performance Problems After Reinstallation
- Wrong Driver Version: Double-check that you downloaded the correct driver for your specific GPU model and operating system.
- Old Drivers Still Present: Even after using DDU, a rare persistent issue might occur. Re-run DDU in Safe Mode, then try the installation again.
- Hardware Issues: If problems persist after a clean driver install, the issue might be hardware-related (e.g., overheating GPU, faulty power supply, or a dying graphics card).
Display Issues
- Black Screen/No Display: If your screen remains black after a restart, try booting into Safe Mode (using the Shift+Restart method or repeatedly pressing F8/F5 during boot, depending on your system). If you can get into Safe Mode, you can try uninstalling the drivers again or using System Restore.
- Low Resolution/Generic Driver: This is normal immediately after using DDU, but if it persists after a full installation and restart, the driver either failed to install or is not loading correctly. Check Device Manager.
- Incorrect Display Cable/Port: Ensure your monitor is connected to the graphics card’s output, not the motherboard’s integrated graphics output (unless you intentionally want to use integrated graphics).
Best Practices for Driver Maintenance
Maintaining optimal driver health goes beyond just reinstallation. Adopting good habits can prevent many issues from occurring in the first place.
Regular Updates (But with Caution)
While it’s generally good to keep drivers updated for performance gains and bug fixes, avoid immediately installing every new driver release. Sometimes, new drivers introduce their own bugs. It’s often wise to wait a few days or a week after a new release to see if other users report major issues. Read release notes carefully to understand what’s changed.
Using NVIDIA GeForce Experience (with Discretion)
NVIDIA GeForce Experience is a utility that can automatically notify you of new driver updates, optimize game settings, and provide recording features. It’s convenient, but some users prefer not to have extra background processes. If you use it, ensure automatic driver installation is configured to your preference, and consider performing ‘Custom’ clean installations even when updating through GeForce Experience.
Monitoring System Health
Tools like HWMonitor, MSI Afterburner, or even the built-in Windows Performance Monitor can help you keep an eye on your GPU’s temperature, clock speeds, and usage. Unusually high temperatures or erratic clock speeds can indicate underlying issues that might lead to driver instability.
Conclusion
Reinstalling NVIDIA drivers is a powerful troubleshooting technique that can resolve a multitude of system performance and stability issues. By following this comprehensive guide, from understanding the ‘why’ behind driver issues to executing a meticulous clean installation using tools like Display Driver Uninstaller, you empower yourself to diagnose and fix common graphical problems. A well-maintained and correctly configured NVIDIA driver setup is essential for unlocking the full potential of your graphics card, ensuring a smooth, responsive, and visually stunning computing experience. Regular maintenance, informed updates, and knowing how to perform a clean reinstallation will keep your system running efficiently for years to come.
aViewFromTheCave is a participant in the Amazon Services LLC Associates Program, an affiliate advertising program designed to provide a means for sites to earn advertising fees by advertising and linking to Amazon.com. Amazon, the Amazon logo, AmazonSupply, and the AmazonSupply logo are trademarks of Amazon.com, Inc. or its affiliates. As an Amazon Associate we earn affiliate commissions from qualifying purchases.