The prospect of upgrading your home’s climate control to a smart thermostat like the Nest can be incredibly appealing. Beyond the sleek design and intuitive interface, Nest thermostats offer significant benefits, including potential energy savings and remote control over your home’s temperature. But for many, the installation process itself can seem daunting. This guide aims to demystify the installation of a Nest thermostat, breaking it down into manageable steps. Whether you’re a seasoned DIY enthusiast or a complete novice, we’ll walk you through everything you need to know, from preparing your workspace to troubleshooting common issues.

Understanding Your Nest Thermostat and Your HVAC System
Before you even think about touching a wire, it’s crucial to understand the Nest thermostat you’ve purchased and, more importantly, the heating, ventilation, and air conditioning (HVAC) system it will be controlling. This foundational knowledge will not only make the installation smoother but also help you avoid potential mistakes that could damage your system or the thermostat itself.
2.1 Decoding Your Nest Model: Features and Compatibility
Google Nest offers a range of thermostats, each with slightly different features and installation requirements. The most popular models include the Nest Learning Thermostat and the Nest Thermostat. While the core installation process is similar, understanding the specific model you have is key.
- Nest Learning Thermostat: This is the premium model, known for its ability to learn your habits and create a custom schedule automatically. It typically has a more robust display and a metal casing.
- Nest Thermostat: This is the more budget-friendly option, offering core smart thermostat functionalities like app control and basic scheduling, but without the advanced learning capabilities of its pricier counterpart. It often features a mirror-like display and a plastic casing.
The first step in determining compatibility is checking if your HVAC system is compatible with Nest thermostats. Fortunately, Nest thermostats are designed to work with a vast majority of low-voltage (24V) HVAC systems, including:
- Forced air systems: Gas, electric, oil furnaces.
- Heat pumps: With or without auxiliary heat.
- Radiant systems: Hot water or steam.
- Central air conditioners.
However, there are a few exceptions. High-voltage (line-voltage) systems, commonly found in older homes or in specific applications like electric baseboard heaters, are not compatible with Nest thermostats. Nest also doesn’t directly support proprietary communication or multi-zone systems that require specific controllers.
To check your system’s compatibility before you buy:
- Visit the Nest Compatibility Checker: Google provides an excellent online tool. Simply input your current thermostat’s wiring configuration (you’ll see this in the next step), and it will tell you if your system is compatible.
- Examine your existing thermostat’s wiring: This is the most direct way. With the faceplate of your old thermostat removed (but not disconnected), look at the wires connected to the terminals. The letters next to each terminal indicate what each wire is for. Nest’s compatibility checker will guide you on what to look for.
2.2 Understanding Your Existing Thermostat Wiring
This is arguably the most critical step in preparation. Your existing thermostat is a gateway to understanding how your HVAC system is wired.
- Turn off power to your HVAC system: This is non-negotiable for safety. Locate the circuit breaker that controls your furnace and air conditioner and switch it to the “off” position. Double-check by trying to adjust your old thermostat – if the system doesn’t respond, the power is off.
- Remove the old thermostat’s faceplate: Most older thermostats have a cover that can be gently pulled off, or they might have small screws holding it in place.
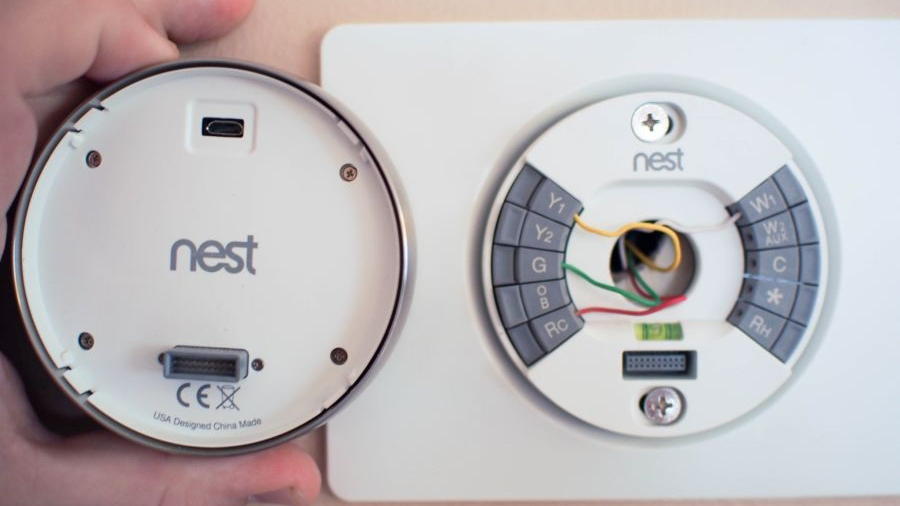
- Photograph the wiring: Before disconnecting anything, take a clear picture of the wires connected to the terminals. Ensure the labels (like R, G, Y, W, C) are visible. This photo will be your lifeline during the Nest installation.
- Identify the wires:
- R (or Rh/Rc): Power (usually 24V) from the transformer. Rh is for heating, Rc is for cooling. If you have both, Nest will usually use a jumper.
- G: Fan wire.
- Y (or Y1): Cooling wire.
- W (or W1): Heating wire.
- C: Common wire. This provides continuous power to the thermostat. Many older systems lack a C wire, which can present a unique installation challenge for smart thermostats.
The Importance of the C Wire: The Nest thermostat, like most smart thermostats, requires a constant 24V power supply to operate its Wi-Fi, screen, and other smart features. This power is typically provided by the C wire. If your existing thermostat doesn’t have a C wire connected, you have a few options:
- Use the Nest Power Connector: For many systems, the Nest Thermostat (2020 model) comes with a small adapter called the Nest Power Connector. This can sometimes “create” a virtual C wire by repurposing an existing wire. Your Nest compatibility check will confirm if this is an option for you.
- Wire a C wire from your HVAC system: This is the most robust solution and involves running a new wire from your furnace control board to the thermostat location. This is a more advanced DIY task or may require professional assistance.
- Use a plug-in adapter: Some users opt for a plug-in transformer and run a wire to the thermostat, though this is less elegant.
Step-by-Step Nest Thermostat Installation
With your preparation complete and the power safely off, you’re ready to begin the physical installation.
3.1 Removing the Old Thermostat and Mounting the Nest Base

This is where you’ll physically disconnect your old thermostat and begin to attach the Nest.
- Disconnect the wires: One by one, carefully disconnect the wires from the terminals on your old thermostat. You can use a small screwdriver to loosen the screws holding them. Make sure the wires don’t slip back into the wall – you can wrap them around a pencil or use tape to keep them organized.
- Remove the old thermostat’s base plate: Unscrew the old base plate from the wall.
- Mount the Nest base:
- Thread the wires: Gently feed the wires from your wall through the central opening of the Nest base plate.
- Position the base: Hold the Nest base plate against the wall. Many Nest models come with a mounting plate that can be used to cover any unsightly marks left by the old thermostat or to provide a larger mounting surface. Use the included screws to secure the base plate to the wall. If your wall is drywall, you might need to use the included wall anchors.
- Ensure it’s level: Use a small level (often built into the Nest base or the mounting plate) to ensure the base is straight.
3.2 Wiring Your Nest Thermostat
This is the core of the installation process. Refer to your photograph and the Nest’s wiring diagram.
- Connect the wires to the Nest base: Each terminal on the Nest base is clearly labeled.
- Match the wires from your wall to the corresponding terminals on the Nest base plate. For example, the wire that was connected to the ‘R’ terminal on your old thermostat should go into the ‘R’ terminal on the Nest.
- Push the wires firmly into the terminals. Most Nest models have push-in connectors, so you simply insert the wire and it should be held securely.
- If using the Nest Power Connector (for Nest Thermostat 2020): The instructions for the Power Connector are specific to its installation and the wires it utilizes. Follow the Nest app’s guidance precisely for this. It typically involves connecting the Power Connector to specific terminals on the base and then connecting wires from the wall to the Power Connector.
- Tidy up the wires: Ensure all wires are securely in their terminals and that no excess wire is exposed.
3.3 Attaching the Nest Display and Initial Setup
With the base wired and mounted, you can now attach the main display unit and begin the smart setup.
- Attach the Nest display: Simply snap the Nest display unit onto the base plate. It usually clicks into place.
- Restore power: Go back to your circuit breaker and switch the power to your HVAC system back on.
- Initial setup on the Nest display: The Nest thermostat should power on and guide you through the initial setup process. This typically includes:
- Language selection.
- Connecting to your Wi-Fi network. You’ll need your Wi-Fi password.
- HVAC system configuration: The Nest will often ask you to confirm the wires you’ve connected and the type of system you have. This is where your preparation pays off.
- Setting up your Nest account: You’ll likely be prompted to download the Google Home app on your smartphone or tablet and set up your Nest thermostat within the app.
Troubleshooting and Advanced Considerations
Even with careful planning, you might encounter minor issues. Here’s how to address some common problems and some advanced topics to consider.
4.1 Common Installation Issues and Solutions
-
“No Power” or “Nest is not turning on”:
- Check the circuit breaker: Ensure the power to your HVAC system is definitely on.
- Verify wiring: Double-check that all wires are securely connected to the correct terminals on the Nest base. Pay close attention to the R wire and the C wire (or the Power Connector setup).
- Check for loose connections: Wires can sometimes slip out.
- Ensure the display is properly seated: Make sure the Nest display is firmly attached to the base.
-
“Heating/Cooling not working”:
- Confirm wire labels: Ensure you’ve matched the wires correctly to the terminals (W for heat, Y for cool).
- Verify HVAC configuration in the app: During the setup, Nest asks about your system type. Ensure this is accurate.
- Check your furnace/AC: Make sure the furnace or air conditioner itself is functioning correctly (e.g., pilot light is on, unit is powered).
-
Wi-Fi Connectivity Problems:
- Check your Wi-Fi password: Ensure you’ve entered it correctly.
- Router proximity: If your Nest is too far from your router, it might have a weak signal.
- Router settings: Some advanced router settings (like MAC filtering or specific firewall rules) might interfere.
4.2 When to Call a Professional
While Nest thermostats are designed for DIY installation, there are situations where seeking professional help is the best course of action:
- High-voltage systems: If you have electric baseboard heaters or other line-voltage systems, you must hire an electrician.
- Complex HVAC systems: Multi-zone systems with proprietary controllers, or systems with unusual wiring configurations, might require professional expertise.
- Lack of a C wire and inability to use the Power Connector: If you don’t have a C wire and the Nest Power Connector isn’t compatible or you’re uncomfortable running new wires, an HVAC technician can install a C wire for you.
- Persistent problems: If you’ve tried all the troubleshooting steps and your Nest still isn’t working correctly, a professional HVAC technician or a Nest Pro installer can diagnose the issue.
The Benefits of a Smartly Installed Nest Thermostat
Once your Nest thermostat is successfully installed and configured, you unlock a world of benefits. The convenience of adjusting your home’s temperature from anywhere using the Google Home app, the potential for significant energy savings through intelligent scheduling and learning, and the sleek, modern aesthetic it brings to your home are just the beginning. You’ll also gain access to energy reports, which can provide valuable insights into your home’s energy consumption patterns, helping you make informed decisions to further reduce waste. The integration with other Google Assistant-enabled devices also opens up possibilities for a more connected and automated home environment.
In conclusion, installing a Nest thermostat is a rewarding DIY project that can enhance your home’s comfort and efficiency. By following these detailed steps, understanding your system, and prioritizing safety, you can confidently upgrade your home to the future of climate control.
aViewFromTheCave is a participant in the Amazon Services LLC Associates Program, an affiliate advertising program designed to provide a means for sites to earn advertising fees by advertising and linking to Amazon.com. Amazon, the Amazon logo, AmazonSupply, and the AmazonSupply logo are trademarks of Amazon.com, Inc. or its affiliates. As an Amazon Associate we earn affiliate commissions from qualifying purchases.