In the ever-evolving landscape of personal computing, the ability to perform a clean installation of your operating system is a fundamental skill that empowers users, enhances system performance, and serves as a vital troubleshooting tool. While Windows 11 has certainly captured headlines, Windows 10 remains a robust, widely used, and incredibly stable operating system that continues to be the backbone for millions of users worldwide, from casual browsing to intensive professional tasks. Whether you’re setting up a new PC, refreshing an old one, or recovering from a system crash, installing Windows 10 from a USB drive is the most common, efficient, and recommended method.

This comprehensive guide will walk you through every step of the process, ensuring a smooth and successful installation. We’ll cover everything from the initial preparation and understanding why a USB installation is superior, to creating your bootable media, configuring your computer’s BIOS/UEFI settings, and finally, completing the Windows 10 installation and post-setup essentials. By the end, you’ll not only have a freshly installed operating system but also a deeper understanding of your computer’s mechanics, boosting your digital security and productivity.
Why Choose a USB for Windows 10 Installation?
Before diving into the technicalities, it’s worth understanding why installing Windows 10 via a USB drive has become the standard. This method offers several distinct advantages over traditional DVD installations or system upgrades, making it the preferred choice for both beginners and seasoned tech enthusiasts.
The Advantages of a Clean Installation
A clean installation means starting fresh. Unlike upgrading an existing operating system, which carries over old files, settings, and potentially corrupted data, a clean install wipes the primary drive entirely. This results in:
- Optimal Performance: Eliminates bloatware, leftover files from previous installations, and registry clutter, leading to a faster, more responsive system. Your PC will feel brand new, maximizing its efficiency from day one.
- Enhanced Stability: Reduces conflicts between old software components and drivers, leading to fewer crashes and errors. This contributes to better digital security and a more reliable computing experience.
- Troubleshooting & Recovery: If your current Windows installation is severely corrupted, unbootable, or plagued by persistent issues, a clean USB installation often serves as the most effective solution to restore functionality.
- Better Resource Management: With only essential files and fresh drivers, your system resources (CPU, RAM, storage) are allocated more effectively, which is particularly beneficial for demanding applications and overall productivity.
Speed and Portability
USB drives inherently offer speed and portability that traditional optical media cannot match.
- Faster Installation: USB 3.0 and newer drives boast significantly faster read/write speeds than DVDs, drastically cutting down the time it takes to copy installation files and complete the setup process.
- Widespread Compatibility: Most modern computers, especially laptops and compact desktops, no longer include optical drives. USB ports, however, are ubiquitous, making a bootable USB a universally compatible solution.
- Reusability: Once you’re done installing, you can format the USB drive and reuse it for other purposes, making it a versatile and eco-friendly option.
- Convenience: A small USB stick is incredibly portable, allowing you to carry your Windows 10 installation media with you wherever you go, ready for emergencies or new machine setups. This can save you time and potentially money by avoiding professional IT assistance.
Pre-Installation Checklist: What You’ll Need
A successful installation hinges on thorough preparation. Before you begin, gather these essential items and complete the necessary preparatory steps to avoid any hiccups.
Essential Hardware and Software
- A Computer to Create the Media: You’ll need access to a working computer with an internet connection to download the Windows 10 Media Creation Tool and the Windows 10 ISO file.
- A USB Flash Drive: A minimum of 8 GB capacity is required. Ensure it’s empty or contains data you don’t mind losing, as the process will format the drive. For optimal speed, a USB 3.0 drive is recommended.
- Internet Connection: Required for downloading the Media Creation Tool and subsequent Windows updates after installation.
- Windows 10 Product Key (Optional but Recommended): While you can install Windows 10 without a product key, you’ll eventually need one to activate the operating system and unlock all features. If you’re reinstalling Windows 10 on a computer that previously had an activated version, it might reactivate automatically after connecting to the internet, as the license is often tied to your hardware or Microsoft account.
- Target PC: The computer on which you intend to install Windows 10.
Crucial Data Backup
This is arguably the most critical step. Installing Windows 10 from scratch will erase all data on the primary drive (typically C: drive). Failure to back up your personal files can lead to permanent data loss.
- Identify Important Files: Photos, documents, videos, music, project files, browser bookmarks, and any specialized software configurations.
- Choose a Backup Method:
- External Hard Drive: A reliable and common method for large amounts of data.
- Cloud Storage: Services like OneDrive, Google Drive, or Dropbox are excellent for smaller, frequently accessed files and provide off-site redundancy.
- Network Attached Storage (NAS): For those with home servers, NAS offers centralized and secure backup solutions.
- Verify Your Backup: After copying, double-check that your essential files are indeed present and accessible on your backup medium. This protects your valuable digital assets and ensures continuity.
Understanding System Requirements
Ensure your target PC meets the minimum specifications for Windows 10 to guarantee a smooth experience.
- Processor: 1 GHz or faster compatible processor (or System on a Chip, SoC).
- RAM: 1 GB for 32-bit or 2 GB for 64-bit. (Realistically, 4 GB is the minimum for comfortable use, 8 GB or more is recommended).
- Hard Disk Space: 32 GB for 64-bit OS or 16 GB for 32-bit OS. (Again, more is always better for applications and future updates).
- Graphics Card: DirectX 9 or later with WDDM 1.0 driver.
- Display: 800×600 resolution.
Knowing these requirements helps you manage expectations and confirm your hardware is up to the task, ensuring your investment in a new OS is well-placed.
Step-by-Step Guide: Creating Your Bootable USB
The heart of the USB installation process is creating a bootable drive containing the Windows 10 installation files. Microsoft provides an official tool for this, making the process straightforward.
Downloading the Windows 10 Media Creation Tool
- Visit Microsoft’s Website: Open your web browser and navigate to the official Microsoft Windows 10 download page. You can usually find it by searching “Windows 10 download” or “Windows 10 Media Creation Tool.”
- Download the Tool: Look for the section titled “Create Windows 10 installation media” and click the “Download tool now” button. Save the
MediaCreationTool.exefile to your computer.
Using the Tool to Create Bootable Media
- Run the Tool: Locate the downloaded
MediaCreationTool.exefile and double-click it to run. You may be prompted by User Account Control (UAC) to allow the app to make changes to your device; click “Yes.” - Accept Terms: Read and accept the license terms.
- Choose an Action: On the “What do you want to do?” screen, select “Create installation media (USB flash drive, DVD, or ISO file) for another PC,” then click “Next.”
- Select Language, Architecture, and Edition: The tool will usually recommend options based on your current PC. You can uncheck “Use recommended options for this PC” if you need to choose a different language, a specific Windows 10 edition (e.g., Home or Pro), or a different architecture (32-bit or 64-bit). For most modern systems, choose “64-bit (x64).” If unsure, 64-bit is usually the correct choice. Click “Next.”
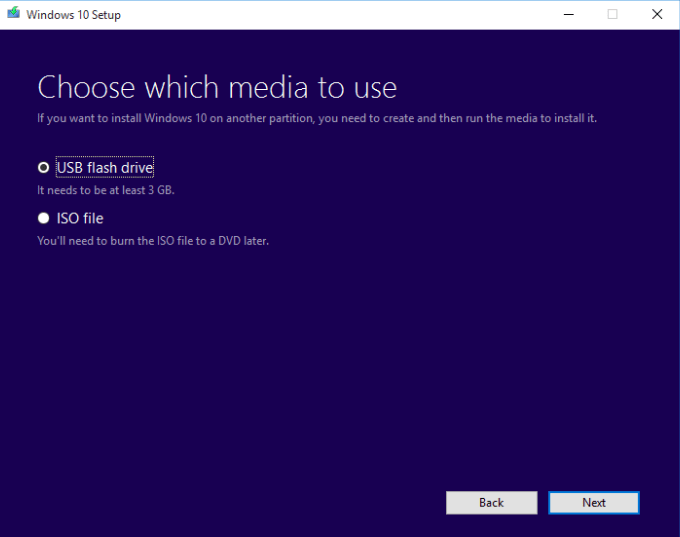
- Choose Media: Select “USB flash drive” as the media you want to use, then click “Next.”
- Select USB Drive: From the list of available drives, select your prepared USB flash drive. Double-check that you’re selecting the correct drive, as this step will format it and erase all its contents. Click “Next.”
- Download and Create: The tool will now download the Windows 10 files and write them to your USB drive. This process can take some time, depending on your internet speed and the speed of your USB drive. Do not remove the USB drive or shut down your computer during this phase.
- Finish: Once complete, the tool will indicate that your USB flash drive is ready. Click “Finish.” You can now safely remove the USB drive.
Alternative Method: Manual ISO Download and Rufus (Advanced)
While the Media Creation Tool is generally sufficient, some advanced users or specific scenarios might prefer to manually download the ISO file and use a third-party tool like Rufus to create the bootable USB. This offers more control over partition schemes (MBR vs. GPT) and target systems (UEFI vs. BIOS).
- Download Windows 10 ISO: On the Microsoft download page, instead of selecting “USB flash drive,” choose “ISO file” in the Media Creation Tool or use a direct ISO download link if available.
- Download Rufus: Go to the official Rufus website and download the latest portable version.
- Create Bootable USB with Rufus:
- Open Rufus.
- Select your USB drive under “Device.”
- Click “SELECT” and browse to your downloaded Windows 10 ISO file.
- Choose your “Partition scheme” (GPT for UEFI, MBR for BIOS) and “Target system” (UEFI or BIOS). Most modern systems use GPT and UEFI.
- Click “START” and confirm the warning about data loss.
- Wait for Rufus to complete the process.

Configuring Your PC for USB Booting
With your bootable USB ready, the next step is to instruct your computer to start from this drive instead of its internal hard drive. This involves accessing and adjusting your PC’s BIOS (Basic Input/Output System) or UEFI (Unified Extensible Firmware Interface) settings.
Accessing BIOS/UEFI Settings
- Connect USB: Plug your bootable Windows 10 USB drive into an available USB port on your target PC.
- Restart PC: Reboot your computer.
- Enter BIOS/UEFI: As soon as the computer starts, you’ll need to repeatedly press a specific key to enter the BIOS/UEFI setup utility. This key varies by manufacturer but is commonly one of the following:
Delete,F2,F10,F12, orEsc.- Tip: Watch the screen closely during startup; it often flashes a message like “Press DEL to enter Setup” or “Press F2 for BIOS.” If you miss it, simply restart and try again.
- Navigate the Interface: Once inside the BIOS/UEFI, you’ll typically use the arrow keys to navigate and
Enterto select. UEFI interfaces might offer mouse support.
Setting the Boot Order
- Find Boot Options: Look for a section labeled “Boot,” “Boot Options,” “Boot Order,” or “Startup.”
- Prioritize USB: In the boot order list, locate your USB drive (it might be listed by brand, model, or as “USB HDD”). Move it to the top of the boot priority list. This tells the computer to try booting from the USB drive first.
- Save and Exit: After making changes, navigate to the “Exit” or “Save & Exit” section. Select “Save Changes and Exit” or “Exit Saving Changes.” Confirm your choice if prompted. Your computer will then restart and attempt to boot from the USB drive.
UEFI vs. Legacy BIOS Considerations
Modern computers predominantly use UEFI, which offers faster boot times, supports larger hard drives (GPT partition scheme), and provides a more graphical interface. Older systems use Legacy BIOS (MBR partition scheme).
- Secure Boot: If you’re installing Windows 10 on a UEFI system, you might encounter a “Secure Boot” option. For Windows 10, it’s generally compatible, but sometimes it might need to be temporarily disabled or reconfigured to allow booting from external media, especially if you used Rufus with specific settings. Re-enable it after installation for enhanced security.
- Boot Mode (UEFI/Legacy): Some BIOS/UEFI settings allow you to choose between “UEFI Native,” “Legacy Support,” or “CSM (Compatibility Support Module).” For a clean Windows 10 installation on a modern drive, “UEFI Native” is usually the best choice. Ensure your bootable USB was created with the corresponding partition scheme (GPT for UEFI, MBR for Legacy). The Media Creation Tool typically handles this automatically for UEFI-compatible systems.
The Windows 10 Installation Process
Once your PC boots from the USB drive, the familiar Windows setup interface will appear. Follow these steps carefully to install Windows 10 onto your hard drive.
Initial Setup and Language Selection
- Windows Setup: The first screen will ask you to choose your language, time and currency format, and keyboard or input method. Make your selections and click “Next.”
- Install Now: Click the “Install now” button to proceed.
Entering Your Product Key (or Skipping)
- Activate Windows: You’ll be prompted to enter your Windows 10 product key.
- If you have one, enter it here.
- If you’re reinstalling Windows on a machine that previously had an activated copy, or if you plan to activate later, you can click “I don’t have a product key” to continue. Windows will often activate automatically once it connects to the internet if your license is tied to your hardware or Microsoft account.
- Select Operating System: If your product key covers multiple editions (e.g., Home and Pro), or if you skipped the key, you’ll be asked to choose which edition of Windows 10 you want to install. Select the appropriate one and click “Next.”
- Accept License Terms: Read the license terms and check the “I accept the license terms” box, then click “Next.”
Drive Partitioning and Formatting
This is where you determine where Windows 10 will be installed. Exercise extreme caution here, as incorrect choices can lead to data loss on other drives.
- Choose Installation Type: Select “Custom: Install Windows only (advanced).” This is crucial for a clean installation.
- Select Drive/Partition: You’ll see a list of drives and partitions on your computer.
- New PC/Blank Drive: If you’re installing on a new, unformatted drive, it will likely show as “Drive 0 Unallocated Space.” Select it and click “New” to create partitions. Windows will typically create a few small system partitions automatically and then the main Windows partition.
- Existing PC/Reinstalling: If you’re reinstalling on a drive that previously had Windows, you’ll see multiple partitions (e.g., “Drive 0 Partition 1,” “Drive 0 Partition 2: Windows”).
- Identify the main Windows partition. It’s usually the largest one.
- Delete Partitions: Select each partition associated with the previous Windows installation (including system partitions) and click “Delete.” Confirm deletion for each. This will turn them into “Unallocated Space.”
- Create New Partition: Select the “Unallocated Space” and click “New.” You can choose the size or just apply the default maximum. Click “Apply” and then “OK” when prompted.
- Format: Select the newly created primary partition (the largest one) and click “Format.” This prepares it for Windows installation.
- Important Note: Ensure you are selecting and deleting partitions only on the drive you intend to install Windows on. If you have other drives with valuable data, leave them untouched.
- Proceed: Select the newly formatted main partition where you want to install Windows 10 and click “Next.”
Completing the Installation
- Copying Files: Windows will now begin copying files and installing features, updates, and drivers. This process involves several reboots. Let the computer restart on its own; do not press any keys.
- Initial Setup: After the reboots, you’ll be greeted by the Out-of-Box Experience (OOBE).
- Region and Keyboard Layout: Select your region and keyboard layout.
- Network Connection: Connect to a Wi-Fi or Ethernet network.
- Microsoft Account: Sign in with your Microsoft account. If you prefer a local account, look for options like “Offline account” or “Domain join instead” (though these options are sometimes subtly hidden).
- Privacy Settings: Review and adjust your privacy settings (location, diagnostics, advertising ID, etc.).
- Cortana: Choose whether to enable or disable Cortana.
- Desktop: After a few more minutes, you’ll finally arrive at your brand-new Windows 10 desktop!
Post-Installation Essentials: Optimizing Your New System
A fresh installation is just the beginning. To ensure your system is secure, performant, and ready for productivity, there are a few crucial steps to take.
Installing Drivers
While Windows 10 has excellent built-in driver support, specific hardware components (graphics card, motherboard chipsets, Wi-Fi adapters) may benefit from manufacturer-supplied drivers for optimal performance and stability.
- Check Device Manager: Right-click the Start button and select “Device Manager.” Look for any devices with yellow exclamation marks, indicating missing or problematic drivers.
- Visit Manufacturer Websites: Go to the official websites of your PC manufacturer (Dell, HP, Lenovo, ASUS, Acer, etc.) or individual component manufacturers (NVIDIA, AMD, Intel). Download the latest drivers for your specific model, especially for your:
- Graphics Card: Crucial for gaming and multimedia performance.
- Chipset: Essential for motherboard functionality.
- Network Adapters: To ensure stable internet connectivity.
- Audio Drivers: For sound quality and features.
- Install Drivers: Run the downloaded driver installers, usually following on-screen prompts. Reboot your system after installing major drivers.
Windows Updates and Security
Keeping Windows up-to-date is paramount for security, stability, and access to new features.
- Run Windows Update: Go to
Settings > Update & Security > Windows Updateand click “Check for updates.” Install all available updates, including optional ones. This process may require several restarts. - Antivirus Software: While Windows Defender provides robust basic protection, consider additional antivirus software for enhanced digital security, especially if you handle sensitive information or frequently download files.
- Firewall: Ensure Windows Firewall is active (
Settings > Update & Security > Windows Security > Firewall & network protection).
Essential Software and Customization
Now for the personalized touch!
- Web Browser: Install your preferred web browser (Chrome, Firefox, Edge, Brave).
- Productivity Suite: Install office software (Microsoft Office, LibreOffice, Google Docs suite via browser).
- Cloud Storage Sync: Re-sync your cloud storage services (OneDrive, Google Drive, Dropbox) to restore your backed-up files.
- Utilities: Consider installing helpful utilities like VLC Media Player, 7-Zip, or a PDF reader.
- Personalization: Customize your desktop background, theme, and other settings to make your new Windows 10 environment truly your own.
By diligently following these steps, you’ll not only successfully install Windows 10 from a USB drive but also lay a strong foundation for a secure, high-performing, and personalized computing experience. This process, while seemingly technical, is a valuable skill that empowers you to maintain control over your digital environment, ultimately enhancing your productivity and protecting your technological investment.
aViewFromTheCave is a participant in the Amazon Services LLC Associates Program, an affiliate advertising program designed to provide a means for sites to earn advertising fees by advertising and linking to Amazon.com. Amazon, the Amazon logo, AmazonSupply, and the AmazonSupply logo are trademarks of Amazon.com, Inc. or its affiliates. As an Amazon Associate we earn affiliate commissions from qualifying purchases.