
In the rapidly evolving world of technology, data has become the new oil, driving innovation across every industry. From tech giants to burgeoning startups, the ability to collect, process, and analyze data is paramount for making informed decisions, developing cutting-edge AI tools, and optimizing productivity. At the heart of this data revolution for Python users lies Pandas, an open-source library that has cemented its status as an indispensable tool for data manipulation and analysis. If you’re looking to delve into data science, machine learning, or simply need to handle structured data efficiently in Python, learning how to install Pandas is your crucial first step.

This comprehensive guide will walk you through the entire process of installing Pandas for Python, ensuring you’re equipped with the knowledge to get started smoothly. We’ll cover the essential prerequisites, explore different installation methods suitable for various workflows, provide robust verification steps, and offer practical troubleshooting tips. By the end of this tutorial, you won’t just know how to install Pandas; you’ll understand why it’s a cornerstone of modern data work and how it can empower your journey into data mastery, enhancing your analytical capabilities and overall tech productivity.
Understanding Pandas: The Powerhouse Behind Data Manipulation
Before we dive into the mechanics of installation, it’s essential to grasp what Pandas is and why it has become such a cornerstone in the Python data ecosystem. Understanding its core value proposition will not only motivate your learning but also highlight its importance within current technology trends, especially concerning software development and AI tools.
What is Pandas and Why Do You Need It?
Pandas is a fast, powerful, flexible, and easy-to-use open-source data analysis and manipulation tool, built on top of the Python programming language. It stands for “Python Data Analysis Library,” and its primary data structures, DataFrame and Series, are designed to make working with labeled or relational data intuitive and efficient. Think of a DataFrame as a highly flexible spreadsheet or a SQL table, but with the added power of Python’s programming capabilities. A Series is essentially a single column of a DataFrame.
You need Pandas because raw data often comes in messy, unorganized forms. Whether you’re dealing with CSV files, Excel spreadsheets, SQL databases, or JSON data, Pandas provides the tools to:
- Read and Write Data: Easily import data from various file formats and export processed data.
- Clean and Prepare Data: Handle missing values, filter rows/columns, merge datasets, and reshape data for analysis.
- Analyze and Explore Data: Perform aggregations, descriptive statistics, time-series analysis, and more, allowing you to uncover patterns and insights.
- Manipulate Data: Apply functions, perform calculations, and transform data in countless ways, preparing it for visualization or machine learning models.
In an era where AI tools and machine learning algorithms are voracious consumers of structured data, Pandas acts as the crucial preprocessing step, ensuring data is clean, consistent, and ready for advanced computations. It significantly boosts productivity for anyone working with data by streamlining otherwise cumbersome tasks.
Key Benefits for Modern Data Analysis
The benefits of integrating Pandas into your data workflow extend beyond mere data handling; they touch upon several aspects crucial for modern tech professionals and businesses:
- Enhanced Productivity: Pandas’ intuitive API and optimized performance allow data scientists, analysts, and developers to perform complex operations with just a few lines of code, saving significant time and effort compared to manual methods or less specialized libraries. This directly impacts project timelines and resource allocation, a key consideration for “Money” and “Business Finance” efficiency.
- Seamless Integration with the Python Ecosystem: As a Python library, Pandas integrates effortlessly with other powerful Python libraries like NumPy (for numerical computing), Matplotlib and Seaborn (for data visualization), and Scikit-learn (for machine learning). This creates a robust and comprehensive toolkit for end-to-end data projects.
- Versatility Across Domains: Whether you’re analyzing financial market data (“Money,” “Investing”), processing sensor data for IoT applications, evaluating marketing campaign performance (“Brand,” “Marketing”), or cleaning datasets for AI model training, Pandas provides the foundational capabilities needed across diverse domains.
- Open-Source and Community Support: Being open-source means Pandas is freely available, continually improved by a global community of developers, and boasts extensive documentation and a vibrant user base. This accessibility makes it a cost-effective and reliable choice for individuals and organizations alike.
- Industry Standard: Pandas has become an industry standard for data manipulation in Python. Proficiency in Pandas is a highly sought-after skill for roles in data science, analytics, and software engineering, making it a valuable asset for career development and “Personal Branding.”
By mastering Pandas, you’re not just learning a software tool; you’re acquiring a foundational skill that opens doors to advanced data analysis, machine learning, and contributes significantly to your technological prowess and problem-solving capabilities.
Essential Prerequisites for a Seamless Installation
Before you can unleash the power of Pandas, there are a couple of foundational components that need to be in place on your system. Ensuring these prerequisites are correctly set up will prevent most common installation headaches and ensure a smooth experience.
Ensuring Python is Ready
Pandas is a Python library, so having Python installed on your system is the absolute first requirement. It’s recommended to use Python 3.7 or newer, as older versions might not be compatible with the latest Pandas releases.
How to Check Python Installation:
Open your command prompt (Windows), Terminal (macOS/Linux), or PowerShell and type:
python --version
or
python3 --version
If Python is installed, you’ll see its version number (e.g., Python 3.9.7). If you receive an error like “command not found” or similar, Python is not installed or not correctly added to your system’s PATH.
Installing Python (if needed):
- Windows: Download the installer from the official Python website (python.org/downloads/windows/). During installation, crucially, check the box that says “Add Python to PATH” before clicking “Install Now.” This ensures you can run Python from any command prompt.
- macOS: Python 3 often comes pre-installed, but it’s usually an older version. It’s best to install a fresh version using Homebrew (
brew install python3) or download the installer from python.org/downloads/macos/. - Linux: Most Linux distributions come with Python pre-installed. You can usually install the latest version via your package manager (e.g.,
sudo apt update && sudo apt install python3on Debian/Ubuntu, orsudo dnf install python3on Fedora/RHEL).
After installation, reopen your command prompt/Terminal and re-check the version.
Mastering Pip: Python’s Package Installer
pip is Python’s standard package-management system used to install and manage software packages written in Python. When you install Python 3.4 or later (or Python 2.7.9 and later), pip is usually included by default. Pandas, like most other Python libraries, is distributed via pip.
How to Check Pip Installation:
In your command prompt/Terminal, type:
pip --version
or
pip3 --version
You should see output similar to pip 21.2.4 from C:Python39libsite-packagespip (python 3.9). If pip is not found, it might mean:
- Python wasn’t installed correctly (especially if you missed “Add Python to PATH”).
- You’re using an older Python version that didn’t bundle
pip. - Your
PATHenvironment variable isn’t correctly configured to findpip.
Installing/Upgrading Pip (if needed):
If pip is missing or outdated, you can typically install or upgrade it using ensurepip (which comes with Python) or by directly downloading get-pip.py.
python -m ensurepip --upgrade
or
python3 -m ensurepip --upgrade
It’s also good practice to ensure your pip is always up-to-date to avoid potential dependency conflicts:
python -m pip install --upgrade pip
The Importance of Virtual Environments (for Tech Best Practices)
While you can install Pandas directly into your system’s global Python environment, it’s a strongly recommended best practice in the tech world to use virtual environments. A virtual environment is an isolated Python environment that allows you to install packages for specific projects without interfering with other projects or your system’s global Python installation. This is crucial for:
- Dependency Management: Different projects might require different versions of the same library. Virtual environments prevent conflicts.
- Cleanliness: Keeps your global Python environment pristine and avoids clutter.
- Reproducibility: Makes it easy to share your project’s exact dependencies, ensuring others can run your code without issues.
- Digital Security and Stability: Isolating dependencies reduces the risk of unintended consequences when updating or removing packages.
Creating and Activating a Virtual Environment:
Python 3 comes with venv, a module for creating virtual environments.
-
Navigate to your project directory:
cd my_data_project(If
my_data_projectdoesn’t exist, create it:mkdir my_data_project && cd my_data_project) -
Create a virtual environment:
python -m venv venv(You can name
venvanything you like, butvenvor.venvare common conventions.) -
Activate the virtual environment:
- Windows:
bash

.venvScriptsactivate
- macOS/Linux:
bash

source venv/bin/activate
Once activated, your command prompt/Terminal will typically show the environment’s name (e.g.,(venv) C:my_data_project>). This indicates that any packages you install now will be installed within this specific virtual environment.
- Windows:
With Python, pip, and a virtual environment ready, you are perfectly set for a clean and efficient Pandas installation.
Step-by-Step Installation Guides
Now that your system is prepared, let’s proceed with installing Pandas. We’ll cover the two most common and recommended methods, followed by how to verify your installation.
Method 1: Installing Pandas with Pip (Recommended)
This is the most straightforward and widely used method for installing Pandas and other Python packages. It’s ideal for most users and project setups.
-
Activate your virtual environment (if using one):
If you followed the best practices outlined above, ensure your virtual environment is active. You should see(venv)or a similar indicator in your prompt.- Windows:
.venvScriptsactivate - macOS/Linux:
source venv/bin/activate
- Windows:
-
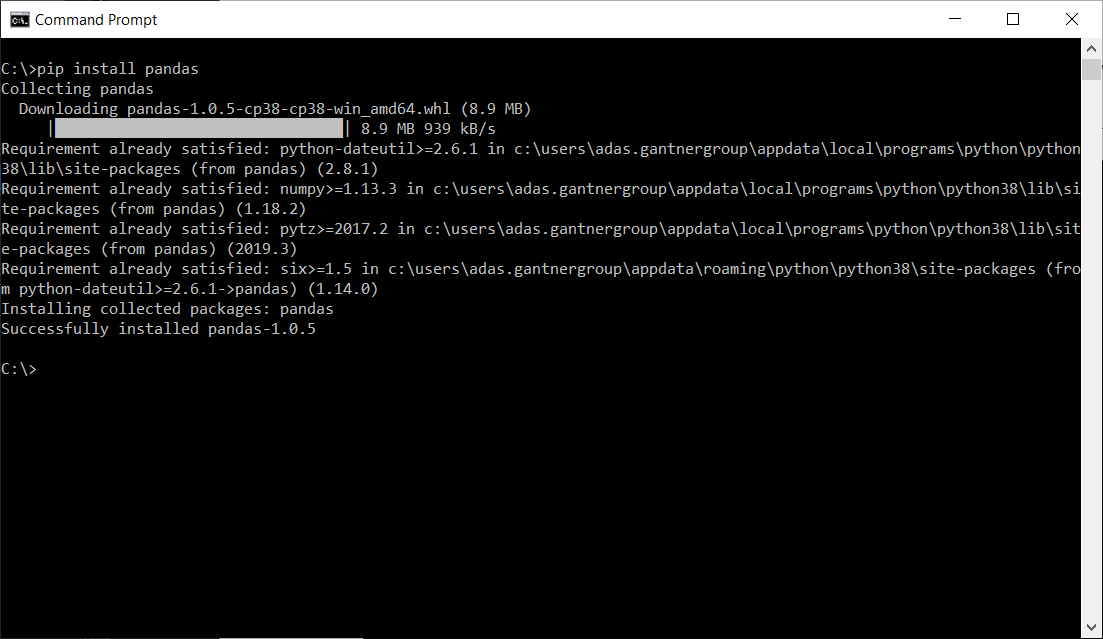
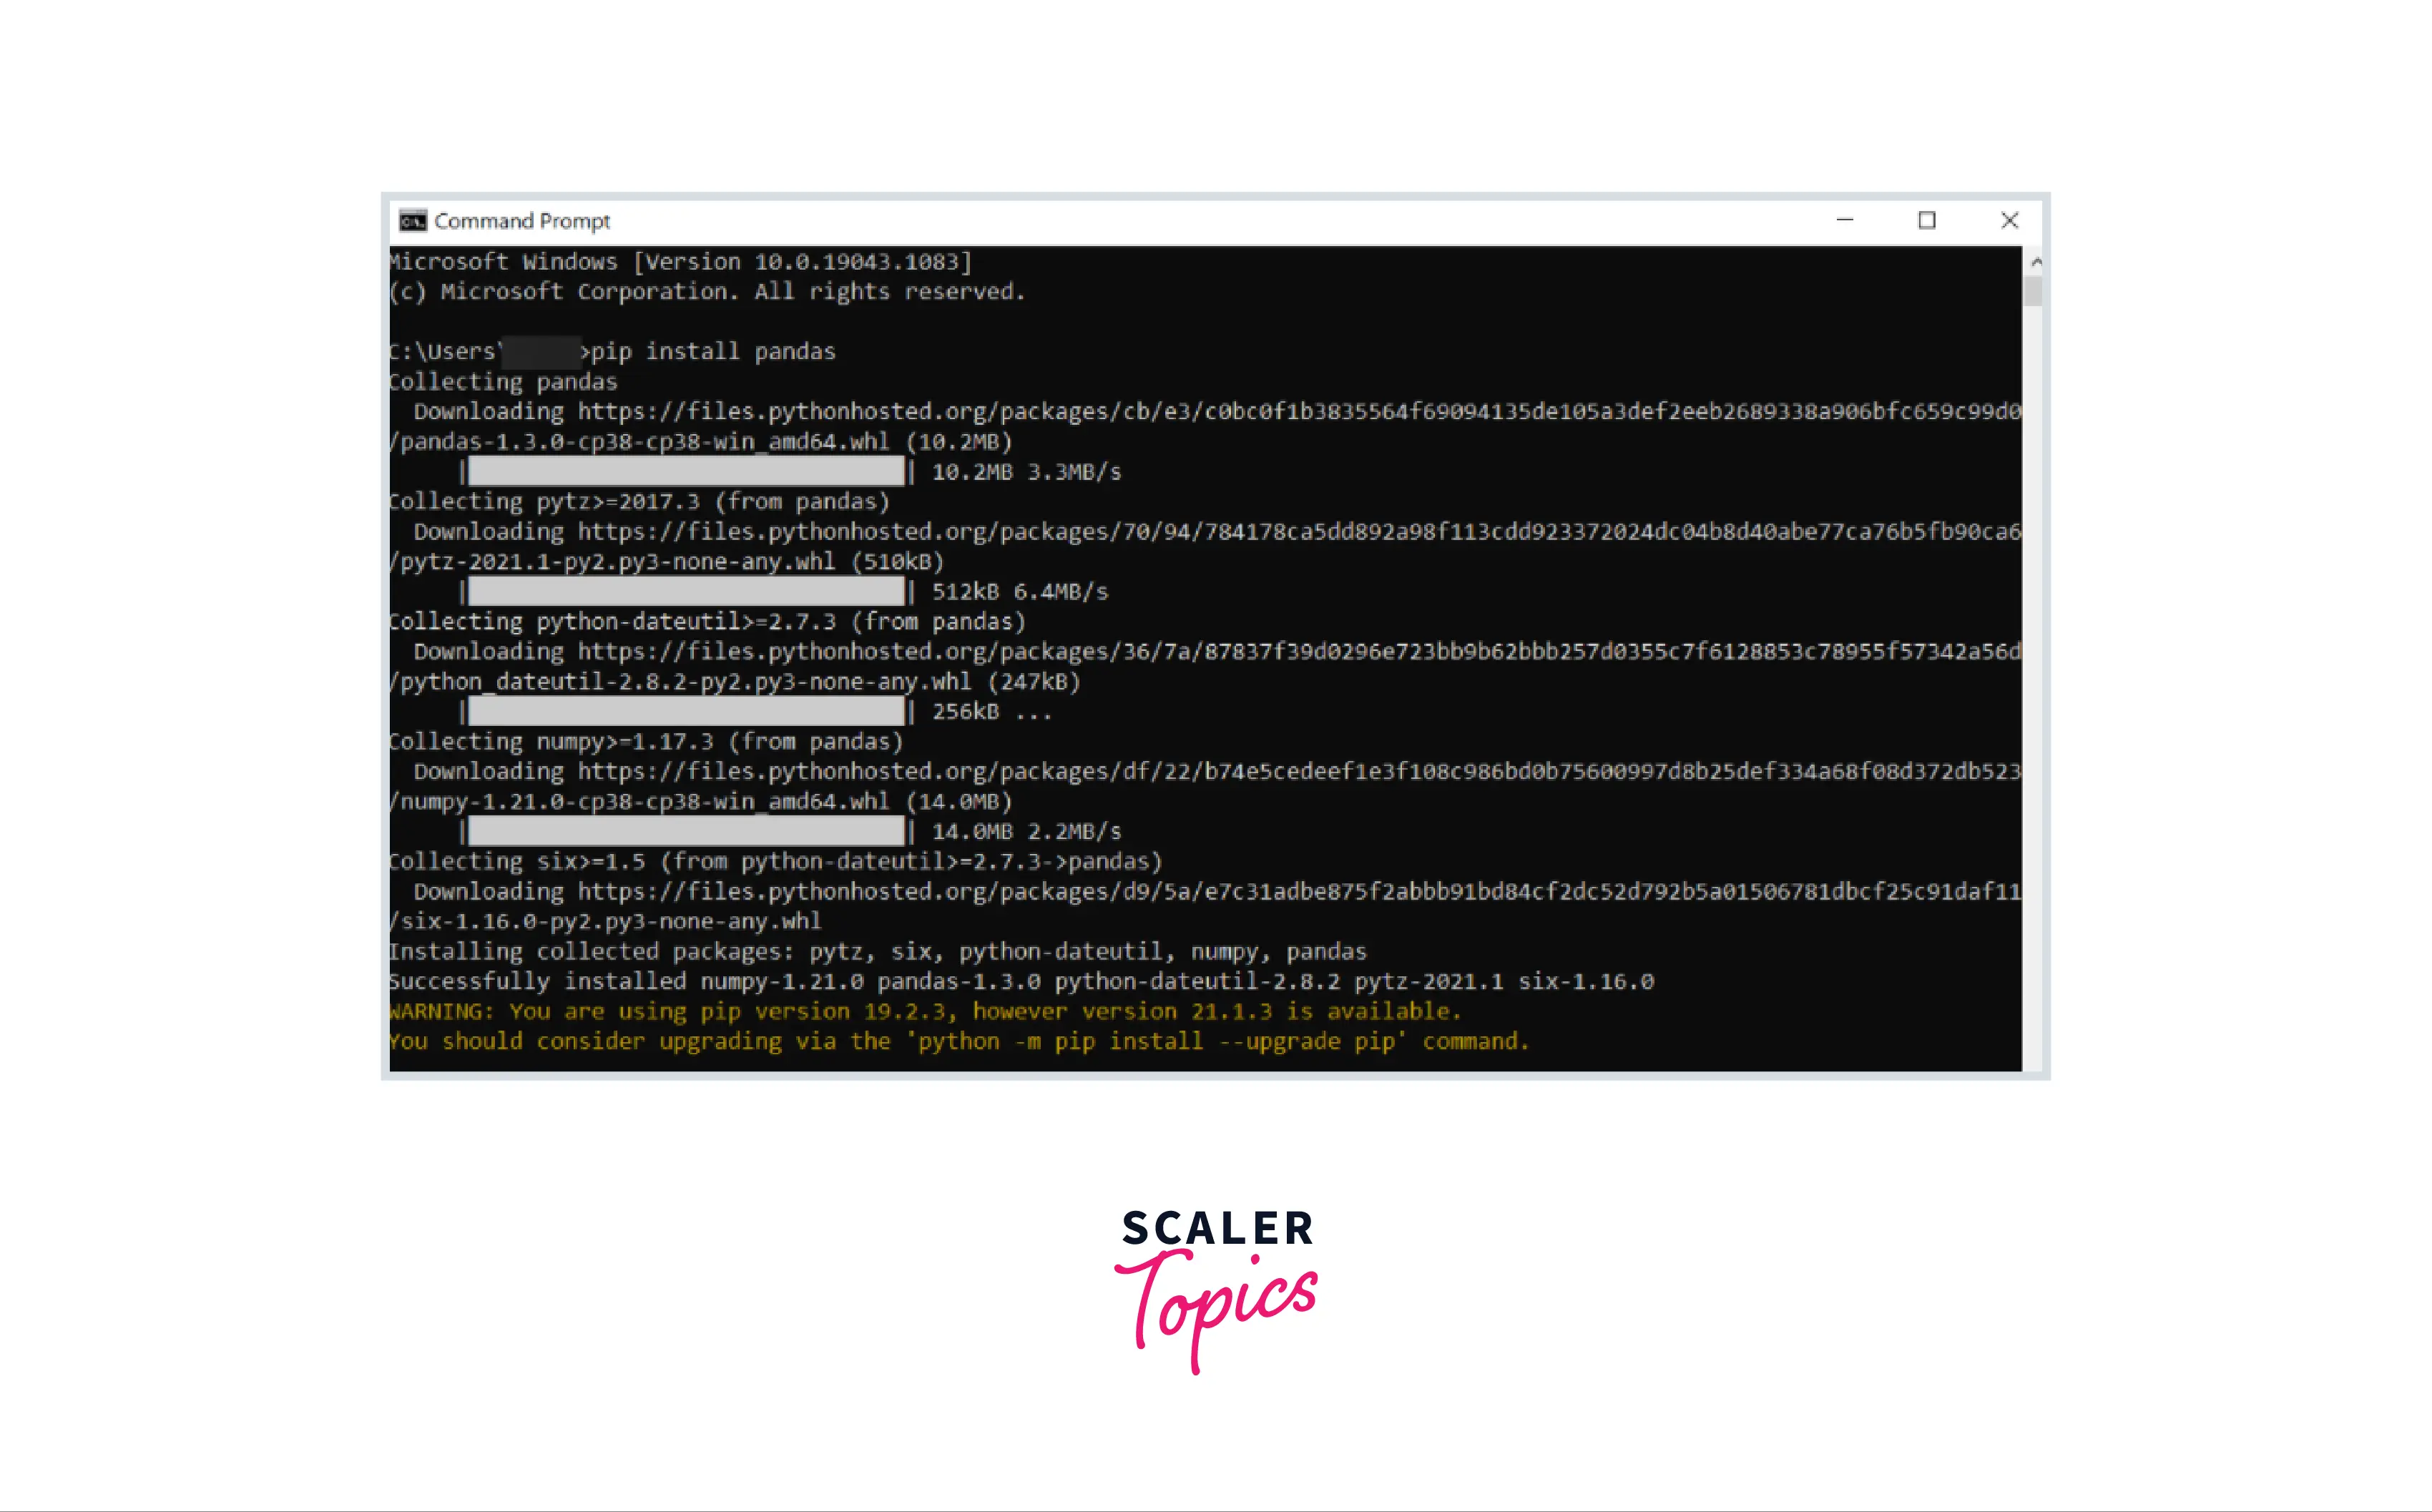
Install Pandas:
Once your virtual environment is active, simply run the following command:pip install pandasIf you’re not using a virtual environment (though not recommended for long-term projects), you might use
pip3 install pandasorpython -m pip install pandasto explicitly target Python 3’spip.pipwill automatically download Pandas and all its dependencies (like NumPy, which Pandas relies heavily upon) from the Python Package Index (PyPI) and install them into your active environment. You’ll see progress indicators as packages are downloaded and installed. -
Wait for completion:
The process might take a minute or two, depending on your internet connection and system speed. Once complete,pipwill usually show a message indicating successful installation, often including version numbers of installed packages.
Method 2: Leveraging Anaconda for Data Science Workflows
Anaconda is a popular distribution for data science and machine learning that simplifies package management and environment creation, especially for complex scientific computing libraries like Pandas, NumPy, SciPy, and Scikit-learn. If you’re serious about data science and want a complete ecosystem that includes Python, R, Jupyter Notebooks, and many pre-installed data-focused libraries, Anaconda is an excellent choice.
- Install Anaconda (if you haven’t already):
Download the Anaconda Individual Edition installer from the official Anaconda website (anaconda.com/products/individual). Follow the installation instructions for your operating system. During installation, it’s generally recommended to NOT add Anaconda to your system PATH unless you specifically know how to manage multiple Python installations. Instead, rely on the Anaconda Navigator or Anaconda Prompt (or Terminal) for launching your environments.
-
Open Anaconda Prompt (Windows) or Terminal (macOS/Linux):
After installing Anaconda, search for “Anaconda Prompt” in your Windows Start Menu, or open your regular Terminal on macOS/Linux. This special prompt/Terminal is pre-configured to use Anaconda’s package manager,conda. -
Create a new Conda environment (recommended):
Similar tovenv,condaallows you to create isolated environments. This is a best practice within the Anaconda ecosystem.conda create -n myenv python=3.9(Replace
myenvwith your desired environment name and3.9with your preferred Python version.) Confirm the creation when prompted. -
Activate your Conda environment:
conda activate myenvYour prompt will change to
(myenv)indicating the environment is active. -
Install Pandas within the Conda environment:
With your Conda environment active, install Pandas:conda install pandascondais often faster thanpipfor installing complex scientific packages as it pre-compiles many binaries and manages dependencies very robustly. It will list the packages to be installed/updated and ask for confirmation. -
Wait for completion:
Allowcondato resolve dependencies and install Pandas. This typically includes NumPy and other core libraries.
Verifying Your Pandas Installation
After completing the installation using either pip or conda, it’s crucial to verify that Pandas has been installed correctly and is accessible to your Python interpreter.
-
Open a Python interpreter:
Ensure your virtual environment (if usingpip) or Conda environment (if usingconda) is active. Then, typepythonorpython3and press Enter to start an interactive Python session.(venv) $ python -
Import Pandas and check its version:
Inside the Python interpreter, type the following commands:import pandas as pd print(pd.__version__)If Pandas is installed correctly, you should see its version number printed (e.g.,
1.4.3). If you get anModuleNotFoundError: No module named 'pandas', it means Pandas was not installed or not installed in the environment you are currently using. -
Exit the Python interpreter:
Typeexit()and press Enter, or pressCtrl+ZthenEnter(Windows) orCtrl+D(macOS/Linux).
Congratulations! If you saw the version number, Pandas is successfully installed and ready to be used. This verification step is a simple yet powerful check, confirming your software environment is correctly configured – a fundamental aspect of digital security and productivity.
Troubleshooting Common Installation Issues
Even with careful preparation, you might encounter issues during installation. Here’s a breakdown of common problems and how to resolve them, ensuring your journey into data science isn’t derailed by technical glitches.
Addressing ‘Pip Not Found’ and Path Problems
Issue: You get an error like 'pip' is not recognized as an internal or external command or pip: command not found.
Reason: Python’s pip executable is not in your system’s PATH environment variable, or Python itself isn’t.
Solution:
- Reinstall Python: If you’re on Windows, make sure you checked “Add Python to PATH” during installation. Re-running the installer and selecting this option, or explicitly modifying your system’s PATH variables, is often necessary.
- Explicitly use Python’s
pip: Instead of justpip install pandas, trypython -m pip install pandasorpython3 -m pip install pandas. This tells Python to runpipas a module, bypassing direct PATH issues forpip. - Verify Python PATH: On Windows, search for “Environment Variables” and edit the
Pathvariable under “System variables.” Ensure the paths to your Python installation directory (e.g.,C:Python39) and itsScriptssubdirectory (e.g.,C:Python39Scripts) are included. On macOS/Linux, check your~/.bashrc,~/.zshrc, or~/.profilefile forPATHconfigurations.
Resolving Permissions and Network Errors
Issue: You receive “Permission denied” errors during installation, or errors related to network connectivity.
Reason:
- Permissions: Your user account doesn’t have the necessary permissions to write files to the installation directory (common if trying to install globally without
sudo/admin rights). - Network: Your internet connection is unstable, or a firewall/proxy is blocking access to PyPI (Python Package Index).
Solution: - Permissions (Pip):
- Use virtual environments: This is the best solution as packages are installed in your user’s home directory, avoiding system-wide permission issues.
- Install with
--user: If you must install globally without admin rights (not recommended), trypip install pandas --user. This installs packages into a user-specific directory. - Use
sudo(Linux/macOS): For system-wide installations (again, use virtual environments instead), you might prefix withsudo:sudo pip install pandas. Be cautious withsudo.
- Permissions (Conda): Conda environments are usually installed in your user directory, so permission issues are less common.
- Network:
- Check your internet connection.
- If you’re behind a corporate proxy, you might need to configure
piporcondato use it. Forpip:pip install --proxy http://user:pass@proxy.server:port pandas. Forconda:conda config --set proxy_servers.http http://user:pass@proxy.server:port. - Temporarily disable your firewall to see if it’s the culprit (re-enable afterward).
Handling Environment Conflicts
Issue: Pandas installs, but then another package breaks, or Pandas itself doesn’t work as expected.
Reason: Different packages in the same environment require conflicting versions of a dependency (e.g., package_A needs numpy==1.20 but package_B needs numpy==1.22).
Solution:
- Always use virtual environments (pip) or Conda environments (Anaconda): This is the primary defense against conflicts. Each project gets its own isolated set of dependencies.
- Create a clean environment: If an environment is heavily conflicted, sometimes the easiest solution is to create a brand new virtual or Conda environment and install only the necessary packages into it.
- Check dependency requirements: If you suspect a conflict, you can look at the dependency requirements of your packages (e.g., on PyPI or by examining
setup.pyfiles). pipdeptreeorconda list: Use these tools to inspect your environment’s installed packages and their dependencies, which can help pinpoint conflicts.
Troubleshooting is an integral part of any tech learning journey. These solutions address the most common obstacles, helping you maintain productivity and focus on the data analysis itself rather than installation woes.
Getting Started with Pandas: A First Dive into Data
With Pandas successfully installed, the real fun begins! Let’s take a quick look at how you might use it to perform a basic data operation. This simple example will provide a tangible connection between the installation process and the powerful capabilities Pandas unlocks, showcasing its direct impact on productivity and potential for building sophisticated AI tools.
Your First Pandas DataFrame
A DataFrame is the primary Pandas data structure, representing data in a tabular form with labeled rows and columns, similar to a spreadsheet or SQL table.
Let’s create a simple DataFrame and perform a basic operation:
import pandas as pd

# 1. Create a dictionary of data
data = {
    'Name': ['Alice', 'Bob', 'Charlie', 'David', 'Eve'],
    'Age': [24, 27, 22, 32, 29],
    'City': ['New York', 'Los Angeles', 'Chicago', 'Houston', 'Miami'],
    'Salary': [70000, 85000, 60000, 95000, 80000]
}

# 2. Convert the dictionary into a Pandas DataFrame
df = pd.DataFrame(data)

# 3. Print the DataFrame
print("Original DataFrame:")
print(df)
print("n")

# 4. Perform a simple operation: Calculate average age
average_age = df['Age'].mean()
print(f"Average Age: {average_age:.2f}")
print("n")

# 5. Filter data: Select people older than 25
older_than_25 = df[df['Age'] > 25]
print("People older than 25:")
print(older_than_25)
Output of the above code:
Original DataFrame:
      Name  Age         City  Salary
0    Alice   24     New York   70000
1      Bob   27  Los Angeles   85000
2  Charlie   22      Chicago   60000
3    David   32      Houston   95000
4      Eve   29        Miami   80000

Average Age: 26.80

People older than 25:
    Name  Age         City  Salary
1    Bob   27  Los Angeles   85000
3  David   32      Houston   95000
4    Eve   29        Miami   80000
This small example illustrates how quickly you can create structured data, inspect it, and perform analytical operations. Imagine doing this manually for thousands or millions of rows – Pandas simplifies it immensely, directly contributing to productivity.
Beyond Installation: Next Steps in Data Mastery
Installing Pandas is just the beginning of an exciting journey. To truly harness its power and integrate it into your “Tech” workflows, consider these next steps:
- Explore the Official Pandas Documentation: The Pandas documentation (pandas.pydata.org) is incredibly thorough and is the ultimate resource for learning its functionalities. Dive into tutorials and the user guide.
- Practice with Real-World Data: Download publicly available datasets (e.g., from Kaggle, government data portals) and try to clean, analyze, and visualize them using Pandas. This hands-on experience is invaluable.
- Learn Key Functions: Familiarize yourself with common Pandas functions such as
read_csv(),groupby(),merge(),fillna(),pivot_table(), and methods for filtering and selecting data. These are your daily drivers. - Integrate with Other Libraries: Learn how Pandas works seamlessly with Matplotlib and Seaborn for data visualization, and Scikit-learn for machine learning model preparation.
- Follow Tutorials and Courses: Many online platforms offer excellent courses and tutorials that delve deeper into Pandas and its applications in data science, aligning with the “Tutorials” aspect of the website’s Tech category.
By diligently practicing and exploring, you’ll not only master Pandas but also significantly enhance your data analysis skills, positioning yourself at the forefront of technology trends and enabling you to contribute to and develop advanced software and AI tools.
Conclusion
Installing Pandas for Python is a foundational step for anyone venturing into data science, data analysis, or building robust data-driven applications. As the digital landscape continues to expand, proficiency with tools like Pandas becomes increasingly vital for navigating complex datasets, extracting meaningful insights, and ultimately driving informed decisions in various aspects of “Tech,” “Brand,” and “Money.”
This guide has walked you through the journey from understanding Pandas’s significance in modern computing to successfully installing and verifying its setup on your system. We emphasized the importance of sound technical practices like using virtual environments to ensure project integrity and maximize productivity – key considerations for any tech professional. With Pandas installed, you now possess a powerful toolkit capable of transforming raw data into actionable intelligence, empowering you to clean, transform, and analyze information with unprecedented efficiency.
The ability to manipulate data effectively is no longer a niche skill but a fundamental requirement across almost all digital domains. By mastering Pandas, you are not only equipping yourself with a versatile software tool but also investing in a skill that will enhance your problem-solving capabilities, accelerate your projects, and keep you at the cutting edge of technology trends. So, take your first step with the simple DataFrame example, then delve deeper into the vast capabilities of Pandas, and unlock a world of data-driven possibilities. Your journey to becoming a data master begins now!
aViewFromTheCave is a participant in the Amazon Services LLC Associates Program, an affiliate advertising program designed to provide a means for sites to earn advertising fees by advertising and linking to Amazon.com. Amazon, the Amazon logo, AmazonSupply, and the AmazonSupply logo are trademarks of Amazon.com, Inc. or its affiliates. As an Amazon Associate we earn affiliate commissions from qualifying purchases.