The evolution of the smart home has transitioned from a futuristic concept to a modern standard, with the smart thermostat serving as a cornerstone of this digital transformation. Among the leaders in this space, the Google Nest Thermostat stands out for its sleek design, intuitive interface, and sophisticated machine-learning algorithms. However, for many users, the transition from a traditional analog or programmable thermostat to a high-tech IoT (Internet of Things) device can be intimidating.
Installing a Nest Thermostat is more than just a home improvement project; it is a technical integration of hardware and software. This guide provides an in-depth, technical walkthrough of the installation process, ensuring that your device is configured for optimal performance and connectivity within your smart home ecosystem.

Preparing Your Home for a Smart Upgrade
Before unboxing the hardware, the first step in any tech deployment is verifying system requirements. Not every HVAC (Heating, Ventilation, and Air Conditioning) system is immediately compatible with smart technology, and identifying these variables early prevents hardware damage or mid-installation frustration.
Checking Compatibility and Voltage Requirements
Nest thermostats are designed to work with most 24V heating and cooling systems. This includes forced air, heat pumps, and radiant systems. However, they are generally not compatible with high-voltage “line voltage” systems, such as those used for electric baseboard heaters (which often operate at 120V or 240V).
To verify compatibility, remove your current thermostat’s cover and inspect the wiring. Look for labels like R, W, Y, G, and C. If you see thick wires connected with wire nuts or wires labeled 110V/220V, your system is high-voltage and incompatible without a specialized adapter. Google provides an online Compatibility Checker where you can input your specific wire labels to receive a custom wiring diagram.
Essential Tools and Safety Precautions
One of the highlights of the Nest ecosystem is that the hardware package includes most of what you need, including a custom-designed screwdriver and mounting screws. However, you should have a few additional items on hand:
- A mobile device with the Google Home or Nest app installed.
- A stable 2.4GHz or 5GHz Wi-Fi connection.
- A drill (if mounting on drywall without existing anchors).
- Needle-nose pliers for manipulating older, stiff wires.
Critical Safety Note: Before touching any wires, navigate to your home’s electrical breaker box and turn off the power to your HVAC system. This protects the delicate circuitry of the Nest unit from short-circuiting and ensures your personal safety.
Step-by-Step Hardware Installation
Once the power is cut and your tools are ready, you can begin the physical installation. This phase requires precision, as the communication between the thermostat and your furnace/AC depends on secure electrical contacts.
Removing the Old Unit and Mapping the Wires
The most common mistake in thermostat installation is losing track of which wire performs which function. Do not rely on wire colors alone, as HVAC installers do not always follow a standardized color code.
Instead, use the adhesive labels provided in the Nest box to mark each wire according to the terminal it is currently plugged into on your old thermostat. For example, if a blue wire is plugged into the “Y” terminal, label it “Y.” Once labeled, disconnect the wires and remove the old wall plate. Ensure the wires do not slip back into the wall cavity by wrapping them around a pencil or securing them with painter’s tape.
Mounting the Nest Base and Leveling
The Nest base is the interface between your home’s wiring and the thermostat’s processor. If your previous thermostat was larger than the Nest, you might want to use the optional trim plate (included in most models) to cover any unpainted drywall or old screw holes.
Pull the labeled wires through the center hole of the Nest base. Position the base against the wall. The Nest base features a built-in bubble level—a small but significant engineering touch. Adjust the base until the bubble is centered, then screw the base into the wall. A level installation is not just for aesthetics; it ensures the internal sensors (like the Far-Field sensor for motion detection) function at the correct angles.
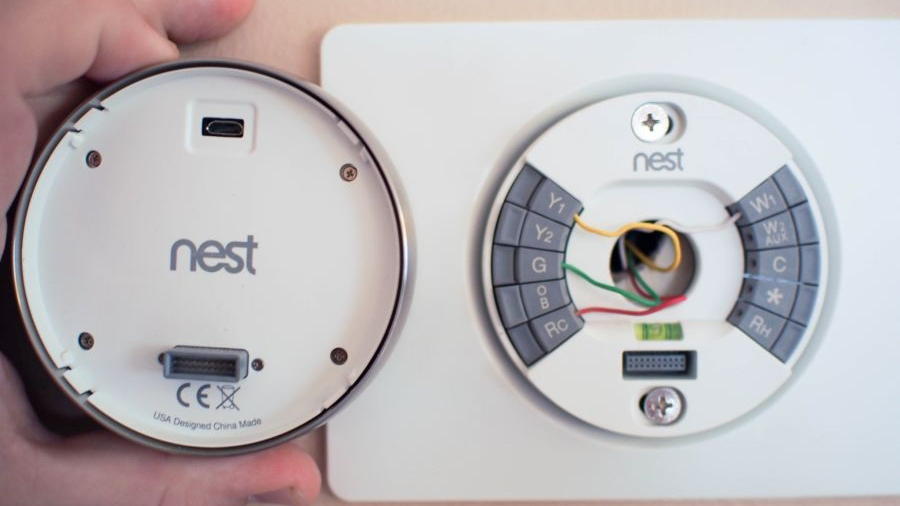
Connecting the Wiring and Attaching the Display
Nest utilizes “push-connector” terminals. Simply press down on the grey button, insert the stripped end of the labeled wire into the corresponding slot, and release. The button should stay depressed if the wire is properly seated.

Common terminal designations include:
- Rh/Rc: Power (Red)
- W: Heat (White)
- Y: Cooling (Yellow)
- G: Fan (Green)
- C: Common wire (essential for consistent power delivery)
Once all wires are secure, tuck them flat against the base so they don’t interfere with the display. Finally, push the Nest display unit onto the base until it clicks into place. Turn the power back on at the breaker. The Nest logo should appear on the screen, signaling the start of the boot sequence.
Configuring the Software and App Integration
The “Smart” in smart thermostat comes from its software. The setup process transitions from the physical wall unit to your smartphone to integrate the device into your digital life.
Connecting to Wi-Fi and the Nest Ecosystem
Using the Google Home app (or the legacy Nest app, depending on your model), select “Add Device.” You will be prompted to scan the QR code located on the back of the thermostat display or the installation guide. This establishes a secure Bluetooth handshake between your phone and the thermostat.
The app will guide you through connecting the device to your local Wi-Fi network. This connection is vital for receiving over-the-air (OTA) software updates, accessing weather data for “Seasonal Savings,” and allowing remote control via your smartphone. During this stage, you will also define your “Home/Away Assist” settings, which use geofencing (tracking your phone’s location) to determine when you have left the house.
Optimizing the Learning Features and Scheduling
If you are using the Nest Learning Thermostat (3rd Gen), the device spends the first week “learning” your habits. Every time you turn the dial up or down, it logs the data point. Over time, it builds a predictive schedule.
For the Nest Thermostat (2020 model), you will manually set a schedule within the app. From a technical standpoint, it is highly recommended to enable “Early-On.” This feature calculates the time required to reach a specific temperature based on your home’s insulation and the outdoor weather, ensuring the house is exactly 72 degrees at 7:00 AM, rather than just starting the heater at 7:00 AM.
Troubleshooting Common Installation Hurdles
Even with a streamlined process, technical discrepancies can occur. Most issues stem from power delivery or network interference.
Dealing with the C-Wire (Common Wire) Issue
The most frequent technical hurdle is the absence of a “C-wire” (Common wire). While Nest is designed to “power steal” from the heating or cooling lines, some HVAC systems have sensitive control boards that may chatter or pulse if a dedicated power return (the C-wire) isn’t present.
Symptoms of a missing C-wire include the thermostat frequently disconnecting from Wi-Fi, the battery draining, or the HVAC system turning on and off rapidly. If your home lacks a C-wire, you have two tech-forward solutions:
- Nest Power Connector: A simple adapter installed at the furnace control board that provides consistent power without requiring new wires to be pulled through the walls.
- C-Wire Transformer: An external power supply that plugs into a standard wall outlet (though this is less aesthetically pleasing).
Connectivity and Power Errors
If the Nest displays a “W5” error code, it indicates a failure of the Wi-Fi chip or a localized interference issue. Ensure your router is not blocked by heavy metal objects and that you are using a standard 2.4GHz band if the 5GHz band is unstable at that distance. If the device fails to turn on, check the “fused” switch on your furnace; often, a small automotive-style fuse on the HVAC control board can blow if wires were touched while the power was on.
The Future of Home Automation: Beyond Simple Temperature Control
The installation of a Nest Thermostat is often the “gateway drug” into broader home automation. Because Nest is a Google-owned product, it integrates seamlessly with Google Assistant, allowing for voice-activated climate control. However, its technical utility extends further into the “Matter” protocol—a new industry standard for smart home compatibility.
By installing this device, you are moving toward a reactive environment. With the integration of Nest Protect (smoke detectors) and Nest Temperature Sensors, your thermostat can detect if a room is too cold and prioritize it, or automatically shut off the HVAC fan if smoke is detected to prevent the spread of fire.
From the precision of the push-connectors to the complexity of the adaptive learning algorithms, the Nest Thermostat represents a significant leap in domestic technology. Successful installation ensures not only a comfortable environment but a sophisticated, data-driven approach to energy management in the modern age.
aViewFromTheCave is a participant in the Amazon Services LLC Associates Program, an affiliate advertising program designed to provide a means for sites to earn advertising fees by advertising and linking to Amazon.com. Amazon, the Amazon logo, AmazonSupply, and the AmazonSupply logo are trademarks of Amazon.com, Inc. or its affiliates. As an Amazon Associate we earn affiliate commissions from qualifying purchases.