In today’s increasingly connected world, bolstering your home’s security and convenience is paramount. Among the plethora of smart home devices available, the Ring Video Doorbell stands out as a popular and effective solution. It’s not just about seeing who’s at your door; it’s about enhancing your peace of mind, managing deliveries remotely, and even deterring potential intruders. This comprehensive guide will walk you through the entire process of installing your Ring Video Doorbell, from initial unboxing to final testing, ensuring a smooth and successful setup. We’ll also touch upon the underlying technology, the brand’s commitment to security, and the financial implications of investing in such a device.
Understanding Your Ring Video Doorbell: Technology and Features
Before diving into the installation process, it’s beneficial to understand the technology that powers your Ring Video Doorbell. Ring devices leverage a combination of hardware and software to deliver their smart security features. At its core, a Ring Video Doorbell is a Wi-Fi-enabled camera and microphone system integrated into a doorbell unit.
The Technological Backbone
- High-Definition Camera: The primary function is its video recording capability. Most Ring Video Doorbells offer HD video, allowing you to see visitors clearly, even in low light conditions thanks to infrared night vision. This is crucial for identifying individuals and capturing evidence if an incident occurs.
- Two-Way Audio: This feature, enabled by the built-in microphone and speaker, allows you to communicate with visitors directly through the Ring app on your smartphone or tablet, regardless of your location. Imagine being able to instruct a delivery driver where to leave a package when you’re at work, or reassuring a friend who has arrived while you’re still on your way home.
- Motion Detection: Ring doorbells are equipped with motion sensors that can detect movement within a customizable zone. When motion is detected, you receive an alert on your device, allowing you to view the live feed and respond accordingly. This proactive approach to security is a significant advantage over traditional doorbells.
- Wi-Fi Connectivity: Seamless integration into your home’s Wi-Fi network is essential. This allows the doorbell to stream video, transmit audio, and receive commands from the Ring app. A stable and robust Wi-Fi signal is therefore a prerequisite for optimal performance.
- Power Source: Ring Video Doorbells are typically powered in one of two ways:
- Hardwired: They can be connected to your existing doorbell wiring, drawing power continuously. This is the most common and reliable method, ensuring your doorbell is always ready.
- Battery-Powered: Some models come with a rechargeable battery pack, offering greater flexibility in installation location, especially if you don’t have existing doorbell wiring. These require periodic charging.
The Ring Ecosystem and Digital Security
Ring is a brand that has placed a significant emphasis on digital security and user privacy. When you install a Ring Video Doorbell, you’re not just adding a gadget; you’re integrating a device into your digital life. Ring employs various security measures to protect your data and your home.
- End-to-End Encryption: Ring utilizes encryption protocols to secure the video streams and data transmitted between your doorbell, Ring’s servers, and your connected devices. This helps prevent unauthorized access to your footage.
- Two-Factor Authentication (2FA): This is a critical security feature for your Ring account. 2FA adds an extra layer of protection by requiring a second form of verification (usually a code sent to your phone) in addition to your password when logging in. It’s highly recommended to enable this for your Ring account.
- Privacy Zones: The Ring app allows you to define “privacy zones” within the camera’s field of view. These are areas that the doorbell will not record from, offering greater control over what is captured and respecting the privacy of your neighbors.
- Regular Software Updates: Like any smart technology, Ring regularly releases software updates to improve performance, introduce new features, and patch security vulnerabilities. Keeping your Ring app and device firmware updated is crucial for maintaining optimal security.
Preparing for Installation: Tools, Materials, and Location
A successful Ring Video Doorbell installation begins with proper preparation. This phase ensures you have everything you need and minimizes any potential hiccups during the actual mounting process.
Essential Tools and Materials
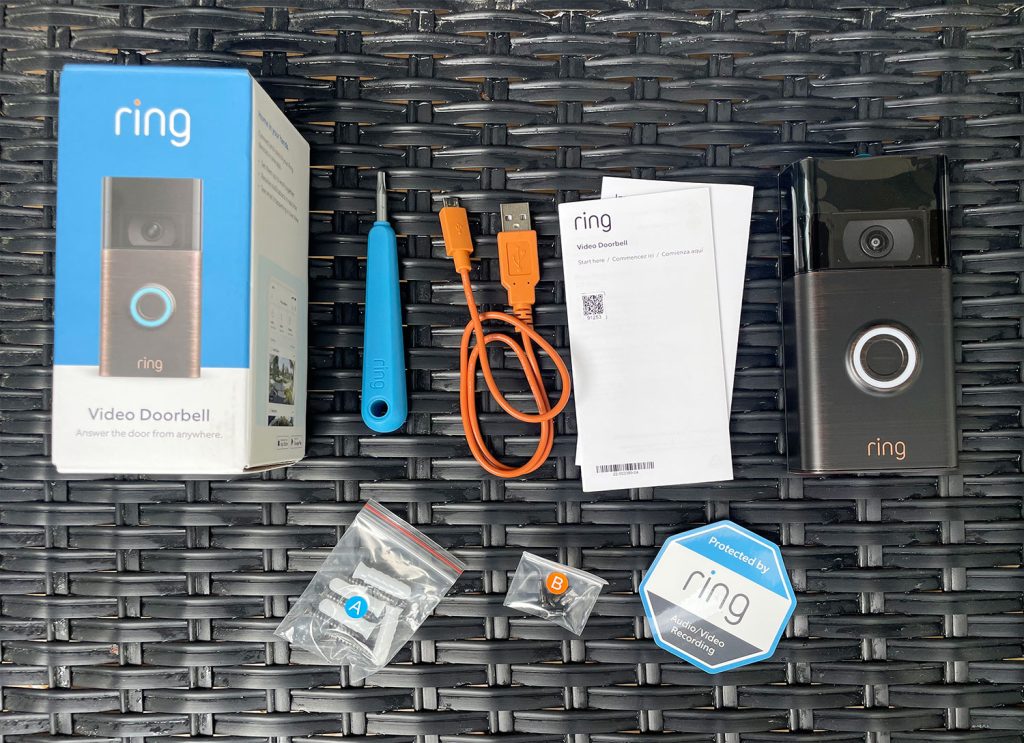
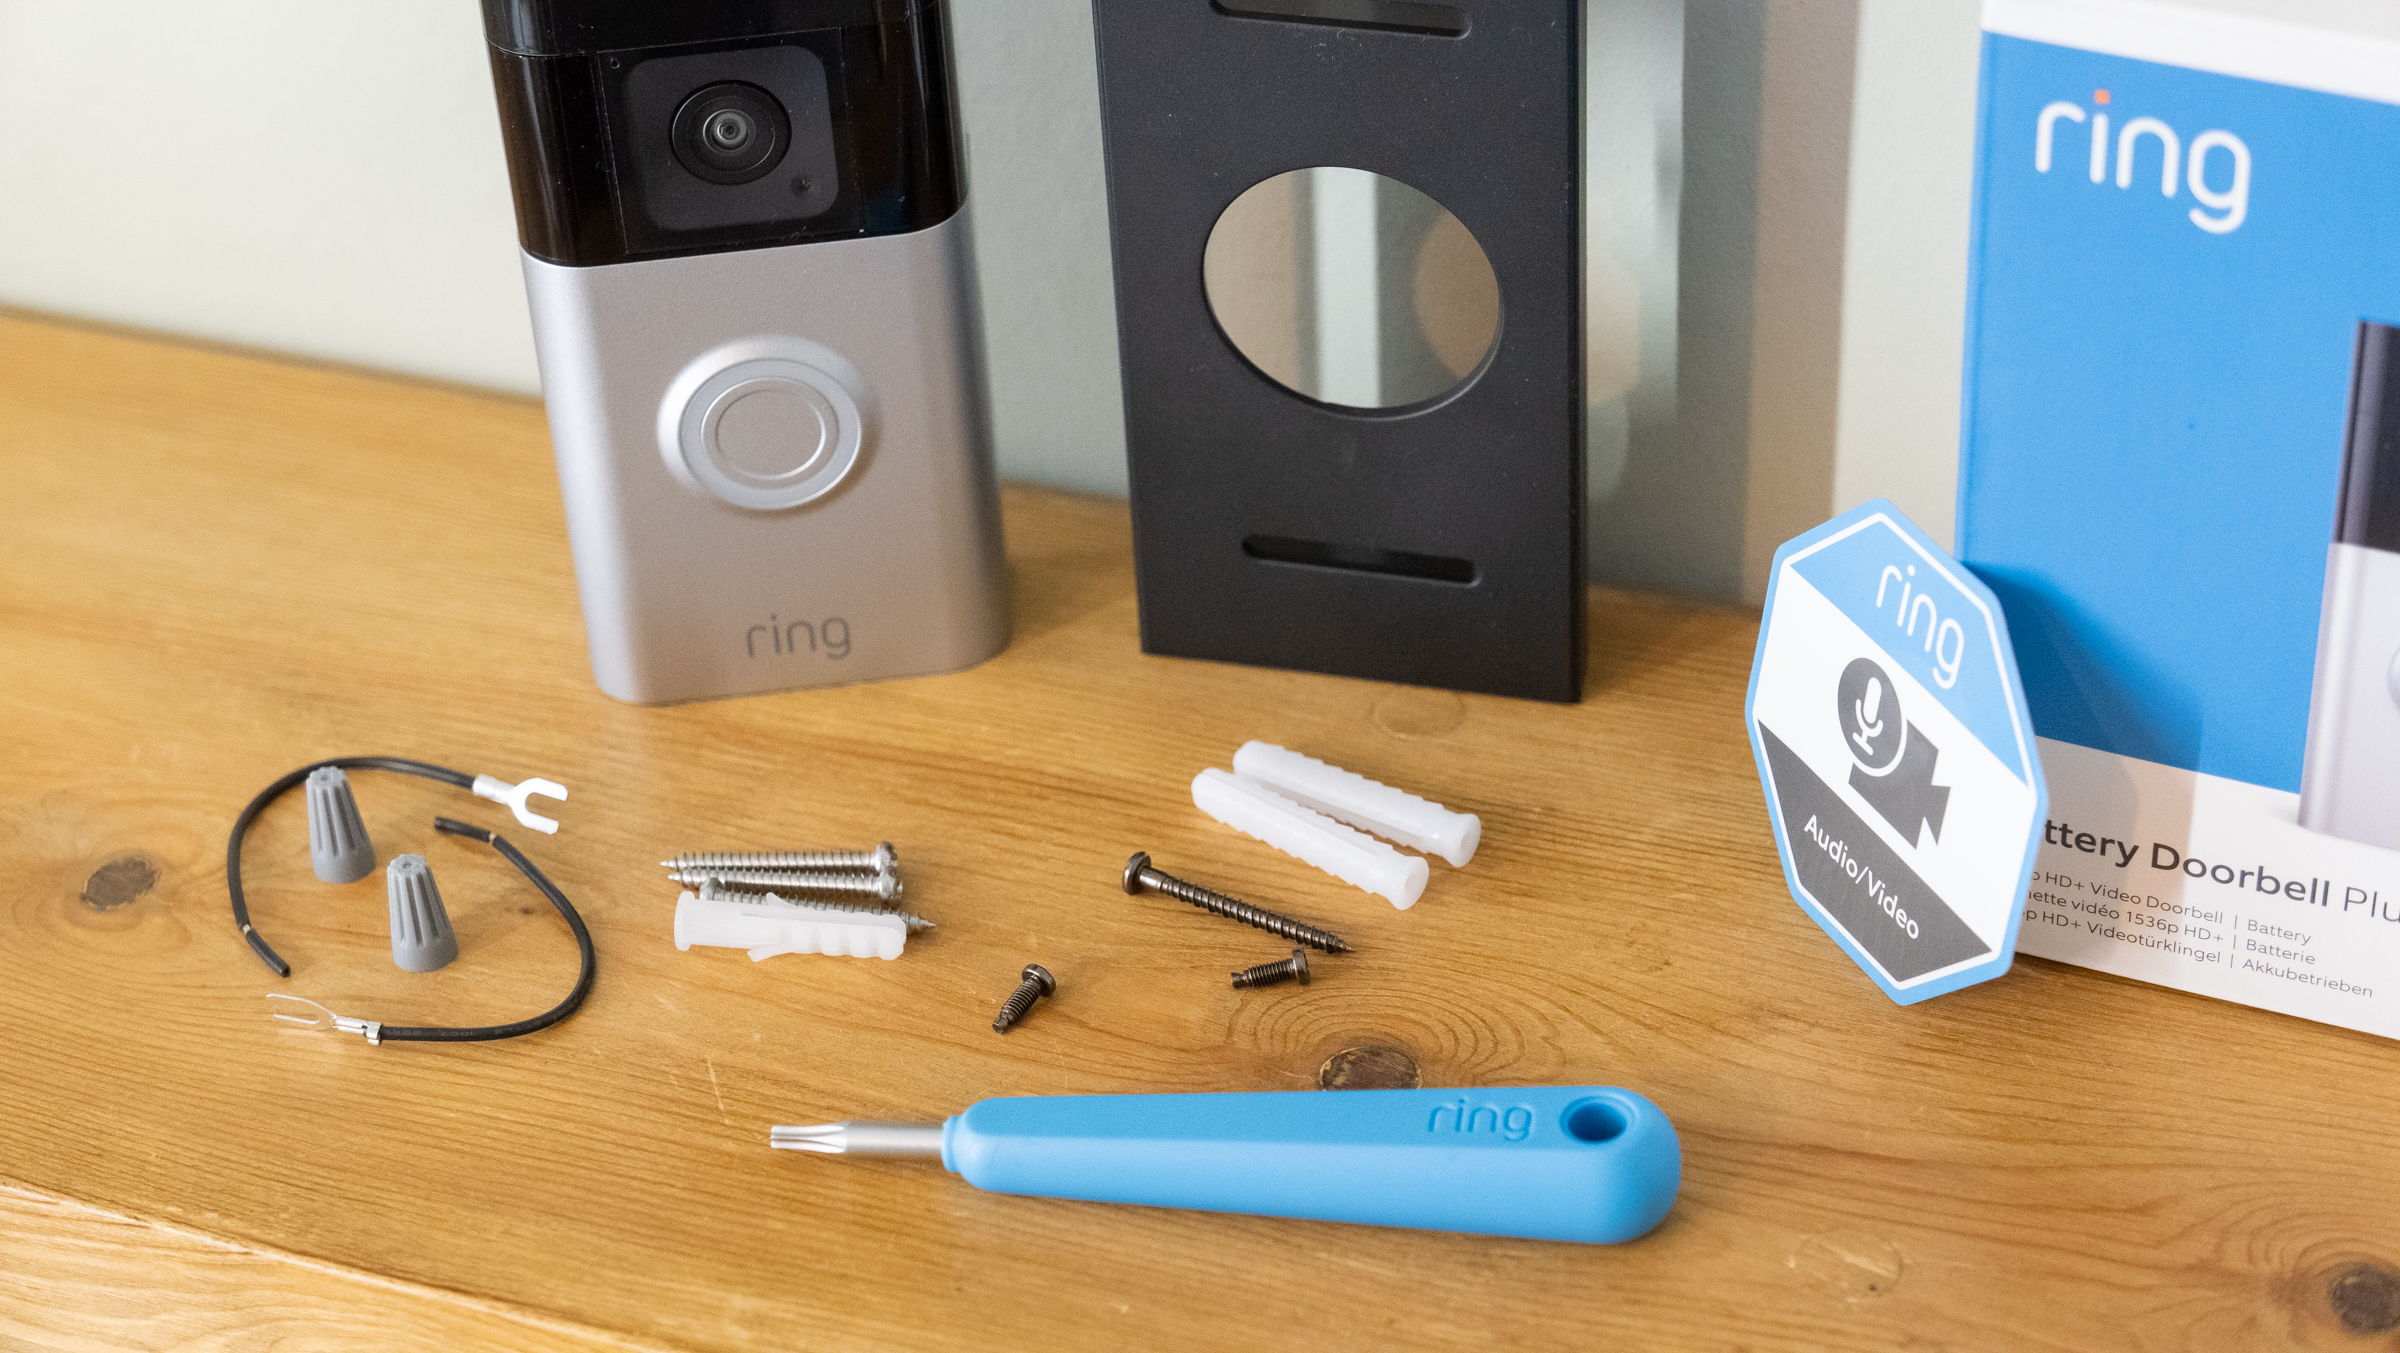
Before you begin, gather the following items. Most are standard household tools, and the necessary mounting hardware is usually included in your Ring Video Doorbell box.
- Your Ring Video Doorbell Kit: This should include the doorbell unit, mounting bracket, screws, anchors, and a screwdriver.
- Drill and Drill Bits: You’ll likely need a drill to create pilot holes for the mounting screws, especially if you’re mounting into brick, stucco, or concrete. The size of the drill bit will depend on the anchors provided.
- Screwdriver: A Phillips head screwdriver is typically required. Some kits may include a specialized screwdriver.
- Level: To ensure your doorbell is mounted straight and level for optimal viewing angles.
- Wire Strippers and Pliers (if hardwiring): If you are connecting to existing doorbell wiring, you may need these tools to strip the wires and secure them.
- Chisel (optional, for hardwiring): In some cases, you might need a chisel to create a small recess for wires.
- Ladder or Step Stool: If your existing doorbell is mounted at a height that requires it.
- Smartphone or Tablet: With the Ring app downloaded and your Wi-Fi password handy.
Choosing the Ideal Mounting Location
Selecting the right spot for your Ring Video Doorbell is crucial for both its functionality and effectiveness. Consider these factors:
- Height: The recommended mounting height for most Ring Video Doorbells is around 4 feet (1.2 meters) from the ground. This height provides a good view of visitors’ faces and their feet, which can be important for identifying individuals and observing packages left at your doorstep.
- Viewing Angle: Ensure the chosen location offers a clear, unobstructed view of your entire entryway, including the porch, walkway, and any potential hiding spots. Avoid pointing the camera directly at a busy street or a neighbor’s property where it might infringe on privacy.
- Proximity to Power (if hardwiring): If you’re hardwiring, the location must be within reach of your existing doorbell wires.
- Wi-Fi Signal Strength: Before permanently mounting, test your Wi-Fi signal strength at the intended location. Open the Ring app and check the signal strength indicator. If it’s weak, you might need to consider a Wi-Fi extender or relocating the doorbell.
- Protection from the Elements: While Ring doorbells are designed to withstand various weather conditions, try to mount it in a location that offers some protection from direct rain or intense sun, which can sometimes affect camera performance.
- Aesthetics and Brand Image: While security is paramount, consider how the doorbell will look on your home. Ensure it complements your home’s exterior.
Installation Steps: A Step-by-Step Guide
Now that you’re prepared, it’s time to get hands-on with the installation. This guide covers both battery-powered and hardwired options.
1. Setting Up Your Ring Video Doorbell in the App
This is the very first step, even before you touch any tools. It’s designed to be done before physical mounting.
- Download the Ring App: If you haven’t already, download the Ring app from the Apple App Store or Google Play Store.
- Create or Log In to Your Account: Open the app and follow the on-screen prompts to create a new account or log in to your existing one.
- Add a Device: Tap “Set up a device” and select “Doorbells.”
- Scan the QR Code: Your Ring Video Doorbell will have a QR code (usually on the packaging or the device itself). Scan this code using your smartphone’s camera via the Ring app.
- Follow In-App Instructions: The app will guide you through connecting your doorbell to your Wi-Fi network and naming your device. It will also prompt you to insert the battery if it’s a battery-powered model.
2. Mounting the Ring Video Doorbell (Hardwired Installation)
If you have existing doorbell wiring, this is the more permanent and often preferred method.
- Turn Off Power: Crucially, locate your home’s circuit breaker and turn off the power to your existing doorbell. This is a critical safety step. If you’re unsure which breaker controls your doorbell, you can test it by pressing your old doorbell button; if it no longer rings, you’ve found the right one.
- Remove Your Old Doorbell: Unscrew and remove your existing doorbell button from the wall. Carefully disconnect the two wires from the back of the old button.
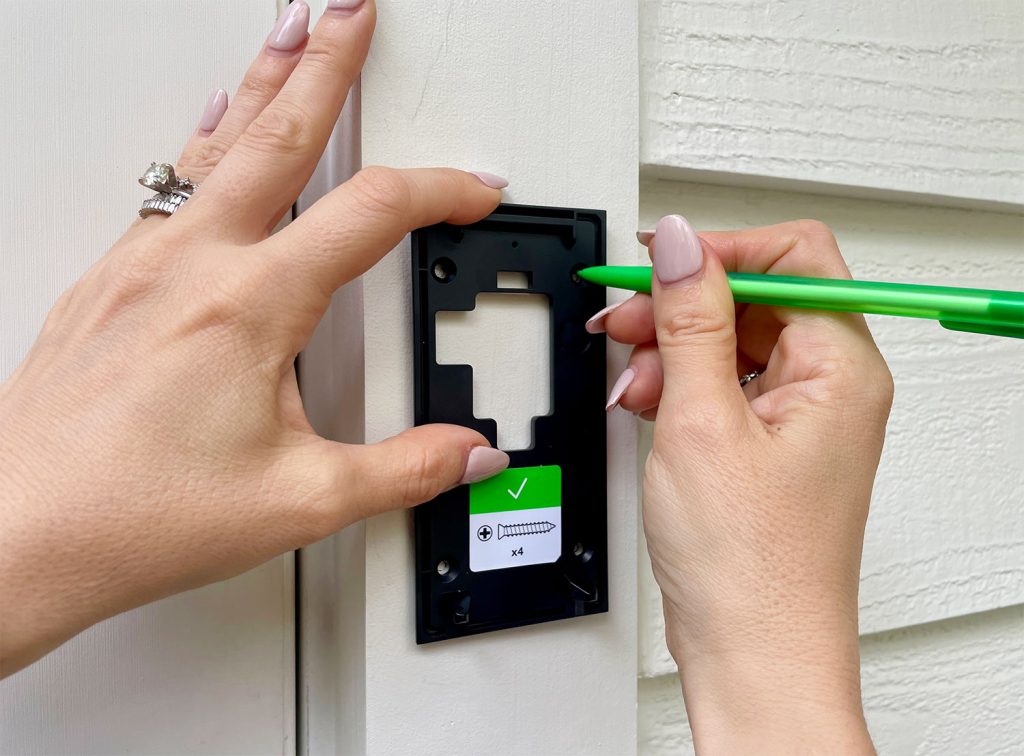
- Install the Mounting Bracket:
- Thread the existing doorbell wires through the center opening of the Ring mounting bracket.
- Hold the bracket against the wall at your chosen location, ensuring it’s level.
- Mark the screw holes on the wall.
- Drill pilot holes at the marked locations. If you’re drilling into brick or concrete, insert the provided anchors into the holes.
- Feed the wires through the bracket again and secure the bracket to the wall using the provided screws.
- Connect the Wires:
- Loosen the terminal screws on the back of your Ring Video Doorbell.
- Wrap one wire around each terminal screw. Tighten the screws to secure the wires firmly. It doesn’t matter which wire goes to which terminal.
- Attach the Ring Doorbell:
- Align the Ring Video Doorbell with the mounting bracket and push it gently into place until it clicks.
- Secure the doorbell to the bracket using the security screw at the bottom. Use the provided screwdriver.
3. Mounting the Ring Video Doorbell (Battery-Powered Installation)
This option offers more flexibility and is ideal for homes without existing doorbell wiring.
- Charge the Battery: Ensure the battery pack is fully charged according to the instructions in your Ring manual.
- Install the Mounting Bracket:
- Hold the mounting bracket against the wall at your chosen location, ensuring it’s level.
- Mark the screw holes on the wall.
- Drill pilot holes. If you’re drilling into brick or concrete, insert the provided anchors.
- Secure the bracket to the wall using the provided screws.
- Attach the Ring Doorbell:
- Align the Ring Video Doorbell with the mounting bracket and push it gently into place until it clicks.
- Secure the doorbell to the bracket using the security screw at the bottom.
4. Testing Your Installation
Once the doorbell is physically mounted, it’s time for the crucial testing phase.
- Restore Power (if hardwired): Go back to your circuit breaker and turn the power back on to your doorbell.
- Check the Ring App: The Ring Video Doorbell should power on. You’ll typically see a light indicating it’s booting up.
- Test the Doorbell Button: Press the button on your Ring Video Doorbell. You should receive a notification on your smartphone or tablet via the Ring app.
- Initiate a Live View: Open the Ring app and tap on your doorbell. This should activate the live video feed. Check the video quality, clarity, and audio.
- Test Two-Way Audio: Speak into your phone and check if the sound comes through the doorbell’s speaker. Then, speak into the doorbell and check if you can hear yourself on your phone.
- Test Motion Detection: Walk in front of the doorbell and check if you receive a motion alert in the Ring app. Adjust the motion sensitivity settings in the app if needed.
Post-Installation: Maximizing Your Ring Experience
Your Ring Video Doorbell is now installed and functional, but there are still a few steps to take to maximize its benefits and ensure ongoing security.
Configuring Settings in the Ring App
The Ring app is your command center for all things Ring. Spend some time exploring and customizing its settings:
- Motion Settings: Fine-tune motion detection sensitivity, set up motion zones to avoid false alerts from passing cars or trees, and schedule “motion snooze” times.
- Notification Preferences: Decide how you want to be alerted – push notifications, emails, or both. You can also set up shared users to grant access to other family members.
- Video Quality: Adjust the video recording quality based on your Wi-Fi strength and data plan (if applicable).
- Privacy Settings: Review and adjust your privacy zones to ensure they are correctly configured.
- Ring Protect Plan: While the basic functionality is free, a Ring Protect plan is essential for accessing recorded video history, motion event recordings, and advanced features. Consider which plan best suits your needs and budget. This ties into the “Money” aspect of the website’s main topics, as it’s an ongoing cost for enhanced functionality.
Maintaining Your Ring Video Doorbell
Like any electronic device, your Ring Video Doorbell requires minimal but important maintenance:
- Battery Charging (for battery models): Keep an eye on the battery level in the Ring app and recharge or swap batteries as needed.
- Cleaning the Lens: Periodically clean the camera lens with a soft, dry microfiber cloth to ensure clear video quality.
- Software Updates: Ensure your Ring app and device firmware are always up to date. This is automatically handled for most devices, but it’s good practice to check periodically.
- Wi-Fi Stability: A stable internet connection is vital. If you experience frequent connectivity issues, troubleshoot your Wi-Fi network or consider a Wi-Fi extender.
The Brand and Your Investment
Ring has built a strong brand reputation around smart home security and convenience. When you install a Ring Video Doorbell, you’re investing in a product from a company committed to innovation in this space. Their focus on user-friendly technology, combined with ongoing development of new features and integrations, makes them a compelling choice for homeowners. The “Brand” topic of the website is relevant here, highlighting how Ring has established itself as a leader in the smart home security market through consistent product development and marketing. From a “Money” perspective, investing in a Ring Video Doorbell is a decision that balances upfront cost with long-term benefits of enhanced security, potential insurance discounts, and the convenience of remote access and communication.
By following these steps, you can confidently install your Ring Video Doorbell and start enjoying the enhanced security, convenience, and peace of mind it provides. Remember to consult your specific Ring Video Doorbell model’s manual for any unique instructions or considerations.
aViewFromTheCave is a participant in the Amazon Services LLC Associates Program, an affiliate advertising program designed to provide a means for sites to earn advertising fees by advertising and linking to Amazon.com. Amazon, the Amazon logo, AmazonSupply, and the AmazonSupply logo are trademarks of Amazon.com, Inc. or its affiliates. As an Amazon Associate we earn affiliate commissions from qualifying purchases.