The question “Does installing Windows 11 delete everything?” is a common and entirely valid concern for anyone contemplating an upgrade to Microsoft’s latest operating system. The prospect of a fresh start with new features and enhanced performance is appealing, but the fear of losing precious files, documents, photos, and installed applications can be a significant deterrent. Fortunately, the answer to this question isn’t a simple “yes” or “no.” Instead, it hinges on the type of installation you choose and the preparation you undertake. This article will delve into the nuances of installing Windows 11, clarifying what happens to your data and providing actionable advice to ensure a smooth and worry-free transition, all while touching upon the broader themes of technology, digital security, and smart decision-making.

Understanding the Installation Types and Their Impact on Your Data
When you decide to install Windows 11, you’ll typically encounter a few distinct installation methods, each with a different implication for your existing data. Understanding these options is crucial to managing your expectations and safeguarding your digital life.
In-Place Upgrade: The Most Common Path
The most frequent way users upgrade to Windows 11 is through an “in-place upgrade.” This method is designed to preserve your personal files, settings, and compatible applications while replacing the underlying operating system with Windows 11.
How an In-Place Upgrade Works
During an in-place upgrade, the Windows installer analyzes your current Windows installation and intelligently migrates essential data. This includes:
- Personal Files: Documents, pictures, videos, music, and other files stored in your user profile folders (like Documents, Pictures, Desktop) are generally kept intact.
- Installed Applications: Most applications that were compatible with your previous Windows version will remain installed and accessible after the upgrade. However, there’s a caveat: not all software is guaranteed to be compatible with Windows 11. Older or specialized applications might encounter issues or require reinstallation.
- Windows Settings: Many of your personalized Windows settings, such as display preferences, network configurations, and user account details, are carried over.
Potential Risks and Considerations
While the in-place upgrade is convenient and aims to be non-destructive, it’s not entirely risk-free. The primary concern is software compatibility. If an application is not designed to work with Windows 11, it could cause system instability, prevent the upgrade from completing successfully, or simply stop functioning after the upgrade.
Furthermore, unforeseen glitches or conflicts can arise during any complex software installation. Although rare, there’s always a small chance of data corruption or loss due to a power outage, a faulty hard drive, or a bug in the installer itself. This is why meticulous preparation is paramount.
Clean Installation: A Fresh Start with a Trade-off
A “clean installation” or “fresh install” offers a completely different experience. This method involves formatting your drive (or a specific partition) and installing Windows 11 from scratch.
The Process of a Clean Install
A clean installation is akin to wiping the slate clean. The installer formats the target drive, erasing everything that was previously on it. Then, it installs a pristine copy of Windows 11.
What Happens to Your Data During a Clean Install
- All Personal Files are Deleted: This is the most critical point. Every document, photo, video, and file stored on the drive that is formatted will be permanently erased.
- All Installed Applications are Removed: You will need to re-download and reinstall all your software from scratch.
- All Settings are Reset: Your Windows personalization will be gone, and you’ll start with the default settings.
When to Consider a Clean Install
Despite the data-wiping aspect, a clean installation is often recommended in certain scenarios:
- Troubleshooting Persistent Issues: If your current Windows system is plagued with slowdowns, crashes, or persistent errors that you can’t resolve, a clean install can often provide a definitive solution by eliminating any underlying software conflicts or corrupted system files.
- Maximizing Performance: A fresh installation can often lead to a noticeable performance boost, especially on older systems, as it removes accumulated junk files, registry bloat, and potentially problematic software.
- Changing Drive Partitions or Installing on a New Drive: If you’re installing Windows 11 on a new hard drive or SSD, or if you’re reconfiguring your drive partitions, a clean install is the standard procedure.
- Security Concerns: For users who want the absolute highest level of digital security and a completely uncompromised system, a clean install is the preferred method.
Essential Steps to Protect Your Data Before Installing Windows 11
Regardless of whether you choose an in-place upgrade or a clean installation, the cardinal rule of any major operating system change is backup, backup, backup! This is not just a good practice; it’s an absolute necessity. Thinking about your data protection strategy is a crucial aspect of responsible tech adoption, much like considering the financial implications of new software or the brand perception of a company investing in AI.
1. Back Up Your Important Files and Documents
This is the most critical step, and it cannot be overstated. Before you even begin the Windows 11 installation process, you must back up all your irreplaceable data.
Where to Store Your Backups:
- External Hard Drive or SSD: This is the most common and reliable method. Connect an external drive to your computer and copy all your important folders (Documents, Pictures, Videos, Desktop, Downloads, etc.) onto it. Ensure the external drive has enough capacity.
- Cloud Storage Services: Services like OneDrive (which is integrated with Windows), Google Drive, Dropbox, or iCloud offer convenient ways to back up your files. You can sync entire folders or manually upload specific items. This provides an off-site backup, which is invaluable in case of physical damage to your computer or external drive.
- Network Attached Storage (NAS): For users with a home network, a NAS device offers a centralized storage solution that can be accessed from multiple devices and is excellent for comprehensive backups.
What to Back Up:
- Personal Documents: Word files, PDFs, spreadsheets, presentations, and any other work-related or personal documents.
- Photos and Videos: Your cherished memories captured over the years.
- Music and Other Media: Your digital entertainment library.
- Desktop and Downloads Folders: These often contain a mix of important files that users forget to move.
- Specific Application Data: Some applications store critical data in specific locations (e.g., game save files, browser bookmarks, email archives). Research where these are located for your frequently used programs.
Verifying Your Backup:
After completing your backup, take the time to browse the backup location and ensure that all the files are present and accessible. Don’t assume the backup was successful without verification.
2. Create a System Image Backup (Optional but Highly Recommended)
A system image is a complete snapshot of your entire hard drive, including the operating system, installed programs, settings, and all your files. This is a more comprehensive backup than just copying individual files.
Benefits of a System Image:

- Full System Restore: If anything goes wrong with the Windows 11 installation, or if you decide to revert to your previous Windows version, a system image allows you to restore your computer to its exact previous state.
- Quick Recovery: In the event of a catastrophic failure, restoring from a system image can be faster than reinstalling everything from scratch.
How to Create a System Image:
Windows has a built-in tool for creating system images. You can usually find this under “Backup and Restore (Windows 7)” in the Control Panel, even though it’s available in Windows 10 and 11. You’ll need an external drive with sufficient space to store the image.
3. Note Down Your Installed Applications and Licenses
While an in-place upgrade attempts to preserve your applications, it’s wise to have a list of what you have installed.
Why this is Important:
- Compatibility Checks: Knowing your software helps you proactively check if each application is compatible with Windows 11. You can visit the software developer’s website for specific information.
- Reinstallation Plan: If you opt for a clean install or if some applications don’t survive an in-place upgrade, you’ll have a clear list of what needs to be reinstalled.
- License Keys: For paid software, make sure you have your license keys or activation information readily available. This is crucial for re-activating your software after a clean installation or if an application requires re-authentication.
How to Get Your List:
- Manually: Go to “Apps & features” in Windows Settings and jot down the names of your programs.
- Third-Party Tools: Several free system information tools can generate a detailed list of installed software.
4. Check Windows 11 System Requirements
Before you even think about downloading the installer, ensure your hardware meets the minimum requirements for Windows 11. Attempting to install on unsupported hardware can lead to a failed installation, performance issues, or an unstable system, which could indirectly lead to data loss if the process is interrupted.
Key Requirements to Check:
- Processor: A compatible 64-bit processor.
- RAM: 4GB or more.
- Storage: 64GB or larger storage device.
- System Firmware: UEFI with Secure Boot capability.
- TPM: Trusted Platform Module (TPM) version 2.0.
- Graphics Card: Compatible with DirectX 12 or later with WDDM 2.0 driver.
- Display: High definition (720p) display that is greater than 9 inches diagonally, 8 bits per color channel.
Microsoft provides a tool called the PC Health Check app to help you determine if your PC is ready for Windows 11.
The Installation Process: What to Expect
With your data secured and your system ready, you can proceed with the installation. The actual process will vary slightly depending on whether you’re doing an in-place upgrade or a clean install, but the core steps involve preparing the installer and running it.
Performing an In-Place Upgrade
The easiest way to perform an in-place upgrade is by using the Windows 11 Installation Assistant from Microsoft’s official website. This tool will download Windows 11 and guide you through the upgrade process directly on your current Windows machine.
- Download the Assistant: Visit the official Microsoft Windows 11 download page and download the Installation Assistant.
- Run the Assistant: Execute the downloaded file and follow the on-screen prompts.
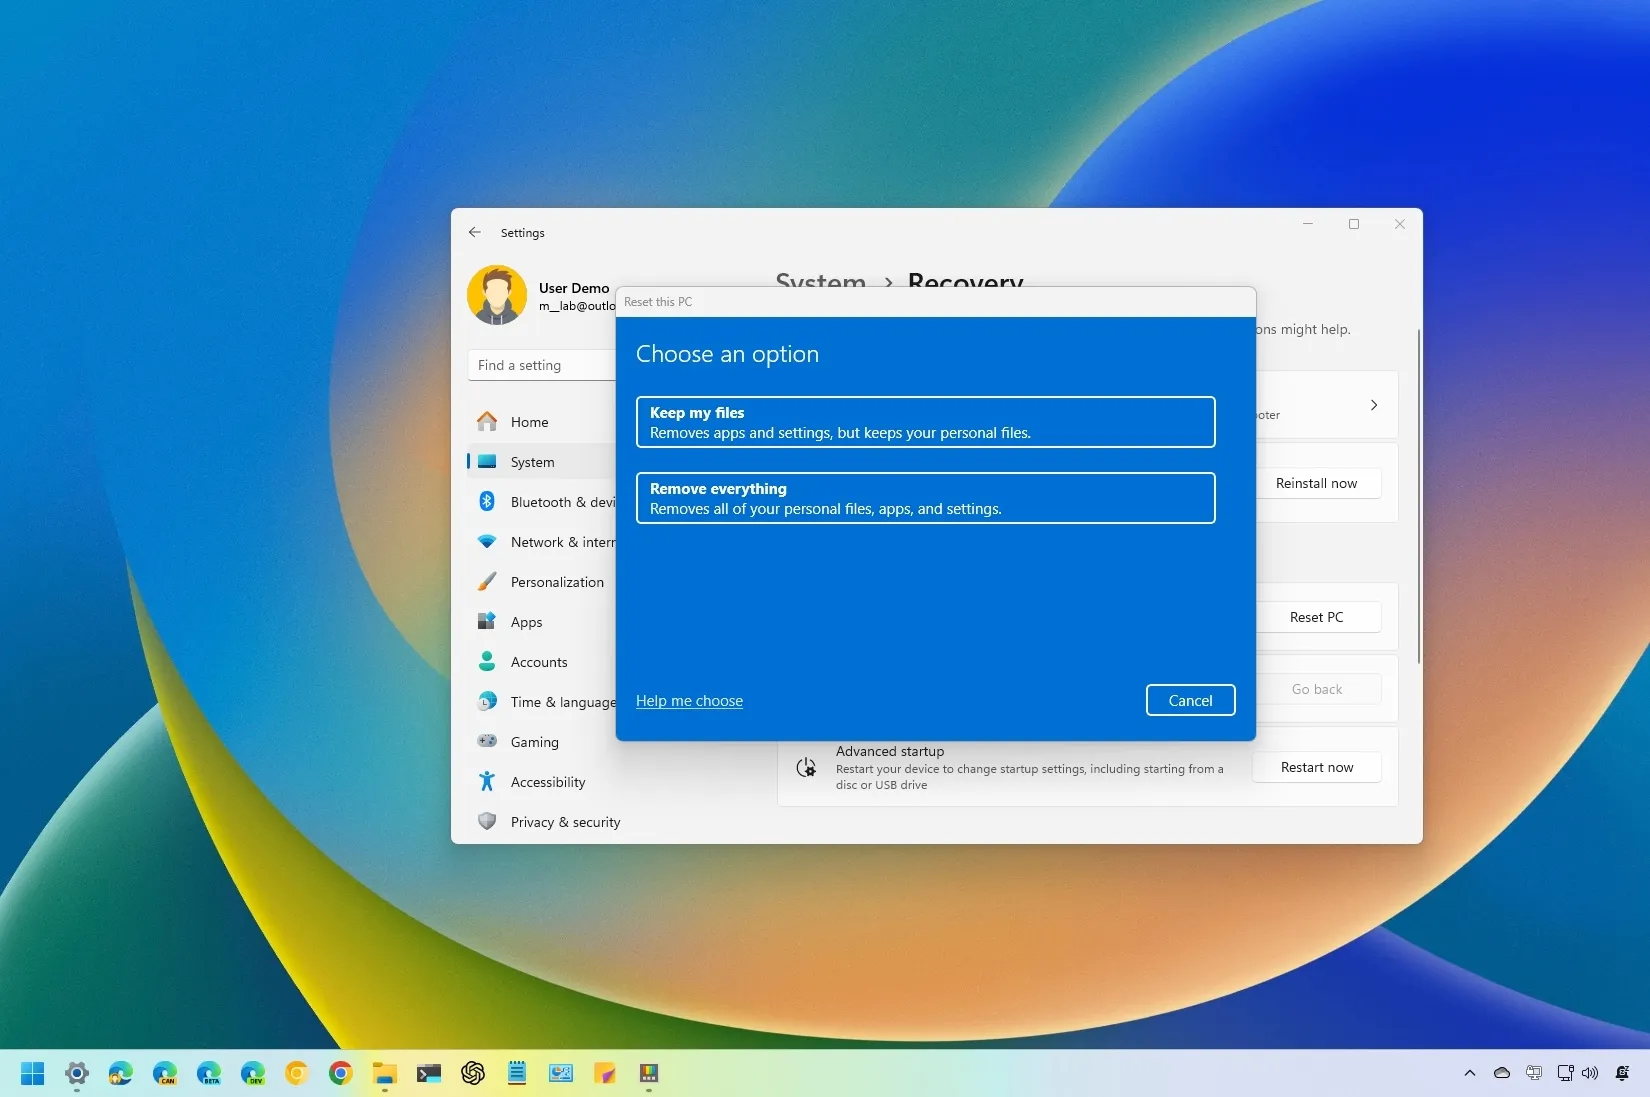
- Choose “Keep personal files and apps”: This is the crucial option that tells the installer to perform an in-place upgrade.
- Proceed with the Installation: The assistant will download Windows 11, prepare your system, and then initiate the installation, which will involve several restarts.
Alternatively, you can perform an in-place upgrade by downloading the Windows 11 Media Creation Tool and choosing to upgrade your PC.
Performing a Clean Installation
A clean installation typically requires creating bootable media (a USB drive or DVD) using the Windows 11 Media Creation Tool.
- Create Bootable Media: Use the Media Creation Tool to create a bootable USB drive or DVD with the Windows 11 installation files.
- Boot from Media: Restart your computer and configure your BIOS/UEFI to boot from the USB drive or DVD.
- Follow the Installer Prompts: The Windows setup wizard will appear.
- Choose “Custom: Install Windows only (advanced)”: This option will allow you to select the drive or partition where you want to install Windows 11.
- Format the Drive: When prompted to choose where to install Windows, select the partition you want to use and click “Format.” This step will erase all data on that partition. If you are installing on a new drive, you will simply create a new partition and install Windows there.
- Complete the Installation: The installer will copy files and set up Windows 11. You will then proceed through the initial setup screens, creating your user account, and configuring settings.
After Installation: Reclaiming Your Digital Space
Once Windows 11 is successfully installed, your primary focus shifts to restoring your experience and ensuring everything is working correctly. This is where your preparation pays off.
Restoring Your Files and Applications
- Restore from Backup: Connect your external drive or access your cloud storage and copy your backed-up personal files back to their appropriate locations on your new Windows 11 system.
- Reinstall Applications: For a clean install, or if some applications were incompatible with the upgrade, reinstall them from their original sources. Use the list you created earlier to ensure you don’t miss anything.
- Activate Software: Enter any license keys or use your account credentials to re-activate your paid software.
Checking for Updates and Drivers
- Windows Updates: Immediately run Windows Update to download and install any critical security patches and feature updates released since your installation.
- Driver Updates: Ensure all your hardware components are functioning correctly by checking for updated drivers. You can do this through Device Manager, Windows Update, or by visiting the manufacturer’s websites for your motherboard, graphics card, and other peripherals.
Optimizing Your Windows 11 Experience
Now that your system is up and running, you can personalize it to your liking. Explore the new features of Windows 11, adjust your settings, and install your favorite productivity apps. This is also a good time to consider digital security tools like robust antivirus software and a VPN, especially if you handle sensitive information or engage in online financial transactions.
Conclusion: Peace of Mind Through Preparation
So, does installing Windows 11 delete everything? Not if you perform an in-place upgrade and take the necessary precautions. Microsoft designs the in-place upgrade process to be as non-intrusive as possible, preserving your data. However, the inherent complexity of operating system upgrades means that unforeseen issues can arise.
The key to a successful and stress-free Windows 11 installation, whether it’s an upgrade or a clean install, lies in proactive preparation. By backing up your data, documenting your software, and understanding the different installation methods, you can navigate the process with confidence. Think of it as an investment in your digital well-being, akin to responsible personal finance or strategic brand management. By taking these simple yet vital steps, you can ensure that your transition to Windows 11 is a positive one, allowing you to enjoy the benefits of the new operating system without the dreaded fear of data loss.
aViewFromTheCave is a participant in the Amazon Services LLC Associates Program, an affiliate advertising program designed to provide a means for sites to earn advertising fees by advertising and linking to Amazon.com. Amazon, the Amazon logo, AmazonSupply, and the AmazonSupply logo are trademarks of Amazon.com, Inc. or its affiliates. As an Amazon Associate we earn affiliate commissions from qualifying purchases.