Navigating the world of web development and software engineering on a Mac often leads you to the essential package manager known as npm. For those diving into JavaScript development, understanding how to install and manage npm is a fundamental step. This guide will walk you through the process of installing npm on your macOS device, ensuring you’re equipped with the tools needed to manage project dependencies, run scripts, and leverage the vast ecosystem of open-source JavaScript packages. We’ll cover the prerequisites, the installation methods, and some initial steps to verify your setup, all within the context of the broader tech landscape, brand building, and financial implications of mastering these development tools.
Understanding npm and Its Importance in the Tech Ecosystem
Before we get our hands dirty with the installation process, it’s crucial to understand what npm is and why it’s such a pivotal tool in modern software development. npm stands for Node Package Manager. It’s not just a tool; it’s the world’s largest software registry, housing an ever-growing collection of free and packaged software available to JavaScript developers.
The Role of npm in Modern Web Development
In the realm of Tech, npm plays a central role in streamlining the development workflow. When you’re building a website or a web application, you often rely on pre-written code modules – packages – created by other developers. These packages can range from UI component libraries like React or Vue.js, to utility functions for data manipulation, to entire frameworks for building complex applications.
npm automates the process of:
- Installing Packages: Instead of manually downloading and integrating every piece of code you need, npm allows you to specify the packages your project requires, and it fetches and installs them automatically.
- Managing Dependencies: Projects often have dependencies on other packages, which in turn have their own dependencies. npm expertly manages this complex tree of dependencies, ensuring that all necessary components are present and compatible.
- Version Control: npm helps you manage different versions of packages, allowing you to specify exact versions or version ranges to ensure your project remains stable and reproducible.
- Running Scripts: npm can be used to define and run scripts for common development tasks, such as building your project, running tests, or starting a development server.
Without npm, managing the dependencies for even a moderately sized JavaScript project would be a daunting and error-prone task. It’s the backbone that supports much of the modern web development ecosystem.
Beyond Code: The Brand and Financial Implications of npm Proficiency
While the immediate benefit of npm is its technical utility, mastering it also has tangential benefits that touch upon Brand and Money.
For individuals, a strong understanding of npm and its associated technologies contributes to building a personal brand as a proficient developer. Being able to efficiently set up and manage projects using industry-standard tools signals competence and professionalism. This can be a significant advantage when seeking employment, freelancing opportunities, or collaborating on open-source projects. Your ability to contribute effectively to tech communities, powered by tools like npm, directly impacts your reputation and perceived value.
From a Money perspective, efficiency and speed are directly linked to profitability. Projects that can be set up and deployed quickly, thanks to effective dependency management via npm, mean less time spent on development overhead and more time focused on delivering core functionality or revenue-generating features. For businesses, this translates to faster time-to-market and reduced development costs. For freelancers, it means being able to take on more projects and deliver them faster, increasing earning potential. Furthermore, the accessibility of npm’s vast library of open-source tools can significantly reduce the need for costly proprietary software, offering a cost-effective path to building robust applications.
Installing npm on Your Mac: The Recommended Approach
The most straightforward and recommended way to install npm on a Mac is by installing Node.js, as npm is bundled with it. Node.js is a JavaScript runtime environment that allows you to run JavaScript code outside of a web browser.
Option 1: Using the Official Node.js Installer
This is generally the simplest method for most users.
Step 1: Download the Node.js Installer
- Visit the official Node.js website: https://nodejs.org/
- On the homepage, you will typically see two download options:
- LTS (Long Term Support): This is the recommended version for most users. It’s more stable and receives long-term support.
- Current: This version includes the latest features but might be less stable.
- Click on the LTS download button for macOS. This will download a
.pkgfile (e.g.,node-vXX.YY.Z-darwin-x64.pkg).
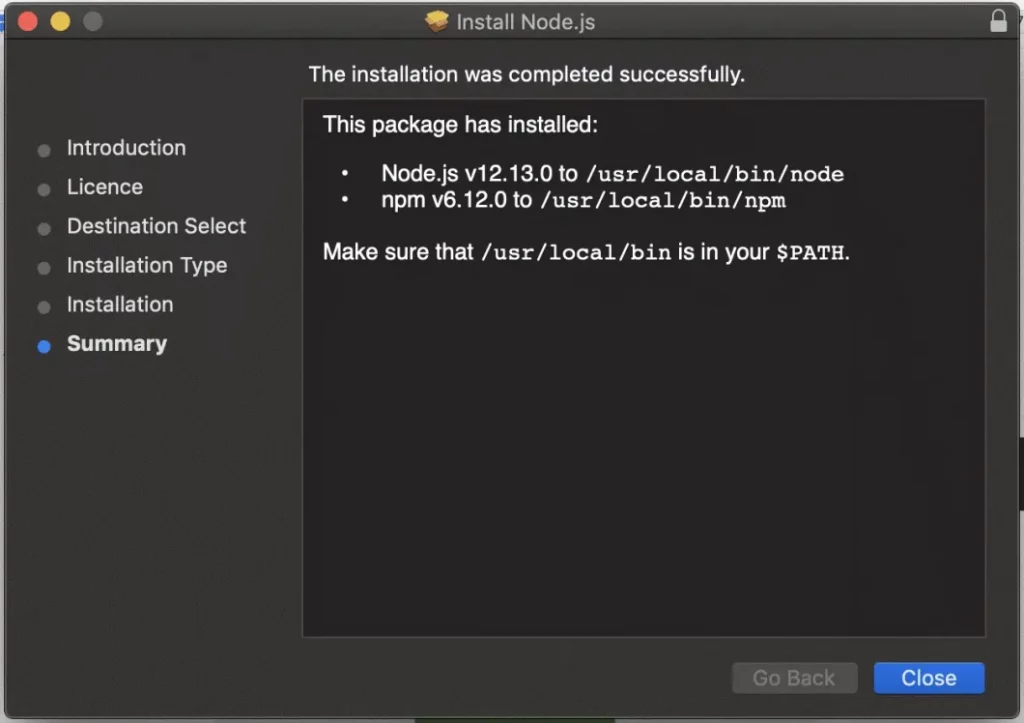
Step 2: Run the Installer
- Locate the downloaded
.pkgfile in your Downloads folder. - Double-click the file to launch the Node.js installer.
- Follow the on-screen prompts. The installer is straightforward:
- Click “Continue” on the Introduction screen.
- Agree to the software license agreement.
- Choose the installation destination (usually the default is fine).
- Click “Install.” You may be prompted to enter your Mac’s administrator password.
- The installer will proceed to install Node.js and npm.
Step 3: Verify the Installation
Once the installation is complete, you need to verify that both Node.js and npm have been installed correctly and are accessible from your terminal.
-
Open your Terminal application. You can find it in
Applications > Utilities > Terminalor by searching for “Terminal” using Spotlight (Cmd + Space). -
In the Terminal window, type the following command and press Enter:
node -vThis command should display the installed Node.js version (e.g.,
vXX.YY.Z). -
Next, type the following command and press Enter to check the npm version:
npm -vThis command should display the installed npm version (e.g.,
X.Y.Z).
If both commands return version numbers, congratulations! You have successfully installed Node.js and npm on your Mac.
Option 2: Using a Package Manager (Homebrew)
For developers who prefer using a command-line package manager like Homebrew, this method offers a streamlined way to install and manage Node.js and npm.
Step 1: Install Homebrew (if you don’t have it already)

If you don’t have Homebrew installed, open your Terminal and run the following command:
/bin/bash -c "$(curl -fsSL https://raw.githubusercontent.com/Homebrew/install/HEAD/install.sh)"
Follow the on-screen instructions to complete the Homebrew installation.
Step 2: Install Node.js using Homebrew
Once Homebrew is installed, you can install Node.js with a simple command:
brew install node
Homebrew will download and install the latest stable version of Node.js, which includes npm.
Step 3: Verify the Installation
Similar to the previous method, open your Terminal and run:
node -v
npm -v
You should see the version numbers for both Node.js and npm, confirming a successful installation.
Advantages of Using Homebrew:
- Easy Updates: Updating Node.js and npm is as simple as running
brew upgrade node. - Dependency Management: Homebrew manages other development tools you might install, keeping your system organized.
- Consistency: It provides a consistent way to install software across different macOS machines.
Basic npm Commands and Next Steps
With npm installed, you’re ready to start managing your projects. Here are a few fundamental commands to get you started.
Essential npm Commands
-
Initializing a New Project: Navigate to your project’s root directory in the Terminal and run:
npm initThis command will create a
package.jsonfile, which is the heart of your npm project. It stores metadata about your project, including its name, version, dependencies, and scripts. Thenpm init -ycommand can be used for a quick initialization with default settings. -
Installing Packages: To install a package (e.g., a library like
lodash), use:npm install lodashThis command downloads the
lodashpackage and its dependencies and adds them to yournode_modulesfolder. It also automatically updates yourpackage.jsonfile to listlodashas a dependency. -
Installing Packages as Development Dependencies: Some packages are only needed during development (e.g., testing frameworks or build tools). You can install them as development dependencies using the
--save-devflag:npm install jest --save-devThis will add
jestto thedevDependenciessection of yourpackage.json. -
Uninstalling Packages: To remove a package:
npm uninstall lodash -
Listing Installed Packages: To see all packages installed in your project:
npm list -
Running Scripts: If you’ve defined scripts in your
package.json(e.g., astartscript), you can run them like this:npm start

Further Exploration and Best Practices
- Node Version Management (nvm): For developers working on multiple projects that require different Node.js versions, it’s highly recommended to install a Node Version Manager (NVM). NVM allows you to easily install, switch between, and manage multiple Node.js versions on your system. You can install NVM using Homebrew:
brew install nvm. After installation, follow the instructions to set it up. - Understanding
package.json: Familiarize yourself with the different sections ofpackage.json, especiallydependenciesanddevDependencies. This file is crucial for collaborative development and for ensuring reproducible builds. - Semantic Versioning: Understand how npm uses semantic versioning (SemVer) to manage package versions. This helps prevent unexpected issues when updating dependencies.
- Security: Be mindful of the packages you install. Always check the popularity and maintenance status of a package before adding it to your project. npm provides security advisories for known vulnerabilities.
By following these steps and commands, you’ll have a solid foundation for using npm on your Mac, enabling you to efficiently manage your JavaScript projects and tap into the immense power of the Node.js ecosystem. This proficiency not only enhances your technical capabilities but also contributes to your professional brand and can lead to more lucrative opportunities in the ever-evolving world of technology.
aViewFromTheCave is a participant in the Amazon Services LLC Associates Program, an affiliate advertising program designed to provide a means for sites to earn advertising fees by advertising and linking to Amazon.com. Amazon, the Amazon logo, AmazonSupply, and the AmazonSupply logo are trademarks of Amazon.com, Inc. or its affiliates. As an Amazon Associate we earn affiliate commissions from qualifying purchases.