
The world of 3D printing has traditionally been dominated by Windows and macOS environments, but as the maker community grows, so does the demand for robust Linux support. FlashPrint, the proprietary slicing software developed by Flashforge, is a critical tool for owners of Finder, Dreamer, and Creator series printers. While Linux users are often accustomed to compiling software from source or dealing with complex dependencies, installing FlashPrint on a Linux distribution requires a specific approach to ensure stability and performance.
This guide provides an in-depth exploration of how to integrate FlashPrint into your Linux-based workflow, covering everything from system preparation to advanced troubleshooting.

Understanding FlashPrint and Linux Compatibility
Before diving into the technical steps, it is essential to understand what FlashPrint does and why its presence on Linux is a significant advantage for the open-source community. FlashPrint serves as the “slicer”—the bridge between a 3D digital model (usually in STL or OBJ format) and the physical instructions (G-code) that the printer understands.
What is FlashPrint?
FlashPrint is known for its user-friendly interface and powerful features, such as automatic support generation, “cut” functions for large models, and a highly efficient pathing algorithm. Unlike some open-source slicers that require extensive configuration, FlashPrint is pre-tuned for Flashforge hardware. For Linux users, having access to this software means they can leverage the full potential of their 3D printers without needing to dual-boot into a different operating system.
Why Linux Users Choose FlashPrint?
While there are excellent open-source alternatives like Slic3r or Cura, FlashPrint remains the gold standard for Flashforge machine owners due to its proprietary optimization. Linux enthusiasts, who value control and system efficiency, often find that FlashPrint runs faster and more reliably on a lean Linux kernel than on resource-heavy alternatives. The software’s ability to handle complex geometries and its integrated Wi-Fi printing capabilities make it an indispensable tool for the modern digital fabricator.
Prerequisites for a Successful Installation
A successful software deployment on Linux begins with environment preparation. Because Linux distributions vary significantly in how they handle libraries and packages, checking your system requirements is the first step toward a functional 3D printing station.
System Requirements and Hardware Acceleration
FlashPrint is a graphically intensive application. It uses OpenGL to render 3D models and simulate the printing process. To run it smoothly, your Linux system should ideally have:
- A 64-bit Architecture: Most modern versions of FlashPrint are optimized for x64 systems.
- Dedicated GPU Drivers: Whether you are using NVIDIA, AMD, or Intel, ensure your drivers are up to date. Slicing software relies heavily on the GPU to visualize layers.
- Minimum RAM: At least 4GB of RAM is recommended, though 8GB is preferable when working with high-poly models.
Identifying Your Linux Distribution
The installation method differs based on your “distro.” Flashforge typically provides a .deb package, which is natively compatible with Debian-based systems such as Ubuntu, Linux Mint, and Pop!_OS. If you are using an Arch-based system (like Manjaro) or a Fedora-based system (RPM), you may need to use conversion tools or community-maintained repositories. This guide focuses on the standard Debian/Ubuntu path, which is the most common environment for desktop Linux users.
Step-by-Step Installation Guide for Ubuntu and Debian
The most reliable way to install FlashPrint is through the official package provided by the manufacturer. While you can sometimes find it in community software centers, manual installation via the terminal offers the best control over dependency management.
Downloading the Official Package
First, visit the official Flashforge website or their support download center. Locate the FlashPrint section and select the Linux version. You will typically download a file named something like FlashPrint_x.x.x_amd64.deb.
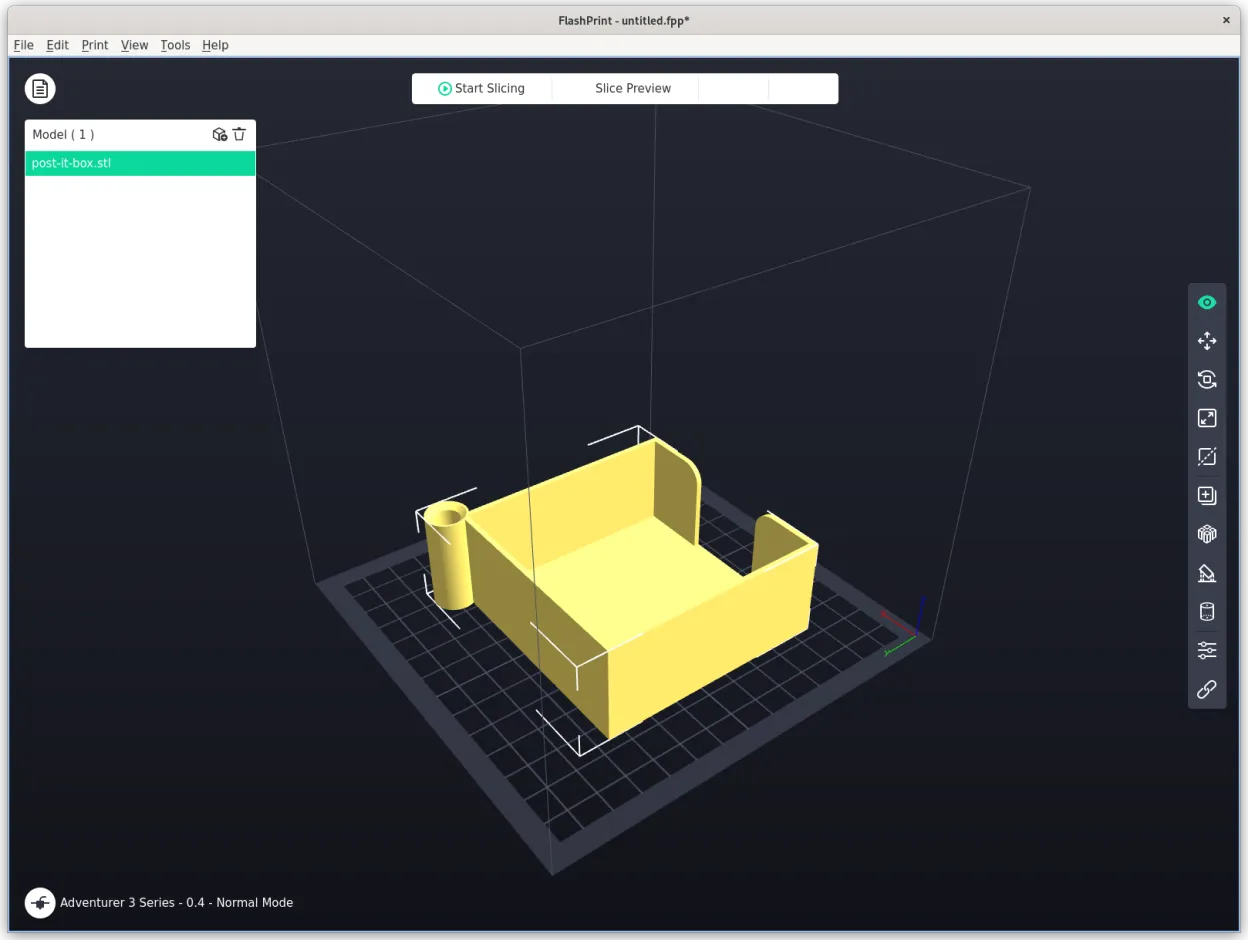
Once the download is complete, open your terminal and navigate to the folder where the file is located (usually the Downloads folder):
cd ~/Downloads
Executing the Installation
To install the package, use the dpkg command. However, dpkg does not automatically install dependencies, so it is often followed by a command to fix any missing links. Run:
sudo dpkg -i FlashPrint_x.x.x_amd64.deb
(Replace x.x.x with the actual version number you downloaded).
If the terminal reports missing dependencies, run the following command to automatically resolve them:
sudo apt-get install -f
This command communicates with the Ubuntu/Debian repositories to fetch any required libraries (such as libnsl or specific GL libraries) that FlashPrint needs to function.
Setting User Permissions
For FlashPrint to communicate with your 3D printer via USB, your user account must have the correct permissions to access serial ports. On many Linux systems, this involves adding your user to the dialout group. Execute the following command:
sudo usermod -a -G dialout $USER
After running this, you will need to log out and log back in for the changes to take effect.
Troubleshooting Common Linux-Specific Hurdles
Even with a successful installation, Linux users may encounter specific glitches due to the evolving nature of shared libraries. Understanding how to troubleshoot these “Tech” hurdles is what separates a novice user from an expert.
Resolving Missing Library Errors
One common issue on newer versions of Ubuntu (22.04 and later) is the absence of libnsl.so.1. FlashPrint may fail to launch, throwing an error in the terminal regarding this library. To fix this, you can manually install the legacy network support library:
sudo apt install libnsl-dev
If the software still complains about missing libpng12 or other older libraries, you may need to search for “PPA” (Personal Package Archives) that host these legacy files or manually link them from a local directory.
Managing Graphics and OpenGL Issues
If FlashPrint opens but shows a black screen or crashes when loading a model, the culprit is usually the graphics stack. Ensure that your system is using the proprietary drivers for your graphics card rather than the open-source “Nouveau” drivers (for NVIDIA users). You can check your OpenGL version by running glxinfo | grep "OpenGL version". FlashPrint requires a modern OpenGL context to render the 3D workspace.
Running FlashPrint on Non-Debian Systems
For users on Arch Linux or Manjaro, the .deb package is not directly compatible. However, the Arch User Repository (AUR) often contains a “flashprint” package maintained by the community that scripts the conversion of the .deb file into an Arch-compatible format. Users can install it using an AUR helper like yay:
yay -S flashprint
Optimizing the 3D Printing Workflow on Linux
Once FlashPrint is installed and running, the next step is to optimize the environment for a seamless “Tech” experience. A 3D printer is only as good as the software driving it, and Linux offers several tools to enhance this interaction.
Integrating with Hardware and Networks
FlashPrint for Linux supports both USB and Wi-Fi connectivity. If your printer is on the same network as your Linux machine, you can connect by entering the printer’s IP address within the FlashPrint interface. This bypasses the need for physical cables and allows you to monitor the print progress from across the room. On Linux, ensure that your firewall (like ufw) is not blocking the ports used by FlashPrint for network communication.
Keeping Software Updated
Unlike Windows applications that might have an “auto-update” feature, Linux packages installed via dpkg usually require manual updates. It is a good practice to check the Flashforge website once a month for new releases. When a new version is released, simply download the new .deb file and run the dpkg -i command again. The system will automatically upgrade the existing installation while preserving your custom print profiles and settings.
Conclusion: The Power of Linux in Digital Fabrication
Installing FlashPrint on a Linux system might require a few more steps than a standard “point-and-click” installation, but the rewards are significant. Linux offers a stable, high-performance environment that is free from the intrusive background processes often found in other operating systems. By following this tutorial, you ensure that your 3D printing workflow is built on a solid foundation, allowing you to focus on what matters most: bringing your digital designs to life with precision and efficiency. Whether you are a hobbyist or a professional engineer, mastering the installation of FlashPrint on Linux is a valuable skill in the ever-evolving landscape of modern technology.
aViewFromTheCave is a participant in the Amazon Services LLC Associates Program, an affiliate advertising program designed to provide a means for sites to earn advertising fees by advertising and linking to Amazon.com. Amazon, the Amazon logo, AmazonSupply, and the AmazonSupply logo are trademarks of Amazon.com, Inc. or its affiliates. As an Amazon Associate we earn affiliate commissions from qualifying purchases.