Minecraft, the immensely popular sandbox game, has a long and storied history. Over the years, Mojang Studios has released numerous updates, each introducing new features, mobs, biomes, and gameplay mechanics. While many players eagerly embrace the latest innovations, there’s a significant segment of the community that cherishes the charm, simplicity, or specific gameplay elements of older versions. Whether you’re seeking the nostalgic feel of a classic release, need a specific version for a modpack, or are troubleshooting compatibility issues, installing an older version of Minecraft is a common desire.
Navigating the official Minecraft launcher can sometimes feel like a labyrinth when you’re trying to deviate from the most current release. However, the process is entirely feasible and, with the right guidance, relatively straightforward. This article will walk you through the steps, from understanding why you might want to play an older version to the practicalities of downloading and launching it. We’ll delve into the technical considerations, the benefits of revisiting past Minecraft eras, and how to ensure a smooth experience.
Why Play an Older Version of Minecraft?
The allure of older Minecraft versions isn’t just about nostalgia, though that’s a powerful motivator for many. There are several compelling reasons why a player might choose to install and play a version of the game that isn’t the latest release. Understanding these motivations can help you appreciate the broader Minecraft ecosystem and why this capability is important for a diverse player base.
Nostalgia and the Golden Age of Minecraft
For many, older versions of Minecraft represent a formative period in their gaming lives. Perhaps it was the first version they ever played, or a version associated with shared memories with friends. The blocky aesthetics of early releases, the simpler mechanics, and even the specific music tracks can evoke a strong sense of nostalgia. Playing these versions allows players to relive those cherished moments, reconnecting with the origins of their passion for the game. It’s akin to listening to a favorite old song or rewatching a beloved childhood movie; it transports you back to a different time and place.
Modding and Community Projects
The Minecraft modding community is one of the most vibrant and long-standing in gaming. Many popular modpacks are developed and tested on specific older versions of Minecraft. These modpacks often rely on the game’s code and mechanics as they existed in a particular release. If you want to experience a renowned modpack like Technic, FTB (Feed The Beast), or Voltz, you’ll often be directed to install a specific older version of Minecraft. These older versions provide a stable foundation for complex modding ecosystems, allowing for unique gameplay experiences that would be difficult or impossible to replicate with current versions.
Specific Gameplay Features and Mechanics
Not all changes in Minecraft updates are universally welcomed. Some players may prefer the gameplay mechanics, item balancing, or world generation algorithms of older versions. For instance, some might miss the simplicity of the crafting system before certain additions, or prefer the way certain mobs behaved. Others might be drawn to the difficulty or challenges presented by earlier iterations of the game. The absence of certain features, or the presence of others, can fundamentally alter the gameplay loop, and some players find that older versions offer a more satisfying or familiar experience.
Troubleshooting and Compatibility
Occasionally, players might need to install an older version of Minecraft for technical reasons. This can include compatibility issues with specific hardware, operating systems, or even other software. If a particular mod or server plugin is not yet updated for the latest Minecraft version, using an older version becomes a necessity for continued enjoyment. It also allows for easier debugging when encountering bugs that might have been introduced or fixed in later updates.
Installing Older Minecraft Versions: The Official Launcher Method
The official Minecraft launcher, available for Java Edition, is your primary tool for managing different game versions. Mojang has thoughtfully integrated the ability to install and switch between various historical releases, making it surprisingly accessible for players. This method ensures you’re downloading legitimate game files directly from the source.
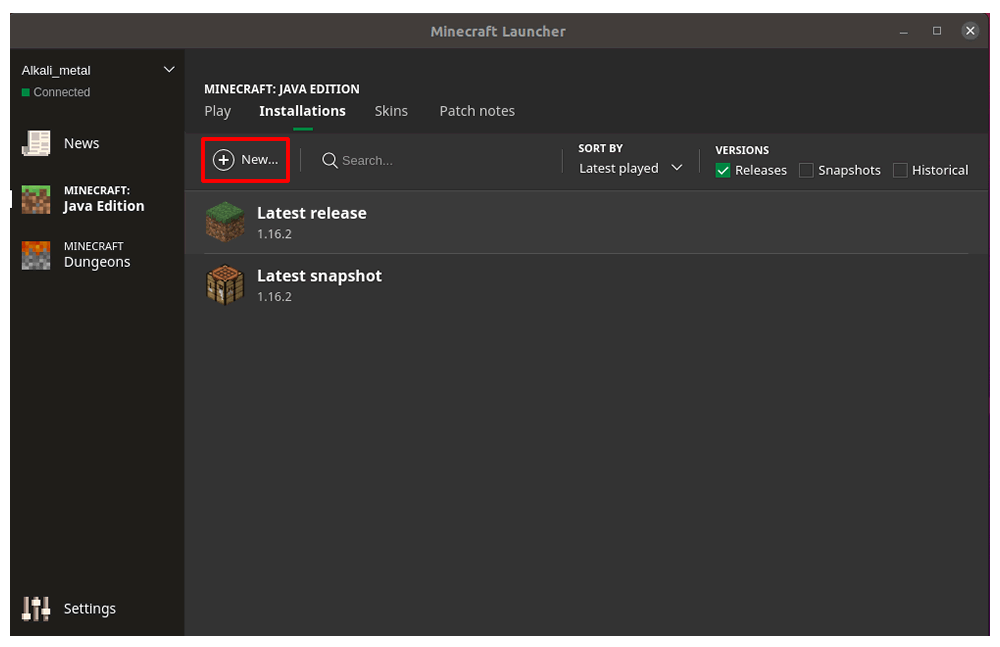
Accessing the Installations Tab
- Open the Minecraft Launcher: Launch the Minecraft Launcher application on your computer. Ensure you are logged in with your Microsoft account.
- Navigate to “Installations”: On the top bar of the launcher window, you’ll see several tabs: “Play,” “Installations,” “Snapshots,” and “Settings.” Click on the “Installations” tab. This is where you manage all your installed Minecraft versions and create new ones.
Creating a New Installation Profile
Within the “Installations” tab, you’ll see a list of your current game versions. To install an older version, you need to create a new “Installation Profile.”
- Click “New Installation”: In the top-right corner of the “Installations” tab, you’ll find a prominent button labeled “+ New Installation”. Click this button.
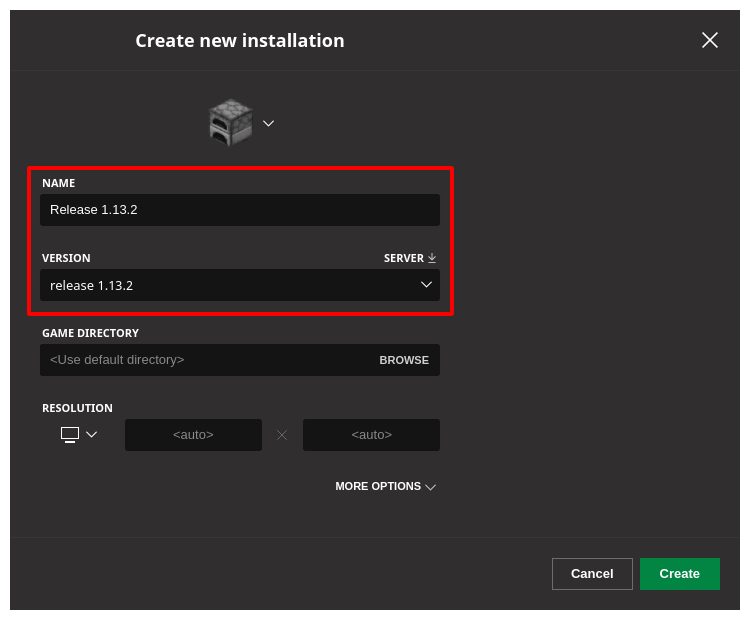
- Name Your Installation: A new window will pop up, prompting you to configure your new installation. At the top, you’ll see a field for “NAME.” Give your installation a descriptive name, such as “Minecraft 1.8.9,” “Beta 1.7.3,” or “Release 1.12.2.” This will help you easily identify it later.
- Select the Game Version: This is the most crucial step. Below the name field, you’ll see a dropdown menu labeled “VERSION”. Click on this dropdown. You’ll be presented with a long list of available Minecraft versions, including the latest release, older official releases, snapshots, and even older development versions like “oldbeta” or “oldalpha.” Scroll through this list and select the specific version you wish to install. For older versions, you might need to scroll quite far down. Some versions might require you to click “Show older versions” or similar options.
- Configure Optional Settings (Optional but Recommended):
- Game Directory: By default, Minecraft stores its game files in a designated folder. You can change this if you prefer to keep older versions in separate, custom directories. This is particularly useful if you have multiple older versions installed or are using specific modpacks.
- JVM Arguments: This section allows advanced users to modify Java Virtual Machine (JVM) arguments, such as RAM allocation. For most users, the default settings are fine. However, if you’re experiencing performance issues with an older version, you might consider increasing the allocated RAM by editing the
-Xmxvalue (e.g.,-Xmx2Gfor 2 gigabytes).
- Click “Create”: Once you’ve selected your desired version and made any optional adjustments, click the green “Create” button at the bottom right of the window.
Launching Your Older Version
After creating your new installation profile, you’ll be taken back to the “Installations” tab, and your newly created profile will appear in the list.
- Locate Your Installation: Find the profile you just created in the list.
- Click “Play”: To the right of your installation’s name, you’ll see a “Play” button. Click it.
- Confirm Version Change: The launcher will then prompt you with a confirmation message, indicating that you are about to play a specific version of Minecraft. Click “Play” again to proceed.
- Download Process: The launcher will now download the necessary game files for the selected older version. This might take a few minutes, depending on your internet speed. You’ll see a progress bar at the bottom of the launcher.
- Enjoy the Game: Once the download is complete, the Minecraft game window will open, and you’ll be playing the older version you selected.
Important Note: Each time you want to play a different version of Minecraft, you’ll need to go back to the “Installations” tab, select the desired profile, and click “Play.”
Managing Multiple Versions and Troubleshooting
Having multiple versions of Minecraft installed can be incredibly convenient, but it also introduces the potential for minor conflicts or confusion if not managed properly. Understanding how to organize your installations and address common issues will ensure a smooth gaming experience across different eras of Minecraft.
Organizing Your Installations
As you install more older versions, the list in the “Installations” tab can become quite long. Keeping it organized is key to avoiding mistakes.
- Descriptive Naming: As mentioned earlier, using clear and descriptive names for your installations is paramount. Instead of just “Version 1,” use “Minecraft 1.7.10 – Forge 10.13.4.1614” or “Beta 1.7.3.” This immediately tells you what the installation is for.
- Custom Game Directories: For more advanced users or those running heavily modded older versions, consider setting up custom game directories. When creating a new installation profile, you can specify a unique folder for each version’s
saves,resourcepacks,mods, andconfigfiles. This prevents mods or save files from one version from interfering with another. To do this, click “Browse” next to the “Game Directory” field and create a new folder for that specific installation. - Archive or Disable Unused Installations: If you have many old versions you rarely use, you can either delete their installation profiles from the launcher (they will remain installed on your system until you manually remove the associated game files) or, more practically, simply ignore them. The launcher won’t automatically launch them.
Common Issues and Solutions
While the official launcher is robust, you might encounter a few hiccups when dealing with older game versions.
- “The JVM could not be started…” Error: This often indicates a problem with your Java installation. Minecraft Java Edition relies on a specific version of Java. Ensure you have a compatible Java Runtime Environment (JRE) installed. Sometimes, reinstalling Java or updating it can resolve this. You can also try manually specifying the Java executable path in the JVM arguments, though this is an advanced troubleshooting step.
- Performance Issues: Older versions might not be as optimized as newer ones, or they might be running with insufficient RAM. Ensure you’ve allocated adequate RAM to your installation profile via the JVM arguments. Also, check if your computer meets the minimum system requirements for that specific older version. While older versions generally demand less, very old hardware might still struggle.
- Launcher Not Showing Desired Version: Sometimes, the launcher might not immediately list every single historical version. Ensure you’ve selected “Show older versions” in the dropdown if available. If you’re looking for extremely obscure or pre-release versions, you might need to look at third-party launchers or manual installation methods (though this is generally not recommended for security reasons).
- Modding Conflicts: If you’re installing mods for an older version, ensure the mods are compatible with that specific version of Minecraft and with each other. Modding communities often have detailed compatibility lists and troubleshooting guides. Always download mods from reputable sources.
By following these guidelines, you can effectively manage your Minecraft installations, ensuring you can always jump back to the version that best suits your needs, whether it’s for a trip down memory lane, a specific modding project, or to recapture a beloved gameplay experience.
Conclusion: Reliving Minecraft’s Past
The ability to install and play older versions of Minecraft is more than just a technical feature; it’s a testament to the game’s enduring legacy and the diverse needs of its passionate community. From the nostalgic allure of its early days to the intricate worlds crafted by modding communities, older versions offer unique experiences that continue to captivate players.
By leveraging the official Minecraft launcher, you have the power to access and revisit these cherished eras of the game with relative ease. The straightforward process of creating new installation profiles, selecting specific versions, and launching them ensures that your journey back in time is seamless. Remember to name your installations descriptively and consider custom game directories for better organization, especially if you plan on extensive modding.
While occasional troubleshooting might be necessary, understanding common issues like JVM errors or performance dips and knowing how to address them will allow you to overcome any obstacles. The Minecraft launcher is a powerful tool that, when used correctly, unlocks a treasure trove of past gaming experiences. So, whether you’re yearning for the simplicity of Beta 1.7.3, the modding capabilities of 1.7.10, or any other significant release, the path to installing and enjoying older Minecraft versions is clear. Dive back in, relive your favorite memories, and discover why these classic iterations of Minecraft continue to hold a special place in the hearts of so many players.
aViewFromTheCave is a participant in the Amazon Services LLC Associates Program, an affiliate advertising program designed to provide a means for sites to earn advertising fees by advertising and linking to Amazon.com. Amazon, the Amazon logo, AmazonSupply, and the AmazonSupply logo are trademarks of Amazon.com, Inc. or its affiliates. As an Amazon Associate we earn affiliate commissions from qualifying purchases.