In the dynamic world of software development, efficiency, standardization, and robust project management are paramount. Apache Maven stands out as an indispensable tool that empowers developers to achieve these goals with remarkable ease. As a powerful build automation and project management tool, Maven simplifies the build process, manages dependencies, and provides a unified project structure, making it a cornerstone for countless Java projects and increasingly for other languages too. If you’re looking to streamline your development workflow, enhance collaboration, and ensure consistent project builds, integrating Maven into your toolkit is a crucial step.
This comprehensive guide will walk you through the entire process of installing Apache Maven on various operating systems, ensuring you have a solid foundation to leverage its full potential. From understanding its core benefits to navigating common installation pitfalls, we’ll cover everything you need to get Maven up and running smoothly, aligning perfectly with the productivity and software aspects of our Tech section.
Unlocking Development Efficiency: Why Apache Maven Matters
Before diving into the installation specifics, it’s vital to grasp why Maven is such a critical asset in modern software development. At its core, Maven is a project management tool that provides developers with a complete build lifecycle framework. This means it doesn’t just compile your code; it handles everything from cleaning your project directory to compiling, testing, packaging, deploying, and even generating documentation and reports.
Standardized Project Structure: One of Maven’s greatest strengths is its convention-over-configuration approach. It enforces a standard directory layout for projects, which means any developer familiar with Maven can instantly understand the structure of any Maven project. This standardization drastically reduces the learning curve for new team members and promotes consistency across an organization’s codebase.
Dependency Management: Modern applications often rely on numerous third-party libraries. Manually managing these dependencies can be a time-consuming and error-prone task, leading to “dependency hell” where incompatible library versions cause conflicts. Maven elegantly solves this by automatically downloading and managing project dependencies from central repositories. You simply declare the required libraries in your project’s pom.xml (Project Object Model) file, and Maven handles the rest, ensuring your project always uses the correct versions. This automation not only saves time but also significantly reduces potential build issues.
Simplified Build Process: Maven abstracts away the complexities of the underlying build tools (like Ant or Make) with a set of predefined lifecycle phases and goals. Whether you need to compile your code, run tests, or package your application into a JAR or WAR file, Maven provides simple, consistent commands (e.g., mvn clean install). This uniformity makes builds repeatable and predictable, which is essential for continuous integration and deployment pipelines.
Extensibility with Plugins: Maven’s functionality can be extended through a rich ecosystem of plugins. These plugins allow developers to perform a wide array of tasks, from code generation and static analysis to deploying applications to servers. This extensibility ensures that Maven can adapt to various project requirements and development methodologies.
In essence, Maven transforms the build process from a series of manual, often inconsistent steps into an automated, standardized, and highly efficient workflow. For any developer or team striving for higher productivity and reliable software delivery, understanding and utilizing Apache Maven is not just beneficial—it’s essential.
The Essential Prerequisites: Preparing Your System for Maven
Before you embark on the Maven installation journey, there’s one crucial prerequisite you must address: the Java Development Kit (JDK). Maven is written in Java and relies heavily on a Java runtime environment to function correctly. Without a properly installed and configured JDK, Maven simply won’t run.
Java Development Kit (JDK): The Foundation
The Java Development Kit is a software development environment used for developing Java applications and applets. It includes the Java Runtime Environment (JRE), an interpreter/loader (java), a compiler (javac), an archiver (jar), a documentation generator (javadoc), and other tools needed for Java development.
Why JDK is Crucial: Maven uses the Java compiler to build your Java projects and relies on the Java runtime to execute its own processes. Therefore, having a compatible JDK version installed is non-negotiable. While Maven itself doesn’t strictly require the absolute latest JDK version, it’s generally recommended to use a recent, actively supported LTS (Long Term Support) version of Java, such as Java 11, 17, or 21, for optimal compatibility and security.
How to Check for JDK Installation:
Before installing a new JDK, it’s wise to check if you already have one installed. Open your terminal or command prompt and type the following commands:
java -version
javac -version
If you see output similar to “openjdk version “17.0.2” 2022-01-18″ or “java version “1.8.0_311″”, then Java is likely installed. If javac also returns a version, you have the full JDK. If you receive “command not found” errors, or if java -version works but javac -version doesn’t, then you’ll need to install the JDK.
Installing the JDK:
If you need to install the JDK, follow these general steps:
-
Choose a Vendor: Oracle, OpenJDK (Adoptium/Eclipse Temurin, Amazon Corretto, Azul Zulu, etc.) are popular choices. OpenJDK distributions are free and open-source, making them widely adopted.
-
Download: Visit the official website of your chosen vendor (e.g., adoptium.net for Eclipse Temurin) and download the appropriate installer for your operating system (Windows, macOS, Linux).
-
Installation: Run the installer. On Windows and macOS, it’s usually a straightforward graphical installation. On Linux, you might use a package manager or extract an archive.
-
Set
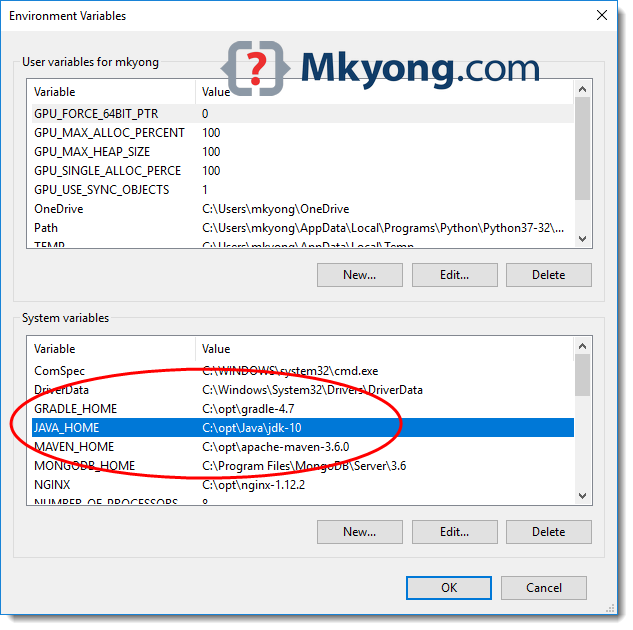
JAVA_HOMEEnvironment Variable: This step is critical for Maven. Maven expects to find theJAVA_HOMEenvironment variable pointing to the root directory of your JDK installation.-
Windows:
- Search for “Environment Variables” and select “Edit the system environment variables.”
- Click “Environment Variables…”
- Under “System variables,” click “New…”
- For “Variable name,” enter
JAVA_HOME. - For “Variable value,” enter the path to your JDK installation directory (e.g.,
C:Program FilesJavajdk-17). - Find the
Pathvariable in “System variables,” select it, and click “Edit…” - Click “New” and add
%JAVA_HOME%binto the list. Move it up if necessary. - Click “OK” on all windows to save changes.
-
macOS / Linux:
- Open your preferred shell configuration file (
~/.bashrc,~/.zshrc,~/.profile, or/etc/profilefor system-wide). - Add the following lines, replacing
/path/to/your/jdkwith your actual JDK installation path:
bash

export JAVA_HOME="/Library/Java/JavaVirtualMachines/jdk-17.jdk/Contents/Home" # Example for macOS

# OR

export JAVA_HOME="/usr/lib/jvm/java-17-openjdk-amd64" # Example for Linux

export PATH="$JAVA_HOME/bin:$PATH"
- Save the file and source it to apply changes:
source ~/.bashrc(or your relevant file).
- Open your preferred shell configuration file (
-
After setting JAVA_HOME and updating PATH, open a new terminal/command prompt and verify echo %JAVA_HOME% (Windows) or echo $JAVA_HOME (macOS/Linux) to confirm it points to the correct directory.
Step-by-Step Maven Installation Across Platforms
With your JDK successfully installed and configured, you are now ready to install Apache Maven itself. The process involves downloading the Maven binary distribution, extracting it, and then setting up the necessary environment variables to make Maven accessible from anywhere on your system.
Downloading Apache Maven
The first step is to obtain the Maven binary archives from the official Apache Maven website.
- Navigate to the Official Download Page: Open your web browser and go to maven.apache.org/download.cgi.
- Choose the Binary Archive: Look for the “Binary zip archive” (e.g.,
apache-maven-X.Y.Z-bin.zipfor Windows) or “Binary tar.gz archive” (e.g.,apache-maven-X.Y.Z-bin.tar.gzfor macOS/Linux). Always download the binary distribution, not the source. - Verify Integrity (Recommended): Before using the downloaded file, it’s good practice to verify its integrity using the SHA512 checksum provided on the download page. This ensures the file hasn’t been tampered with or corrupted during download.
Installing Maven on Windows
Installing Maven on Windows involves extracting the downloaded ZIP file and then configuring two environment variables: M2_HOME (or MAVEN_HOME) and updating the Path variable.
-
Extract the Archive:
- Locate the downloaded
apache-maven-X.Y.Z-bin.zipfile. - Right-click the file and select “Extract All…”
- Extract the contents to a directory where you want Maven installed. A common and recommended location is
C:Program FilesApache Mavenor a similar path. For example, if you extractapache-maven-3.9.6, the full path might beC:Program FilesApache Mavenapache-maven-3.9.6. Avoid paths with spaces or special characters if possible, though modern Maven versions handle them better.
- Locate the downloaded
-
Set
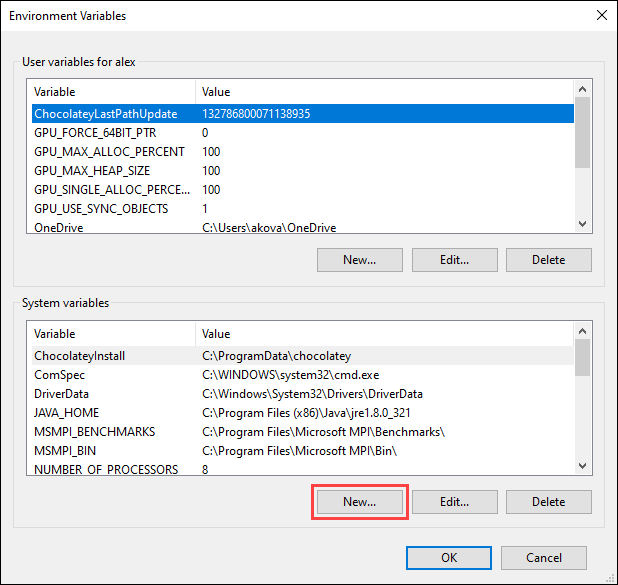
M2_HOME(orMAVEN_HOME) Environment Variable:- Search for “Environment Variables” in the Windows search bar and select “Edit the system environment variables.”
- Click the “Environment Variables…” button.
- Under the “System variables” section, click “New…”.
- For “Variable name,” enter
M2_HOME(orMAVEN_HOME). WhileMAVEN_HOMEis sometimes used,M2_HOMEis the convention. - For “Variable value,” enter the path to your Maven installation directory (e.g.,
C:Program FilesApache Mavenapache-maven-3.9.6). - Click “OK.”
-
Update the
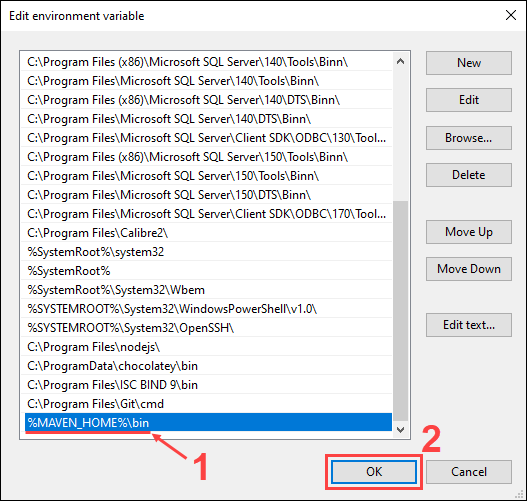
PathEnvironment Variable:- In the same “System variables” section, find the
Pathvariable, select it, and click “Edit…”. - In the “Edit environment variable” dialog, click “New” and add
%M2_HOME%binto the list. - (Optional but Recommended) Move this entry to the top of the list using the “Move Up” button to ensure it’s prioritized.
- Click “OK” on all open dialogs to save your changes.
- In the same “System variables” section, find the
-
Restart Command Prompt: It’s crucial to close any existing Command Prompt or PowerShell windows and open a new one for the environment variable changes to take effect.
Installing Maven on macOS and Linux
The installation process for macOS and Linux is quite similar, typically involving extracting a .tar.gz archive and configuring environment variables in your shell’s profile file.
-
Extract the Archive:
- Open your terminal.
- Navigate to a suitable directory where you want to install Maven, such as
/opt/(for system-wide installation) or~/(for user-specific installation). We’ll use/opt/as an example, which usually requiressudo. - Move the downloaded
apache-maven-X.Y.Z-bin.tar.gzto this directory. - Extract the archive:
bash

sudo tar -xvzf apache-maven-X.Y.Z-bin.tar.gz -C /opt/
(ReplaceX.Y.Zwith your Maven version.) - (Optional) Create a symbolic link for easier upgrades:
bash

sudo ln -s /opt/apache-maven-X.Y.Z /opt/maven
This way, yourM2_HOMEcan always point to/opt/maven, and you just update the symlink when you upgrade Maven.
-
Set
M2_HOMEand UpdatePATHEnvironment Variables:-
Open your shell’s profile configuration file in a text editor. This is typically
~/.bashrc,~/.zshrc,~/.profile, or~/.bash_profiledepending on your shell and system setup. For system-wide access, you might edit/etc/profile.
bash

# For Bash users

nano ~/.bashrc

# For Zsh users

nano ~/.zshrc
-
Add the following lines to the end of the file. If you created a symlink, use
/opt/maven. Otherwise, use the full path to your Maven installation (e.g.,/opt/apache-maven-X.Y.Z).export M2_HOME="/opt/maven" # Or /opt/apache-maven-X.Y.Z export PATH="$M2_HOME/bin:$PATH"It’s also common to define
MAVEN_HOMEinstead ofM2_HOME. Either works, butM2_HOMEis the more established convention. -
Save the file and exit the text editor.
-
Apply Changes: Source the profile file to load the new environment variables into your current terminal session:
bash

source ~/.bashrc # Or source ~/.zshrc, etc.
-
Open a new terminal window/tab to ensure the changes are fully propagated.
-
While some Linux distributions and macOS offer Maven through package managers (e.g., apt install maven on Debian/Ubuntu, brew install maven on macOS with Homebrew), the manual installation described above gives you more control over the specific version and location, which can be beneficial for certain development setups.
Verifying Your Installation and Initial Configuration
After meticulously following the installation steps, the final crucial stage is to verify that Maven has been successfully installed and is accessible from your system. This confirmation ensures that all environment variables are correctly set and that Maven is ready to execute commands. Beyond basic verification, understanding initial configuration like the local repository and settings.xml is key to optimizing your Maven experience.
Confirming Maven’s Presence
To verify your Maven installation, open a new terminal or command prompt (this is important to ensure the freshly set environment variables are loaded) and type the following command:
mvn -v
# or
mvn --version
Expected Output:
If Maven is installed correctly, you should see output similar to this:
Apache Maven 3.9.6 (XXXXX; YYYY-MM-DD HH:MM:SS+ZZ:ZZ)
Maven home: /opt/maven
Java version: 17.0.2, vendor: Eclipse Adoptium, runtime: /Library/Java/JavaVirtualMachines/temurin-17.jdk/Contents/Home
Default locale: en_US, platform encoding: UTF-8
OS name: "mac os x", version: "13.6.1", arch: "aarch64", family: "mac"
This output confirms:
- Apache Maven version: The specific version of Maven you have installed.
- Maven home: The directory where Maven is installed, which should match your
M2_HOME(orMAVEN_HOME) variable. - Java version, vendor, and runtime: Details about the JDK Maven is using, ensuring it correctly located your
JAVA_HOME. - Operating system details: Information about your system.
If you see this output, congratulations! Maven is successfully installed on your system.
What to Do if Verification Fails:
If you receive an error message like “mvn: command not found,” “mvn is not recognized as an internal or external command, operable program or batch file,” or errors related to Java, here’s a quick checklist for troubleshooting:
- Restart Terminal/Command Prompt: Always start with this. Environment variables often require a new shell session.
- Double-Check
PATHVariable: Ensure%M2_HOME%bin(Windows) or$M2_HOME/bin(macOS/Linux) is correctly added to yourPathvariable and that no typos exist. On Linux/macOS, also confirm your profile file was sourced. - Verify
M2_HOME(orMAVEN_HOME): Ensure this variable points to the root directory of your Maven installation (e.g.,C:Program FilesApache Mavenapache-maven-3.9.6or/opt/maven), not thebinsubdirectory. - Confirm
JAVA_HOME: EnsureJAVA_HOMEis set correctly and points to your JDK installation. Runecho %JAVA_HOME%(Windows) orecho $JAVA_HOME(macOS/Linux) to verify. - Check JDK
bininPATH: WhileJAVA_HOMEis usually sufficient for Maven, ensure%JAVA_HOME%bin(Windows) or$JAVA_HOME/bin(macOS/Linux) is also in your system’sPathvariable. - Review Installation Directory: Ensure the Maven directory structure is correct, specifically that the
binfolder exists directly inside yourM2_HOMEpath.
Understanding Maven’s Local Repository and settings.xml
While Maven is now installed, two fundamental configuration aspects will significantly impact your day-to-day use: the local repository and the settings.xml file.
Maven’s Local Repository:
When Maven needs a dependency (a library or plugin), it first checks its local repository. If the dependency isn’t found there, Maven downloads it from remote repositories (like Maven Central) and stores it in your local repository for future use. This significantly speeds up subsequent builds by avoiding repeated downloads.
- Default Location: By default, Maven’s local repository is located in your user’s home directory:
- Windows:
C:Users<your-username>.m2repository - macOS / Linux:
~/.m2/repository
- Windows:
You will see this directory fill up with JARs and other artifacts as you build Maven projects.
The settings.xml File:
The settings.xml file allows you to customize Maven’s behavior for your user account or for all users on a system. There are two locations for this file:
- User-specific:
~/.m2/settings.xml(recommended for most users, as it only affects your projects). - Global:
$M2_HOME/conf/settings.xml(affects all users on the system where Maven is installed).
Common uses for settings.xml include:
- Changing the Local Repository Location: If you want your local repository in a different directory (e.g., on a separate drive or network share), you can specify it in
settings.xml:
xml

<settings>

  <localRepository>/path/to/your/custom/repository</localRepository>

</settings>
- Configuring Proxies: If your organization uses a proxy server to access the internet, you’ll need to configure it here so Maven can download dependencies:
xml

<settings>

  <proxies>

    <proxy>

      <active>true</active>

      <protocol>http</protocol>

      <host>proxy.example.com</host>

      <port>8080</port>

      <username>proxyuser</username>

      <password>proxypass</password>

      <nonProxyHosts>localhost|127.0.0.1</nonProxyHosts>

    </proxy>

  </proxies>

</settings>
- Defining Mirror Repositories: You can configure a mirror to redirect requests for dependencies to an internal repository (like Nexus or Artifactory) within your company’s network, which can speed up builds and provide more control over dependencies.
- Server Authentication: Storing server credentials for deploying artifacts to private repositories.
How to Create/Modify settings.xml:
The simplest way to create your user-specific settings.xml is to copy the global settings.xml from $M2_HOME/conf/settings.xml to ~/.m2/settings.xml and then modify it. This way, you start with a well-commented template.
Understanding and configuring these aspects of Maven are crucial steps toward maximizing your development productivity and ensuring a robust, consistent build environment for your projects.
Troubleshooting Common Installation Hiccups and Moving Forward
Even with careful execution, installation processes can sometimes hit snags. Knowing how to diagnose and resolve common issues can save significant time and frustration. Once past any hurdles, it’s time to move beyond installation and start leveraging Maven for your projects.
Addressing “mvn command not found”
This is by far the most frequent issue encountered after installing Maven. It signifies that your operating system cannot locate the mvn executable in any of the directories specified in your system’s Path environment variable.
Symptoms:
- Windows:
'mvn' is not recognized as an internal or external command, operable program or batch file. - macOS/Linux:
mvn: command not found
Solutions:
- Restart Your Terminal/Command Prompt: This is the golden rule for environment variable changes. Close all existing terminal windows and open a new one. The new session will load the updated environment variables.
- Verify
PATHVariable (Again):- Windows: Open “Edit the system environment variables,” click “Environment Variables,” and check the
Pathvariable under “System variables.” Ensure that%M2_HOME%bin(or%MAVEN_HOME%bin) is present and correctly spelled. Also, confirm thatM2_HOMEitself points to the correct Maven installation root. - macOS/Linux: Open your shell configuration file (
~/.bashrc,~/.zshrc, etc.) and ensure theexport PATH="$M2_HOME/bin:$PATH"line is present and correctly points to$M2_HOME. Also, check that$M2_HOMEis defined correctly. After checking, don’t forget tosourcethe file again.
- Windows: Open “Edit the system environment variables,” click “Environment Variables,” and check the
- Check
M2_HOMEVariable Value: Ensure theM2_HOME(orMAVEN_HOME) variable points precisely to the root directory of your Maven installation (e.g.,C:Program FilesApache Mavenapache-maven-3.9.6or/opt/maven), not thebinsubdirectory. A common mistake is appendingbintoM2_HOMEitself. - Confirm Maven Directory Structure: Navigate to your
M2_HOMEdirectory. Does it contain abinfolder? And does thatbinfolder contain themvnexecutable (ormvn.cmd/mvn.baton Windows)? If not, your extraction might have gone wrong, or you’re pointing to the wrong directory. - Typo Check: Carefully review all variable names and paths for any spelling errors.
Resolving JDK-Related Issues
Maven’s reliance on Java means that any issues with your JDK installation or configuration will impact Maven.
Symptoms:
Error: JAVA_HOME is not set and no 'java' command could be found in your PATH.Error: JAVA_HOME is set to an invalid directory.Maven requires Java 8 or higher.(or a similar version requirement)
Solutions:
- Set
JAVA_HOMECorrectly: This is the most common cause. Ensure theJAVA_HOMEenvironment variable points to the root directory of your JDK installation. This should be the directory containingbin,lib,jre(orjdkwithinContents/Homeon macOS). Do not point it to thebinsubdirectory.- Verify with
echo %JAVA_HOME%(Windows) orecho $JAVA_HOME(macOS/Linux).
- Verify with
- Verify JDK
bininPATH: Ensure%JAVA_HOME%bin(Windows) or$JAVA_HOME/bin(macOS/Linux) is included in your system’sPathvariable. This ensures thejavaandjavaccommands are directly accessible. - Check JDK Version: Run
java -versionandjavac -version. Ensure the version displayed is compatible with your Maven installation (Maven generally requires Java 8 or newer, but specific project requirements might demand a higher version). If you have multiple JDKs installed, ensureJAVA_HOMEpoints to the desired one, and that it’s the one found first in yourPATH. - Re-install JDK: If
java -versionstill doesn’t work or gives unexpected errors, consider fully uninstalling and then reinstalling a fresh JDK from a reliable source (e.g., Adoptium, Oracle). - Restart Terminal: Again, critical for new environment variables to take effect.
Beyond Installation: Your First Maven Project
With Maven successfully installed and verified, you’re ready to harness its power. The best way to start is by creating your first Maven project.
Maven provides archetypes, which are project templates, to quickly generate a basic project structure.
-
Generate a Simple Project:
Open your terminal/command prompt, navigate to a directory where you want to create your project, and execute:mvn archetype:generate -DgroupId=com.example -DartifactId=my-first-maven-app -DarchetypeArtifactId=maven-archetype-quickstart -DinteractiveMode=false-DgroupId: Defines the unique base name of your company or organization (e.g.,com.example).-DartifactId: Defines the name of your project (e.g.,my-first-maven-app).-DarchetypeArtifactId: Specifies the template to use (maven-archetype-quickstartcreates a simple Java project).-DinteractiveMode=false: Skips interactive prompts.
Maven will download the necessary archetype and dependencies and create a new directory named
my-first-maven-appwith a standard project structure and apom.xmlfile. -
Explore the
pom.xml:
Navigate into your new project directory (cd my-first-maven-app) and open thepom.xmlfile. This file is the heart of your Maven project. It defines project dependencies, build configurations, plugins, and more. Take some time to understand its structure, especially the<dependencies>section. -
Build Your Project:
Execute the following command in your project’s root directory:mvn clean installclean: Removes the target directory, ensuring a fresh build.install: Compiles the source code, runs tests, and packages the compiled code into a JAR file, then installs it into your local Maven repository.
You should see output indicating that the build was successful. In the
targetdirectory (created by Maven), you’ll find your compiled JAR file.
This initial step is just the beginning. From here, you can explore adding more complex dependencies, configuring different build plugins, integrating with IDEs (like IntelliJ IDEA, Eclipse, or VS Code), and delving deeper into Maven’s powerful lifecycle phases. The Apache Maven documentation (maven.apache.org) is an excellent resource for further learning.
By mastering the installation and fundamental usage of Maven, you’re not just setting up a tool; you’re adopting a methodology that will significantly boost your productivity, standardize your projects, and enhance your overall software development experience, making you a more effective and efficient developer in the tech landscape.
aViewFromTheCave is a participant in the Amazon Services LLC Associates Program, an affiliate advertising program designed to provide a means for sites to earn advertising fees by advertising and linking to Amazon.com. Amazon, the Amazon logo, AmazonSupply, and the AmazonSupply logo are trademarks of Amazon.com, Inc. or its affiliates. As an Amazon Associate we earn affiliate commissions from qualifying purchases.