In the rapidly evolving landscape of web development, efficiency, reliability, and scalability are paramount. Developers constantly seek tools that not only streamline their workflow but also enhance the robustness and maintainability of their applications. Enter TypeScript, a powerful superset of JavaScript that has revolutionized how modern web applications are built. By adding optional static typing to JavaScript, TypeScript empowers developers to catch errors early, improve code readability, and build more robust, enterprise-grade applications. This guide will walk you through the essential steps to install TypeScript, from setting up prerequisites to configuring your first project, while also exploring why this technology is a smart investment for your tech journey, your brand, and your bottom line.
Whether you’re an aspiring coder or a seasoned professional, integrating TypeScript into your development toolkit is a strategic move. For those focused on Tech, TypeScript offers superior tooling, better code intelligence, and a more predictable development experience. From a Brand perspective, adopting TypeScript signals a commitment to quality and best practices, enhancing both personal and corporate credibility by producing more reliable software. And for those mindful of Money, TypeScript translates to reduced debugging time, faster development cycles, and lower long-term maintenance costs, ultimately delivering a higher return on investment for development efforts. Let’s dive into how you can get started with this transformative technology.
Laying the Foundation: Prerequisites for TypeScript
Before you can embark on your TypeScript journey, there are a couple of fundamental tools you need to have in place. These prerequisites form the bedrock of your development environment, ensuring a smooth and effective installation process.
The Essential Runtime: Node.js and npm
At the heart of modern JavaScript development, and by extension TypeScript, lies Node.js. Node.js is an open-source, cross-platform JavaScript runtime environment that executes JavaScript code outside a web browser. It’s an indispensable tool for server-side development, build tooling, and package management, which is precisely why it’s critical for TypeScript.
Why Node.js?
Node.js provides the execution environment for npm (Node Package Manager), which is the primary tool we’ll use to install TypeScript itself. It’s the standard for managing dependencies in the JavaScript ecosystem, connecting developers to a vast repository of open-source libraries and tools. For a tech-savvy professional, understanding and utilizing Node.js is non-negotiable, providing access to a rich ecosystem that boosts productivity and broadens project capabilities.
How to Install Node.js:
- Download: Visit the official Node.js website at nodejs.org.
- Choose Version: You’ll typically see two recommended versions: the LTS (Long Term Support) version and the Current version. For most users, the LTS version is recommended as it’s more stable and thoroughly tested.
- Install: Download the appropriate installer for your operating system (Windows, macOS, or Linux) and follow the installation prompts. The installer usually includes npm.
Verifying Your Installation:
After installation, open your terminal or command prompt and run the following commands:
node -v
npm -v
You should see version numbers for both Node.js and npm, confirming a successful installation. If you encounter errors, double-check your installation steps or consult the Node.js documentation. This simple verification step is crucial for any developer, as it ensures the foundation of your development environment is solid, saving time and frustration later on.
Choosing Your Workbench: A Robust Code Editor
While strictly not a prerequisite for installing TypeScript, a powerful code editor or Integrated Development Environment (IDE) is absolutely essential for using TypeScript effectively. A good editor transforms the coding experience from a mundane task into an efficient, almost intuitive process.
Why a Dedicated Editor?
TypeScript truly shines when paired with an editor that understands its static typing capabilities. Features like intelligent autocompletion, real-time error checking, refactoring tools, and integrated debugging are not just conveniences; they are productivity multipliers. For instance, an editor can instantly highlight type mismatches as you type, catching bugs before they even reach the compiler. This immediate feedback significantly reduces debugging time—a direct benefit to your project’s timeline and budget.
Our Recommendation: Visual Studio Code (VS Code)
Visual Studio Code, developed by Microsoft (which also created TypeScript), is arguably the most popular choice for TypeScript development. It offers:
- First-class TypeScript support: Built-in language services provide excellent autocompletion, type definitions, and navigation.
- Extensibility: A vast marketplace of extensions for virtually any programming language, framework, or tool.
- Performance: Lightweight yet powerful, it handles large codebases with ease.
- Cost-effectiveness: It’s completely free and open-source, aligning with the “Money” aspect by providing professional-grade tools without a licensing fee.
Getting VS Code:
- Download: Visit the official VS Code website at code.visualstudio.com.
- Install: Download the installer for your operating system and follow the instructions.
While VS Code is highly recommended, other excellent editors like WebStorm, Sublime Text, or Atom also offer varying degrees of TypeScript support through plugins. The key is to choose an editor that maximizes your productivity and enhances your coding experience, allowing you to focus on building rather than battling your tools.
Step-by-Step: Installing TypeScript on Your System
With Node.js and npm ready, and a capable code editor at your fingertips, you’re now poised to install TypeScript. There are two primary methods for installation: global and local. Understanding when and why to use each is crucial for effective project management and collaboration.
Global Installation for Universal Access
A global installation makes the TypeScript compiler (tsc) command-line tool accessible from any directory in your system. This is convenient for quick scripts, testing, or when you want a single version of TypeScript available for general use.
The Command:
To install TypeScript globally, open your terminal or command prompt and execute the following command:
npm install -g typescript
npm install: This is the command to install packages using npm.-g: This flag indicates a global installation.typescript: This is the name of the package you want to install.
When to Use Global Installation:
- Personal Use: If you frequently write small, standalone TypeScript files and don’t want to manage project-specific dependencies.
- Learning/Experimentation: For quickly trying out TypeScript features or writing simple scripts.
- Testing: To quickly compile a
.tsfile without setting up a full project.
While convenient, it’s generally advised for larger, collaborative projects to use local installation to ensure all team members are using the exact same TypeScript version, preventing “it works on my machine” scenarios.
Local Installation for Project-Specific Control
For serious development, especially in team environments or for any project with specific version requirements, local installation is the recommended best practice. This installs TypeScript as a development dependency within your project’s node_modules directory, making the TypeScript version explicit for that project.
The Process:
-
Navigate to Your Project: Open your terminal and change your current directory to your project folder. If you don’t have one, create it:
mkdir my-typescript-project cd my-typescript-project -
Initialize npm: If it’s a new project, initialize npm to create a
package.jsonfile. This file will track your project’s dependencies.npm init -yThe
-yflag answers “yes” to all setup questions, creating a defaultpackage.json. You can edit this file later if needed. -
Install Locally: Now, install TypeScript as a development dependency:
npm install --save-dev typescript
--save-dev: This flag adds TypeScript to thedevDependenciessection of yourpackage.json. These are packages required only during development (e.g., compilers, testing frameworks), not for the final deployed application.
Why Local Installation is Superior for Projects:
- Version Control: Each project can use its specific TypeScript version, ensuring consistency across different projects and team members. This is crucial for avoiding compatibility issues and managing long-term project maintenance, aligning with “Brand” by promoting reliable development practices.
- Collaboration: When sharing your project,
package.jsonensures that anyone who clones your repository can simply runnpm installto get the exact TypeScript version (and all other dependencies) your project relies on. - Isolation: Prevents conflicts between different projects using different TypeScript versions, a common headache in large-scale development environments.
Verifying Your TypeScript Setup
After installing TypeScript, it’s vital to verify that it’s correctly installed and accessible. This ensures that the TypeScript compiler (tsc) is available for use.
For Global Installation:
Run the following command in your terminal:
tsc -v
You should see the installed TypeScript version number (e.g., Version 5.x.x).
For Local Installation:
Since tsc isn’t globally available, you need to use npx to execute the locally installed version. npx is a tool that comes with npm (version 5.2.0 and above) that allows you to run executables from node_modules/.bin or from the central npm registry.
npx tsc -v
This will output the TypeScript version installed within your current project’s node_modules. If both global and local installations show their respective versions, you’re all set to start coding! This verification step, while simple, is a cornerstone of good development practices, saving significant time by confirming tools are ready before deep diving into coding.
Your First Encounter: Writing and Compiling TypeScript Code
With TypeScript installed, it’s time to experience its power firsthand. We’ll create a simple TypeScript file, compile it into standard JavaScript, and then run it.
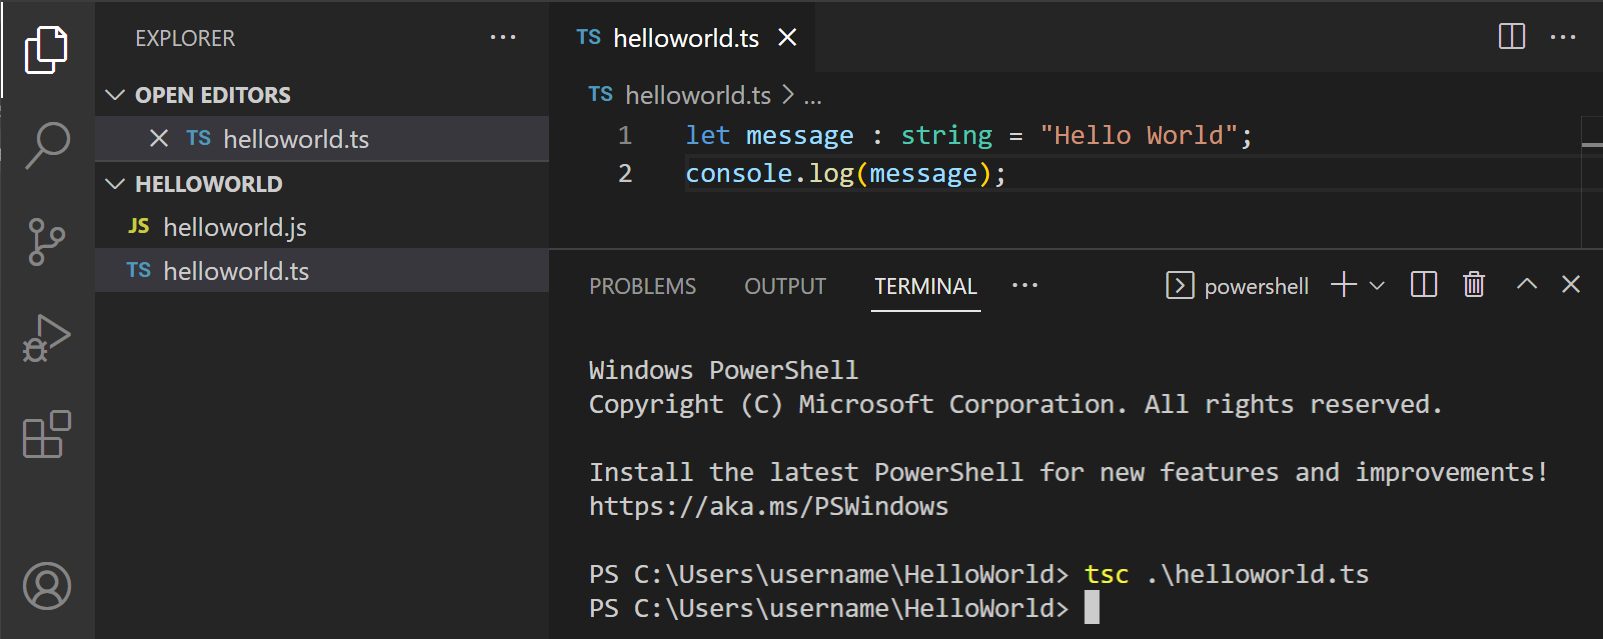
Crafting Your First .ts File
Using your chosen code editor (like VS Code), create a new file named hello.ts in your project directory. Add the following TypeScript code:
// hello.ts

function greet(person: string) {
    // The 'person' parameter is explicitly typed as a string.
    // TypeScript will warn us if we try to pass a non-string value.
    console.log(`Hello, ${person}! Welcome to the world of TypeScript.`);
}

let userName: string = "TypeScript User"; // Explicitly typing 'userName' as a string

// Calling the function with a string argument
greet(userName);

// --- Example of a type error (uncomment to see error) ---
// greet(123); // TypeScript will flag this as an error because 123 is not a string
In this simple example, notice the : string annotation after person and userName. This is TypeScript’s static typing in action. It tells the compiler that these variables are expected to hold string values. If you were to uncomment the greet(123) line, your editor (especially VS Code) would immediately highlight it as a type error, preventing a potential runtime bug—a clear demonstration of TypeScript’s value in promoting “Code Quality” and “Productivity” (Tech).
The Transformation: Compiling TypeScript to JavaScript
TypeScript code cannot be directly executed by browsers or Node.js runtimes. It must first be transpiled (compiled) into plain JavaScript. The TypeScript compiler (tsc) handles this transformation.
Compiling Your File:
Open your terminal, navigate to your project directory (where hello.ts resides), and run the appropriate compile command:
If you installed TypeScript globally:
tsc hello.ts
If you installed TypeScript locally (recommended):
npx tsc hello.ts
After running the command, you’ll notice a new file named hello.js appearing in the same directory. Open hello.js, and you’ll see the compiled JavaScript output, which looks very similar to your original TypeScript, but without the type annotations. This transformation is a core concept in modern web development, allowing you to leverage advanced language features today while ensuring compatibility across different environments.
Executing Your Application
Now that you have hello.js, you can run it using Node.js:
node hello.js
You should see the output: Hello, TypeScript User! Welcome to the world of TypeScript.
This completes the cycle: writing TypeScript, compiling it to JavaScript, and executing the resulting JavaScript. This foundational understanding is key to leveraging TypeScript in any project, from small scripts to large-scale enterprise applications.
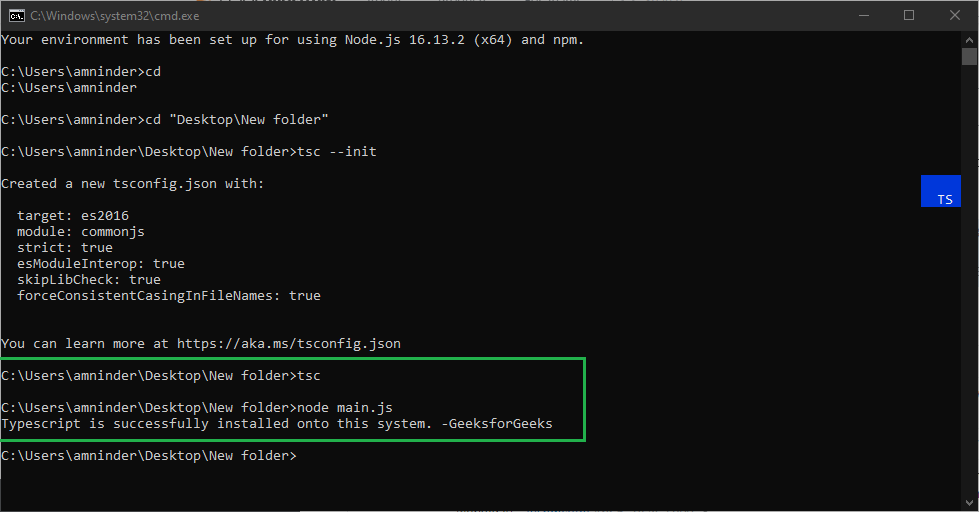
Mastering Configuration: The tsconfig.json File
While compiling single TypeScript files is straightforward, real-world projects are far more complex. They involve multiple files, specific compilation targets (e.g., ES5 for older browsers, ESNext for modern environments), module systems, and various compilation options. This is where tsconfig.json comes in—it’s the configuration file for the TypeScript compiler, enabling you to define how your project’s TypeScript files are compiled.
Generating the Configuration Baseline
Creating a tsconfig.json file is simple. In your project’s root directory, open your terminal and run:
If you installed TypeScript globally:
tsc --init
If you installed TypeScript locally:
npx tsc --init
This command generates a tsconfig.json file with a comprehensive set of default compiler options, many of which are commented out. It provides a solid starting point for any TypeScript project. This file is critical for “Team Collaboration” and “Project Standardization” (Brand/Tech), ensuring everyone works with the same compilation rules.
Key Configuration Options for Optimal Development
The tsconfig.json file is highly customizable. While exploring all options is beyond this guide’s scope, let’s highlight some essential compilerOptions you’ll frequently use:
"target": This specifies the JavaScript version your TypeScript code will be compiled into (e.g.,"es5","es2015"/"es6","esnext"). Choosing an appropriate target ensures compatibility with your deployment environment. For older browsers,"es5"is common; for modern environments,"es2017"or"esnext"might be preferred.- Relevance: Impacts “Compatibility” (Tech) and “Performance” (Tech/Money), as newer JS features can be more optimized.
"module": Defines the module system for the generated JavaScript code (e.g.,"commonjs"for Node.js,"es2015"/"es6"for modern browsers and bundlers).- Relevance: Essential for structuring large applications and integrating with “Build Tools” (Tech).
"outDir": Specifies the output directory for the compiled JavaScript files. This keeps your source (.ts) and compiled (.js) files neatly separated. A common value is"./dist".- Relevance: Promotes “Project Organization” (Tech/Brand), making deployment and source control cleaner.
"rootDir": Specifies the root directory of input files. Often, this is set to"./src"if your TypeScript source code resides there.- Relevance: Enhances “Project Structure” (Tech).
"strict": This is a crucial flag that enables a wide range of strict type-checking options. Setting"strict": trueis highly recommended for all new projects as it significantly improves “Code Quality” and helps catch subtle bugs early, leading to more “Robust Applications” (Tech/Brand).- Relevance: Directly contributes to “Reduced Bugs” and “Improved Maintainability” (Money/Tech).
"esModuleInterop": Enables compatibility with CommonJS modules when importing them as ES modules. This is often necessary when working with third-party libraries.- Relevance: Facilitates integration with the broader “JavaScript Ecosystem” (Tech).
By carefully configuring tsconfig.json, you establish a consistent, reliable compilation process tailored to your project’s specific needs, significantly contributing to the “Brand” reputation of your software and the “Money” saved on bug fixing and refactoring.
Beyond Installation: Why TypeScript Powers Modern Development
Installing TypeScript is just the first step. The true value of this technology lies in its profound impact on the development lifecycle, offering substantial benefits that resonate across technology trends, brand integrity, and financial efficiency.
Elevating Developer Productivity and Team Collaboration
One of TypeScript’s most immediate and tangible benefits is the boost it gives to developer productivity. Static typing provides an extra layer of confidence when writing and refactoring code.
- Early Bug Detection: Catching type-related errors during development (compile-time) rather than at runtime significantly reduces debugging cycles, saving precious “Time and Money.”
- Enhanced IDE Support: With explicit types, code editors can offer incredibly intelligent autocompletion, precise code navigation, and powerful refactoring tools. This speeds up coding and makes exploring new codebases far easier.
- Improved Readability and Documentation: Types serve as living documentation for your codebase. When a developer reads a function signature like
function processOrder(orderId: number, customer: Customer): Promise<Order>, they immediately understand the expected inputs and outputs without diving into implementation details. - Seamless Collaboration: In team environments, TypeScript acts as a contract between different parts of the application. Developers can understand and integrate with each other’s code more quickly and with fewer misunderstandings, fostering better teamwork and accelerating project delivery. This translates to “Faster Time to Market” and “Reduced Rework” (Money).
Building Resilient and Scalable Applications
As applications grow in size and complexity, managing their codebase becomes a significant challenge. TypeScript is designed to address this by promoting architecture that is robust and maintainable.
- Scalability for Large Codebases: For projects with hundreds or thousands of files and multiple contributors, TypeScript’s type system helps maintain structure and consistency. It prevents the kind of “spaghetti code” that often plagues large JavaScript projects, making them costly to manage.
- Reduced Runtime Errors: By enforcing type constraints, TypeScript eliminates a whole class of common runtime errors, leading to more stable applications that deliver a better user experience. This reliability builds “Customer Trust” and strengthens your “Brand” reputation.
- Easier Refactoring: The type system provides a safety net during refactoring. If you change a function’s signature or a data structure, TypeScript immediately highlights all affected areas, ensuring that changes don’t introduce new bugs elsewhere. This confidence in refactoring is invaluable for adapting applications to evolving business requirements.
Future-Proofing Your Skillset and Project Investments
Adopting TypeScript is not just about solving today’s problems; it’s about preparing for tomorrow.
- Alignment with Industry Trends: TypeScript has become a cornerstone of modern web development, with major frameworks like Angular built entirely in TypeScript and React and Vue.js projects increasingly adopting it. Mastering TypeScript keeps your skills current and in high demand. This enhances your “Personal Branding” and “Career Prospects” (Money).
- Long-Term Maintainability: Investing in TypeScript now pays dividends in the long run. Applications built with TypeScript are typically easier to maintain, debug, and extend over their lifecycle. This reduces the “Total Cost of Ownership” (Money) for software projects.
- Access to Modern JavaScript Features: TypeScript frequently incorporates new JavaScript features and syntax proposals before they are fully standardized across all runtimes. This allows developers to use cutting-edge language constructs today, which are then transpiled down to compatible JavaScript.
In essence, TypeScript is more than just a language; it’s a development philosophy that emphasizes quality, predictability, and efficiency. Its installation marks the beginning of a journey towards building more professional, robust, and scalable applications that truly stand the test of time and market demands.

Conclusion
Installing TypeScript is a straightforward process that unlocks a world of benefits for modern web development. From setting up Node.js and npm to choosing between global and local installations, and finally, configuring your project with tsconfig.json, each step paves the way for a more productive and reliable coding experience.
By embracing TypeScript, you’re not just adding a tool to your arsenal; you’re adopting a mindset that prioritizes code quality, maintainability, and scalability. This commitment reflects positively on your Tech proficiency, strengthens your Brand as a developer or an organization, and ultimately leads to significant Money savings through reduced bugs and accelerated development cycles. Whether you’re building a personal project or a large-scale enterprise application, TypeScript empowers you to craft software that is robust, easy to maintain, and ready for the future. So, go ahead, install TypeScript, and transform the way you build for the web. The journey to more confident and efficient development starts now.
aViewFromTheCave is a participant in the Amazon Services LLC Associates Program, an affiliate advertising program designed to provide a means for sites to earn advertising fees by advertising and linking to Amazon.com. Amazon, the Amazon logo, AmazonSupply, and the AmazonSupply logo are trademarks of Amazon.com, Inc. or its affiliates. As an Amazon Associate we earn affiliate commissions from qualifying purchases.