In an increasingly digital world, the need for physical documents might seem to be diminishing, yet printers remain an indispensable tool for homes and businesses alike. From printing essential legal documents and academic papers to cherished photos and professional reports, a reliable printer streamlines countless tasks, boosting productivity and providing a tangible record in a world dominated by screens. However, the prospect of installing a new printer can often feel daunting, a tangle of wires, drivers, and network settings that intimidate even the most tech-savvy among us.
Fear not. This comprehensive guide is designed to demystify the printer installation process, breaking it down into manageable, step-by-step instructions that cater to various connection types and operating systems. Whether you’re setting up a brand-new device straight out of the box, reconnecting an existing printer, or troubleshooting a connectivity issue, we’ll walk you through everything you need to know. By the end of this article, you’ll not only have your printer up and running but also possess a deeper understanding of its functions and how to maintain its optimal performance. Let’s transform that intimidating box into a productive asset for your digital workspace.
Pre-Installation Checklist: Laying the Groundwork
Before you even think about plugging in cables or clicking through software menus, a little preparation can save a lot of headaches. This preliminary stage ensures you have all the necessary components and information at hand, making the actual installation process smooth and efficient.
Gathering Your Tools and Information
First things first, gather everything you might need. This typically includes:
- Your New Printer: Ensure it’s out of its packaging, and all protective tapes and inserts are removed.
- Power Cable: Usually included with the printer.
- Connection Cable (if applicable): For USB printers, you’ll need a USB A-to-B cable. For Ethernet printers, an Ethernet cable. For Wi-Fi, ensure your computer is connected to the same network as the printer will be.
- Installation CD/DVD (Optional): Many newer printers forgo these, relying on downloads, but if provided, keep it handy.
- Instruction Manual: Always a good reference, even if you don’t read it cover-to-cover.
- Your Computer/Laptop: Powered on and logged in with administrative privileges.
- Internet Connection: Crucial for downloading updated drivers and software.
- Wi-Fi Network Name (SSID) and Password: Essential for wireless printer setup.
- Ink/Toner Cartridges: Unpack them but don’t install until instructed by the printer or manual.
- Paper: A stack of plain paper for test prints.
Having these items ready minimizes interruptions during the installation process, enhancing your overall productivity.
Choosing the Right Printer for Your Needs
While this guide focuses on installation, a brief consideration of printer types can be beneficial, especially if you’re selecting a new device. The “Brand” and “Money” aspects of our website topics come into play here. Do you need an inkjet for vibrant color photos, or a laser printer for high-volume, cost-effective monochrome text? Are you looking for a reputable brand known for reliability and customer support, or prioritizing a budget-friendly option? Multifunction printers (MFPs) offer scanning, copying, and often faxing capabilities, consolidating office equipment and saving space. Your choice impacts not only the initial purchase but also ongoing costs like ink/toner and paper, so consider your usage patterns and long-term financial implications.
Unboxing and Physical Setup
Carefully remove the printer from its box. Most printers come with various protective tapes, cardboard inserts, and plastic clips designed to secure moving parts during transit. Consult your printer’s manual to identify and remove all these protective materials. Failure to do so can prevent the printer from functioning correctly or even cause damage.
Next, find a suitable location for your printer. Consider:
- Power Accessibility: Close to an electrical outlet.
- Computer Proximity: If using a USB cable, ensure the cable can reach comfortably.
- Ventilation: Allow space around the printer for heat dissipation.
- Stability: Place it on a flat, sturdy surface.
- Network Access: For Wi-Fi or Ethernet printers, ensure good signal strength or an available port.
Once placed, connect the power cable to the printer and then to a wall outlet. Do not power it on just yet, unless the manual instructs you to do so immediately for initial setup prompts.
Connecting Your Printer: Wired and Wireless Solutions
The method of connecting your printer to your computer or network is a crucial step. Modern printers offer several options, each with its own advantages. Understanding these will help you choose the best connection for your specific setup.
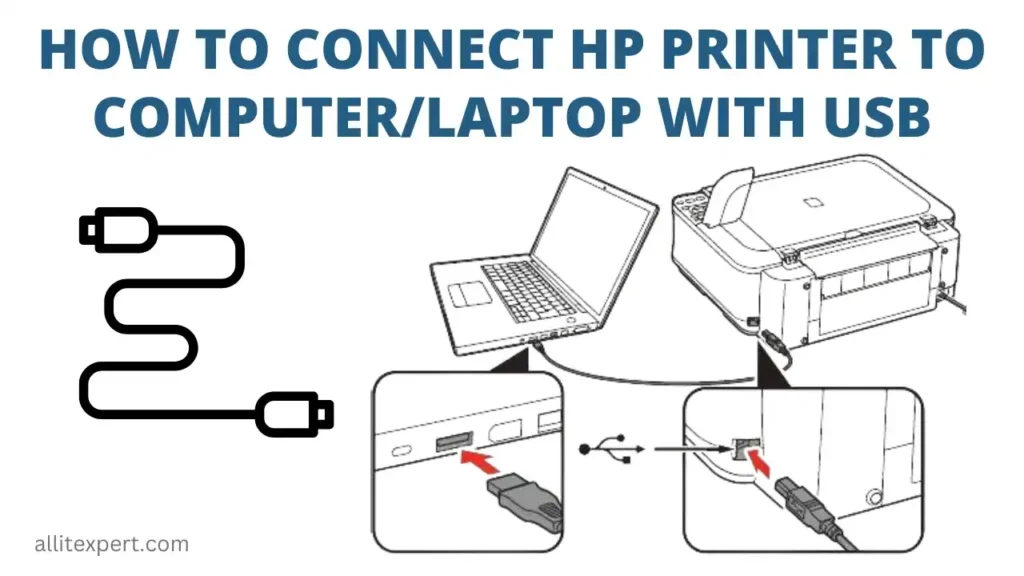
USB Connection: The Classic Approach
The USB connection is perhaps the simplest and most direct method for connecting a printer to a single computer. It’s a plug-and-play solution that has been a staple for decades.
Steps for USB Connection:
- Ensure Printer is Off: Make sure your printer is powered off before connecting the USB cable.
- Connect the Cable: Plug one end of the USB cable (usually the square B-type connector) into the printer’s USB port.
- Connect to Computer: Plug the other end of the USB cable (the rectangular A-type connector) into an available USB port on your computer.
- Power On Printer: Turn on your printer.
- Windows Recognition: For Windows, the operating system will usually detect the new hardware automatically. A notification might appear indicating “Installing device driver software” or “New hardware found.” Allow Windows to search for and install a basic driver.
- macOS Recognition: On macOS, the system will often prompt you to download the necessary software or guide you to “System Settings” (or “System Preferences”) > “Printers & Scanners” to add the device.
This method is ideal for users who only need to print from one computer or for situations where network connectivity is not available or desired. It’s a reliable and straightforward connection that prioritizes digital security by avoiding network vulnerabilities.
Wi-Fi Connection: Embracing Wireless Freedom
Wireless connectivity has revolutionized printer placement, allowing devices to be positioned anywhere within range of your Wi-Fi network. This method is perfect for homes and small offices where multiple devices need to share a single printer.
Steps for Wi-Fi Connection (Common Methods):
-
Method 1: Using the Printer’s Control Panel (Recommended for most modern printers)
- Power On Printer: Turn on your printer.
- Access Setup Menu: Navigate through the printer’s display panel (LCD screen) to find the “Setup,” “Network,” or “Wireless” settings.
- Wi-Fi Setup Wizard: Select “Wi-Fi Setup Wizard” or a similar option.
- Select Network: The printer will scan for available Wi-Fi networks. Select your network’s name (SSID) from the list.
- Enter Password: When prompted, enter your Wi-Fi password (WPA2 passphrase). This is often a complex string of characters, so be careful with capitalization and special symbols.
- Confirm Connection: The printer will attempt to connect. Once successful, it will usually display a confirmation message or a steady Wi-Fi indicator light.
-
Method 2: Wi-Fi Protected Setup (WPS) – If your router and printer support it
- Initiate WPS on Printer: On your printer’s control panel, find the WPS option (often labeled with two arrows forming a circle). Select “Push Button” or “PIN Code.”
- Push Button: If “Push Button,” go to your Wi-Fi router and press the WPS button, usually within two minutes of activating it on the printer.
- PIN Code: If “PIN Code,” the printer will display an 8-digit PIN. You’ll need to enter this PIN into your router’s administration interface on your computer.
- Wait for Connection: The printer and router will communicate and establish a connection.
-
Method 3: Adding Printer via Operating System (After initial Wi-Fi setup)
- Windows: Go to “Settings” > “Bluetooth & devices” > “Printers & scanners” > “Add a device.” Windows will search for network printers. Select yours and follow the prompts.
- macOS: Go to “System Settings” > “Printers & Scanners.” Click the “+” button, and your networked printer should appear in the list. Select it and click “Add.”
Wireless printing offers incredible flexibility and can be a significant boost to office productivity, allowing multiple users to print from different locations without needing physical cables to each computer.
Ethernet Connection: For Networked Environments
Ethernet connection provides a robust and reliable wired network connection, commonly found in office environments or for users who prioritize stability and speed over wireless convenience. This method connects your printer directly to your router or network switch using an Ethernet cable.
Steps for Ethernet Connection:
- Power Off Printer: Ensure the printer is powered off.
- Connect Ethernet Cable: Plug one end of the Ethernet cable into the printer’s Ethernet port (looks like a larger telephone jack).
- Connect to Router/Switch: Plug the other end of the Ethernet cable into an available LAN port on your router or network switch.
- Power On Printer: Turn on the printer. It will usually acquire an IP address from your network automatically (DHCP).
- Add Printer to Computer:
- Windows: Go to “Settings” > “Bluetooth & devices” > “Printers & scanners” > “Add a device.” Windows should discover the network printer. If not, click “Add manually” and select “Add a printer using a TCP/IP address or hostname,” then enter the printer’s IP address (which you can often find in the printer’s network settings menu).
- macOS: Go to “System Settings” > “Printers & Scanners.” Click the “+” button, and if the printer isn’t listed, click “IP” at the top, enter the printer’s IP address, choose “HP Jetdirect – Socket” or “Line Printer Daemon – LPD” for Protocol, and click “Add.”
Ethernet connections are excellent for shared printers in busy workgroups, ensuring consistent performance and minimizing potential interference that wireless connections might experience.
Driver Installation and Software Setup
Once your printer is physically connected, the next critical step is to install the necessary software drivers. A driver is a piece of software that allows your computer’s operating system to communicate effectively with the printer hardware. Without the correct driver, your printer won’t function.
Automatic Driver Installation (Plug and Play)
Most modern operating systems, especially Windows and macOS, come with extensive built-in driver libraries and “plug and play” capabilities. When you connect a new printer (especially via USB) or add a network printer, the OS will often attempt to identify the device and automatically install a generic or basic driver.
- Windows: You’ll typically see a notification like “Device setup is complete” or “New hardware found.” Windows Update can also automatically download and install more specific drivers in the background.
- macOS: macOS usually prompts you to download and install the required software from Apple’s servers or directly from the manufacturer if the printer is recognized.
While automatic installation is convenient, it sometimes installs only a basic driver, which might not unlock all of your printer’s advanced features (like duplex printing, specific tray settings, or comprehensive scanning utilities for MFPs).
Manual Driver Installation (Manufacturer’s Website/Disk)
For the best performance and access to all features, manual driver installation is often recommended, even if an automatic driver was installed. This ensures you have the latest, most compatible driver specifically designed for your printer model.
- Identify Printer Model: Locate the exact model number of your printer (usually on a sticker on the front, back, or bottom).
- Visit Manufacturer’s Support Website: Go to the official website of your printer’s manufacturer (e.g., HP.com, Epson.com, Canon.com, Brother.com).
- Navigate to Support/Drivers Section: Look for a “Support,” “Drivers,” “Downloads,” or “Customer Service” section.
- Search for Your Model: Enter your printer’s model number into the search bar.
- Select Operating System: Crucially, select your computer’s operating system (Windows 10, macOS Ventura, etc.) and its architecture (32-bit or 64-bit for Windows, though macOS is mostly 64-bit now).
- Download Driver Package: Download the full driver and software package, not just a basic driver if a more comprehensive one is available. This usually includes utilities and setup assistants.
- Run Installer: Locate the downloaded file (often an .exe for Windows or .dmg for macOS) and double-click to run it. Follow the on-screen instructions, which typically guide you through accepting license agreements, selecting components, and confirming the printer connection. Some installers might ask you to connect the printer at a specific point in the process.
Security Tip: Always download drivers directly from the manufacturer’s official website. Downloading from third-party sites can expose your system to outdated drivers, malware, or security vulnerabilities, compromising your digital security.
Installing Additional Printer Software and Utilities
Beyond basic drivers, manufacturers often provide additional software suites that enhance your printing experience. These might include:
- Scanning Software: For multifunction printers, this allows you to manage scans, save files in various formats, and send them to email or cloud services.
- Printer Utility/Dashboard: Software to monitor ink/toner levels, clean print heads, align cartridges, perform maintenance tasks, and check printer status.
- Photo Printing Software: Specialized tools for editing and printing photos with optimal quality.
- Mobile Printing Apps: Applications that allow you to print directly from your smartphone or tablet, often integrating with cloud services.
While not strictly necessary for basic functionality, installing these utilities can unlock the full potential of your printer, improving both the quality of your output and the efficiency of your workflow.
Post-Installation: Testing and Troubleshooting
You’ve connected your printer and installed the drivers. Now it’s time for the moment of truth: ensuring everything works as expected. This final stage involves printing a test page and knowing how to address common issues that might arise.
Printing a Test Page
The most straightforward way to confirm a successful installation is to print a test page.
- Windows:
- Go to “Settings” > “Bluetooth & devices” > “Printers & scanners.”
- Click on your installed printer.
- Select “Printer properties” (or “Printing preferences” depending on your printer).
- In the “General” tab, click “Print Test Page.”
- macOS:
- Go to “System Settings” (or “System Preferences”) > “Printers & Scanners.”
- Select your printer from the list.
- Click “Open Print Queue” (or “Options & Supplies,” then “Utility” if available).
- Look for an option to “Print Test Page” or “Print a Self-Test Page.” If not directly available, you can simply open any document (e.g., a Word document or a web page) and try to print it.
A successful test page confirms that your computer can communicate with the printer, the drivers are installed correctly, and the printer itself is physically ready to operate.
Common Printer Problems and Solutions
Even after a seemingly perfect installation, you might encounter issues. Here are some common problems and their solutions:
- Printer Not Responding/Offline:
- Check Cables: Ensure all power and data cables (USB/Ethernet) are securely connected.
- Power Cycle: Turn off both the printer and your computer, wait a minute, then turn them back on.
- Wi-Fi Check: For wireless printers, ensure the printer is connected to the correct Wi-Fi network and has a strong signal. Check your router.
- “Use Printer Offline” Setting: In Windows, go to “Printers & scanners,” right-click your printer, and ensure “Use Printer Offline” is unchecked.
- Documents Stuck in Print Queue:
- Clear Print Queue: In Windows, go to “Printers & scanners,” click your printer, then “Open print queue.” Right-click any stuck documents and select “Cancel.” If they don’t clear, restart your computer and printer.
- Restart Print Spooler (Windows): Open Services (type “services” in Windows search), find “Print Spooler,” right-click and select “Restart.”
- Poor Print Quality (Streaks, Faded Prints, Wrong Colors):
- Check Ink/Toner Levels: Use your printer’s utility software or control panel.
- Run Cleaning Cycles: Most printers have maintenance functions (like “Clean Print Head” or “Nozzle Check”) accessible via the control panel or utility software.
- Replace Cartridges: If low or empty, replace them with genuine cartridges to ensure optimal quality and printer longevity (a good “Money” tip for avoiding costly repairs).
- Align Print Heads: Another common maintenance task available through printer utilities.
- Printer Driver Issues:
- Update Driver: Re-download and install the latest driver from the manufacturer’s website.
- Reinstall Driver: Uninstall the existing driver completely (from “Printers & scanners” and “Device Manager” in Windows), then perform a fresh installation.
Patience is key when troubleshooting. Systematically go through these steps, and you’ll often resolve the issue without needing professional help, saving you time and potentially money.
Maintaining Your Printer for Longevity
Successful installation is just the beginning. Regular maintenance can significantly extend your printer’s lifespan and ensure consistent print quality, impacting your long-term “Money” expenditure.
- Keep it Clean: Dust is a printer’s enemy. Regularly wipe down the exterior and use compressed air to clear vents. Refer to your manual for internal cleaning instructions.
- Use Quality Consumables: Always use recommended paper and genuine ink/toner cartridges. Generic or refilled cartridges might be cheaper upfront but can cause clogs, poor quality, and even damage to your printer in the long run.
- Don’t Let it Sit Idle: If you don’t print often, try to print at least one page in color every week or two. This prevents ink from drying out and print heads from clogging.
- Keep Drivers Updated: Periodically check the manufacturer’s website for updated drivers and firmware. These updates often improve performance, add new features, and fix bugs.

Conclusion
Installing a printer to your computer, whether via USB, Wi-Fi, or Ethernet, is a fundamental task that, while seemingly complex, is quite manageable with a structured approach. By diligently following the pre-installation checklist, choosing the appropriate connection method, installing the correct drivers and software, and performing crucial post-installation tests, you can transform a new device into a fully integrated and highly productive part of your digital ecosystem.
Remember, your printer is more than just a peripheral; it’s a vital tool for turning digital ideas into tangible realities. Mastering its setup and basic maintenance empowers you to stay productive, secure, and efficient in all your printing needs. Embrace the power of print, and let your technology work seamlessly for you.
aViewFromTheCave is a participant in the Amazon Services LLC Associates Program, an affiliate advertising program designed to provide a means for sites to earn advertising fees by advertising and linking to Amazon.com. Amazon, the Amazon logo, AmazonSupply, and the AmazonSupply logo are trademarks of Amazon.com, Inc. or its affiliates. As an Amazon Associate we earn affiliate commissions from qualifying purchases.