In today’s hyper-connected world, a reliable internet connection isn’t a luxury; it’s a necessity. Whether you’re streaming the latest blockbuster, participating in crucial video conferences, or ensuring your smart home devices are always online, your router is the silent workhorse powering it all. Over time, even the best routers can start to falter, leading to frustratingly slow speeds, dropped connections, or a complete lack of internet access. When that time comes, it’s time to upgrade. But the prospect of installing a new router can seem daunting, filled with technical jargon and unfamiliar ports. Fear not! This comprehensive guide will walk you through every step, from unboxing your new device to enjoying a robust and stable internet connection, ensuring you’re back online and connected in no time. We’ll cover everything from the essential preparation to the final setup and troubleshooting, empowering you to tackle this task with confidence.
Getting Started: Preparation is Key
Before you even think about plugging in your new router, a little preparation can save you a lot of hassle. Think of it like planning a road trip – knowing your destination and packing the right essentials ensures a smoother journey. This initial phase is crucial for a successful installation and ensures you’re not scrambling for information mid-setup.
Understanding Your Existing Network and ISP
The first step in upgrading your router is to understand your current setup and your Internet Service Provider (ISP) – the company that provides your internet access. This knowledge will inform your router choice and simplify the installation process.
Your Current Internet Service Provider (ISP)
Your ISP is the gateway to the internet. They provide you with an internet connection, often through a modem. It’s important to know who your ISP is (e.g., Comcast, AT&T, Verizon, Spectrum) and what type of service you have (e.g., DSL, Cable, Fiber Optic). This information is usually found on your monthly bill or by logging into your ISP account online. Knowing your ISP is important because some ISPs may require specific configurations or provide their own modems that you may need to integrate with your new router.
Your Existing Modem and Router Setup
You likely have a modem, which is the device that connects your home to your ISP’s network. In many cases, your ISP provides a combined modem and router unit, often called a gateway. If you have a separate modem and router, you’ll need to identify each device. The modem will typically have a connection for the cable coming from the wall (coaxial for cable, phone line for DSL, or an Ethernet port for fiber) and an Ethernet port to connect to your router. Your current router connects to the modem via an Ethernet cable and then broadcasts your Wi-Fi signal.
Before you disconnect your old equipment, take a moment to note down any important settings you might have configured, such as a custom Wi-Fi network name (SSID) and password. While you’ll likely set these up anew, having them readily available can be helpful for comparison. If you have a complex network with multiple access points or specific port forwarding rules, documenting these will be essential for recreating them on your new router.
Choosing the Right New Router
With your current setup understood, you’re ready to select your new router. The market is flooded with options, each with different features and price points. Making an informed choice will ensure your new router meets your current and future needs.
Key Router Features to Consider
When selecting a new router, several factors come into play. The most significant is the Wi-Fi standard. You’ll commonly see designations like Wi-Fi 5 (802.11ac) and the newer, faster Wi-Fi 6 (802.11ax) and Wi-Fi 6E. Wi-Fi 6 offers improved speed, efficiency, and performance, especially in busy network environments. For most households, a Wi-Fi 6 router is a worthwhile investment.
Speed ratings (e.g., AC1200, AX3000) indicate the maximum theoretical speed your router can deliver across its various bands. A higher number generally means faster speeds, but remember this is a theoretical maximum. Consider your internet plan’s speed; there’s no point in having a router capable of gigabit speeds if your ISP plan is only 100 Mbps.
Coverage area is another crucial aspect. Routers are rated for the size of the area they can cover. If you have a large home or multiple floors, you might need a router with a stronger signal or consider a mesh Wi-Fi system, which uses multiple nodes to blanket your home in Wi-Fi.
Ports are also important. Most routers have several Ethernet ports (LAN ports) for wired connections to devices like gaming consoles, smart TVs, or desktop computers. Ensure the router has enough ports for your needs. Look for Gigabit Ethernet ports for faster wired speeds.
Security features are paramount. Modern routers come with built-in firewalls and support for advanced encryption protocols like WPA3, offering better protection against cyber threats. Some routers also offer parental controls and guest network options, which can be very useful.
Router vs. Modem: Understanding the Difference
It’s vital to distinguish between a modem and a router. A modem is responsible for translating the signal from your ISP into a format your home network can use. A router, on the other hand, takes that internet connection from the modem and distributes it to multiple devices in your home, both wirelessly (Wi-Fi) and via Ethernet cables.
Modem-Router Combos (Gateways): Many ISPs provide a single device that acts as both a modem and a router. While convenient, these often have limitations in terms of features and performance compared to separate, high-quality standalone devices. If you’re upgrading your router, you might be replacing just the router part of a combo unit, or you might be replacing both if you opt for a separate modem. If you’re keeping your ISP-provided modem, your new router will connect to it. If you’re buying your own modem, ensure it’s compatible with your ISP and internet speed.
Gathering Your Tools and Information
Before you begin the physical installation, ensure you have everything you need within reach. This foresight prevents interruptions and makes the process flow more smoothly.
Necessary Cables and Tools
You’ll primarily need the Ethernet cable that came with your new router or a reliable Ethernet cable you already possess. This cable will connect your modem to your new router. You might also need the power adapter for your new router. If you’re setting up a separate modem, ensure you have the appropriate cable to connect it to your wall outlet (e.g., coaxial cable for cable internet, telephone cable for DSL). A screwdriver might be necessary if you need to unplug or secure any wall connections.
Your ISP Account Information
As mentioned earlier, having your ISP account information handy is crucial. You may need it to register your new modem if you’ve purchased your own, or to access specific network settings if required by your ISP. This includes your username and password for your ISP account.
The Installation Process: Step-by-Step
Now that you’re prepared, it’s time to get your hands dirty and install your new router. This section breaks down the process into manageable steps, ensuring you don’t miss anything.
Step 1: Power Down and Disconnect Old Equipment
This is a critical step to avoid damaging your equipment or causing network conflicts.
Safely Shutting Down Your Network
Begin by unplugging the power cords from your current modem and router. If you have a combined modem/router unit, unplugging that single device will suffice. It’s also a good practice to unplug any devices directly connected to the router via Ethernet cable. Wait a minute or two after unplugging to allow the devices to fully discharge any residual power.
Disconnecting Cables
Once the power is off, carefully disconnect all the cables connected to your old modem and router. This includes the Ethernet cable connecting your modem to your router (if separate units), the cable connecting your modem to the wall outlet (coaxial, DSL, or fiber), and any Ethernet cables connected to your router. Note which cable connects to which port, as this will be helpful when connecting your new equipment.
Step 2: Connecting Your New Router
This is where your new router comes into play. Follow these steps carefully to establish the physical connection.
Connecting the Modem
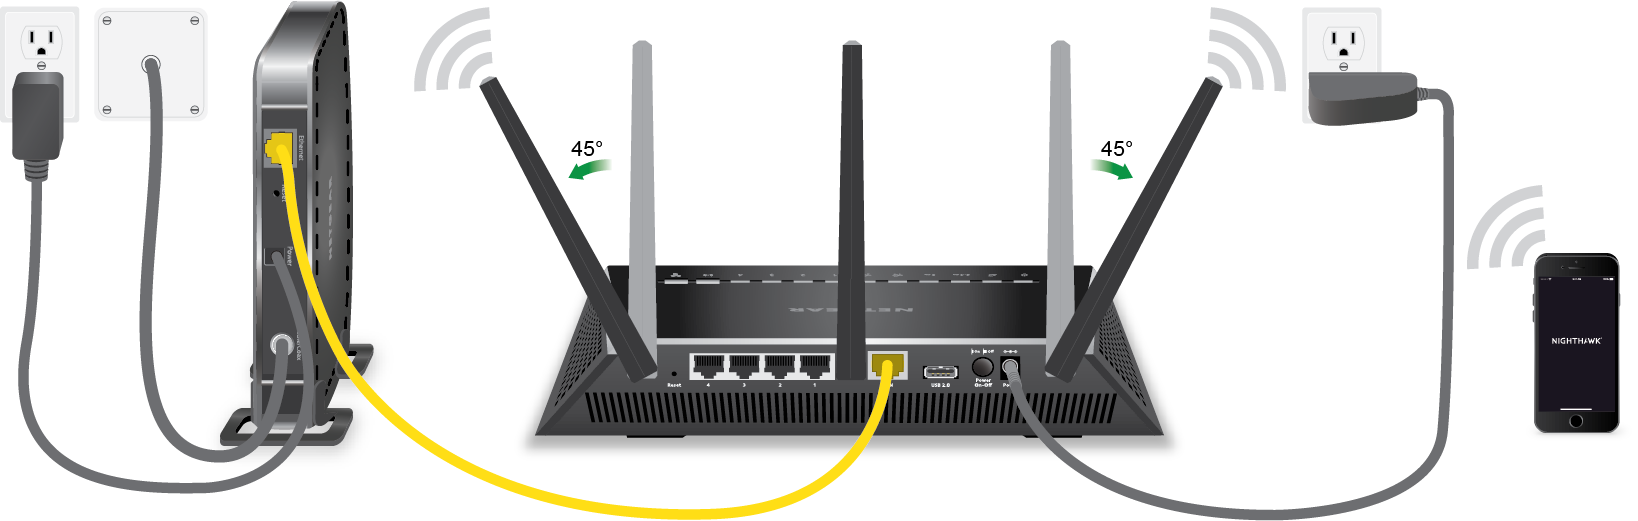
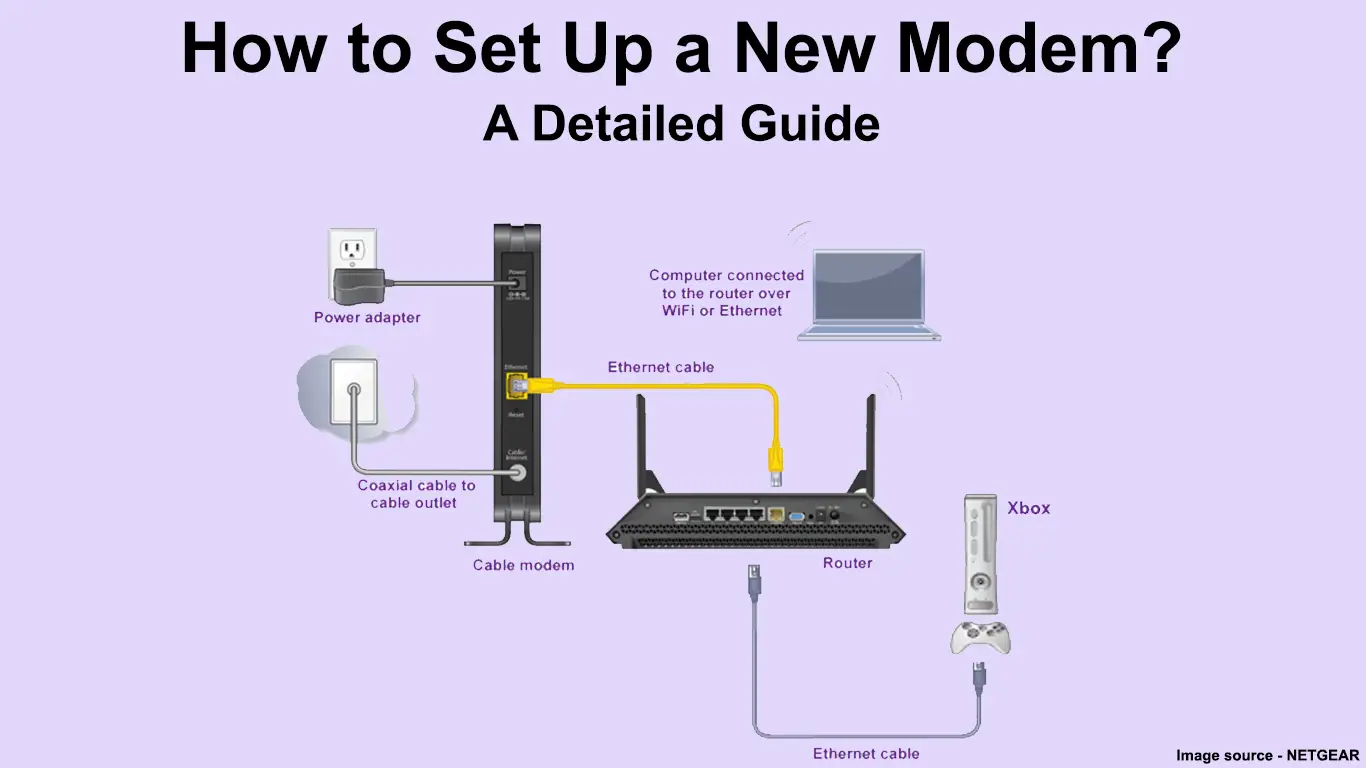
If you are using your ISP-provided modem, ensure it is powered on and has a stable internet connection (indicated by solid lights on the modem). If you’ve purchased a new modem, follow its specific setup instructions. Once the modem is operational, connect an Ethernet cable from the Ethernet port on your modem to the WAN (Wide Area Network) or Internet port on your new router. This port is usually a different color or set apart from the other Ethernet ports on the router.
Connecting the Router to Power
Plug the power adapter into your new router and then into a power outlet. Your router will then begin its startup sequence, which may involve a series of blinking lights. Refer to your router’s manual for the specific meaning of these lights.
Step 3: Initial Router Configuration
Once the hardware is connected, you’ll need to configure your router. This typically involves accessing its web-based interface.
Accessing the Router’s Web Interface
Most routers have a default IP address (e.g., 192.168.1.1 or 192.168.0.1) that you can type into a web browser on a computer or smartphone connected to the router (initially via an Ethernet cable for best results). You can usually find this IP address and the default username and password in your router’s quick start guide or on a sticker on the router itself.
Setting Up Your Wi-Fi Network and Password
Upon logging into the router’s interface, you’ll be guided through a setup wizard or prompted to configure basic settings. The most important of these are your Wi-Fi network name (SSID) and password. Choose a strong, unique password to protect your network. It’s also recommended to change the default administrator password for accessing the router’s settings to prevent unauthorized access.
Security Best Practices for Your Network
During the setup, you’ll be prompted to choose a security protocol. WPA3 is the latest and most secure option, but ensure your devices are compatible. If not, WPA2-PSK (AES) is the next best choice. Avoid older protocols like WEP, which are easily compromised. Consider enabling features like a firewall, which is usually enabled by default, and setting up a guest network if you frequently have visitors, allowing them internet access without giving them access to your main network’s devices.
Post-Installation: Optimizing and Troubleshooting
After the initial setup, there are a few more steps to ensure your network is running optimally and to address any potential issues.
Connecting Your Devices to the New Network
With your Wi-Fi network set up, it’s time to connect your various devices.
Wireless Connections
On your smartphones, tablets, laptops, and other wireless devices, search for available Wi-Fi networks. Select your new network name (SSID) and enter the password you created. Your device should then connect to your new Wi-Fi network.
Wired Connections
For devices that benefit from a stable, high-speed connection, such as desktop computers, gaming consoles, or smart TVs, connect them directly to the LAN ports on your new router using Ethernet cables. Ensure you’re using good quality Ethernet cables, preferably Cat 5e or Cat 6, for optimal performance.
Firmware Updates and Advanced Settings
To ensure your router performs at its best and is protected against the latest threats, keeping its firmware updated is crucial.
Updating Router Firmware
Router manufacturers regularly release firmware updates to improve performance, add new features, and patch security vulnerabilities. Most routers have an option within their web interface to check for and install firmware updates. It’s highly recommended to perform these updates as soon as you can after initial setup and periodically thereafter.
Exploring Advanced Features (Optional)
Once your basic network is up and running, you might want to explore more advanced settings. This can include:
- Quality of Service (QoS): This feature allows you to prioritize certain types of traffic (e.g., video streaming, gaming) over others, ensuring a smoother experience for critical applications.
- Port Forwarding: If you run servers, host online games, or use certain applications that require specific incoming connections, you may need to configure port forwarding to allow external access to those services.
- Parental Controls: Many routers offer robust parental control features that allow you to restrict internet access for specific devices or at certain times of the day.
- Guest Network: As mentioned before, setting up a separate guest network is an excellent way to provide internet access to visitors without compromising the security of your main network.
Troubleshooting Common Issues
Even with careful installation, you might encounter a few hiccups. Here’s how to address some common problems.
No Internet Connection
If you have no internet connection after setting up your router, first check that all cables are securely connected. Ensure your modem is powered on and showing a stable internet connection. Restart both your modem and router by unplugging them, waiting about 30 seconds, and plugging them back in, starting with the modem. If the issue persists, contact your ISP to verify that your service is active and that they can see your modem online.
Slow Wi-Fi Speeds
Slow Wi-Fi can be caused by several factors. Ensure your router is placed in a central location, away from obstructions like thick walls or large metal objects. Avoid placing it near other electronic devices that can cause interference, such as microwaves or cordless phones. If you live in a crowded area with many Wi-Fi networks, consider changing the Wi-Fi channel in your router settings. If your router is older or not powerful enough for your needs, it might be time to upgrade to a newer, more capable model or consider a mesh system for larger homes.

Devices Not Connecting to Wi-Fi
If a specific device isn’t connecting, try forgetting the network on that device and reconnecting, re-entering the Wi-Fi password. Ensure you are within range of the router. If multiple devices are having trouble, try restarting the router. Check your router’s security settings to ensure it’s using a compatible protocol (WPA2 or WPA3).
By following these steps and understanding the nuances of your network, installing a new router becomes a straightforward process. You’ll be rewarded with a faster, more reliable, and more secure internet experience, ensuring all your connected devices perform at their best.
aViewFromTheCave is a participant in the Amazon Services LLC Associates Program, an affiliate advertising program designed to provide a means for sites to earn advertising fees by advertising and linking to Amazon.com. Amazon, the Amazon logo, AmazonSupply, and the AmazonSupply logo are trademarks of Amazon.com, Inc. or its affiliates. As an Amazon Associate we earn affiliate commissions from qualifying purchases.