In the ever-evolving landscape of technology, Linux Ubuntu stands out as a powerful, versatile, and increasingly popular operating system. Favored by developers, IT professionals, and privacy-conscious users alike, Ubuntu offers a robust foundation for a wide array of computing tasks. Yet, despite its inherent strengths, users often find themselves needing familiar tools to maximize their productivity and connectivity. One such tool is Google Chrome, the world’s most widely used web browser.
While Ubuntu comes with Firefox as its default browser, the appeal of Google Chrome is undeniable. Its seamless integration with the Google ecosystem, vast extension library, powerful developer tools, and consistent user experience across multiple platforms make it an indispensable asset for many. Whether you’re a tech enthusiast tracking the latest AI tools, a digital marketer refining your brand strategy, or an entrepreneur managing your online income, having a reliable and feature-rich browser is paramount.

This comprehensive guide will walk you through the process of installing Google Chrome on your Linux Ubuntu system. We’ll cover multiple methods, from the beginner-friendly direct package installation to the more robust repository-based approach, ensuring you can choose the path that best suits your technical comfort level. By the end, you’ll have Chrome up and running, ready to enhance your digital security, boost your productivity, and provide access to the digital world with unparalleled ease.
Why Choose Google Chrome for Your Ubuntu System?
Before diving into the installation process, it’s worth exploring why so many users, despite the excellent alternatives available on Linux, opt for Google Chrome. Understanding its benefits can help you appreciate its role in your tech stack, aligning with the website’s focus on Technology Trends, Software, and Productivity.
The Chrome Advantage: Speed, Features, and Ecosystem
Google Chrome has garnered its massive user base for several compelling reasons. At its core, Chrome is built for speed and efficiency, offering a snappy browsing experience that can be crucial when dealing with complex web applications, demanding content creation tools, or intensive research. For professionals relying on cloud-based AI tools, project management apps, or sophisticated analytics dashboards, Chrome’s performance is often a key differentiator.
Beyond raw speed, Chrome’s extensive feature set contributes significantly to productivity. Its vast Chrome Web Store offers an unparalleled collection of extensions that can transform your browser into a highly specialized tool. From digital security plugins that protect your online presence to productivity boosters like ad blockers, password managers, and note-taking integrations, these extensions cater to virtually every need. For those involved in online income generation or managing side hustles, these tools can streamline workflows, automate repetitive tasks, and provide crucial insights into market trends or financial tools.
Furthermore, Chrome’s deep integration with the Google ecosystem is a major draw. If you frequently use Gmail, Google Drive, Google Calendar, Google Docs, or other Google services, Chrome offers a truly synchronized experience. Your bookmarks, browsing history, saved passwords, and extensions can sync across all your devices, regardless of the operating system. This continuity is a significant advantage for individuals who work across multiple platforms or manage various personal and professional profiles, making device transitions seamless and reducing friction in your daily digital life. This consistency also reinforces Google’s strong “Brand” presence and strategy in the software domain.
Bridging the Digital Divide: Chrome on Linux
While Linux prides itself on open-source philosophy, the reality of the modern web often necessitates compatibility with proprietary standards and specific browser rendering engines. Many corporate websites, online banking portals, and web-based applications are primarily developed and optimized for Chrome. Installing Chrome on Ubuntu ensures that you won’t encounter rendering issues, compatibility problems, or missing features that might arise with less common browsers. This is particularly important for professionals who need reliable access to client portals, specific CRM systems, or complex SaaS platforms that are vital for their business finance or marketing operations.
Moreover, for developers and designers, Chrome’s powerful developer tools are often considered industry-standard. Having them readily available on a Linux development machine can significantly enhance workflows for web development, debugging, and testing, further cementing Chrome’s position as a critical software choice for the tech-savvy user. It bridges the gap between the flexibility of Linux and the demands of the broader web environment, enabling users to harness the full potential of both worlds.
Preparing Your Ubuntu Environment for Chrome Installation
Before proceeding with any software installation, especially on a Linux system, a few preparatory steps are recommended. These steps ensure a smooth installation process, prevent common errors, and maintain the overall health and security of your Ubuntu system. This section is crucial for anyone focusing on Digital Security and efficient Software management.
Essential Prerequisites and System Readiness
The primary prerequisites for installing Google Chrome on Ubuntu are straightforward but vital:
- Internet Connection: You will need an active and stable internet connection to download the necessary packages and files. Without it, the installation will fail.
- Administrator Privileges: You’ll need
sudo(superuser do) privileges, which typically means you need to be logged in as a user with administrative rights. Most personal Ubuntu installations grant the primary usersudoaccess by default. - Up-to-Date System: It’s always good practice to ensure your system’s package lists and installed packages are up to date. This prevents dependency conflicts and ensures you’re running on the most stable and secure version of your system’s software. To update your system, open your terminal (Ctrl+Alt+T) and run the following commands:
bash

sudo apt update

sudo apt upgrade -y
Thesudo apt updatecommand refreshes your local package index, fetching information about the latest versions of packages available in your configured repositories. Thesudo apt upgrade -ycommand then installs those updates, with-yautomatically confirming any prompts, making the process smoother. This maintenance step is fundamental for digital security and overall system productivity.
Understanding Different Installation Methods
There are two primary ways to install Google Chrome on Ubuntu, each with its advantages:
- Using a .deb Package: This involves downloading a pre-compiled Debian package (
.debfile) directly from Google’s website and installing it manually. This method is often preferred by beginners as it can be straightforward, similar to installing software on Windows or macOS by double-clicking an installer. It provides a quick way to get Chrome running but requires manual intervention for future updates. - Using the Google Chrome Repository: This is the recommended method for advanced users and anyone seeking a long-term, low-maintenance solution. It involves adding Google’s official Chrome repository to your Ubuntu system’s list of software sources. Once added, you can install Chrome using Ubuntu’s standard package manager (
apt), and it will receive updates automatically alongside your other system software, ensuring you always have the latest features and security patches. This method aligns perfectly with best practices for Software management and Digital Security.
We will cover both methods in detail, allowing you to choose the one that best suits your needs and technical expertise.
Method 1: Installing Chrome via the .deb Package (Beginner-Friendly)
This method is ideal for users who are new to Linux or prefer a more graphical approach to software installation. It’s a quick way to get Google Chrome up and running without delving too deeply into the command line.
Step-by-Step Guide: Download and GUI Installation
-
Download the Google Chrome .deb Package:
Open your existing web browser (e.g., Firefox) and navigate to the official Google Chrome download page:https://www.google.com/chrome/
On the download page, click the “Download Chrome” button. A pop-up will appear asking you to choose your operating system and accept the terms of service. Select “64 bit .deb (For Debian/Ubuntu)” and then click “Accept and Install.”
Your browser will prompt you to save the file. Choose to save it to your “Downloads” folder, which is the default location and generally the easiest to find. The file will typically be namedgoogle-chrome-stable_current_amd64.deb. -
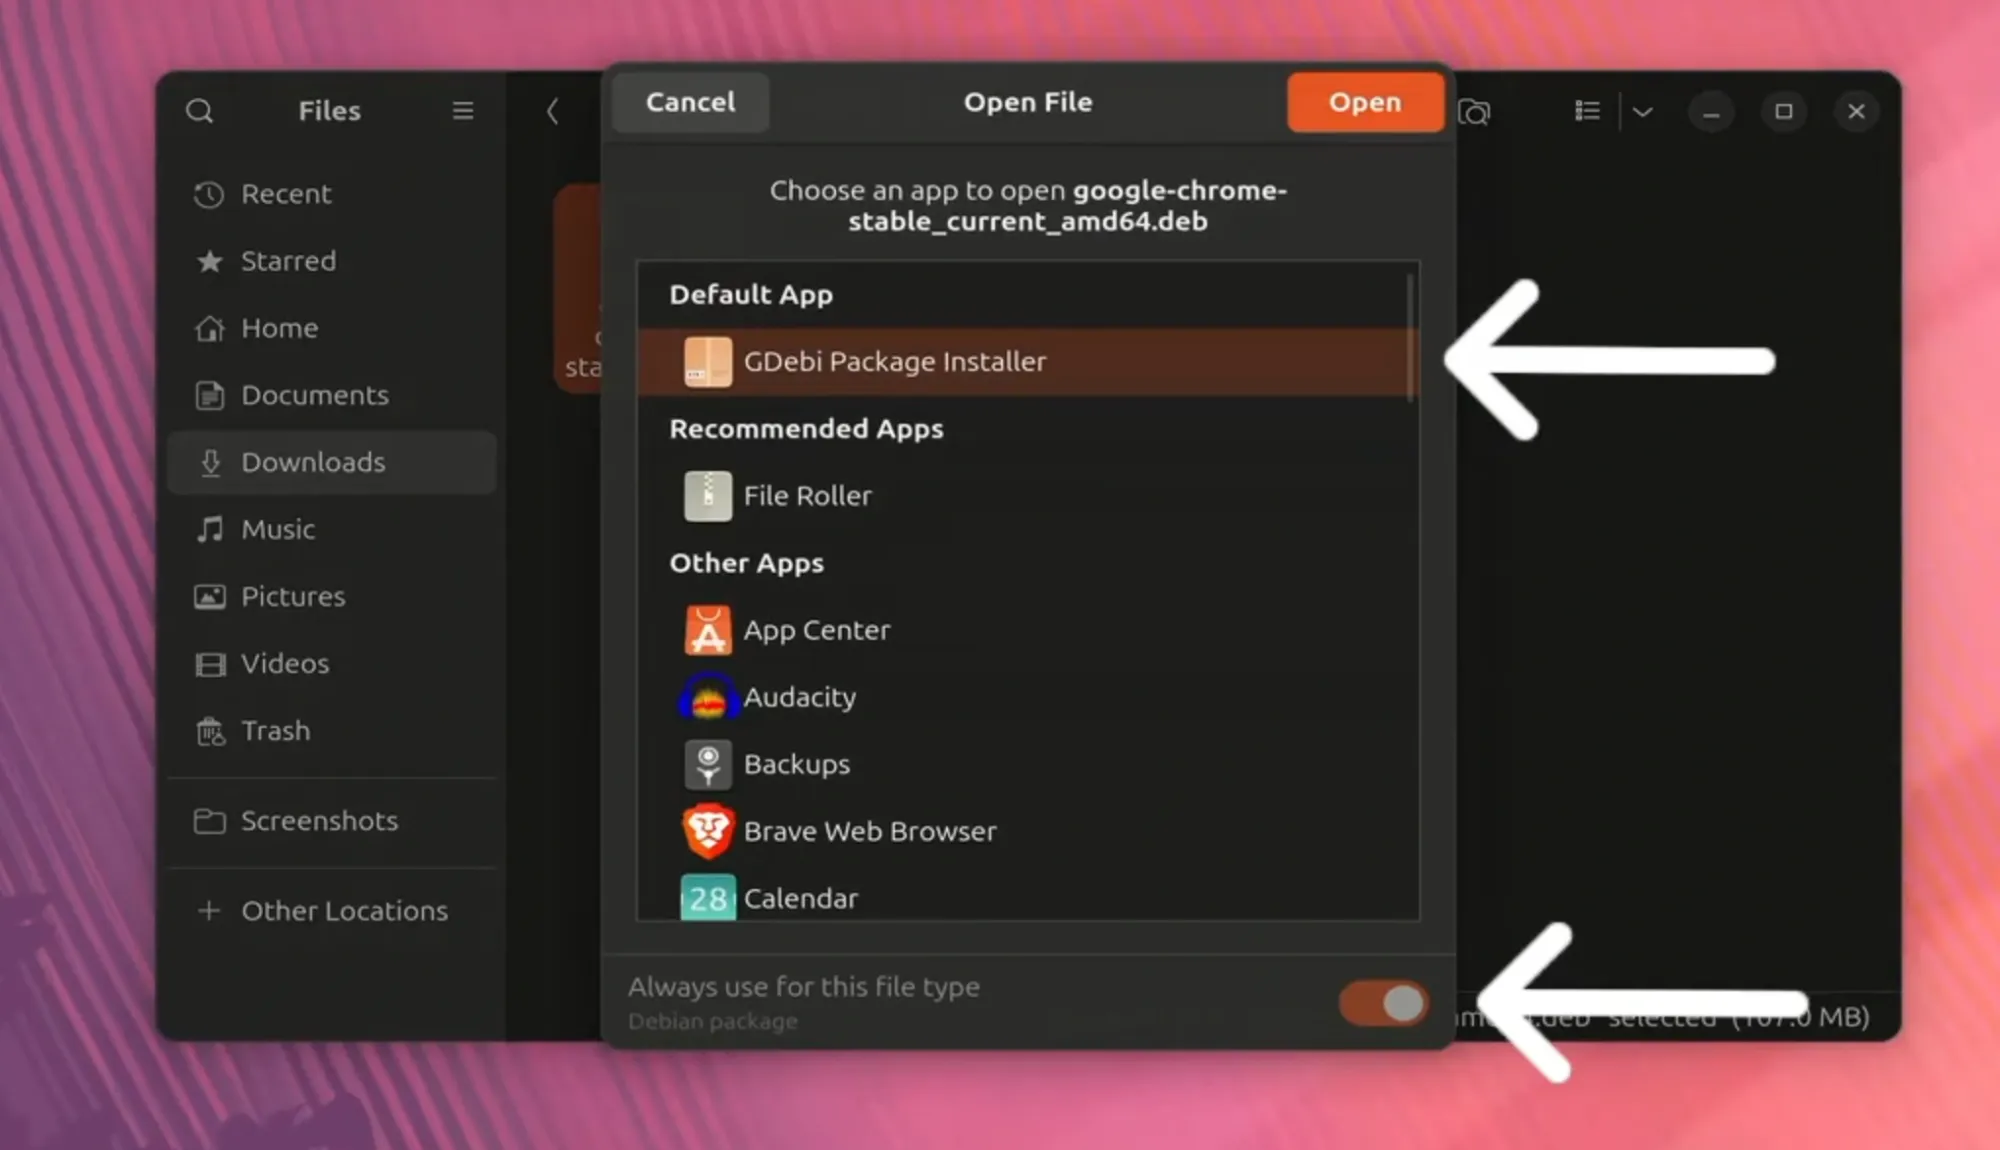
Install via Graphical User Interface (GUI):
Once the download is complete, navigate to your “Downloads” folder using your file manager.
Locate thegoogle-chrome-stable_current_amd64.debfile.
Double-click on the.debfile. This action will typically open the Ubuntu Software Center (or similar package installer).
In the Software Center, you will see details about Google Chrome. Click the “Install” button.
You will be prompted to enter your password to authorize the installation. This is a security measure to ensure you have administrator privileges. Enter your password and press Enter.
The installation process will begin. It might take a few moments to complete, depending on your system’s speed and internet connection. Once finished, the “Install” button will change to “Remove,” indicating that Chrome has been successfully installed.
You can now close the Software Center. Google Chrome will be available in your applications menu.
Terminal Installation for the Command-Line Savvy
For those who prefer working in the terminal or encounter issues with the GUI installer, the .deb package can also be installed using command-line commands. This method offers more control and can be useful for troubleshooting.
-
Open the Terminal:
PressCtrl+Alt+Tto open a new terminal window. -
Navigate to the Downloads Directory:
Use thecdcommand to change your directory to where you saved the.debfile.cd ~/DownloadsThe
~symbol is a shortcut for your home directory. -
Install the .deb Package:
Now, use thedpkgcommand (Debian Package manager) to install the package.sudo dpkg -i google-chrome-stable_current_amd64.debYou will be prompted to enter your password.
During this process, you might encounter dependency errors. This happens if Chrome requires other software packages that are not yet installed on your system. Don’t worry, Ubuntu has a command to fix this. -
Resolve Dependency Issues (if any):
Ifdpkgreports dependency problems, run the following command:
bash

sudo apt install -f
This command tellsaptto find and install any missing dependencies for packages that have been partially installed (like Chrome in this case). It’s a very handy command for fixing common installation hiccups.
After running this command, Chrome should be fully installed and all its dependencies met. You can now launch Chrome from your applications menu.
Method 2: Leveraging the Google Chrome Repository (Advanced & Recommended)
While installing the .deb package works, it doesn’t automatically handle future updates. For continuous access to the latest features, security patches, and performance improvements, adding the official Google Chrome repository is the superior method. This approach aligns perfectly with best practices for Software management and ensuring Digital Security.
Adding the Official Repository to Your System
By adding the repository, your system will know where to fetch Chrome updates, treating it like any other official Ubuntu package.
-
Open the Terminal:
PressCtrl+Alt+Tto open your terminal. -
Import the Google Chrome GPG Key:
Google signs its packages with a GPG (GNU Privacy Guard) key to ensure their authenticity and integrity. Importing this key allows your system to verify that the packages you download from Google’s repository are legitimate and haven’t been tampered with.wget -q -O - https://dl.google.com/linux/linux_signing_key.pub | sudo gpg --dearmor -o /usr/share/keyrings/google-chrome.gpgLet’s break this down:
wget -q -O - ...: Downloads the public signing key quietly (-q) and outputs it to standard output (-O -).|: This is a pipe, sending the output ofwgetas input to the next command.sudo gpg --dearmor -o /usr/share/keyrings/google-chrome.gpg: De-armors (converts from ASCII to binary) the GPG key and saves it to the/usr/share/keyrings/directory, which is a standard location for GPG keys for apt repositories. You will be prompted for your password.
-
Add the Google Chrome Repository to Your Sources List:
Next, you need to tell your system where to find the Chrome packages. This is done by adding a new line to youraptsources list.
bash

echo "deb [arch=amd64 signed-by=/usr/share/keyrings/google-chrome.gpg] http://dl.google.com/linux/chrome/deb/ stable main" | sudo tee /etc/apt/sources.list.d/google-chrome.list
echo "...":Prints the repository line.[arch=amd64 signed-by=/usr/share/keyrings/google-chrome.gpg]: Specifies that this repository is for 64-bit architectures and that packages from it should be verified with the GPG key we just added.http://dl.google.com/linux/chrome/deb/ stable main: This is the actual URL of Google’s Chrome repository and its distribution details.| sudo tee /etc/apt/sources.list.d/google-chrome.list: Pipes the output ofechoto theteecommand, which writes it to the specified file (/etc/apt/sources.list.d/google-chrome.list) with superuser privileges. This creates a new file for the Google Chrome repository configuration.
Seamless Installation and Future Updates
With the key imported and the repository added, you can now install Chrome and ensure it stays updated effortlessly.
-
Update Your Package Lists:
After adding a new repository, you must update your local package index soaptis aware of the new software available.sudo apt update -
Install Google Chrome:
Now that your system knows about the Google Chrome package, you can install it just like any other software.
bash

sudo apt install google-chrome-stable
You will be prompted to confirm the installation and the amount of disk space it will consume. TypeYand press Enter.
The installation process will download and install Google Chrome, along with any necessary dependencies. Once completed, Chrome will be available in your applications menu.
The main advantage of this method is that Chrome will now be updated automatically whenever you runsudo apt upgrade, ensuring you always have the latest and most secure version, which is critical for digital security and taking advantage of new features and AI tools.
Post-Installation: Verifying, Updating, and Troubleshooting Chrome
Installing Google Chrome is just the first step. To ensure a smooth and secure browsing experience, it’s essential to verify the installation, understand how to keep it updated, and know how to address common issues.
Confirming a Successful Installation
After either method, you can quickly verify that Chrome has been successfully installed and is ready for use:
-
Launch Chrome from Applications:
Click on the “Applications” icon (usually a grid of dots or a nine-square icon) in your Ubuntu dock or search bar. Type “Chrome” (or “Google Chrome”) into the search box.
You should see the Google Chrome icon appear. Click on it to launch the browser.
The first time you launch Chrome, it might ask if you want to make it your default browser and if you want to send usage statistics to Google. Configure these settings to your preference. -
Check Chrome Version (Optional):
Once Chrome is open, you can verify its version by typingchrome://versioninto the address bar and pressing Enter. This page displays detailed information about your Chrome installation, including the version number, operating system, and JavaScript engine, which can be useful for troubleshooting or simply confirming everything is as it should be.
Keeping Chrome Updated and Secure
Regular updates are paramount for digital security and performance. They patch vulnerabilities, introduce new features, and improve compatibility with modern web standards and AI tools.
- For Method 1 (.deb package): If you installed Chrome using the
.debpackage, you will need to manually download and install newer.debfiles from the Google Chrome website periodically. This is why Method 2 is generally preferred for its automation. - For Method 2 (Repository installation): This is where the repository method truly shines. When you regularly update your Ubuntu system using:
bash

sudo apt update

sudo apt upgrade -y
Your system will automatically check for and install updates for Google Chrome, along with all your other installed software. This ensures that your browser is always running the latest version, providing optimal performance and the strongest possible digital security against emerging threats.
Common Issues and Quick Fixes
Even with the best preparation, you might encounter minor issues. Here are some common problems and their solutions:
- “google-chrome-stable not found” or “command not found”: This usually means the installation wasn’t successful or the path to the executable isn’t correctly configured.
- Fix: Re-run the installation steps, paying close attention to any error messages. For
.debinstallations, ensure you ransudo apt install -fifdpkgreported dependency issues.
- Fix: Re-run the installation steps, paying close attention to any error messages. For
- Dependency Errors during .deb installation:
- Fix: As mentioned,
sudo apt install -fis designed to resolve these. Run it immediately aftersudo dpkg -iif errors occur.
- Fix: As mentioned,
- Chrome doesn’t launch:
- Fix: Try launching it from the terminal by typing
google-chrome-stableand pressing Enter. Any error messages displayed in the terminal might provide clues. Ensure you have enough system resources (RAM, CPU).
- Fix: Try launching it from the terminal by typing
- Slow performance or crashes:
- Fix: Try clearing Chrome’s cache and cookies (
Settings > Privacy and security > Clear browsing data). Disable extensions one by one to identify if a particular extension is causing issues. Ensure your system has sufficient RAM. For advanced users, check system logs (journalctl -xe) for relevant errors.
- Fix: Try clearing Chrome’s cache and cookies (
- Issues with display or fonts:
- Fix: Ensure your graphics drivers are up to date. Sometimes, enabling or disabling hardware acceleration in Chrome settings (
Settings > System) can resolve display glitches.
- Fix: Ensure your graphics drivers are up to date. Sometimes, enabling or disabling hardware acceleration in Chrome settings (
Uninstallation and Final Thoughts
While Google Chrome is a powerful browser, there might come a time when you need to remove it from your Ubuntu system. Whether you’re switching to an alternative browser or simply performing system maintenance, the process is straightforward.
Removing Google Chrome from Ubuntu
To uninstall Google Chrome and remove its associated files, use the following commands in your terminal:
-
Remove the Google Chrome package:
sudo apt remove google-chrome-stableThis command removes the main Google Chrome application package.
-
Remove unused dependencies (optional but recommended):
After removing a package, there might be some dependencies that were installed specifically for Chrome but are no longer needed by any other software.sudo apt autoremoveThis command helps clean up your system and free up disk space, which is good practice for productivity and system hygiene.
-
Remove user configuration files (optional):
The commands above remove the application itself, but they usually leave behind user-specific configuration files (like bookmarks, history, settings) in your home directory, typically located in~/.config/google-chrome/. If you want a complete removal, including all your personal data for Chrome, you can delete this directory. Be aware that this action is irreversible and will permanently delete all your Chrome data.rm -rf ~/.config/google-chromeYou might also want to remove the cache:
rm -rf ~/.cache/google-chrome -
Remove the Google Chrome repository (if you added it):
If you installed Chrome using Method 2 and no longer wish for your system to check Google’s repository for updates (e.g., if you’re not planning to reinstall Chrome), you can remove the repository configuration file.
bash

sudo rm /etc/apt/sources.list.d/google-chrome.list

sudo rm /usr/share/keyrings/google-chrome.gpg

sudo apt update
The lastsudo apt updatecommand refreshes your package lists, removing any references to the now-deleted Google Chrome repository.

Chrome on Ubuntu: Enhancing Your Digital Workspace
Installing Google Chrome on Linux Ubuntu is a straightforward process that significantly enhances the capabilities of your digital workspace. By providing access to its vast ecosystem, high performance, and broad compatibility, Chrome ensures that Ubuntu users can seamlessly interact with the modern web, leverage the latest AI tools, and efficiently manage their online activities.
Whether you’re exploring new technology trends, building your personal brand online, or navigating the complexities of personal finance and online income, having a robust and reliable browser is a foundational element. Ubuntu offers the freedom and power of open source, and with Google Chrome, you gain the seamless connectivity and productivity tools that are indispensable in today’s digital age. Embrace the best of both worlds and unlock the full potential of your Linux Ubuntu system.
aViewFromTheCave is a participant in the Amazon Services LLC Associates Program, an affiliate advertising program designed to provide a means for sites to earn advertising fees by advertising and linking to Amazon.com. Amazon, the Amazon logo, AmazonSupply, and the AmazonSupply logo are trademarks of Amazon.com, Inc. or its affiliates. As an Amazon Associate we earn affiliate commissions from qualifying purchases.