The macOS ecosystem is renowned for its intuitive design and robust security, offering users a seamless experience for everything from creative work to daily productivity. A fundamental part of this experience involves installing new software, and for Mac users, the .dmg file is a ubiquitous sight. Short for “Disk iMaGe,” DMG files are the standard package format for distributing applications and other software on macOS. If you’ve ever downloaded a new app, chances are it arrived as a DMG. This guide will demystify the process, walking you through everything from the basics of how to install a DMG file on your Mac to advanced troubleshooting, security best practices, and even how this seemingly simple act ties into your digital productivity and security strategy.
Understanding DMG Files: macOS’s Digital Delivery Package
Before diving into the “how-to,” it’s crucial to understand what a DMG file is and why macOS leverages this particular format for software distribution. This foundational knowledge will empower you to navigate installations with greater confidence and troubleshoot potential issues more effectively.
What is a DMG File?
At its core, a DMG file is a mountable disk image. Think of it as a virtual hard drive or a digital CD-ROM. When you open a DMG file, your Mac treats it as if you’ve inserted a physical disk into your computer. This virtual disk contains the application you want to install, along with any associated files, documentation, or even an installer script. The beauty of the DMG format lies in its ability to encapsulate an entire software package, complete with its own file system and metadata, ensuring that the software arrives on your machine exactly as the developer intended.
DMG files can also include read-me files, license agreements, and often a beautifully designed background image that guides the user through the installation process by visually prompting them to drag the application icon to the Applications folder shortcut. This user-friendly approach is a hallmark of the macOS experience, simplifying what could otherwise be a complex software setup.
Why Does macOS Use DMG Files?
The adoption of DMG files by Apple and macOS developers is rooted in several key advantages, impacting everything from user experience to digital security, which is a critical aspect for any tech-savvy individual or brand.
Firstly, simplicity and user experience. For most applications delivered via DMG, the installation process is as simple as dragging an icon. This “drag-and-drop” method is far more intuitive and less prone to errors than complex installer wizards common in other operating systems. It aligns perfectly with Apple’s philosophy of making technology accessible and easy to use.
Secondly, integrity and security. A DMG file can be digitally signed by the developer, allowing macOS’s Gatekeeper security feature to verify its authenticity and ensure it hasn’t been tampered with since its creation. This is a vital layer of defense against malware and corrupted software, protecting your system and data. From a “Digital Security” perspective, which is a key pillar of our Tech discussions, knowing your software comes from a verified source is paramount. For businesses and individuals alike, this provides peace of mind, safeguarding against potential data breaches or system vulnerabilities that could undermine one’s brand reputation or financial stability.
Thirdly, efficient distribution. DMG files are compressed, which means they take up less space and download faster, an important consideration in a world where quick access to tools and applications drives productivity. This efficiency translates directly into better user experiences and less time spent waiting, contributing to overall productivity – a core theme in our Tech discussions. They also maintain the file structure and permissions, ensuring the application functions correctly once installed.
The Standard Installation Process: Step-by-Step Guide
The vast majority of applications delivered via DMG files follow a straightforward, almost standardized, installation procedure. Mastering this process is fundamental to effectively managing your Mac’s software. This section breaks down the typical steps involved, ensuring a smooth setup every time.
Step 1: Downloading the DMG File Securely
The very first step, and arguably the most crucial for your digital security, is acquiring the DMG file. Always download software from trusted sources. This typically means the official website of the software developer, the Mac App Store, or reputable software distribution platforms. Avoid downloading from unknown or suspicious websites, as these are common vectors for distributing malware or compromised applications.
Before clicking download, briefly check the URL to ensure it’s legitimate. Once the download begins, your web browser will typically save the .dmg file to your Downloads folder, though you might have configured a different default location.
Step 2: Mounting the Disk Image
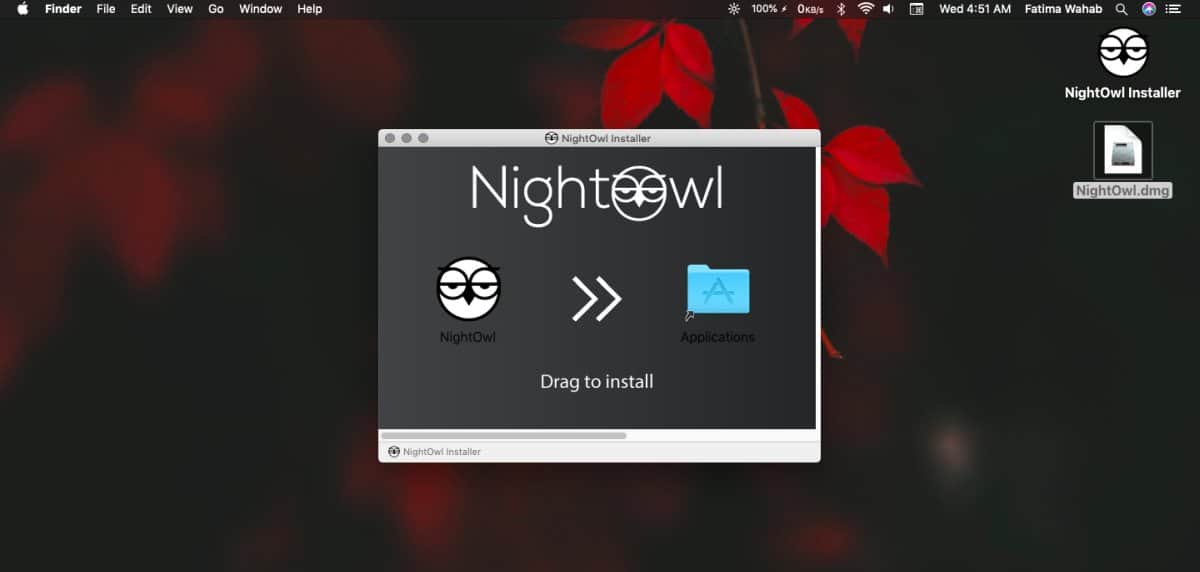
After the download is complete, locate the .dmg file. You can usually find it in your Downloads folder, or by clicking the download icon in your browser. To mount the disk image:
- Double-click the
.dmgfile. Your Mac’s Finder will automatically open the disk image, presenting it as if it were a new drive or volume on your desktop or in the Finder sidebar under “Locations.” - Observe the contents. Inside the mounted DMG, you will typically see the application icon (often with a distinctive brand logo, a nod to “Brand Identity”), and an alias or shortcut to your Applications folder. Sometimes there might be a background image with an arrow visually guiding you.
This action temporarily “attaches” the virtual disk to your system, making its contents accessible. For those concerned with “Digital Security,” macOS will sometimes perform a quick scan of the DMG’s contents during this mounting phase, especially if it’s from an “unidentified developer,” as we’ll discuss in troubleshooting.
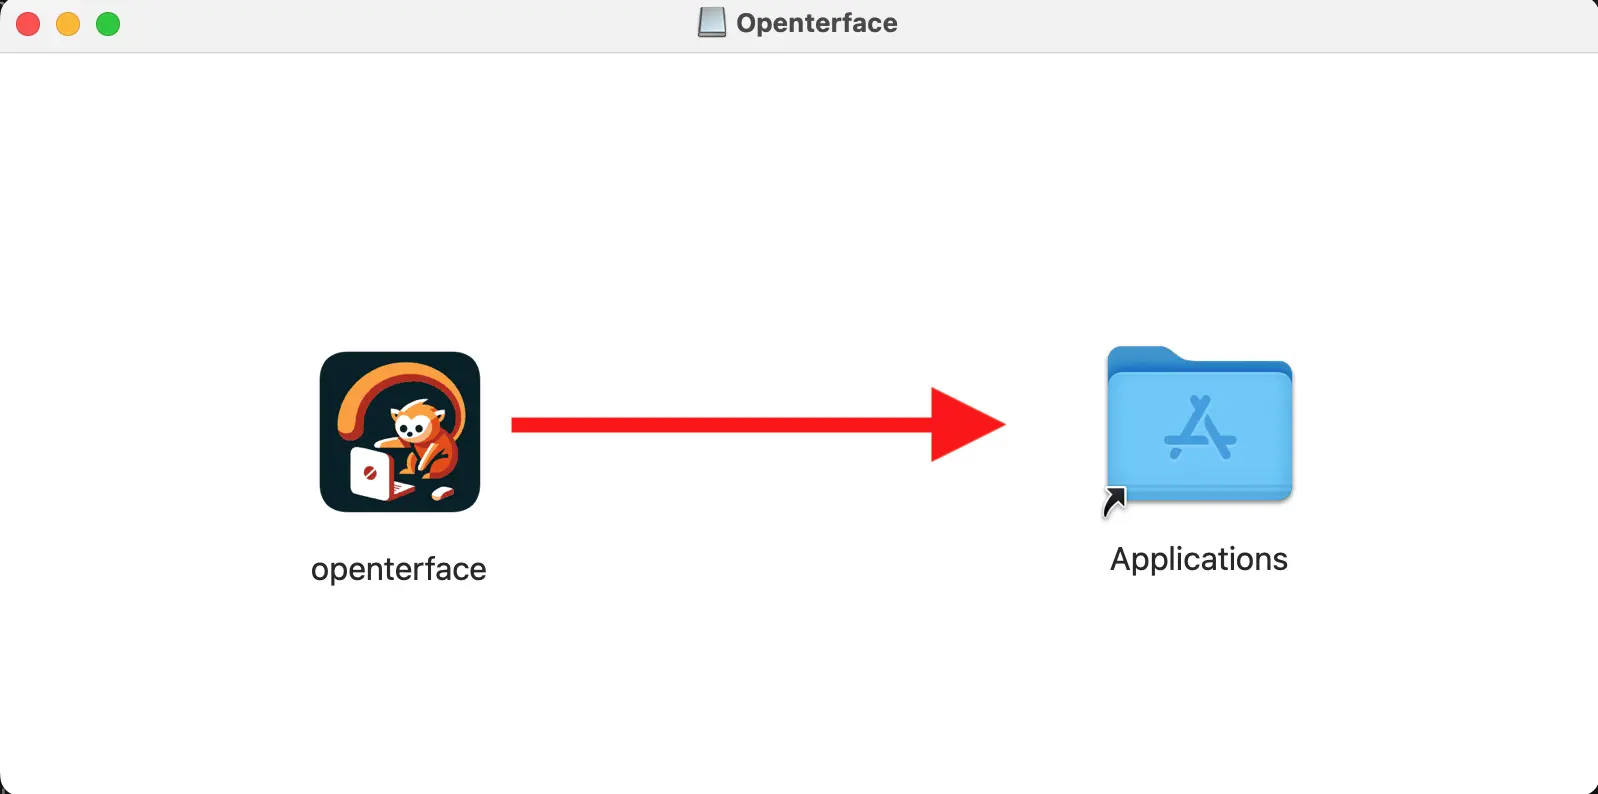
Step 3: Moving the Application to Your Applications Folder
This is the core “installation” step for most DMG-distributed applications:
- Drag the application icon. Click and drag the application icon from the mounted DMG window directly onto the “Applications” folder alias within the same window. Alternatively, you can drag it to the “Applications” folder located in your Finder sidebar or in a new Finder window (Go > Applications).
- Wait for the copy process. Your Mac will then copy the application from the disk image to your main Applications folder. This process can take a few seconds to a few minutes, depending on the size of the application.
- Verify the installation. Once copied, the application is technically installed. You can now launch it from your Applications folder, Launchpad, or by searching with Spotlight. The first launch might prompt additional setup steps or ask for permissions, which is normal.
This method installs the application for all users on your Mac, making it accessible from any user account. It’s a testament to the simplicity that contributes to user “Productivity,” allowing quick deployment of tools.
Step 4: Ejecting the DMG File
Once the application has been successfully copied to your Applications folder, the mounted disk image is no longer needed. It’s good practice to eject it, just as you would a physical USB drive or CD.
- Drag the mounted disk image to the Trash. The Trash icon will transform into an “Eject” icon.
- Right-click (or Control-click) the disk image icon on your desktop or in the Finder sidebar and select “Eject [Disk Image Name].”
- Use the Eject button next to the disk image name in the Finder sidebar.
Ejecting the DMG removes the virtual disk from your system, freeing up resources and decluttering your desktop. You can then safely delete the original .dmg file from your Downloads folder (move it to the Trash and empty it) if you don’t plan on using it again to reinstall the software. However, keeping it can be useful for future reinstallation or transferring to another Mac, especially for large applications or those with limited download attempts.
Advanced Scenarios and Alternative Installations
While the drag-and-drop method is prevalent, not all DMG files operate identically. Some applications, particularly larger or more complex ones, might utilize a different approach within the DMG. Understanding these variations ensures you’re prepared for any scenario.
Installation via Package Installer (.pkg) within a DMG
Sometimes, when you open a DMG file, instead of directly seeing the application icon and an Applications folder shortcut, you’ll find a .pkg file (a package installer) or an application that functions as an installer. This is more common for system-level software, suites with multiple components, or applications that require specific configurations during installation.
- Double-click the
.pkgfile. This will launch an installation wizard, guiding you through a series of steps similar to software installations on other operating systems. - Follow the on-screen prompts. This typically involves agreeing to license terms, choosing an installation location (if applicable), and entering your administrator password to authorize the installation.
- Complete the installation. Once the wizard finishes, the software will be installed in your Applications folder or another designated location, and the installer will usually prompt you to move the
.pkgfile to the Trash.
These .pkg installers often handle dependency checks, create necessary system files, or install components in specific locations beyond just the Applications folder, which contributes to the software’s stability and proper functioning. This more guided process ensures that all necessary components for robust functionality are correctly placed, which is crucial for maintaining “Productivity” when using complex tools.
Handling Applications Without a Drag-and-Drop Option
Occasionally, a DMG might contain only the application itself, with no visible shortcut to the Applications folder. In such cases:
- Manually drag the application. Simply drag the application icon from the mounted DMG window directly into your Mac’s Applications folder (located in Finder under “Go” > “Applications,” or in the sidebar). This achieves the same result as the typical drag-and-drop mechanism.
- Understand the developer’s choice. Developers might opt for this simpler DMG structure if they expect users to be familiar with macOS’s file system, or if their application is exceptionally self-contained and requires no special installation guidance.
Installing Software for Specific User Profiles
Most applications installed from DMGs land in /Applications, making them available to all user accounts on your Mac. However, some applications or utilities might offer an option during a .pkg installation to install only for the current user (e.g., in ~/Applications, a subfolder within your user’s home directory). This is less common but can be useful for personal utilities that you don’t want other users on the Mac to access or clutter their Launchpad with. Always pay attention to installation prompts if you have specific user-level access requirements. This level of control contributes to a cleaner, more personalized “Digital Environment,” enhancing individual “Productivity.”
Troubleshooting Common DMG Installation Issues
Even with a seemingly straightforward process, you might occasionally encounter hurdles. Knowing how to troubleshoot common DMG installation issues can save you time and frustration, getting you back to being productive quickly.
“App Can’t Be Opened Because It Is From an Unidentified Developer”
This is one of the most frequent messages Mac users encounter, rooted in macOS’s robust “Digital Security” features, specifically Gatekeeper.
- Why it happens: macOS Gatekeeper is designed to protect your Mac from malicious software. By default, it only allows apps downloaded from the Mac App Store or from identified developers (who have signed their applications with an Apple Developer ID certificate). If an app is from a developer who hasn’t signed their software or isn’t registered with Apple, Gatekeeper will block it.
- How to resolve:
- Right-click (or Control-click) the application icon in your Applications folder.
- Select “Open” from the contextual menu.
- A dialog box will appear, asking if you are sure you want to open the app. Click “Open.”
This action creates an exception for that specific app, allowing it to open in the future without the warning. You only need to do this once.
- Security note: Only bypass Gatekeeper for apps you trust and have downloaded from reputable sources. Bypassing it for unknown software significantly increases your “Digital Security” risk.
“App is Damaged and Cannot Be Opened”
This message indicates a problem with the application itself, or more commonly, with the integrity of the downloaded DMG file.
- Why it happens:
- Incomplete or corrupted download: The DMG file might have been damaged during download due to network issues.
- Corrupted file on the server: Less common, but the source file itself might be corrupted.
- Security settings: Sometimes, strict security settings or a quarantine attribute on the file can trigger this (though less common than the “unidentified developer” error).
- How to resolve:
- Delete the existing DMG file and the partially copied application. Empty the Trash.
- Clear your browser’s cache and restart your browser.
- Redownload the DMG file. Ensure a stable internet connection during the download.
- Try installing again. If the issue persists, try downloading from an alternative official source if available, or contact the developer.
Installation Freezing or Failing
If your installation process gets stuck, freezes, or consistently fails, several factors could be at play.
- Why it happens:
- System resource conflict: Other running applications might be hogging memory or CPU.
- Insufficient RAM: Your Mac might not have enough free memory to handle the installation.
- Corrupted DMG/installer: The installation files themselves might be faulty.
- macOS issues: A temporary glitch in macOS could be preventing the installation.
- How to resolve:
- Force Quit and Restart: Force quit any unresponsive processes (Cmd+Option+Esc), then restart your Mac.
- Close other applications: Ensure all other unnecessary applications are closed before attempting installation.
- Check for macOS updates: Ensure your macOS is up to date, as updates often include bug fixes.
- Redownload the DMG: As with “App is damaged,” a fresh download can resolve issues.
- Safe Mode: Try installing the application in Safe Mode (restart your Mac and hold the Shift key). Safe Mode starts macOS with minimal processes and without third-party extensions, which can help isolate conflicts.
Disk Image Not Mounting or Opening
If double-clicking the DMG file does nothing, or you receive an error about it not being able to open, the issue likely lies with the DMG file itself or your system’s ability to handle it.
- Why it happens:
- Corrupted DMG file: The file is unreadable.
- Incorrect file extension: The file might be misidentified.
- Security software conflict: Rarely, third-party antivirus or security software can interfere.
- How to resolve:
- Redownload the DMG: This is often the quickest fix for a corrupted file.
- Verify file extension: Ensure the file truly has a
.dmgextension. - Use Disk Utility: Open Disk Utility (Applications > Utilities), go to “File” > “Open Disk Image,” and try opening the DMG from there. Disk Utility can sometimes mount images that Finder struggles with.
- Temporarily disable security software: If you use third-party security software, try temporarily disabling it (at your own risk and only if you trust the DMG source) to see if it’s causing a conflict.
Addressing Insufficient Storage Space
An often-overlooked issue, especially with larger applications, is simply not having enough disk space for the installation.
- Why it happens: Installing an application requires not only space for the application itself but also temporary space for the installation process. macOS also needs free space to function optimally.
- How to resolve:
- Check your storage: Go to Apple Menu > About This Mac > Storage to see how much free space you have.
- Free up space: Delete unnecessary files, empty your Trash, remove old downloads, or offload large media files to external storage. macOS also offers tools under “Storage Management” (from the Storage tab) to help optimize space.
- Be mindful of the “Money” aspect here: Your Mac’s performance and longevity are directly tied to how well you manage its resources. Running out of space can slow down your system, hindering productivity and potentially necessitating costly upgrades or replacements sooner than desired.
Best Practices and Security Considerations
Beyond the mechanical steps of installation, adopting a proactive mindset towards “Digital Security” and “Software Maintenance” is paramount. These best practices not only safeguard your Mac but also contribute to a seamless, efficient, and productive digital experience, aligning perfectly with “Tech” insights and even protecting your “Brand” reputation by ensuring system integrity.
Prioritizing Trusted Sources
The golden rule of software installation: always download from official and reputable sources. This means the developer’s official website, the Mac App Store, or well-known and trusted third-party marketplaces. Avoid torrent sites, obscure download portals, or links from unsolicited emails. Malicious actors frequently disguise malware as popular software to compromise unsuspecting users. For anyone, from individual users to businesses building their “Brand,” compromised systems lead to data breaches, identity theft, and significant financial and reputational damage.
Verifying Download Integrity
Even from trusted sources, network interruptions or server issues can corrupt a download. Some developers provide checksums (like MD5, SHA-1, or SHA-256 hashes) alongside their downloads.
- How to verify: After downloading, you can use Terminal commands (e.g.,
shasum -a 256 /path/to/your/file.dmg) to generate a checksum for your downloaded file and compare it against the developer’s provided hash. If they match, the file’s integrity is verified. While this might seem advanced, for critical software or sensitive applications, it’s an excellent “Digital Security” measure.
The Role of macOS Gatekeeper
As discussed, Gatekeeper is macOS’s built-in security technology that helps ensure only trusted software runs on your Mac.
- How it works: When you attempt to open a new app, Gatekeeper verifies if it’s from the Mac App Store or if it’s signed by an identified Apple developer. If it’s not, it will warn you or block the app.
- Maintaining security: While you can override Gatekeeper for “unidentified developers,” do so judiciously and only for applications you have thoroughly vetted. Never disable Gatekeeper entirely (found in System Settings > Privacy & Security > Security), as this leaves your Mac highly vulnerable. Keeping Gatekeeper active is a cornerstone of Mac’s “Digital Security.”
Regular System Updates and Software Maintenance
Keeping your macOS and all your installed applications updated is not just about getting new features; it’s a critical “Digital Security” and “Productivity” practice.
- macOS updates: Apple regularly releases security patches and bug fixes in macOS updates. Go to System Settings > General > Software Update and install any pending updates.
- Application updates: Many applications have their own update mechanisms (e.g., “Check for Updates” within the app’s menu, or automatic updates). Keep these updated to benefit from the latest features, performance improvements, and crucial security fixes. Outdated software can create vulnerabilities that cybercriminals exploit. This proactive approach ensures your “Productivity” isn’t hampered by security incidents or compatibility issues, reinforcing a professional “Digital Environment.”
Beyond Installation: Managing Your Mac Applications
Installing a DMG is just one part of the software lifecycle on your Mac. Understanding how to manage and uninstall applications is equally important for maintaining a lean, efficient, and secure system.
How to Uninstall Applications
For most applications installed via DMG (the drag-and-drop method):
- Simply drag the application from your Applications folder to the Trash. Then, empty the Trash. This removes the main application bundle.
- For more thorough removal: Applications often leave behind preference files, caches, and support files in various library folders (e.g.,
~/Library/Application Support,~/Library/Caches). While usually small, these can accumulate. Third-party uninstallers (like AppCleaner or CleanMyMac) can help locate and remove these residual files, contributing to better “System Performance” and reclaiming valuable disk space. - For
.pkginstalled apps: Some.pkginstallers come with their own uninstaller script, or require specific steps to remove. Check the developer’s documentation if a simple drag-to-trash doesn’t work.
Proper uninstallation prevents digital clutter, frees up storage, and ensures that old, potentially vulnerable files aren’t lingering on your system. This ties into overall system “Productivity” and “Digital Security.”
The Impact on Productivity and Digital Security
Mastering DMG installations and maintaining good software hygiene directly impacts two crucial areas:
- Productivity: A clean, well-managed Mac with properly installed and updated software runs faster and more reliably. Less time troubleshooting or dealing with slow performance means more time for creative work, business tasks, or personal projects. The tools you choose and how effectively you manage them are direct determinants of your digital output.
- Digital Security: Every piece of software you install is a potential entry point for vulnerabilities. By adhering to best practices—downloading from trusted sources, keeping software updated, and being judicious about what you install—you significantly reduce your exposure to malware, ransomware, and other cyber threats. This proactive defense is vital for protecting your data, your privacy, and the integrity of your “Digital Brand.”

Conclusion: Mastering Software Installation on Your Mac
Installing DMG files on your Mac is a foundational skill for any user navigating the macOS ecosystem. From the simplicity of the drag-and-drop method to the more intricate steps of handling .pkg installers, understanding these processes empowers you to confidently manage your software. Beyond the mechanics, however, lies a deeper importance: integrating secure downloading habits, vigilant troubleshooting, and consistent software maintenance into your routine.
By prioritizing trusted sources, understanding Gatekeeper’s role, and keeping your system and applications updated, you’re not just installing software; you’re actively contributing to a robust, secure, and highly productive digital environment. This comprehensive approach not only ensures your Mac runs smoothly but also safeguards your “Digital Security,” enhances your overall “Productivity,” and ultimately helps maintain a strong “Digital Brand” in an increasingly connected world. Mastering the DMG file means mastering a key aspect of your Mac experience, allowing you to leverage the full power of its software with confidence and peace of mind.
aViewFromTheCave is a participant in the Amazon Services LLC Associates Program, an affiliate advertising program designed to provide a means for sites to earn advertising fees by advertising and linking to Amazon.com. Amazon, the Amazon logo, AmazonSupply, and the AmazonSupply logo are trademarks of Amazon.com, Inc. or its affiliates. As an Amazon Associate we earn affiliate commissions from qualifying purchases.